bootman gives you a starter spring boot app with following abilities:
- Supports REPL feature as a Swagger endpoint to execute any code snippet within the JVM using javascript and groovy dialect. New JSR 223 compliant language dialects can be easily added to bootman. REPL can access any Spring bean or Java class, including their public and private methods and fields
- Modifies existing behavior by injecting Java code via swagger endpoint without recompiling or restarting the running JVM
The name bootman comes from byteman and spring boot colocated in same JVM, with byteman and scripting functionality exposed via REST endpoint.
bootman = "spring boot" + "byteman";
DevConsole = "spring boot" + "JSR 223";
Spring Boot makes it easy to create stand-alone, production-grade Spring based Java Applications that you can "just run". Byteman is a tool which injects Java code into your running application without the need for you to recompile, repackage or even redeploy your application. JSR 223 offers scripting functionality to dynamically evaluate code snippets in the running JVM. bootman combines these three so that you can create production grade spring applications, evaluate code and monitor/modify run time behavior on the fly.
Here is a presentation with more details on bootman.
-
Prerequisities
- A Java runtime Environment -> If you plan to run bootman on java 8, you should have a JDK and not a JRE. The underlying byteman framework depends on tools.jar to attach its agent to the JVM. For Java 9 and above, JRE is sufficient as the necessary agent plumbing code is present inside the JRE. However, for java 9 and above, you need to set this VM property to allow the agent to attach itself to the same VM:
-Djdk.attach.allowAttachSelf=true - git to clone the bootman codebase locally
- A Java runtime Environment -> If you plan to run bootman on java 8, you should have a JDK and not a JRE. The underlying byteman framework depends on tools.jar to attach its agent to the JVM. For Java 9 and above, JRE is sufficient as the necessary agent plumbing code is present inside the JRE. However, for java 9 and above, you need to set this VM property to allow the agent to attach itself to the same VM:
-
Go to your favorite terminal and clone the bootman repository inside a local folder
git clone https://github.com/rajasenapati/bootman.git -
Build and run bootman. bootman can be executed as a standalone springboot based executable fat jar. It can also be executed in its expanded form.
# approach 1: run bootman in expanded form (works for java 8 and above) cd bootman ./mvnw clean ./mvnw spring-boot:run # approach 2: run bootman as a spring boot executable fat jar (for java 8) cd bootman ./mvnw clean ./mvnw install java -Dloader.path=$JAVA_HOME/lib/tools.jar -jar target/bootman-0.0.1-SNAPSHOT.jar # approach 3: run bootman as a spring boot executable fat jar (for java 9 and above) cd bootman ./mvnw clean ./mvnw install java -Djdk.attach.allowAttachSelf=true -jar target/bootman-0.0.1-SNAPSHOT.jar -
This will run the bootman application server on port 8080. You can terminate the server instance anytime by pressing CTRL+C in the same terminal or by killing it by its pid from another terminal.
-
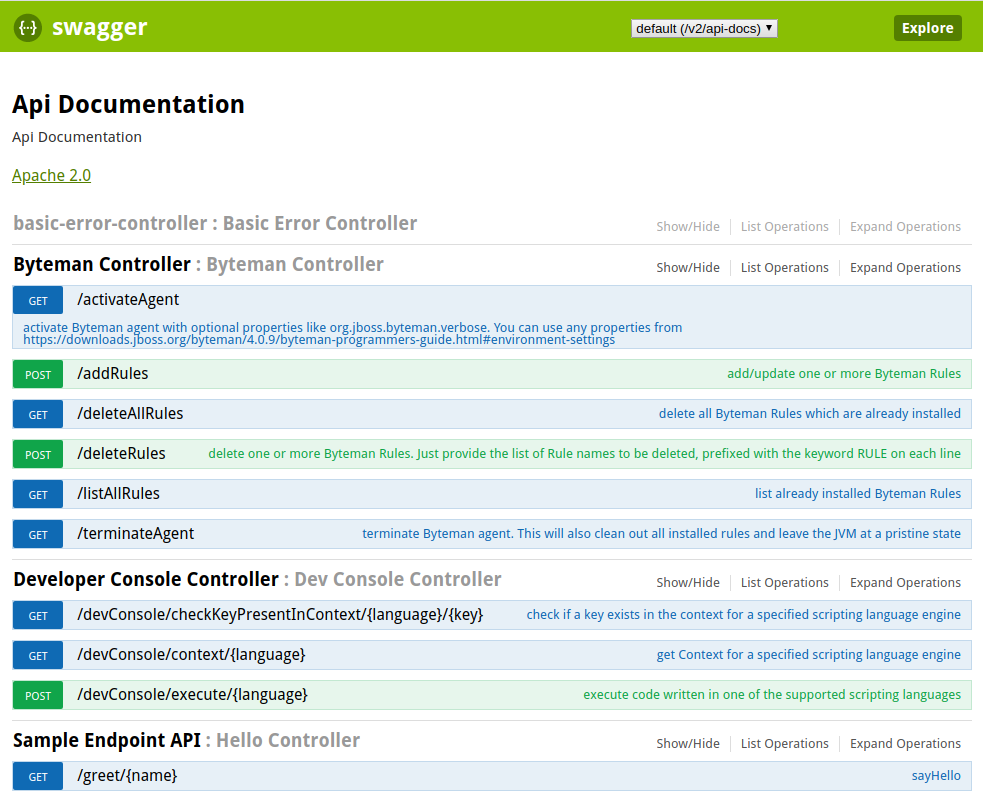
Open the swagger page in your favorite browser window.

bootman comes with four sets of API -
- Developer Console API : APIs to support REPL. A sample code snippet example file is part of this repository. This will be used subsequently to showcase REPL feature.
- Byteman management API : attach to the running VM and then install/reinstall/uninstall rules to modify application behavior as needed. A sample byteman rule file is part of this repository. This will be used subsequently to showcase bootman features in the later part of the document.
- Application API : a sample endpoint is implemented to demonstrate REPL and bootman code injection in action. Replace this with your own application specific logic.
- basic error API: basic error management API autogenerated by spring boot. You can customize it or completely remove it. bootman does not care about it.
- Run some Code snippets from swagger endpoint using javascript/groovy dialect
- Modify Application behavior by injecting some code
-
Let's inspect the following sample class HelloController. It comes with one public method called sayHello() and a private method called sayHelloInternal(). This class is registered in Spring registry as helloContainer bean.
@RestController
@Api(value="/greet", tags={"Sample Endpoint API"}, produces ="application/json")

@RequestMapping("/greet")
public class HelloController {
    private static final Logger logger = LoggerFactory.getLogger(HelloController.class);

    @RequestMapping(value="/{name}",method= RequestMethod.GET)
    public String sayHello(@PathVariable String name) {
        logger.info("just a harmless but useless log statement. I wish the name parameter were logged here.");
        String message = "hello " + name;
        return message;
    }


    private String sayHelloInternal(String name) {
        logger.info("just a private method. Added here to demonstrate call from dev console controller");
        String message = "howdy " + name;
        return message;
    }
}
-
Now open Developer Console Controller section in the swagger page and click on execute endpoint. This is the REPL endpoint. It comes with an option to select the Language Dialect and the code snippet to execute remotely. The result of the code execution will appear in the swagger response section.

Here's a sample REPL in action:

Grab the sample code snippets from following section and paste it in above swagger call. Select either Groovy/Javascript language dialect based on which code you are executing.


    // RUN 1: execute the sayHello() public method of helloController spring bean. This works in both javascript and Groovy
    externalName = helloController.sayHello('John Ext Doe');

    // RUN 2: execute the sayHelloInternal() private method of helloController spring bean using Groovy
    internalName = helloController.sayHelloInternal('John Int Doe');

    //Groovy scripting supports execution of private methods as well without using reflection.

    // RUN 3: execute the sayHelloInternal() private method of helloController spring bean using javascript. This requires reflection.
    var method = helloController.class.getDeclaredMethod("sayHelloInternal", java.lang.String.class);
    method.setAccessible(true);
    internalName = method.invoke(helloController, 'John Int Doe');

    // RUN 4: We don't have to restrict it to single code liners. You can execute any code block as long as it is supported by Groovy/javascript dialect.
    //The following returns a map of two method calls, one private and one public from javascript
    var method = helloController.class.getDeclaredMethod("sayHelloInternal", java.lang.String.class);
    method.setAccessible(true);
    var internalName = method.invoke(helloController, 'John Int Doe');
    var externalName = helloController.sayHello('John Ext Doe');
    var nameMap = {
      internalName : internalName,
      externalName : externalName
     }
    nameMap;


    // RUN 5: The same functionality as above, called from Groovy. Notice how simple it is compared to javascript based invocation.
    internalName = helloController.sayHelloInternal('John Int Doe');
    externalName = helloController.sayHello('John Ext Doe');
    [
      'internalName' : internalName,
      'externalName' : externalName
    ]

    //As you can see, the Groovy dialect offers more powerful constructs (like executing private methods/accessing private fields).
//Javascript dialect needs to use reflection API to access private methods/fields. -
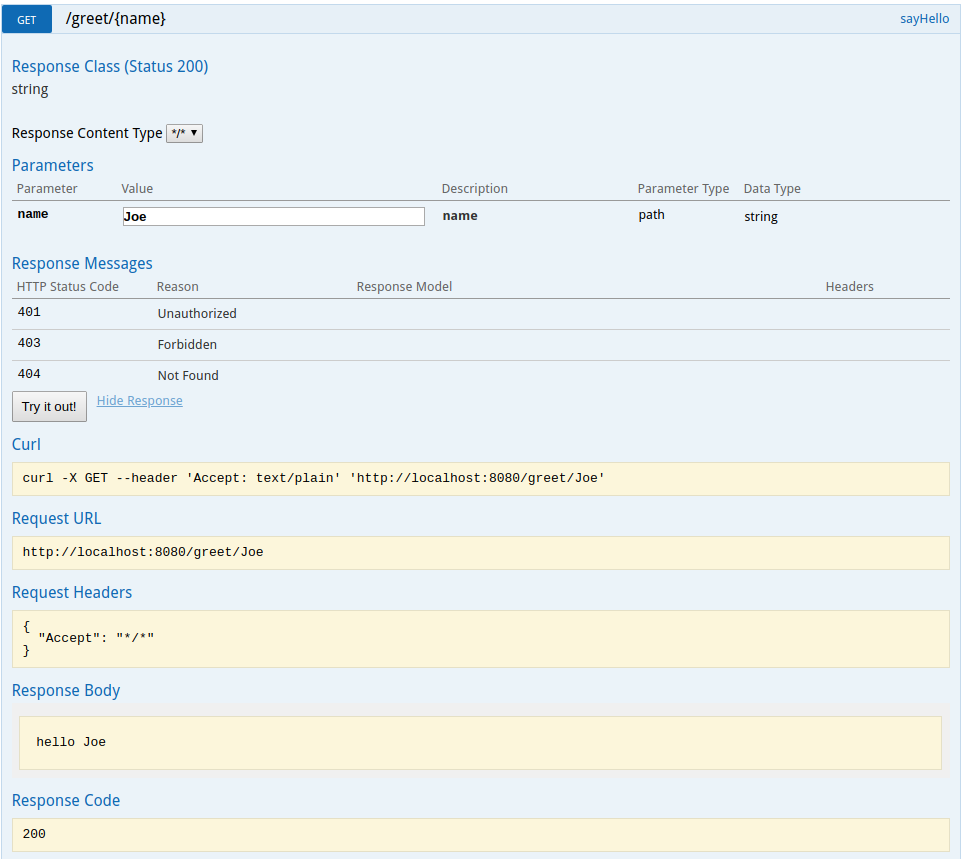
Run the sample endpoint first. You will see an output like this:

Here's the following entry in the application log.
2020-01-04 20:19:30.587 INFO 64827 --- [nio-8080-exec-9] o.j.bootman.controller.HelloController : just a harmless but useless log statement. I wish the name parameter were logged here.The underlying application code for above Rest endpoint is
 @RestController
 @Api(value="/greet", tags={"Sample Endpoint API"}, produces ="application/json")

 @RequestMapping("/greet")
 public class HelloController {
     private static final Logger logger = LoggerFactory.getLogger(HelloController.class);

     @RequestMapping(value="/{name}",method= RequestMethod.GET)
     public String sayHello(@PathVariable String name) {
         logger.info("just a harmless but useless log statement. I wish the name parameter were logged here.");
         String message = "hello " + name;
         return message;
     }


     private String sayHelloInternal(String name) {
         logger.info("just a private method. Added here to demonstrate call from dev console controller");
         String message = "howdy " + name;
         return message;
     }
 }
Notice that the application does not log the parameter
nameit receives from the client request. Imagine you are in production and you have to troubleshoot the above code. I do not know about you. But if it were me, I would definitely like to see thenameparameter this method receives from the client code without changing the code, rebuilding the app and redeploying it. Also I might want to use a different logic to calculate the variablemessagewhich is ultimately sent back to the calling client. With bootman, you can do that. Lets see how this works. -
First activate the agent. This will load and attach the byteman jar as an agent in the self hosted JVM and starts the agent listener on port 9091. This port is configurable in the Controller code itself. Byteman agent looks for any byteman command like adding/deleting rules on this port. bootman takes care of abstracting out these complexities for you.
 While activating the agent, you can optionally pass additional properties/Environment Settings to the agent. By default, we pass
 org.jboss.byteman.verboseproperty to enable verbose logging. With verbose mode enabled, you will see following entry in the application log:for java 8: =========== Setting org.jboss.byteman.verbose= AccessManager:init Initialising default AccessManager TransformListener() : accepting requests on localhost:9091 for java 9 and above: ===================== Setting org.jboss.byteman.verbose= AccessManager:init Initialising JDK9 AccessManager AccessManager:init created module AccessManager:init added extraReads AccessManager:init returning JigsawAccessEnabler TransformListener() : accepting requests on localhost:9091 -
Install the Rules to inject the new code behavior. Grab the rules from here and paste it in following swagger call.
 You will see following response:
 install rule trace HelloController entry
 install rule trace exit
 install rule modify values
Also the application log will have entries similar to what is shown below:
TransformListener() : handling connection on port 9091 retransforming org.javaprofile.bootman.controller.HelloController org.jboss.byteman.agent.Transformer : possible trigger for rule trace HelloController entry in class org.javaprofile.bootman.controller.HelloController RuleTriggerMethodAdapter.injectTriggerPoint : inserting trigger into org.javaprofile.bootman.controller.HelloController.sayHello(java.lang.String) java.lang.String for rule trace HelloController entry org.jboss.byteman.agent.Transformer : inserted trigger for trace HelloController entry in class org.javaprofile.bootman.controller.HelloController org.jboss.byteman.agent.Transformer : possible trigger for rule trace exit in class org.javaprofile.bootman.controller.HelloController RuleTriggerMethodAdapter.injectTriggerPoint : inserting trigger into org.javaprofile.bootman.controller.HelloController.sayHello(java.lang.String) java.lang.String for rule trace exit org.jboss.byteman.agent.Transformer : inserted trigger for trace exit in class org.javaprofile.bootman.controller.HelloController org.jboss.byteman.agent.Transformer : possible trigger for rule modify values in class org.javaprofile.bootman.controller.HelloController RuleTriggerMethodAdapter.injectTriggerPoint : inserting trigger into org.javaprofile.bootman.controller.HelloController.sayHello(java.lang.String) java.lang.String for rule modify values org.jboss.byteman.agent.Transformer : inserted trigger for modify values in class org.javaprofile.bootman.controller.HelloController 2020-01-04 20:50:28.771 INFO 64827 --- [nio-8080-exec-3] o.j.b.controller.BytemanController : Now deleting the rule file: /tmp/rule3592669835277761411.btm -
Verify that the rules have been installed properly

-
Now run the application API again
 You will notice two differences
- The response has now changed from
hello JoetoByteman: hello Joe - Also the application log now captures the parameter
namepassed from the calling client
2020-01-04 21:37:26.910  INFO 64827 --- [nio-8080-exec-9] o.j.bootman.controller.HelloController   : controller parameter as captured by byteman -->Joe
2020-01-04 21:37:26.910  INFO 64827 --- [nio-8080-exec-9] o.j.bootman.controller.HelloController   : message before modification by byteman -->hello Joe
2020-01-04 21:37:26.910  INFO 64827 --- [nio-8080-exec-9] o.j.bootman.controller.HelloController   : message after modification by byteman -->Byteman: hello Joe
Rule.execute called for trace exit_1:0
HelperManager.install for helper class org.jboss.byteman.rule.helper.Helper
calling installed(trace exit) for helper classorg.jboss.byteman.rule.helper.Helper
Installed rule using default helper : trace exit
trace exit execute
2020-01-04 21:37:26.911  INFO 64827 --- [nio-8080-exec-9] o.j.bootman.controller.HelloController   : exiting sayHello
This is due to the installed rules which injected the new behavior. Here you can get to know more about byteman capabilities.
- The response has now changed from
-
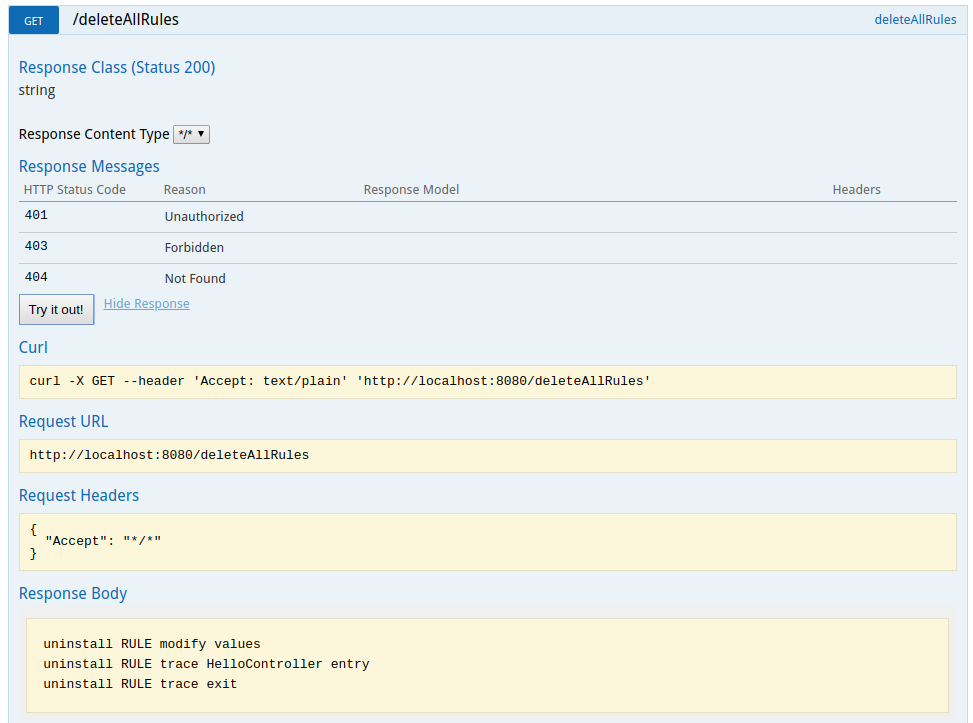
Time to cleanup now. Delete all the rules previously installed. Alternatively you can delete selective rules instead of deleting all rules. Check the API in Step# 13.

-
And verify we are back to square one.

-
As an alternative to Step# 6, you can delete selective rules instead of deleting all rules. Just specify the rules you want deleted in following API. You can specify the entire rule text or just the rule name of the rules to be deleted.

-
Even after you have deleted all the rules, the byteman agent listener keeps on running and listening on the preconfigured port 9091(unless it is changed in the byteman controller code). Its okay to keep the agent listener running as it does not add any significant performance overhead. However, if you decide to terminate the byteman agent listener, then trigger following API. This will also cleanup all installed rules from the JVM, if they have not been deleted earlier and bring it to a pristine state. You can always activate the agent by invoking activateAgent API later.

-
That's it. Feel free to modify the codebase to suit your needs.