Giter VIP home page Giter VIP logo

alttp_vt_randomizer's Introduction

Build Status

ALttP VT Randomizer

First and foremost, big thanks to Dessyreqt, Christos, Smallhacker, and KatDevsGames for their work.

Without their work none of this would even be remotely possible.

Local Setup

System Setup

This assumes you're running Ubuntu 22.04 (either natively, or via Windows Subsystem for Linux). Native Windows is not currently supported. Users of either Mac OS or other Linux distributions will need to install the appropriate packages for their system.

This version of the randomizer requires version 8.1 of PHP.

sudo apt-get install php8.1 php8.1-bcmath php8.1-xml php8.1-mbstring php8.1-curl php8.1-sqlite3 \
php8.1-mysql php8.1-cli php8.1-opcache python3 mariadb-server sqlite3 composer -y

Installing PHP dependencies

The above step installs the Composer PHP package manager. Run:

$ composer install

Database setup

Run the following command to create a new config for the app:

$ cp .env.example .env

MySQL

Create a new mysql database for the randomizer (see mysql documentation.) Modify .env with appropriate username, password, and database name. Change the db connection to mysql.

Example:

DB_CONNECTION=mysql
DB_HOST=127.0.0.1
DB_PORT=3306
DB_DATABASE=randomizer
DB_USERNAME=foo
DB_PASSWORD=bar

SQLite

SQLite can also be used too, this might be a better option for a quick setup. The php artisan migrate command below will ask if you want to create this database if it doesn't exist.

DB_CONNECTION=sqlite
DB_DATABASE=/absolute/path/to/existing/folder/db.sqlite

Then run the following commands to setup the app configuration

Last steps on DB setup

$ php artisan key:generate
$ php artisan config:cache

p.s. If you update the .env file then you'll need to run the config:cache command to pick up the new changes.

Now run the db migration command:

$ php artisan migrate

Generate a base patch

In you .env file, update ENEMIZER_BASE= to the absolute path of an unheadered Japanese 1.0 ROM of A Link to the Past.

Then, in the command line run this to create the base patch.

php artisan config:cache
php artisan alttp:updatebuildrecord

Running from the command line

To generate a game one simply runs the command:

$ php artisan alttp:randomize {input_file.sfc} {output_directory}

For help (and all the options):

$ php artisan alttp:randomize -h

Running the Web Interface

Web server setup

You will need to build assets the first time (you will need NPM to install the javascript dependencies).

$ npm install

And then

$ npm run production

Once you have the dependencies installed. Run the following command then navigate to http://localhost:8000/.

$ php artisan serve

Running tests

You can run the current test suite with the following command (you may need to install PHPUnit)

$ phpunit

Bug Reports

Bug reports for the current release version can be opened in this repository's issue tracker.

Please do not open issues for bugs that you encounter when testing a development branch.

alttp_vt_randomizer's People

Contributors

aerinon avatar algmyr avatar baliame avatar bonimy avatar caitsith2 avatar cassidoxa avatar chrisforrence avatar christosowen avatar compiling avatar cryxia avatar dependabot[bot] avatar doctorblue avatar fouton avatar fryjay avatar jon8rfc avatar kevincathcart avatar krelbel avatar michaelk-underscoreunderscore avatar miketrethewey avatar puzzlesecretary avatar qwertymodo avatar robhanlon22 avatar roxas232 avatar simn avatar sosuke3 avatar spannerisms avatar sporchia avatar tcprescott avatar walkingeyerobot avatar youngkingtut avatar

Stargazers

 avatar  avatar  avatar  avatar  avatar  avatar  avatar  avatar  avatar  avatar  avatar  avatar  avatar  avatar  avatar  avatar  avatar  avatar  avatar  avatar  avatar  avatar  avatar  avatar  avatar  avatar  avatar  avatar  avatar  avatar  avatar  avatar  avatar  avatar  avatar  avatar  avatar  avatar  avatar  avatar  avatar  avatar  avatar  avatar  avatar  avatar  avatar  avatar  avatar  avatar  avatar  avatar  avatar  avatar  avatar  avatar  avatar  avatar  avatar  avatar  avatar  avatar  avatar  avatar  avatar  avatar  avatar  avatar  avatar  avatar  avatar  avatar  avatar  avatar  avatar  avatar  avatar  avatar  avatar  avatar  avatar  avatar  avatar  avatar  avatar  avatar  avatar  avatar  avatar  avatar  avatar  avatar  avatar  avatar  avatar  avatar  avatar  avatar  avatar  avatar

Watchers

 avatar  avatar  avatar  avatar  avatar  avatar  avatar  avatar  avatar  avatar  avatar  avatar  avatar  avatar  avatar  avatar  avatar  avatar  avatar  avatar  avatar  avatar  avatar  avatar  avatar  avatar  avatar  avatar  avatar

alttp_vt_randomizer's Issues

Unsolvable Seed

Seed: 63174208
Logic: Casual - NMG
Rules: V8

Description of Problem: Cannot progress seed past midway through dungeon one. Checked spoiler; Eastern Palace has no item just bomb and arrow upgrades; Desert Palace has the Magic Cape; but requires the book of Mudora from King Zora; The Titan's Mitt is also "in" the Desert Palace down where the heart piece in the outside transition area is usually; and the Power glove according to the spoiler list is in Ganon's Tower.

Spoiler (if available):
ALttP - VT_web-14_v8- No Major Glitches_63174208.txt

Entering a non-number seed gives wrong seed

Seed: E4G67XJwMZ
Difficulty: Normal
Logic: No Glitches
Mode: Standard

Description of Problem: I clicked the "Generate Race ROM" button two days ago and got a file with the name "ALttP - VT_no-glitches-19_normal-standard_E4G67XJwMZ.sfc". I'm a beginner so I got stuck and wanted to check out the spoiler for seed E4G67XJwMZ. But entering the seed "E4G67XJwMZ" and pressing the "Generate" button gives me seed "681720311" instead.

This can just be misinformation, that by pressing the "Generate Race ROM" you can't ever get a spoiler. Can't find any information about this though.

Spoiler (if available):

Clicking labels when creating a seed with custom settings can increase/decrease the total number without toggling the checkbox

When generating a seed with custom difficult (through the web interface), clicking the label (not the "Yes/No" toggle) can affect the count of total items. For example:

If you click the words "Shuffle the Swords (into item pool)" the total items will switch from 150/150 to 150/151. However, the checkbox will not toggle to "No". In fact if you click the text several times the total second number will go up once per click for this particular label.

Nothing major, but thought I would file it anyway. I think it's just a visual bug. I don't think it affects the actual generation of the seed.

Broken Seed: 425464517

Seed: 425464517
Logic: No Glitches
Rules: Normal
Game Mode: Standard

Description of Problem: Can't continue past the Light World. All progressive swords are in Dark World. Hammer is with Flute Boy. Titan's Mitts are in Swamp Palace. The playthrough spoiler goes like this:
{
"1": {
"Light World": {
"Uncle": "Progressive Sword",
"[cave-034] Hyrule Castle secret entrance": "Flute",
"[cave-040] Link's House": "Magic Cape",
"[cave-031] Tavern": "Flippers",
"[cave-035] Sahasrahla's Hut [right chest]": "Ice Rod",
"[cave-021] Kakariko well [left chest row of 3]": "Moon Pearl",
"[cave-022-B1] Thief's hut [top chest]": "Hookshot",
"[cave-050] cave southwest of Lake Hylia [top left chest]": "Silver Arrows Upgrade",
"[cave-050] cave southwest of Lake Hylia - generous guy": "Magic Mirror"
}
},
"2": {
"Death Mountain": {
"Old Mountain Man": "Progressive Glove"
},
"Dark World": {
"[cave-073] cave northeast of swamp palace [top chest]": "Ether",
"Flute Boy": "Hammer"
},
"Swamp Palace": {
"[dungeon-D2-B1] Swamp Palace - map room": "Cane Of Somaria"
},
"Tower Of Hera": {
"Tower of Hera Pendant": "Crystal 1"
}
},
"3": {
"Hyrule Castle": {
"[dungeon-C-B1] Escape - final basement room [right chest]": "Fire Rod"
},
"Dark World": {
"Catfish": "Progressive Sword"
},
"Swamp Palace": {
"[dungeon-D2-B1] Swamp Palace - south of hookshot room": "Bottle (Green Potion)",
"[dungeon-D2-B2] Swamp Palace - flooded room [right chest]": "Progressive Glove",
"Swamp Palace Crystal": "Crystal 6"
},
"Thieves Town": {
"[dungeon-D4-B2] Thieves' Town - big chest": "Bow"
}
},
"4": {
"Light World": {
"Sick Kid": "Pegasus Boots"
},
"Turtle Rock": {
"[dungeon-D7-B1] Turtle Rock - Roller switch room": "Progressive Sword"
},
"Eastern Palace": {
"Eastern Palace Pendant": "Crystal 3"
},
"Ice Palace": {
"Ice Palace Crystal": "Crystal 7"
}
},
"5": {
"Light World": {
"Piece of Heart (Lumberjack Tree)": "Lamp"
},
"Desert Palace": {
"Desert Palace Pendant": "Crystal 5"
}
},
"6": {
"Dark Palace": {
"Palace of Darkness Crystal": "Crystal 2"
},
"Turtle Rock": {
"Turtle Rock Crystal": "Crystal 4"
}
},
"longest_item_chain": 6,
"regions_visited": 17
}
Specifically with section 2, with the items available, there's no way to get to the Flute Boy to get the hammer, as far as I know.
Spoiler (if available):

ALttP - VT_no-glitches-19_normal-standard_425464517.txt

Moon pearl in dark world causing super bunny

Seed: 905938732
Logic: no glitches
Rules:
Game Mode: standard

Description of Problem: Moon pearl spawned at the item location in the dark world on the pyramid. When I picked it up I got stuck as super bunny. I can use items but look like the bunny.

Spoiler (if available):

Unsolveable Ice Palace without bombjumping

Seed: 63474707
Logic: (unsure what this means)
Rules: v8
Game Mode: Casual (NMG)

Description of Problem:
Unless I'm mistaken, the Big Key is missing for this seed in the Ice Palace. I defeated every possible enemy, attempted to push every possible statue and block, opened every chest, and bombed every possible floor or wall, did not get Big Key.

Spoiler (if available):
Spoiler log mentions the Big Key should be in [dungeon-D5-B1] where the compass normally is. I don't remember what I actually got from the chest after killing the pengators, but as that chest is open in my playthrough and I still do not have the Big Key for the Ice Palace, it wasn't the Big Key.

Hammer in Swamp

Seed: 261466898
Logic: No Glitches
Rules:Normal
Game Mode: Standard

Description of Problem:
Hello,
I'm new to randomizer and don't know very well the link to the past game.
I was lost on looked the spoiler trying to find the hammer or gloves because I had no other entrance to dark world than hyrule castle.
But hammer is located in swamp palace, or Titan's mitt is located at flute boy.
I'm not sure what is considered a glitch, if I miss something to get there or if it's an issue from the randomizer so I submit this case.
Is it normal to have such items' places when you can't go to dark world from any other place than hyrule castle (because all the other ones require either mitt or hammer if I remember correctly) ?
Thanks for the support and please remember I'm new to this and might miss something obvious for you :)
Have a nice day,
Occasional Twitch streamer, Pingouin23

Spoiler (if available):
{
"Light World": {
"Altar": "Piece Of Heart",
"Uncle": "Progressive Sword",
"[cave-034] Hyrule Castle secret entrance": "Ten Arrows",
"[cave-018] Graveyard - top right grave": "Bomb Upgrade (5)",
"[cave-047] Dam": "Pegasus Boots",
"[cave-040] Link's House": "Arrow Upgrade (5)",
"[cave-031] Tavern": "Ten Arrows",
"[cave-026] chicken house": "Bomb Upgrade (5)",
"[cave-044] Aginah's cave": "Piece Of Heart",
"[cave-035] Sahasrahla's Hut [left chest]": "Five Rupees",
"[cave-035] Sahasrahla's Hut [center chest]": "Piece Of Heart",
"[cave-035] Sahasrahla's Hut [right chest]": "Twenty Rupees",
"[cave-021] Kakariko well [top chest]": "Twenty Rupees",
"[cave-021] Kakariko well [left chest row of 3]": "Piece Of Heart",
"[cave-021] Kakariko well [center chest row of 3]": "Progressive Sword",
"[cave-021] Kakariko well [right chest row of 3]": "Twenty Rupees",
"[cave-021] Kakariko well [bottom chest]": "Piece Of Heart",
"[cave-022-B1] Thief's hut [top chest]": "Arrow Upgrade (5)",
"[cave-022-B1] Thief's hut [top left chest]": "Twenty Rupees",
"[cave-022-B1] Thief's hut [top right chest]": "Bomb Upgrade (10)",
"[cave-022-B1] Thief's hut [bottom left chest]": "Bottle (Blue Potion)",
"[cave-022-B1] Thief's hut [bottom right chest]": "Fifty Rupees",
"Blacksmiths": "Three Bombs",
"[cave-016] cave under rocks west of Santuary": "Lamp",
"[cave-050] cave southwest of Lake Hylia [bottom left chest]": "Ten Arrows",
"[cave-050] cave southwest of Lake Hylia [top left chest]": "Three Bombs",
"[cave-050] cave southwest of Lake Hylia [top right chest]": "Progressive Glove",
"[cave-050] cave southwest of Lake Hylia [bottom right chest]": "Fifty Rupees",
"[cave-051] Ice Cave": "Piece Of Heart",
"Bottle Vendor": "Three Bombs",
"Sahasrahla": "Piece Of Heart",
"Magic Bat": "Three Bombs",
"Sick Kid": "Bow",
"Purple Chest": "Piece Of Heart",
"Hobo": "Fifty Rupees",
"Bombos Tablet": "Heart Container",
"King Zora": "Moon Pearl",
"Piece of Heart (Thieves' Forest Hideout)": "Silver Arrows Upgrade",
"Piece of Heart (Lumberjack Tree)": "Magical Boomerang",
"Piece of Heart (south of Haunted Grove)": "Twenty Rupees",
"Piece of Heart (Graveyard)": "Three Hundred Rupees",
"Piece of Heart (Desert - northeast corner)": "Heart Container",
"[cave-050] cave southwest of Lake Hylia - generous guy": "Heart Container",
"Library": "Piece Of Heart",
"Mushroom": "Twenty Rupees",
"Witch": "Three Bombs",
"Piece of Heart (Maze Race)": "Twenty Rupees",
"Piece of Heart (Desert - west side)": "Five Rupees",
"Piece of Heart (Lake Hylia)": "Boomerang",
"Piece of Heart (Dam)": "Hookshot",
"Piece of Heart (Zora's River)": "Progressive Sword",
"Haunted Grove item": "Piece Of Heart"
},
"Escape": {
"[dungeon-C-1F] Sanctuary": "Fifty Rupees",
"[dungeon-C-B1] Escape - final basement room [left chest]": "Arrow Upgrade (5)",
"[dungeon-C-B1] Escape - final basement room [middle chest]": "Piece Of Heart",
"[dungeon-C-B1] Escape - final basement room [right chest]": "Quake",
"[dungeon-C-B1] Escape - first B1 room": "Bottle (Green Potion)",
"[dungeon-C-B1] Hyrule Castle - boomerang room": "Key",
"[dungeon-C-B1] Hyrule Castle - map room": "Dungeon Map",
"[dungeon-C-B3] Hyrule Castle - next to Zelda": "Fire Rod"
},
"Eastern Palace": {
"[dungeon-L1-1F] Eastern Palace - compass room": "Cane Of Somaria",
"[dungeon-L1-1F] Eastern Palace - big chest": "Compass",
"[dungeon-L1-1F] Eastern Palace - big ball room": "Dungeon Map",
"[dungeon-L1-1F] Eastern Palace - Big key": "Twenty Rupees",
"[dungeon-L1-1F] Eastern Palace - map room": "Big Key",
"Heart Container - Armos Knights": "Heart Container"
},
"Desert Palace": {
"[dungeon-L2-B1] Desert Palace - big chest": "Compass",
"[dungeon-L2-B1] Desert Palace - Map room": "Key",
"[dungeon-L2-B1] Desert Palace - Small key room": "Big Key",
"[dungeon-L2-B1] Desert Palace - Big key room": "Cane Of Byrna",
"[dungeon-L2-B1] Desert Palace - compass room": "Dungeon Map",
"Heart Container - Lanmolas": "Piece Of Heart"
},
"Death Mountain": {
"Ether Tablet": "Twenty Rupees",
"Old Mountain Man": "Twenty Rupees",
"Piece of Heart (Spectacle Rock Cave)": "Five Rupees",
"Piece of Heart (Spectacle Rock)": "Twenty Rupees"
},
"East Death Mountain": {
"[cave-012-1F] Death Mountain - wall of caves - left cave": "Magic Mirror",
"[cave-013] Mimic cave (from Turtle Rock)": "Piece Of Heart",
"[cave-009-1F] Death Mountain - wall of caves - right cave [top left chest]": "Shovel",
"[cave-009-1F] Death Mountain - wall of caves - right cave [top left middle chest]": "Arrow Upgrade (5)",
"[cave-009-1F] Death Mountain - wall of caves - right cave [top right middle chest]": "Piece Of Heart",
"[cave-009-1F] Death Mountain - wall of caves - right cave [top right chest]": "Book Of Mudora",
"[cave-009-1F] Death Mountain - wall of caves - right cave [bottom chest]": "Mushroom",
"[cave-009-B1] Death Mountain - wall of caves - right cave [left chest]": "Progressive Shield",
"[cave-009-B1] Death Mountain - wall of caves - right cave [right chest]": "Heart Container",
"Piece of Heart (Death Mountain - floating island)": "Bottle (Bee)"
},
"Tower of Hera": {
"[dungeon-L3-1F] Tower of Hera - first floor": "Dungeon Map",
"[dungeon-L3-1F] Tower of Hera - freestanding key": "Key",
"[dungeon-L3-2F] Tower of Hera - Entrance": "Big Key",
"[dungeon-L3-4F] Tower of Hera - 4F [small chest]": "Twenty Rupees",
"[dungeon-L3-4F] Tower of Hera - big chest": "Three Hundred Rupees",
"Heart Container - Moldorm": "Compass"
},
"Hyrule Castle Tower": {
"[dungeon-A1-2F] Hyrule Castle Tower - 2 knife guys room": "Key",
"[dungeon-A1-3F] Hyrule Castle Tower - maze room": "Key"
},
"Dark World": {
"[cave-055] Spike cave": "Three Bombs",
"[cave-071] Misery Mire west area [left chest]": "Twenty Rupees",
"[cave-071] Misery Mire west area [right chest]": "Piece Of Heart",
"[cave-057-1F] Dark World Death Mountain - cave from top to bottom [top chest]": "Piece Of Heart",
"[cave-057-1F] Dark World Death Mountain - cave from top to bottom [bottom chest]": "Twenty Rupees",
"[cave-056] Dark World Death Mountain - cave under boulder [top right chest]": "Twenty Rupees",
"[cave-056] Dark World Death Mountain - cave under boulder [top left chest]": "Magic Powder",
"[cave-056] Dark World Death Mountain - cave under boulder [bottom left chest]": "Heart Container",
"[cave-056] Dark World Death Mountain - cave under boulder [bottom right chest]": "Bottle"
},
"North East Dark World": {
"Catfish": "Flippers",
"Piece of Heart (Pyramid)": "Heart Container",
"Pyramid - Sword": "Fighters Sword",
"Pyramid - Bow": "Bow And Arrows",
"Pyramid Fairy - Left": "Three Bombs",
"Pyramid Fairy - Right": "Progressive Armor"
},
"North West Dark World": {
"[cave-063] doorless hut": "Ether",
"[cave-062] C-shaped house": "Piece Of Heart",
"Piece of Heart (Treasure Chest Game)": "Progressive Armor",
"Piece of Heart (Dark World blacksmith pegs)": "Three Bombs",
"Piece of Heart (Dark World - bumper cave)": "Three Hundred Rupees"
},
"South Dark World": {
"[cave-073] cave northeast of swamp palace [top chest]": "Ice Rod",
"[cave-073] cave northeast of swamp palace [top middle chest]": "Twenty Rupees",
"[cave-073] cave northeast of swamp palace [bottom middle chest]": "Arrow",
"[cave-073] cave northeast of swamp palace [bottom chest]": "Heart Container (refill)",
"Flute Boy": "Progressive Glove",
"[cave-073] cave northeast of swamp palace - generous guy": "Twenty Rupees",
"Piece of Heart (Digging Game)": "Magic Cape"
},
"Palace of Darkness": {
"[dungeon-D1-1F] Dark Palace - big key room": "Key",
"[dungeon-D1-1F] Dark Palace - jump room [right chest]": "Key",
"[dungeon-D1-1F] Dark Palace - jump room [left chest]": "Key",
"[dungeon-D1-1F] Dark Palace - big chest": "Twenty Rupees",
"[dungeon-D1-1F] Dark Palace - compass room": "Key",
"[dungeon-D1-1F] Dark Palace - spike statue room": "Ten Arrows",
"[dungeon-D1-B1] Dark Palace - turtle stalfos room": "Bug Catching Net",
"[dungeon-D1-B1] Dark Palace - room leading to Helmasaur [left chest]": "Dungeon Map",
"[dungeon-D1-B1] Dark Palace - room leading to Helmasaur [right chest]": "Key",
"[dungeon-D1-1F] Dark Palace - statue push room": "Key",
"[dungeon-D1-1F] Dark Palace - maze room [top chest]": "Half Magic",
"[dungeon-D1-1F] Dark Palace - maze room [bottom chest]": "Fifty Rupees",
"[dungeon-D1-B1] Dark Palace - shooter room": "Big Key",
"Heart Container - Helmasaur King": "Compass"
},
"Swamp Palace": {
"[dungeon-D2-1F] Swamp Palace - first room": "Key",
"[dungeon-D2-B1] Swamp Palace - big chest": "Heart Container",
"[dungeon-D2-B1] Swamp Palace - big key room": "Piece Of Heart",
"[dungeon-D2-B1] Swamp Palace - map room": "Hammer",
"[dungeon-D2-B1] Swamp Palace - push 4 blocks room": "Arrow Upgrade (5)",
"[dungeon-D2-B1] Swamp Palace - south of hookshot room": "Big Key",
"[dungeon-D2-B2] Swamp Palace - flooded room [left chest]": "Compass",
"[dungeon-D2-B2] Swamp Palace - flooded room [right chest]": "Fifty Rupees",
"[dungeon-D2-B2] Swamp Palace - hidden waterfall door room": "Dungeon Map",
"Heart Container - Arrghus": "Bomb Upgrade (5)"
},
"Skull Woods": {
"[dungeon-D3-B1] Skull Woods - big chest": "Compass",
"[dungeon-D3-B1] Skull Woods - Big Key room": "Key",
"[dungeon-D3-B1] Skull Woods - Compass room": "Three Bombs",
"[dungeon-D3-B1] Skull Woods - east of Fire Rod room": "Dungeon Map",
"[dungeon-D3-B1] Skull Woods - Entrance to part 2": "Key",
"[dungeon-D3-B1] Skull Woods - Gibdo/Stalfos room": "Big Key",
"[dungeon-D3-B1] Skull Woods - south of Fire Rod room": "Key",
"Heart Container - Mothula": "Twenty Rupees"
},
"Thieves Town": {
"[dungeon-D4-1F] Thieves' Town - Room above boss": "Twenty Rupees",
"[dungeon-D4-B1] Thieves' Town - Bottom left of huge room [bottom right chest]": "Piece Of Heart",
"[dungeon-D4-B1] Thieves' Town - Bottom left of huge room [top left chest]": "Big Key",
"[dungeon-D4-B1] Thieves' Town - Bottom right of huge room": "Key",
"[dungeon-D4-B1] Thieves' Town - Top left of huge room": "Progressive Shield",
"[dungeon-D4-B2] Thieves' Town - big chest": "Twenty Rupees",
"[dungeon-D4-B2] Thieves' Town - next to Blind": "Compass",
"Heart Container - Blind": "Dungeon Map"
},
"Ice Palace": {
"[dungeon-D5-B1] Ice Palace - Big Key room": "Big Key",
"[dungeon-D5-B1] Ice Palace - compass room": "Progressive Sword",
"[dungeon-D5-B2] Ice Palace - map room": "Compass",
"[dungeon-D5-B3] Ice Palace - spike room": "Key",
"[dungeon-D5-B4] Ice Palace - above Blue Mail room": "Twenty Rupees",
"[dungeon-D5-B5] Ice Palace - b5 up staircase": "Dungeon Map",
"[dungeon-D5-B5] Ice Palace - big chest": "Twenty Rupees",
"Heart Container - Kholdstare": "Key"
},
"Misery Mire": {
"[dungeon-D6-B1] Misery Mire - big chest": "Key",
"[dungeon-D6-B1] Misery Mire - big hub room": "Key",
"[dungeon-D6-B1] Misery Mire - big key": "Dungeon Map",
"[dungeon-D6-B1] Misery Mire - compass": "Compass",
"[dungeon-D6-B1] Misery Mire - end of bridge": "Big Key",
"[dungeon-D6-B1] Misery Mire - map room": "Key",
"[dungeon-D6-B1] Misery Mire - spike room": "One Rupee",
"Heart Container - Vitreous": "Piece Of Heart"
},
"Turtle Rock": {
"[dungeon-D7-1F] Turtle Rock - Chain chomp room": "Big Key",
"[dungeon-D7-1F] Turtle Rock - compass room": "Key",
"[dungeon-D7-1F] Turtle Rock - Map room [left chest]": "Twenty Rupees",
"[dungeon-D7-1F] Turtle Rock - Map room [right chest]": "Key",
"[dungeon-D7-B1] Turtle Rock - big chest": "Key",
"[dungeon-D7-B1] Turtle Rock - big key room": "Three Bombs",
"[dungeon-D7-B1] Turtle Rock - Roller switch room": "One Rupee",
"[dungeon-D7-B2] Turtle Rock - Eye bridge room [bottom left chest]": "Compass",
"[dungeon-D7-B2] Turtle Rock - Eye bridge room [bottom right chest]": "Key",
"[dungeon-D7-B2] Turtle Rock - Eye bridge room [top left chest]": "Dungeon Map",
"[dungeon-D7-B2] Turtle Rock - Eye bridge room [top right chest]": "Three Hundred Rupees",
"Heart Container - Trinexx": "Twenty Rupees"
},
"Ganons Tower": {
"[dungeon-A2-1F] Ganon's Tower - down left staircase from entrance": "Key",
"[dungeon-A2-1F] Ganon's Tower - north of gap room [top left chest]": "Flute",
"[dungeon-A2-1F] Ganon's Tower - north of gap room [top right chest]": "Heart Container",
"[dungeon-A2-1F] Ganon's Tower - north of gap room [bottom left chest]": "Fifty Rupees",
"[dungeon-A2-1F] Ganon's Tower - north of gap room [bottom right chest]": "Bomb Upgrade (5)",
"[dungeon-A2-1F] Ganon's Tower - west of teleport room [top left chest]": "Twenty Rupees",
"[dungeon-A2-1F] Ganon's Tower - west of teleport room [top right chest]": "Arrow Upgrade (5)",
"[dungeon-A2-1F] Ganon's Tower - west of teleport room [bottom left chest]": "Progressive Shield",
"[dungeon-A2-1F] Ganon's Tower - west of teleport room [bottom right chest]": "Heart Container",
"[dungeon-A2-1F] Ganon's Tower - north of teleport room": "Bomb Upgrade (5)",
"[dungeon-A2-1F] Ganon's Tower - map room": "Key",
"[dungeon-A2-1F] Ganon's Tower - big chest": "Compass",
"[dungeon-A2-1F] Ganon's Tower - down right staircase from entrance [left chest]": "Key",
"[dungeon-A2-1F] Ganon's Tower - down right staircase from entrance [right chest]": "Five Rupees",
"[dungeon-A2-1F] Ganon's Tower - above Armos": "Piece Of Heart",
"[dungeon-A2-1F] Ganon's Tower - east of down right staircase from entrance": "Dungeon Map",
"[dungeon-A2-1F] Ganon's Tower - compass room [top left chest]": "Key",
"[dungeon-A2-1F] Ganon's Tower - compass room [top right chest]": "Bombos",
"[dungeon-A2-1F] Ganon's Tower - compass room [bottom left chest]": "One Hundred Rupees",
"[dungeon-A2-1F] Ganon's Tower - compass room [bottom right chest]": "Piece Of Heart",
"[dungeon-A2-B1] Ganon's Tower - north of Armos room [bottom chest]": "Piece Of Heart",
"[dungeon-A2-B1] Ganon's Tower - north of Armos room [left chest]": "Bomb Upgrade (5)",
"[dungeon-A2-B1] Ganon's Tower - north of Armos room [right chest]": "Big Key",
"[dungeon-A2-6F] Ganon's Tower - north of falling floor four torches [top left chest]": "Twenty Rupees",
"[dungeon-A2-6F] Ganon's Tower - north of falling floor four torches [top right chest]": "Arrow Upgrade (10)",
"[dungeon-A2-6F] Ganon's Tower - before Moldorm": "Piece Of Heart",
"[dungeon-A2-6F] Ganon's Tower - Moldorm room": "Twenty Rupees"
},
"Pendants": {
"Eastern Palace Pendant": "Crystal 6",
"Desert Palace Pendant": "Crystal 2",
"Tower of Hera Pendant": "Crystal 7"
},
"Crystals": {
"Palace of Darkness Crystal": "Pendant Of Power",
"Swamp Palace Crystal": "Crystal 3",
"Skull Woods Crystal": "Crystal 5",
"Thieves Town Crystal": "Crystal 4",
"Ice Palace Crystal": "Pendant Of Courage",
"Misery Mire Crystal": "Pendant Of Wisdom",
"Turtle Rock Crystal": "Crystal 1"
},
"Medallions": {
"Turtle Rock Medallion": "Quake",
"Misery Mire Medallion": "Ether"
},
"Fountains": {
"Waterfall Bottle": "Bottle (Blue Potion)",
"Pyramid Bottle": "Bottle (Blue Potion)"
},
"playthrough": {
"1": {
"Light World": {
"Uncle": "Progressive Sword",
"[cave-047] Dam": "Pegasus Boots",
"[cave-021] Kakariko well [center chest row of 3]": "Progressive Sword",
"[cave-022-B1] Thief's hut [bottom left chest]": "Bottle (Blue Potion)",
"[cave-050] cave southwest of Lake Hylia [top right chest]": "Progressive Glove",
"Piece of Heart (Thieves' Forest Hideout)": "Silver Arrows Upgrade",
"Piece of Heart (Dam)": "Hookshot"
},
"Hyrule Castle": {
"[dungeon-C-B3] Hyrule Castle - next to Zelda": "Fire Rod"
},
"Eastern Palace": {
"[dungeon-L1-1F] Eastern Palace - compass room": "Cane Of Somaria"
}
},
"2": {
"Light World": {
"[cave-016] cave under rocks west of Santuary": "Lamp",
"Sick Kid": "Bow",
"King Zora": "Moon Pearl"
},
"Hyrule Castle": {
"[dungeon-C-B1] Escape - final basement room [right chest]": "Quake"
},
"Death Mountain": {
"[cave-012-1F] Death Mountain - wall of caves - left cave": "Magic Mirror",
"[cave-009-1F] Death Mountain - wall of caves - right cave [top right chest]": "Book Of Mudora"
}
},
"3": {
"Dark World": {
"Catfish": "Flippers",
"[cave-073] cave northeast of swamp palace [top chest]": "Ice Rod",
"Flute Boy": "Progressive Glove"
},
"Eastern Palace": {
"Eastern Palace Pendant": "Crystal 6"
},
"Desert Palace": {
"Desert Palace Pendant": "Crystal 2"
},
"Tower Of Hera": {
"Tower of Hera Pendant": "Crystal 7"
},
"Skull Woods": {
"Skull Woods Crystal": "Crystal 5"
},
"Thieves Town": {
"Thieves Town Crystal": "Crystal 4"
}
},
"4": {
"Swamp Palace": {
"[dungeon-D2-B1] Swamp Palace - map room": "Hammer"
},
"Ice Palace": {
"[dungeon-D5-B1] Ice Palace - compass room": "Progressive Sword"
}
},
"5": {
"Swamp Palace": {
"Swamp Palace Crystal": "Crystal 3"
},
"Turtle Rock": {
"Turtle Rock Crystal": "Crystal 1"
}
},
"longest_item_chain": 5,
"regions_visited": 16
},
"meta": {
"difficulty": "normal",
"logic": "no-glitches-19",
"seed": 261466898,
"build": "2017-04-15",
"mode": "standard"
}
}

Possible unbeatable seed

Seed: 207778321
Logic: No glitches
Rules: Normal
Game Mode: Standard

Description of Problem: Can't progress through the light world dungeons anymore (finished ToH, progressed through Eastern palace until the bow is needed and through Desert palace until boots are needed), and can't access Dark world dungeons (only the Death Mountain portal is reachable since i don't have Mitts nor the Hammer). The spoiler indicates i need to get the bow on the bombos tablet, but as far as I know, that is unreacheable without Mitts or Hammer.

Spoiler (if available):
ALttP - VT_no-glitches-19_normal-standard_207778321.txt

Item Switch On L+R

I would like to formally request this feature.

Can you add a way to change your Y weapon from the game without accessing the menu? Like using the L and R buttons in the Mega Man X series?

Thanks!

Credits Stats, Tower of Hera Item Locations 6/5

Seed: 444438490
Logic: No Glitches
Rules: Normal
Game Mode: Standard

Description of Problem: Not a gameplay issue, but when watching the credits for this seed. I somehow managed for Items Locations Checked, Tower of Hera comes up as 6 out of 5. When looking at the spoiler, it does look like there are 6 locations in Hera, so this may just be a small admin fix for the stats credits.

Spoiler (if available):
{
"[dungeon-L3-1F] Tower of Hera - first floor": "Dungeon Map",
"[dungeon-L3-1F] Tower of Hera - freestanding key": "Arrow",
"[dungeon-L3-2F] Tower of Hera - Entrance": "Big Key",
"[dungeon-L3-4F] Tower of Hera - 4F [small chest]": "Key",
"[dungeon-L3-4F] Tower of Hera - big chest": "Compass",
"Heart Container - Moldorm": "One Hundred Rupees"
}
alttpv8stats

silver arrow upgrade before bow negated after getting bow

Seed: 243615387
Difficulty: normal
Logic: no glitches
Mode: standard

Description of Problem: I got silver arrow upgrade in hyrule castle in the blue bumerang chest. Later I got the normal bow (dont know where anymore sry) and suddenly silver arrow upgrade didn't count anymore.
I know that I can beat Ganon without it, but for a more or less casual speedrunner like me it's still too hard so yeah. Stuck without real reason, because I should have silver arrows.

Spoiler (if available):

Potential bug with New Logic

Seed:350543605
Logic:no-glitches-19
Rules:
Game Mode:standard

Description of Problem: Flippers were in kings tomb. One of the progressive gloves was at hobo (flippers required in glitchess) and the mirror was in hook shot cave. Since mirror and or titan's mitt is required to open king's tomb and titan's mitt or mirror is required to access hookshot cave it broke the glitchless seed... I think.

Spoiler (if available):
20170418.txt

Hyrule Castle missing key

Seed: 543348961
Difficulty: Timed
Logic: No Glitches
Mode: Open

Description of Problem:
Taking a key from the castle, you can explore the full sewers having entered from the graveyard.
If it was from the firts blue guard and neither the sewers or the map room contain another key, you'll lock yourself out of the castle dungeon.

Spoiler (if available):
"[dungeon-C-B1] Escape - final basement room [left chest]": "Red Clock",
"[dungeon-C-B1] Escape - final basement room [middle chest]": "Dungeon Map",
"[dungeon-C-B1] Escape - final basement room [right chest]": "Green Clock",
"[dungeon-C-B1] Escape - first B1 room": "Green Clock",
"[dungeon-C-B1] Hyrule Castle - map room": "Progressive Sword",
"[dungeon-C-B3] Hyrule Castle - next to Zelda": "Lamp"

In this case it's not really a softlock because you can do the Tower in the dark, though by the progress logic Lamp is absolutely needed.

Custom flag string

This is a feature request, and should help you in your debugging efforts as well.

I would like the web generator to be able to produce a text string that encodes the custom options you've selected. The LoZ randomizer has this feature. This would help users that use custom settings in that they don't have to re-enter all their custom options every time they go to generate new ROMs, and would help developers in that bug reports could include the custom flag string and thus allow you guys to replicate the ROM exactly.

Issue in bumper cave

Seed: 839266165
Logic: no-glitches-19
Rules: Normal/Standard? 1/4 heartbeep speed?
Game Mode: standard

Description of Problem: Faulty logic. Titan's mitt in bumper cave. Bumper Cave requires both magic cape and hookshot. Hookshot is in Ganon's tower. Can't access tower with the mitt and the crystals I'd get from it (mire + turtle rock)
ALttP - VT_no-glitches-19_normal-standard_839266165.txt

Spoiler (if available):

Open Seed unable to progress

Seed:704931681
Logic:No Glitches
Rules:
Game Mode:Open

Description of Problem: Unable to progress in seed. Do not have a sword available to pick up and the titans mitts are needed to get to Dark East Death mountain to obtain the Titan Mitts

Spoiler (if available):
Able to get red pendant crystals 2, 5, and 7

Uncle's Shield

When you fall in the backdoor to the castle, you come across your poor defeated uncle who hands over his sword, but not his shield. If he has a shield, why not hand it over to his poor nephew walking around in the rain in his pajamas to save the world?

Can Uncle's sprite be changed so that he's not holding a shield? Give him a box of Weetabix or something I don't know.

Possible Softlock

Seed:191216810
Logic:web-14
Rules:v8
Game Mode:Casual (NMG)

Description of Problem: After completing light world dungeons, you are only able to access pyramid and the death mountain west portals. All other dark world portals are not accessable. The hammer is in the light world in the cave south of the Haunted grove (need to use mirror) and titan mitts are in Thieves town dungeon. In order to get either you need to use the dark world portals that require said items.

Spoiler (if available):
ALttP - VT_web-14_v8- No Major Glitches_191216810.txt

NPCs for English Translation

In Standard mode, these are the NPCs I found that still have text.

  • Standard

    • Rain State
      • Guards to East of Link's House
      • Guards to South of Link's House
      • Guards to Southwest of Link's House
      • Guards to West of Hyrule Castle
      • Guard at Castle Gate
      • Guard on Southeast Castle Wall
    • Complete Escape (Leave & come back, no text)
      • Priest
      • Zelda
  • Light World

    • Witch's Assistant if you try to buy a potion with no empty bottles
    • Witch's Assistant if you have no bottles
    • Witch's Assistant if you try to buy a potion and have no bottles
    • Magic Powder'd Dancing Pickles
    • Shopkeepers (caves 9, 30, 48) if you try to buy a potion with no bottles or no empties
    • Lost Woods

      • Cheap Chest game (cave-01)
      • Forest Thief in tree (cave-02)
      • Fortune Teller N of Kakariko (cave-15)
      • Twin Lumberjacks
    • Kakariko

      • Thief in Thief's Hut (cave-22)
      • Lady in house E of Thief's Hut (cave-23)
      • Dude with overgrown garden (cave-28)
      • Two Dudes in Tavern (cave-31)
      • Dude in Tavern on the floor (apparently using Flute wakes him up)
      • Fighting brothers before Maze Race (cave-36)
      • Cheap Chest game SE of Library (cave-38)
      • Return fish to Bottle Vendor
      • Yelling Lady in W Kakariko
      • Yelling Lady in E Kakariko
      • Sahasrahla's Grandson
      • Chicken House Lady
      • BugCatchingKid: no bottle
      • BugCatchingKid: after getting item
      • Breadsmith without partner
      • Breadsmiths after returning partner but before exit
      • Maze Race end after getting prize already
    • Desert

      • Purple Chest guy with no purple chest
      • Purple Chest guy after chest turned in
      • Aginah (cave-44)
      • Aginah if you have Level 1 sword and don't have the Book of Mudora
      • Aginah if you have Level 2 or higher sword
      • Rupee Cave Guy (cave-46)
    • Eastern Palace

      • Sahasrahla
  • Dark World

    • Shopkeepers (caves 53, 58) if you try to buy a potion with no bottles or no empties
    • Shopkeepers (caves 53, 58, 64)
    • Lost Woods

      • Fortune Teller N of Dark Kakariko (cave-59)
    • Sanctuary

      • Squid (cave-60)
    • Dark Kakariko

      • Archery game SE of Frogsmith (cave-68)
      • Digging Game expiration, talk to dude after done
      • Chest Game with not enough cash
    • Bomb shop (cave-69)
    • Entering a cave with purple chest
    • Flute Boy after getting item but before exit
    • Digging Game with not enough cash
  • Telepathic Tiles

    • Light World
      • Under rock outside Ice Rod Cave (cave-52)
      • Desert Palace (torch bonk item room)
      • Aga1's Tower (5F)
      • PoD (Right, downstairs to B1, use teleporter, 2 Anti-Faeries, map)
      • Swamp Entrance
      • Thieves' (1F, surrounded by Keese, map)
      • Mire (1F, after torch-lighting puzzle)
      • Under rock (outside of cave-74)
      • Ganon's Bitch Chest tile (cave-65)

Ether medallion doesn't show in inventory

Seed: 379039546
Logic: No Glitches
Rules: Normal
Game Mode: Standard

Description of Problem: I went into the Water Palace to collect the Ether Medallion, and when I opened the large chest containing it, the icon appeared coming out of the chest but it is not available in my inventory. I reloaded the game and tried it again, and the problem persisted. Unfortunately, this prevents me from entering Turtle Rock in this seed.

Spoiler (if available):
https://github.com/sporchia/alttp_vt_randomizer/files/878424/ALttP.-.VT_no-glitches-18_normal-standard_379039546.txt

Silver Arrow Upgrade Item not working maybe?

Seed: 556900306
Logic: no-glitches-16
Rules: Normal
Game Mode: standard

Description of Problem:

The logic wasn't incorrect in this case, and perhaps this was since fixed, but upon getting the silver arrow upgrade in Ganon's Tower my Arrows remained of the can't kill Ganon variety.

I made a custom game in web-17 where all the unnecessary items were silver arrow upgrades and that still seemed to be case. Maybe there's something I'm not understanding about the silver arrow upgrade, but boy is beating Ganon without silver arrows difficult, I still haven't pulled it off.

Now with the pyramid fairy item in the pool the silver arrow upgrade appears to be the only way to get silver arrows, though perhaps that could be fixed by adding the 'Bow and Silver Arrows' back into the pool?

Spoiler (if available):
While playing this ROM the web tool updated from web-16 to web-17 so I don't have a spoiler log :(

Nothing in Purple Chest glitch

Seed: 9201977
Logic: web-15
Rules: custom (NMG default + no maps/compasses)
Game Mode: No Major Glitches

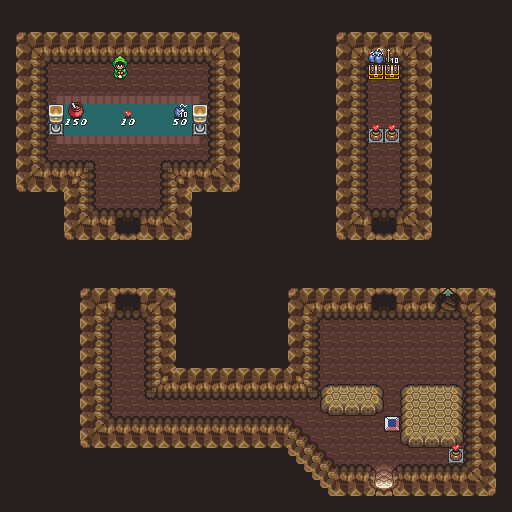
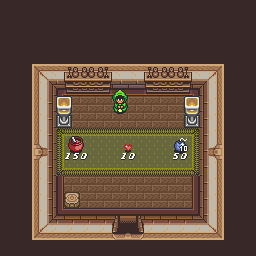
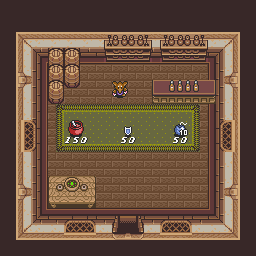
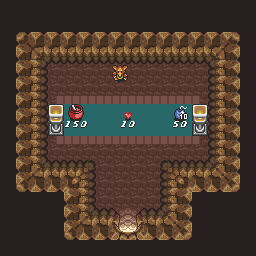
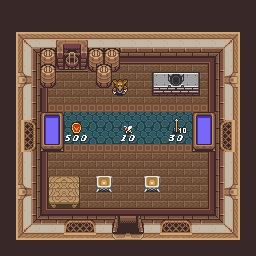
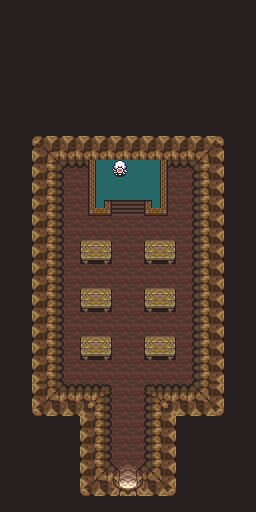
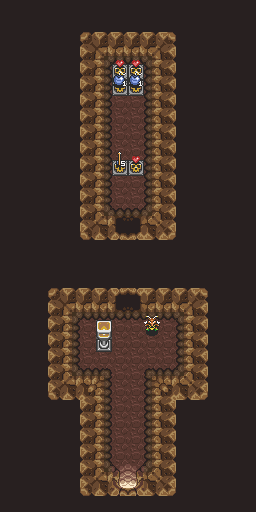
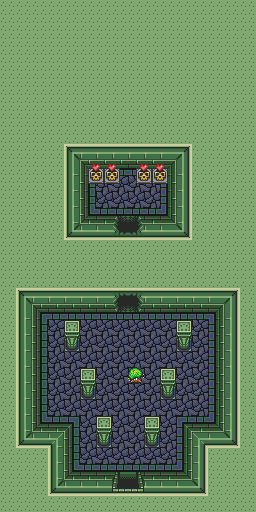
Description of Problem: If the Purple Chest contains Nothing, there's a graphical glitch: while opening the chest, the retired thief's head disappears, and after getting the item, his head reappears and his body disappears.

Spoiler (if available):
{
"Light World": {
"Uncle": "Fighters Sword",
"[cave-034] Hyrule Castle secret entrance": "Five Rupees",
"[cave-018] Graveyard - top right grave": "Nothing",
"[cave-047] Dam": "Nothing",
"[cave-040] Link's House": "Mushroom",
"[cave-031] Tavern": "Flippers",
"[cave-026] chicken house": "Nothing",
"[cave-044] Aginah's cave": "Piece Of Heart",
"[cave-035] Sahasrahla's Hut [left chest]": "Piece Of Heart",
"[cave-035] Sahasrahla's Hut [center chest]": "Shovel",
"[cave-035] Sahasrahla's Hut [right chest]": "Piece Of Heart",
"[cave-021] Kakariko well [top chest]": "Ten Arrows",
"[cave-021] Kakariko well [left chest row of 3]": "Twenty Rupees",
"[cave-021] Kakariko well [center chest row of 3]": "Nothing",
"[cave-021] Kakariko well [right chest row of 3]": "Bomb Upgrade (5)",
"[cave-021] Kakariko well [bottom chest]": "Twenty Rupees",
"[cave-022-B1] Thief's hut [top chest]": "Twenty Rupees",
"[cave-022-B1] Thief's hut [top left chest]": "Twenty Rupees",
"[cave-022-B1] Thief's hut [top right chest]": "Bomb Upgrade (5)",
"[cave-022-B1] Thief's hut [bottom left chest]": "Twenty Rupees",
"[cave-022-B1] Thief's hut [bottom right chest]": "Twenty Rupees",
"[cave-016] cave under rocks west of Santuary": "Hookshot",
"[cave-050] cave southwest of Lake Hylia [bottom left chest]": "Three Bombs",
"[cave-050] cave southwest of Lake Hylia [top left chest]": "Piece Of Heart",
"[cave-050] cave southwest of Lake Hylia [top right chest]": "Bomb Upgrade (5)",
"[cave-050] cave southwest of Lake Hylia [bottom right chest]": "Nothing",
"[cave-051] Ice Cave": "Heart Container",
"Bottle Vendor": "Piece Of Heart",
"Sahasrahla": "Twenty Rupees",
"Magic Bat": "Three Hundred Rupees",
"Sick Kid": "Three Bombs",
"Purple Chest": "Nothing",
"Hobo": "Twenty Rupees",
"Bombos Tablet": "Nothing",
"King Zora": "Titans Mitt",
"Piece of Heart (Thieves' Forest Hideout)": "Fifty Rupees",
"Piece of Heart (Lumberjack Tree)": "Nothing",
"Piece of Heart (south of Haunted Grove)": "Piece Of Heart",
"Piece of Heart (Graveyard)": "Twenty Rupees",
"Piece of Heart (Desert - northeast corner)": "Piece Of Heart",
"[cave-050] cave southwest of Lake Hylia - generous guy": "Piece Of Heart",
"Library": "Power Glove",
"Mushroom": "Heart Container",
"Witch": "Cane Of Byrna",
"Piece of Heart (Maze Race)": "Piece Of Heart",
"Piece of Heart (Desert - west side)": "Heart Container",
"Piece of Heart (Lake Hylia)": "Nothing",
"Piece of Heart (Dam)": "Arrow Upgrade (5)",
"Piece of Heart (Zora's River)": "Boomerang",
"Haunted Grove item": "Flute"
},
"Escape": {
"[dungeon-C-1F] Sanctuary": "Five Rupees",
"[dungeon-C-B1] Escape - final basement room [left chest]": "Ten Arrows",
"[dungeon-C-B1] Escape - final basement room [middle chest]": "Three Bombs",
"[dungeon-C-B1] Escape - final basement room [right chest]": "Heart Container",
"[dungeon-C-B1] Escape - first B1 room": "Piece Of Heart",
"[dungeon-C-B1] Hyrule Castle - boomerang room": "Key",
"[dungeon-C-B1] Hyrule Castle - map room": "Nothing",
"[dungeon-C-B3] Hyrule Castle - next to Zelda": "Piece Of Heart"
},
"Eastern Palace": {
"[dungeon-L1-1F] Eastern Palace - compass room": "Three Bombs",
"[dungeon-L1-1F] Eastern Palace - big chest": "Twenty Rupees",
"[dungeon-L1-1F] Eastern Palace - big ball room": "Pegasus Boots",
"[dungeon-L1-1F] Eastern Palace - Big key": "Magical Boomerang",
"[dungeon-L1-1F] Eastern Palace - map room": "Big Key",
"Heart Container - Armos Knights": "Arrow Upgrade (5)"
},
"Desert Palace": {
"[dungeon-L2-B1] Desert Palace - big chest": "Key",
"[dungeon-L2-B1] Desert Palace - Map room": "Hammer",
"[dungeon-L2-B1] Desert Palace - Small key room": "Big Key",
"[dungeon-L2-B1] Desert Palace - Big key room": "Fifty Rupees",
"[dungeon-L2-B1] Desert Palace - compass room": "Piece Of Heart",
"Heart Container - Lanmolas": "Nothing"
},
"Death Mountain": {
"Ether Tablet": "Bug Catching Net",
"Old Mountain Man": "Book Of Mudora",
"Piece of Heart (Spectacle Rock Cave)": "Magic Cape",
"Piece of Heart (Spectacle Rock)": "Twenty Rupees"
},
"East Death Mountain": {
"[cave-012-1F] Death Mountain - wall of caves - left cave": "Fire Rod",
"[cave-013] Mimic cave (from Turtle Rock)": "Arrow Upgrade (5)",
"[cave-009-1F] Death Mountain - wall of caves - right cave [top left chest]": "Piece Of Heart",
"[cave-009-1F] Death Mountain - wall of caves - right cave [top left middle chest]": "Heart Container",
"[cave-009-1F] Death Mountain - wall of caves - right cave [top right middle chest]": "Bottle (Blue Potion)",
"[cave-009-1F] Death Mountain - wall of caves - right cave [top right chest]": "Magic Mirror",
"[cave-009-1F] Death Mountain - wall of caves - right cave [bottom chest]": "Mirror Shield",
"[cave-009-B1] Death Mountain - wall of caves - right cave [left chest]": "Bomb Upgrade (5)",
"[cave-009-B1] Death Mountain - wall of caves - right cave [right chest]": "Piece Of Heart",
"Piece of Heart (Death Mountain - floating island)": "Twenty Rupees"
},
"Tower of Hera": {
"[dungeon-L3-1F] Tower of Hera - first floor": "Big Key",
"[dungeon-L3-1F] Tower of Hera - freestanding key": "Key",
"[dungeon-L3-2F] Tower of Hera - Entrance": "Nothing",
"[dungeon-L3-4F] Tower of Hera - 4F [small chest]": "Bow",
"[dungeon-L3-4F] Tower of Hera - big chest": "Magic Powder",
"Heart Container - Moldorm": "Moon Pearl"
},
"Hyrule Castle Tower": {
"[dungeon-A1-2F] Hyrule Castle Tower - 2 knife guys room": "Key",
"[dungeon-A1-3F] Hyrule Castle Tower - maze room": "Key"
},
"Dark World": {
"[cave-055] Spike cave": "Twenty Rupees",
"[cave-071] Misery Mire west area [left chest]": "Ten Arrows",
"[cave-071] Misery Mire west area [right chest]": "Three Hundred Rupees",
"[cave-057-1F] Dark World Death Mountain - cave from top to bottom [top chest]": "Bottle (Golden Bee)",
"[cave-057-1F] Dark World Death Mountain - cave from top to bottom [bottom chest]": "Half Magic",
"[cave-056] Dark World Death Mountain - cave under boulder [top right chest]": "Ether",
"[cave-056] Dark World Death Mountain - cave under boulder [top left chest]": "Heart Container",
"[cave-056] Dark World Death Mountain - cave under boulder [bottom left chest]": "Nothing",
"[cave-056] Dark World Death Mountain - cave under boulder [bottom right chest]": "Bombos"
},
"North East Dark World": {
"Catfish": "Bomb Upgrade (10)",
"Piece of Heart (Pyramid)": "Nothing"
},
"North West Dark World": {
"[cave-063] doorless hut": "Nothing",
"[cave-062] C-shaped house": "Heart Container",
"Piece of Heart (Treasure Chest Game)": "Piece Of Heart",
"Piece of Heart (Dark World blacksmith pegs)": "Bomb Upgrade (5)",
"Piece of Heart (Dark World - bumper cave)": "Twenty Rupees"
},
"South Dark World": {
"[cave-073] cave northeast of swamp palace [top chest]": "Fifty Rupees",
"[cave-073] cave northeast of swamp palace [top middle chest]": "Nothing",
"[cave-073] cave northeast of swamp palace [bottom middle chest]": "Twenty Rupees",
"[cave-073] cave northeast of swamp palace [bottom chest]": "Bottle (Golden Bee)",
"Flute Boy": "Arrow Upgrade (5)",
"[cave-073] cave northeast of swamp palace - generous guy": "Heart Container",
"Piece of Heart (Digging Game)": "Three Hundred Rupees"
},
"Palace of Darkness": {
"[dungeon-D1-1F] Dark Palace - big key room": "Key",
"[dungeon-D1-1F] Dark Palace - jump room [right chest]": "Key",
"[dungeon-D1-1F] Dark Palace - jump room [left chest]": "Key",
"[dungeon-D1-1F] Dark Palace - big chest": "Arrow Upgrade (5)",
"[dungeon-D1-1F] Dark Palace - compass room": "Big Key",
"[dungeon-D1-1F] Dark Palace - spike statue room": "Red Mail",
"[dungeon-D1-B1] Dark Palace - turtle stalfos room": "Ice Rod",
"[dungeon-D1-B1] Dark Palace - room leading to Helmasaur [left chest]": "Key",
"[dungeon-D1-B1] Dark Palace - room leading to Helmasaur [right chest]": "Key",
"[dungeon-D1-1F] Dark Palace - statue push room": "Piece Of Heart",
"[dungeon-D1-1F] Dark Palace - maze room [top chest]": "Three Hundred Rupees",
"[dungeon-D1-1F] Dark Palace - maze room [bottom chest]": "Twenty Rupees",
"[dungeon-D1-B1] Dark Palace - shooter room": "Key",
"Heart Container - Helmasaur King": "Twenty Rupees"
},
"Swamp Palace": {
"[dungeon-D2-1F] Swamp Palace - first room": "Key",
"[dungeon-D2-B1] Swamp Palace - big chest": "Arrow Upgrade (10)",
"[dungeon-D2-B1] Swamp Palace - big key room": "Five Rupees",
"[dungeon-D2-B1] Swamp Palace - map room": "Cane Of Somaria",
"[dungeon-D2-B1] Swamp Palace - push 4 blocks room": "Big Key",
"[dungeon-D2-B1] Swamp Palace - south of hookshot room": "Piece Of Heart",
"[dungeon-D2-B2] Swamp Palace - flooded room [left chest]": "Arrow",
"[dungeon-D2-B2] Swamp Palace - flooded room [right chest]": "Piece Of Heart",
"[dungeon-D2-B2] Swamp Palace - hidden waterfall door room": "Heart Container",
"Heart Container - Arrghus": "Twenty Rupees"
},
"Skull Woods": {
"[dungeon-D3-B1] Skull Woods - big chest": "Key",
"[dungeon-D3-B1] Skull Woods - Big Key room": "Twenty Rupees",
"[dungeon-D3-B1] Skull Woods - Compass room": "Big Key",
"[dungeon-D3-B1] Skull Woods - east of Fire Rod room": "Key",
"[dungeon-D3-B1] Skull Woods - Entrance to part 2": "Bottle (Golden Bee)",
"[dungeon-D3-B1] Skull Woods - Gibdo/Stalfos room": "Fire Shield",
"[dungeon-D3-B1] Skull Woods - south of Fire Rod room": "Key",
"Heart Container - Mothula": "Lamp"
},
"Thieves Town": {
"[dungeon-D4-1F] Thieves' Town - Room above boss": "Fifty Rupees",
"[dungeon-D4-B1] Thieves' Town - Bottom left of huge room [bottom right chest]": "Big Key",
"[dungeon-D4-B1] Thieves' Town - Bottom left of huge room [top left chest]": "Fifty Rupees",
"[dungeon-D4-B1] Thieves' Town - Bottom right of huge room": "Nothing",
"[dungeon-D4-B1] Thieves' Town - Top left of huge room": "Key",
"[dungeon-D4-B2] Thieves' Town - big chest": "Twenty Rupees",
"[dungeon-D4-B2] Thieves' Town - next to Blind": "Three Bombs",
"Heart Container - Blind": "Heart Container"
},
"Ice Palace": {
"[dungeon-D5-B1] Ice Palace - Big Key room": "Big Key",
"[dungeon-D5-B1] Ice Palace - compass room": "Key",
"[dungeon-D5-B2] Ice Palace - map room": "Arrow Upgrade (5)",
"[dungeon-D5-B3] Ice Palace - spike room": "Piece Of Heart",
"[dungeon-D5-B4] Ice Palace - above Blue Mail room": "One Rupee",
"[dungeon-D5-B5] Ice Palace - b5 up staircase": "Key",
"[dungeon-D5-B5] Ice Palace - big chest": "Fighters Shield",
"Heart Container - Kholdstare": "Quake"
},
"Misery Mire": {
"[dungeon-D6-B1] Misery Mire - big chest": "Nothing",
"[dungeon-D6-B1] Misery Mire - big hub room": "Big Key",
"[dungeon-D6-B1] Misery Mire - big key": "One Rupee",
"[dungeon-D6-B1] Misery Mire - compass": "Fifty Rupees",
"[dungeon-D6-B1] Misery Mire - end of bridge": "Key",
"[dungeon-D6-B1] Misery Mire - map room": "Key",
"[dungeon-D6-B1] Misery Mire - spike room": "Twenty Rupees",
"Heart Container - Vitreous": "Key"
},
"Turtle Rock": {
"[dungeon-D7-1F] Turtle Rock - Chain chomp room": "Key",
"[dungeon-D7-1F] Turtle Rock - compass room": "Key",
"[dungeon-D7-1F] Turtle Rock - Map room [left chest]": "Key",
"[dungeon-D7-1F] Turtle Rock - Map room [right chest]": "Fifty Rupees",
"[dungeon-D7-B1] Turtle Rock - big chest": "One Hundred Rupees",
"[dungeon-D7-B1] Turtle Rock - big key room": "Big Key",
"[dungeon-D7-B1] Turtle Rock - Roller switch room": "Nothing",
"[dungeon-D7-B2] Turtle Rock - Eye bridge room [bottom left chest]": "Twenty Rupees",
"[dungeon-D7-B2] Turtle Rock - Eye bridge room [bottom right chest]": "Key",
"[dungeon-D7-B2] Turtle Rock - Eye bridge room [top left chest]": "Piece Of Heart",
"[dungeon-D7-B2] Turtle Rock - Eye bridge room [top right chest]": "Three Bombs",
"Heart Container - Trinexx": "Three Bombs"
},
"Ganons Tower": {
"[dungeon-A2-1F] Ganon's Tower - down left staircase from entrance": "Key",
"[dungeon-A2-1F] Ganon's Tower - north of gap room [top left chest]": "Piece Of Heart",
"[dungeon-A2-1F] Ganon's Tower - north of gap room [top right chest]": "Three Bombs",
"[dungeon-A2-1F] Ganon's Tower - north of gap room [bottom left chest]": "Three Bombs",
"[dungeon-A2-1F] Ganon's Tower - north of gap room [bottom right chest]": "Twenty Rupees",
"[dungeon-A2-1F] Ganon's Tower - west of teleport room [top left chest]": "Key",
"[dungeon-A2-1F] Ganon's Tower - west of teleport room [top right chest]": "Ten Arrows",
"[dungeon-A2-1F] Ganon's Tower - west of teleport room [bottom left chest]": "Nothing",
"[dungeon-A2-1F] Ganon's Tower - west of teleport room [bottom right chest]": "Twenty Rupees",
"[dungeon-A2-1F] Ganon's Tower - north of teleport room": "Key",
"[dungeon-A2-1F] Ganon's Tower - map room": "Five Rupees",
"[dungeon-A2-1F] Ganon's Tower - big chest": "Twenty Rupees",
"[dungeon-A2-1F] Ganon's Tower - down right staircase from entrance [left chest]": "Nothing",
"[dungeon-A2-1F] Ganon's Tower - down right staircase from entrance [right chest]": "Twenty Rupees",
"[dungeon-A2-1F] Ganon's Tower - above Armos": "Piece Of Heart",
"[dungeon-A2-1F] Ganon's Tower - east of down right staircase from entrace": "Key",
"[dungeon-A2-1F] Ganon's Tower - compass room [top left chest]": "Blue Mail",
"[dungeon-A2-1F] Ganon's Tower - compass room [top right chest]": "Twenty Rupees",
"[dungeon-A2-1F] Ganon's Tower - compass room [bottom left chest]": "Piece Of Heart",
"[dungeon-A2-1F] Ganon's Tower - compass room [bottom right chest]": "Twenty Rupees",
"[dungeon-A2-B1] Ganon's Tower - north of Armos room [bottom chest]": "Nothing",
"[dungeon-A2-B1] Ganon's Tower - north of Armos room [left chest]": "Piece Of Heart",
"[dungeon-A2-B1] Ganon's Tower - north of Armos room [right chest]": "Big Key",
"[dungeon-A2-6F] Ganon's Tower - north of falling floor four torches [top left chest]": "Three Bombs",
"[dungeon-A2-6F] Ganon's Tower - north of falling floor four torches [top right chest]": "Heart Container (refill)",
"[dungeon-A2-6F] Ganon's Tower - before Moldorm": "Bomb Upgrade (5)",
"[dungeon-A2-6F] Ganon's Tower - Moldorm room": "Nothing"
},
"Pendants": {
"Eastern Palace Pendant": "Crystal 2",
"Desert Palace Pendant": "Crystal 4",
"Tower of Hera Pendant": "Crystal 7"
},
"Crystals": {
"Palace of Darkness Crystal": "Crystal 6",
"Swamp Palace Crystal": "Crystal 1",
"Skull Woods Crystal": "Pendant Of Wisdom",
"Thieves Town Crystal": "Crystal 3",
"Ice Palace Crystal": "Pendant Of Courage",
"Misery Mire Crystal": "Crystal 5",
"Turtle Rock Crystal": "Pendant Of Power"
},
"Swords": {
"Pyramid": "Tempered Sword",
"Blacksmiths": "Golden Sword",
"Altar": "Master Sword"
},
"Medallions": {
"Turtle Rock Medallion": "Ether",
"Misery Mire Medallion": "Bombos"
},
"Fountains": {
"Waterfall Bottle": "Bottle (Red Potion)",
"Pyramid Bottle": "Bottle (Blue Potion)"
},
"playthrough": {
"1": {
"Light World": {
"Uncle": "Fighters Sword",
"[cave-034] Hyrule Castle secret entrance": "Five Rupees",
"[cave-047] Dam": "Nothing",
"[cave-040] Link's House": "Mushroom",
"[cave-031] Tavern": "Flippers",
"[cave-026] chicken house": "Nothing",
"[cave-044] Aginah's cave": "Piece Of Heart",
"[cave-035] Sahasrahla's Hut [left chest]": "Piece Of Heart",
"[cave-035] Sahasrahla's Hut [center chest]": "Shovel",
"[cave-035] Sahasrahla's Hut [right chest]": "Piece Of Heart",
"[cave-021] Kakariko well [top chest]": "Ten Arrows",
"[cave-021] Kakariko well [left chest row of 3]": "Twenty Rupees",
"[cave-021] Kakariko well [center chest row of 3]": "Nothing",
"[cave-021] Kakariko well [right chest row of 3]": "Bomb Upgrade (5)",
"[cave-021] Kakariko well [bottom chest]": "Twenty Rupees",
"[cave-022-B1] Thief's hut [top chest]": "Twenty Rupees",
"[cave-022-B1] Thief's hut [top left chest]": "Twenty Rupees",
"[cave-022-B1] Thief's hut [top right chest]": "Bomb Upgrade (5)",
"[cave-022-B1] Thief's hut [bottom left chest]": "Twenty Rupees",
"[cave-022-B1] Thief's hut [bottom right chest]": "Twenty Rupees",
"[cave-050] cave southwest of Lake Hylia [bottom left chest]": "Three Bombs",
"[cave-050] cave southwest of Lake Hylia [top left chest]": "Piece Of Heart",
"[cave-050] cave southwest of Lake Hylia [top right chest]": "Bomb Upgrade (5)",
"[cave-050] cave southwest of Lake Hylia [bottom right chest]": "Nothing",
"[cave-051] Ice Cave": "Heart Container",
"Bottle Vendor": "Piece Of Heart",
"Piece of Heart (Thieves' Forest Hideout)": "Fifty Rupees",
"[cave-050] cave southwest of Lake Hylia - generous guy": "Piece Of Heart",
"Mushroom": "Heart Container",
"Piece of Heart (Maze Race)": "Piece Of Heart",
"Piece of Heart (Dam)": "Arrow Upgrade (5)"
},
"Hyrule Castle": {
"[dungeon-C-1F] Sanctuary": "Five Rupees",
"[dungeon-C-B1] Hyrule Castle - map room": "Nothing",
"[dungeon-C-B3] Hyrule Castle - next to Zelda": "Piece Of Heart"
},
"Eastern Palace": {
"[dungeon-L1-1F] Eastern Palace - compass room": "Three Bombs",
"[dungeon-L1-1F] Eastern Palace - big chest": "Twenty Rupees",
"[dungeon-L1-1F] Eastern Palace - big ball room": "Pegasus Boots",
"[dungeon-L1-1F] Eastern Palace - Big key": "Magical Boomerang"
}
},
"2": {
"Light World": {
"[cave-016] cave under rocks west of Santuary": "Hookshot",
"Hobo": "Twenty Rupees",
"King Zora": "Titans Mitt",
"Library": "Power Glove",
"Witch": "Cane Of Byrna",
"Piece of Heart (Zora's River)": "Boomerang",
"Haunted Grove item": "Flute"
}
},
"3": {
"Light World": {
"[cave-018] Graveyard - top right grave": "Nothing"
},
"Hyrule Castle": {
"[dungeon-C-B1] Escape - final basement room [left chest]": "Ten Arrows",
"[dungeon-C-B1] Escape - final basement room [middle chest]": "Three Bombs",
"[dungeon-C-B1] Escape - final basement room [right chest]": "Heart Container",
"[dungeon-C-B1] Escape - first B1 room": "Piece Of Heart"
},
"Death Mountain": {
"Old Mountain Man": "Book Of Mudora",
"Piece of Heart (Spectacle Rock Cave)": "Magic Cape",
"[cave-012-1F] Death Mountain - wall of caves - left cave": "Fire Rod",
"[cave-009-1F] Death Mountain - wall of caves - right cave [top left chest]": "Piece Of Heart",
"[cave-009-1F] Death Mountain - wall of caves - right cave [top left middle chest]": "Heart Container",
"[cave-009-1F] Death Mountain - wall of caves - right cave [top right middle chest]": "Bottle (Blue Potion)",
"[cave-009-1F] Death Mountain - wall of caves - right cave [top right chest]": "Magic Mirror",
"[cave-009-1F] Death Mountain - wall of caves - right cave [bottom chest]": "Mirror Shield",
"[cave-009-B1] Death Mountain - wall of caves - right cave [left chest]": "Bomb Upgrade (5)",
"[cave-009-B1] Death Mountain - wall of caves - right cave [right chest]": "Piece Of Heart"
}
},
"4": {
"Light World": {
"Sick Kid": "Three Bombs",
"Piece of Heart (Lumberjack Tree)": "Nothing",
"Piece of Heart (Desert - northeast corner)": "Piece Of Heart",
"Piece of Heart (Desert - west side)": "Heart Container"
},
"Desert Palace": {
"[dungeon-L2-B1] Desert Palace - Map room": "Hammer",
"[dungeon-L2-B1] Desert Palace - Big key room": "Fifty Rupees",
"[dungeon-L2-B1] Desert Palace - compass room": "Piece Of Heart",
"Heart Container - Lanmolas": "Nothing",
"Desert Palace Pendant": "Crystal 4"
},
"Death Mountain": {
"Piece of Heart (Spectacle Rock)": "Twenty Rupees"
},
"Tower Of Hera": {
"[dungeon-L3-2F] Tower of Hera - Entrance": "Nothing",
"[dungeon-L3-4F] Tower of Hera - 4F [small chest]": "Bow",
"[dungeon-L3-4F] Tower of Hera - big chest": "Magic Powder",
"Heart Container - Moldorm": "Moon Pearl",
"Tower of Hera Pendant": "Crystal 7"
},
"Dark World": {
"Piece of Heart (Pyramid)": "Nothing"
}
},
"5": {
"Light World": {
"Magic Bat": "Three Hundred Rupees",
"Purple Chest": "Nothing",
"Piece of Heart (south of Haunted Grove)": "Piece Of Heart",
"Piece of Heart (Graveyard)": "Twenty Rupees",
"Piece of Heart (Lake Hylia)": "Nothing"
},
"Eastern Palace": {
"Heart Container - Armos Knights": "Arrow Upgrade (5)",
"Eastern Palace Pendant": "Crystal 2"
},
"Death Mountain": {
"Piece of Heart (Death Mountain - floating island)": "Twenty Rupees"
},
"Dark World": {
"[cave-055] Spike cave": "Twenty Rupees",
"[cave-071] Misery Mire west area [left chest]": "Ten Arrows",
"[cave-071] Misery Mire west area [right chest]": "Three Hundred Rupees",
"[cave-057-1F] Dark World Death Mountain - cave from top to bottom [top chest]": "Bottle (Golden Bee)",
"[cave-057-1F] Dark World Death Mountain - cave from top to bottom [bottom chest]": "Half Magic",
"[cave-056] Dark World Death Mountain - cave under boulder [top right chest]": "Ether",
"[cave-056] Dark World Death Mountain - cave under boulder [top left chest]": "Heart Container",
"[cave-056] Dark World Death Mountain - cave under boulder [bottom left chest]": "Nothing",
"[cave-056] Dark World Death Mountain - cave under boulder [bottom right chest]": "Bombos",
"Catfish": "Bomb Upgrade (10)",
"[cave-063] doorless hut": "Nothing",
"[cave-062] C-shaped house": "Heart Container",
"Piece of Heart (Treasure Chest Game)": "Piece Of Heart",
"Piece of Heart (Dark World blacksmith pegs)": "Bomb Upgrade (5)",
"Piece of Heart (Dark World - bumper cave)": "Twenty Rupees",
"[cave-073] cave northeast of swamp palace [top chest]": "Fifty Rupees",
"[cave-073] cave northeast of swamp palace [top middle chest]": "Nothing",
"[cave-073] cave northeast of swamp palace [bottom middle chest]": "Twenty Rupees",
"[cave-073] cave northeast of swamp palace [bottom chest]": "Bottle (Golden Bee)",
"Flute Boy": "Arrow Upgrade (5)",
"[cave-073] cave northeast of swamp palace - generous guy": "Heart Container",
"Piece of Heart (Digging Game)": "Three Hundred Rupees"
},
"Dark Palace": {
"[dungeon-D1-B1] Dark Palace - turtle stalfos room": "Ice Rod",
"[dungeon-D1-1F] Dark Palace - statue push room": "Piece Of Heart"
},
"Swamp Palace": {
"[dungeon-D2-B1] Swamp Palace - big chest": "Arrow Upgrade (10)",
"[dungeon-D2-B1] Swamp Palace - big key room": "Five Rupees",
"[dungeon-D2-B1] Swamp Palace - map room": "Cane Of Somaria",
"[dungeon-D2-B1] Swamp Palace - south of hookshot room": "Piece Of Heart",
"[dungeon-D2-B2] Swamp Palace - flooded room [left chest]": "Arrow",
"[dungeon-D2-B2] Swamp Palace - flooded room [right chest]": "Piece Of Heart",
"[dungeon-D2-B2] Swamp Palace - hidden waterfall door room": "Heart Container",
"Heart Container - Arrghus": "Twenty Rupees",
"Swamp Palace Crystal": "Crystal 1"
},
"Skull Woods": {
"[dungeon-D3-B1] Skull Woods - Big Key room": "Twenty Rupees",
"[dungeon-D3-B1] Skull Woods - Entrance to part 2": "Bottle (Golden Bee)",
"[dungeon-D3-B1] Skull Woods - Gibdo/Stalfos room": "Fire Shield",
"Heart Container - Mothula": "Lamp",
"Skull Woods Crystal": "Pendant Of Wisdom"
},
"Thieves Town": {
"[dungeon-D4-1F] Thieves' Town - Room above boss": "Fifty Rupees",
"[dungeon-D4-B1] Thieves' Town - Bottom left of huge room [top left chest]": "Fifty Rupees",
"[dungeon-D4-B1] Thieves' Town - Bottom right of huge room": "Nothing",
"[dungeon-D4-B2] Thieves' Town - big chest": "Twenty Rupees",
"[dungeon-D4-B2] Thieves' Town - next to Blind": "Three Bombs",
"Heart Container - Blind": "Heart Container",
"Thieves Town Crystal": "Crystal 3"
},
"Ice Palace": {
"[dungeon-D5-B2] Ice Palace - map room": "Arrow Upgrade (5)",
"[dungeon-D5-B3] Ice Palace - spike room": "Piece Of Heart",
"[dungeon-D5-B4] Ice Palace - above Blue Mail room": "One Rupee",
"[dungeon-D5-B5] Ice Palace - big chest": "Fighters Shield",
"Heart Container - Kholdstare": "Quake",
"Ice Palace Crystal": "Pendant Of Courage"
},
"Swords": {
"Blacksmiths": "Golden Sword"
}
},
"6": {
"Light World": {
"Sahasrahla": "Twenty Rupees",
"Bombos Tablet": "Nothing"
},
"Death Mountain": {
"Ether Tablet": "Bug Catching Net",
"[cave-013] Mimic cave (from Turtle Rock)": "Arrow Upgrade (5)"
},
"Dark Palace": {
"[dungeon-D1-1F] Dark Palace - big chest": "Arrow Upgrade (5)",
"[dungeon-D1-1F] Dark Palace - spike statue room": "Red Mail",
"[dungeon-D1-1F] Dark Palace - maze room [top chest]": "Three Hundred Rupees",
"[dungeon-D1-1F] Dark Palace - maze room [bottom chest]": "Twenty Rupees",
"Heart Container - Helmasaur King": "Twenty Rupees",
"Palace of Darkness Crystal": "Crystal 6"
},
"Misery Mire": {
"[dungeon-D6-B1] Misery Mire - big chest": "Nothing",
"[dungeon-D6-B1] Misery Mire - big key": "One Rupee",
"[dungeon-D6-B1] Misery Mire - compass": "Fifty Rupees",
"[dungeon-D6-B1] Misery Mire - spike room": "Twenty Rupees",
"Misery Mire Crystal": "Crystal 5"
},
"Turtle Rock": {
"[dungeon-D7-1F] Turtle Rock - Map room [right chest]": "Fifty Rupees",
"[dungeon-D7-B1] Turtle Rock - big chest": "One Hundred Rupees",
"[dungeon-D7-B1] Turtle Rock - Roller switch room": "Nothing",
"[dungeon-D7-B2] Turtle Rock - Eye bridge room [bottom left chest]": "Twenty Rupees",
"[dungeon-D7-B2] Turtle Rock - Eye bridge room [top left chest]": "Piece Of Heart",
"[dungeon-D7-B2] Turtle Rock - Eye bridge room [top right chest]": "Three Bombs",
"Heart Container - Trinexx": "Three Bombs",
"Turtle Rock Crystal": "Pendant Of Power"
}
},
"7": {
"Ganons Tower": {
"[dungeon-A2-1F] Ganon's Tower - north of gap room [top left chest]": "Piece Of Heart",
"[dungeon-A2-1F] Ganon's Tower - north of gap room [top right chest]": "Three Bombs",
"[dungeon-A2-1F] Ganon's Tower - north of gap room [bottom left chest]": "Three Bombs",
"[dungeon-A2-1F] Ganon's Tower - north of gap room [bottom right chest]": "Twenty Rupees",
"[dungeon-A2-1F] Ganon's Tower - west of teleport room [top right chest]": "Ten Arrows",
"[dungeon-A2-1F] Ganon's Tower - west of teleport room [bottom left chest]": "Nothing",
"[dungeon-A2-1F] Ganon's Tower - west of teleport room [bottom right chest]": "Twenty Rupees",
"[dungeon-A2-1F] Ganon's Tower - map room": "Five Rupees",
"[dungeon-A2-1F] Ganon's Tower - big chest": "Twenty Rupees",
"[dungeon-A2-1F] Ganon's Tower - down right staircase from entrance [left chest]": "Nothing",
"[dungeon-A2-1F] Ganon's Tower - down right staircase from entrance [right chest]": "Twenty Rupees",
"[dungeon-A2-1F] Ganon's Tower - above Armos": "Piece Of Heart",
"[dungeon-A2-1F] Ganon's Tower - compass room [top left chest]": "Blue Mail",
"[dungeon-A2-1F] Ganon's Tower - compass room [top right chest]": "Twenty Rupees",
"[dungeon-A2-1F] Ganon's Tower - compass room [bottom left chest]": "Piece Of Heart",
"[dungeon-A2-1F] Ganon's Tower - compass room [bottom right chest]": "Twenty Rupees",
"[dungeon-A2-B1] Ganon's Tower - north of Armos room [bottom chest]": "Nothing",
"[dungeon-A2-B1] Ganon's Tower - north of Armos room [left chest]": "Piece Of Heart",
"[dungeon-A2-6F] Ganon's Tower - north of falling floor four torches [top left chest]": "Three Bombs",
"[dungeon-A2-6F] Ganon's Tower - north of falling floor four torches [top right chest]": "Heart Container (refill)",
"[dungeon-A2-6F] Ganon's Tower - before Moldorm": "Bomb Upgrade (5)",
"[dungeon-A2-6F] Ganon's Tower - Moldorm room": "Nothing"
},
"Swords": {
"Pyramid": "Tempered Sword",
"Altar": "Master Sword"
}
},
"longest_item_chain": 7,
"regions_visited": 29
},
"meta": {
"rules": "custom",
"logic": "web-15",
"seed": 9201977,
"build": "2017-02-14",
"mode": "No Major Glitches"
}
}

Eastern Palace problem/No Bow

Seed: 379039546
Logic: No Glitches
Rules: Normal
Game Mode: Standard

Description of Problem: I'm unable to get through the Eastern Palace; I get to the room before the boss and cannot progress any further because there is a red Eyegore in the room, which are invulnerable to all weapons apart from arrows. I've found plenty of arrows so far, but no bow. According to the spoiler, the bow is all the way at the Pyramid where the heart piece would normally be.

Spoiler (if available):
ALttP - VT_no-glitches-18_normal-standard_379039546.txt

Smaller upgrades

OK, this is a pretty petty request, but since you've implemented totally new +5 and +10 upgrade "items," this should be easy.

+5 and especially +10 are kind of overkill, especially for bombs. It's pretty rare that even 10 bombs aren't enough for even a pretty casual player; 15 or 20 are excessive, let alone 50. Arrows are at least a moderately useful weapon, but still, who uses up 50 arrows? So how about smaller upgrades? +2 is still enough to be helpful, and makes it so that if you find more than one or two, it's not pointless. Even +1 wouldn't be a horrible find.

Progressive shield upgrades and buying shields

Seed: 111373207
Difficulty: Normal
Logic: No Glitches
Mode: Standard

Description of Problem:
After killing the Helmasaur King it drops a shield upgrade. Before beating the boss and picking up the upgrade I first bought the small shield in the light world and then the fire shield in the dark world. Picking up the shield upgrade did nothing as I still had the fire shield.

Later on in Ganon's Tower I found the fire shield upgrade which obviously didn't do a single thing. My shield remained the fire shield.

I found another shield upgrade in Ganon's Tower which then finally upgraded my shield to the mirror shield.

I thought it was a bug, but it isn't. it is just a kind of weird design decision, that being able to buy shields conflicts with the progressive upgrade system. Yet it wont downgrade the shields, but the 'non-working' upgrades made me think it was a bug.

Spoiler (if available):

{
    "[dungeon-D1-1F] Dark Palace - big key room": "Key",
    "[dungeon-D1-1F] Dark Palace - jump room [right chest]": "Key",
    "[dungeon-D1-1F] Dark Palace - jump room [left chest]": "Piece Of Heart",
    "[dungeon-D1-1F] Dark Palace - big chest": "Twenty Rupees",
    "[dungeon-D1-1F] Dark Palace - compass room": "Twenty Rupees",
    "[dungeon-D1-1F] Dark Palace - spike statue room": "Key",
    "[dungeon-D1-B1] Dark Palace - turtle stalfos room": "Key",
    "[dungeon-D1-B1] Dark Palace - room leading to Helmasaur [left chest]": "Dungeon Map",
    "[dungeon-D1-B1] Dark Palace - room leading to Helmasaur [right chest]": "Twenty Rupees",
    "[dungeon-D1-1F] Dark Palace - statue push room": "Key",
    "[dungeon-D1-1F] Dark Palace - maze room [top chest]": "Compass",
    "[dungeon-D1-1F] Dark Palace - maze room [bottom chest]": "Big Key",
    "[dungeon-D1-B1] Dark Palace - shooter room": "Key",
    "Heart Container - Helmasaur King": "Progressive Shield"
}
{
    "[dungeon-A2-1F] Ganon's Tower - down left staircase from entrance": "Bomb Upgrade (5)",
    "[dungeon-A2-1F] Ganon's Tower - north of gap room [top left chest]": "Progressive Shield",
    "[dungeon-A2-1F] Ganon's Tower - north of gap room [top right chest]": "Three Hundred Rupees",
    "[dungeon-A2-1F] Ganon's Tower - north of gap room [bottom left chest]": "Arrow Upgrade (5)",
    "[dungeon-A2-1F] Ganon's Tower - north of gap room [bottom right chest]": "Heart Container",
    "[dungeon-A2-1F] Ganon's Tower - west of teleport room [top left chest]": "Heart Container",
    "[dungeon-A2-1F] Ganon's Tower - west of teleport room [top right chest]": "Compass",
    "[dungeon-A2-1F] Ganon's Tower - west of teleport room [bottom left chest]": "Big Key",
    "[dungeon-A2-1F] Ganon's Tower - west of teleport room [bottom right chest]": "Five Rupees",
    "[dungeon-A2-1F] Ganon's Tower - north of teleport room": "Key",
    "[dungeon-A2-1F] Ganon's Tower - map room": "Three Hundred Rupees",
    "[dungeon-A2-1F] Ganon's Tower - big chest": "Bottle",
    "[dungeon-A2-1F] Ganon's Tower - down right staircase from entrance [left chest]": "Key",
    "[dungeon-A2-1F] Ganon's Tower - down right staircase from entrance [right chest]": "Piece Of Heart",
    "[dungeon-A2-1F] Ganon's Tower - above Armos": "One Rupee",
    "[dungeon-A2-1F] Ganon's Tower - east of down right staircase from entrance": "Key",
    "[dungeon-A2-1F] Ganon's Tower - compass room [top left chest]": "Heart Container",
    "[dungeon-A2-1F] Ganon's Tower - compass room [top right chest]": "Bug Catching Net",
    "[dungeon-A2-1F] Ganon's Tower - compass room [bottom left chest]": "Twenty Rupees",
    "[dungeon-A2-1F] Ganon's Tower - compass room [bottom right chest]": "Piece Of Heart",
    "[dungeon-A2-B1] Ganon's Tower - north of Armos room [bottom chest]": "Progressive Shield",
    "[dungeon-A2-B1] Ganon's Tower - north of Armos room [left chest]": "Bottle (Golden Bee)",
    "[dungeon-A2-B1] Ganon's Tower - north of Armos room [right chest]": "Arrow Upgrade (5)",
    "[dungeon-A2-6F] Ganon's Tower - north of falling floor four torches [top left chest]": "Key",
    "[dungeon-A2-6F] Ganon's Tower - north of falling floor four torches [top right chest]": "Piece Of Heart",
    "[dungeon-A2-6F] Ganon's Tower - before Moldorm": "Heart Container",
    "[dungeon-A2-6F] Ganon's Tower - Moldorm room": "Dungeon Map"
}

Issue with a seed.

Seed: 151751690
Difficulty: normal
Logic: no glitches
Mode: open

Description of Problem:
The moon pearl in this seed is located in "[dungeon-C-B1] Escape - final basement room [middle chest]": "Moon Pearl", the key however is located next to it "[dungeon-C-B1] Escape - final basement room [left chest]": "Key". This isn't a complete problem, if you know about this ahead of time you can get one of the keys off an enemy on the way to zelda, then head to the escape, bomb the wall and get the moon pearl and key, then go back. But, without knowing that most likely a player will go through the whole of the hyrule castle to 'rescue zelda' use all the keys the knights drop to open the doors on the way to her, and have no way to open the locked door in the escape, since the key is 'suppose' to be in the chest on B1 for the locked door there.

I don't know much about how this works, but maybe that one chest's key should be static in 'open' mode, always there to make sure the player can get through the escape?

Spoiler (if available):
"[dungeon-C-1F] Sanctuary": "Dungeon Map",
"[dungeon-C-B1] Escape - final basement room [left chest]": "Key",
"[dungeon-C-B1] Escape - final basement room [middle chest]": "Moon Pearl",
"[dungeon-C-B1] Escape - final basement room [right chest]": "Heart Container",
"[dungeon-C-B1] Escape - first B1 room": "Bottle (Golden Bee)",
"[dungeon-C-B1] Hyrule Castle - boomerang room": "Hookshot",
"[dungeon-C-B1] Hyrule Castle - map room": "Piece Of Heart",
"[dungeon-C-B3] Hyrule Castle - next to Zelda": "Piece Of Heart"

Red Cane on Ganon's Tower?

Seed: 8916610
Logic: no-glitches-18
Rules: Glitchless
Game Mode: standard

Description of Problem: This seed was supposed to be completely glitchless (No bomb jumping), but as we were going further into the seed race, we found out that there was no place where the red cane was, at that point I realized that the only way to do Ice Palace which was required would be by Bomb Jumping, so things got pretty heated up once i did it because it was glitchless but there was no way to do it, so i went into Ganon's tower just to encounter that the Cane of Somaria was there. How is it possible to have this kind of ''dead'' seed on a race?, I would suggest a fix for Red cane and also to bosses dropping small keys on key-based dungeons like Ice Palace or Misery Mire.

Spoiler (if available):"[dungeon-A2-1F] Ganon's Tower - down left staircase from entrance": "Twenty Rupees",
"[dungeon-A2-1F] Ganon's Tower - north of gap room [top left chest]": "Magic Cape",
"[dungeon-A2-1F] Ganon's Tower - north of gap room [top right chest]": "Key",
"[dungeon-A2-1F] Ganon's Tower - north of gap room [bottom left chest]": "Twenty Rupees",
"[dungeon-A2-1F] Ganon's Tower - north of gap room [bottom right chest]": "Heart Container",
"[dungeon-A2-1F] Ganon's Tower - west of teleport room [top left chest]": "Piece Of Heart",
"[dungeon-A2-1F] Ganon's Tower - west of teleport room [top right chest]": "Three Bombs",
"[dungeon-A2-1F] Ganon's Tower - west of teleport room [bottom left chest]": "Twenty Rupees",
"[dungeon-A2-1F] Ganon's Tower - west of teleport room [bottom right chest]": "Cane Of Somaria",???
"[dungeon-A2-1F] Ganon's Tower - north of teleport room": "Three Hundred Rupees",
"[dungeon-A2-1F] Ganon's Tower - map room": "Ten Arrows",
"[dungeon-A2-1F] Ganon's Tower - big chest": "Twenty Rupees",
"[dungeon-A2-1F] Ganon's Tower - down right staircase from entrance [left chest]": "Twenty Rupees",
"[dungeon-A2-1F] Ganon's Tower - down right staircase from entrance [right chest]": "Magic Powder",
"[dungeon-A2-1F] Ganon's Tower - above Armos": "Five Rupees",
"[dungeon-A2-1F] Ganon's Tower - east of down right staircase from entrace": "Key",
"[dungeon-A2-1F] Ganon's Tower - compass room [top left chest]": "Twenty Rupees",
"[dungeon-A2-1F] Ganon's Tower - compass room [top right chest]": "Three Bombs",
"[dungeon-A2-1F] Ganon's Tower - compass room [bottom left chest]": "Dungeon Map",
"[dungeon-A2-1F] Ganon's Tower - compass room [bottom right chest]": "Twenty Rupees",
"[dungeon-A2-B1] Ganon's Tower - north of Armos room [bottom chest]": "Key",
"[dungeon-A2-B1] Ganon's Tower - north of Armos room [left chest]": "Big Key",
"[dungeon-A2-B1] Ganon's Tower - north of Armos room [right chest]": "Fifty Rupees",
"[dungeon-A2-6F] Ganon's Tower - north of falling floor four torches [top left chest]": "Key",
"[dungeon-A2-6F] Ganon's Tower - north of falling floor four torches [top right chest]": "Ether",
"[dungeon-A2-6F] Ganon's Tower - before Moldorm": "Twenty Rupees",
"[dungeon-A2-6F] Ganon's Tower - Moldorm room": "Compass"

Softlock - Cant complete dungeon

Seed: 197543630
Logic: web-14
Rules: v8
Mode: No Major Glitches

Description of Problem: Skull Woods - Boss has "Big Key" to open chest which has a "Key" to open the door in the 3rd area (after you burn the skull open it).
I could have passed it if I didn't use a key on the door the "troll door with nothing in it" (Has disappearing floor in it)

{
"[dungeon-D3-B1] Skull Woods - big chest": "Key",
"[dungeon-D3-B1] Skull Woods - Big Key room": "Dungeon Map",
"[dungeon-D3-B1] Skull Woods - Compass room": "Key",
"[dungeon-D3-B1] Skull Woods - east of Fire Rod room": "Bombos",
"[dungeon-D3-B1] Skull Woods - Entrance to part 2": "Compass",
"[dungeon-D3-B1] Skull Woods - Gibdo/Stalfos room": "Five Rupees",
"[dungeon-D3-B1] Skull Woods - south of Fire Rod room": "Key",
"Heart Container - Mothula": "Big Key"
}

Spoiler (if available): http://puu.sh/tTJ6k/ae712c4e4e.txt

Progressive Gloves not being recieved

Seed: 569227041
Logic:No glitch
Rules: Normal difficulty
Game Mode: Standard

Description of Problem: Progressive gloves from Hobo and Generous guy would come up as a blank item and I would not receive a glove

Spoiler (if available):[cave-050] cave southwest of Lake Hylia - generous guy": "Progressive Glove", "Hobo": "Progressive Glove", Cave is with the guy and 4 chests

seed 989819554 unbeatable

Seed: 989819554
Logic: major-glitches-19
Rules: ??? (if you want difficulty it's masochist)
Game Mode: open

Description of Problem:
The game is unbeatable the way it's generated, to continue further a sword is required - not that it matters even if I did get a sword I can't get the magic mirror, I can't get the hammer, I can't get the book of mudora and I can't get the ocarina/flute.

Possible routes:

  1. To get the sword I need the flippers, to get the flippers I need the magic mirror, to get the mirror I need to enter ganon's tower
  2. To get the sword I need fake flippers glitch, to do fake flippers glitch I need sword... (by means of slash buffering a direction change)
  3. To get the sword I need to enter desert temple, to do that I need the book of mudora, to get the book of mudora I need the magic mirror...
  4. To get the sword I need to enter the desert temple, to do that I need the ocarina and power glove, to get the ocarina I need to enter the desert temple...

QED it's impossible to progress unless there's some fancy glitch I don't know of, I can't use any of the other teleportation tiles either since I don't have the hammer or titan's mitt and all the ones I can think of require hammer and/or mitt to access

Spoiler (if available):

{
"Light World": {
"Altar": "Arrow",
"Uncle": "Piece Of Heart",
"[cave-034] Hyrule Castle secret entrance": "Bomb",
"[cave-018] Graveyard - top right grave": "Nothing",
"[cave-047] Dam": "Rupoor",
"[cave-040] Link's House": "Nothing",
"[cave-031] Tavern": "Five Rupees",
"[cave-026] chicken house": "Rupoor",
"[cave-044] Aginah's cave": "Bottle (Bee)",
"[cave-035] Sahasrahla's Hut [left chest]": "Progressive Glove",
"[cave-035] Sahasrahla's Hut [center chest]": "Nothing",
"[cave-035] Sahasrahla's Hut [right chest]": "Five Rupees",
"[cave-021] Kakariko well [top chest]": "Nothing",
"[cave-021] Kakariko well [left chest row of 3]": "Nothing",
"[cave-021] Kakariko well [center chest row of 3]": "One Rupee",
"[cave-021] Kakariko well [right chest row of 3]": "Nothing",
"[cave-021] Kakariko well [bottom chest]": "Twenty Rupees",
"[cave-022-B1] Thief's hut [top chest]": "Fifty Rupees",
"[cave-022-B1] Thief's hut [top left chest]": "One Rupee",
"[cave-022-B1] Thief's hut [top right chest]": "Shovel",
"[cave-022-B1] Thief's hut [bottom left chest]": "Nothing",
"[cave-022-B1] Thief's hut [bottom right chest]": "Piece Of Heart",
"Blacksmiths": "Rupoor",
"[cave-016] cave under rocks west of Santuary": "Ice Rod",
"[cave-050] cave southwest of Lake Hylia [bottom left chest]": "Nothing",
"[cave-050] cave southwest of Lake Hylia [top left chest]": "Five Rupees",
"[cave-050] cave southwest of Lake Hylia [top right chest]": "Magic Cape",
"[cave-050] cave southwest of Lake Hylia [bottom right chest]": "One Rupee",
"[cave-051] Ice Cave": "Piece Of Heart",
"Bottle Vendor": "Nothing",
"Sahasrahla": "Five Rupees",
"Magic Bat": "One Hundred Rupees",
"Sick Kid": "Piece Of Heart",
"Purple Chest": "Arrow",
"Hobo": "Nothing",
"Bombos Tablet": "Nothing",
"King Zora": "Five Rupees",
"Piece of Heart (Thieves' Forest Hideout)": "Rupoor",
"Piece of Heart (Lumberjack Tree)": "Nothing",
"Piece of Heart (south of Haunted Grove)": "Nothing",
"Piece of Heart (Graveyard)": "Rupoor",
"Piece of Heart (Desert - northeast corner)": "Nothing",
"[cave-050] cave southwest of Lake Hylia - generous guy": "Bomb",
"Library": "Twenty Rupees",
"Mushroom": "Bomb",
"Witch": "Piece Of Heart",
"Piece of Heart (Maze Race)": "Bottle (Bee)",
"Piece of Heart (Desert - west side)": "Flute",
"Piece of Heart (Lake Hylia)": "Nothing",
"Piece of Heart (Dam)": "Rupoor",
"Piece of Heart (Zora's River)": "Progressive Sword",
"Haunted Grove item": "Rupoor"
},
"Escape": {
"[dungeon-C-1F] Sanctuary": "Pegasus Boots",
"[dungeon-C-B1] Escape - final basement room [left chest]": "Five Rupees",
"[dungeon-C-B1] Escape - final basement room [middle chest]": "Moon Pearl",
"[dungeon-C-B1] Escape - final basement room [right chest]": "Nothing",
"[dungeon-C-B1] Escape - first B1 room": "Nothing",
"[dungeon-C-B1] Hyrule Castle - boomerang room": "Bomb",
"[dungeon-C-B1] Hyrule Castle - map room": "Hookshot",
"[dungeon-C-B3] Hyrule Castle - next to Zelda": "Bombos"
},
"Eastern Palace": {
"[dungeon-L1-1F] Eastern Palace - compass room": "Big Key",
"[dungeon-L1-1F] Eastern Palace - big chest": "Lamp",
"[dungeon-L1-1F] Eastern Palace - big ball room": "Nothing",
"[dungeon-L1-1F] Eastern Palace - Big key": "One Rupee",
"[dungeon-L1-1F] Eastern Palace - map room": "Five Rupees",
"Heart Container - Armos Knights": "Magic Powder"
},
"Desert Palace": {
"[dungeon-L2-B1] Desert Palace - big chest": "Key",
"[dungeon-L2-B1] Desert Palace - Map room": "Rupoor",
"[dungeon-L2-B1] Desert Palace - Small key room": "Big Key",
"[dungeon-L2-B1] Desert Palace - Big key room": "Five Rupees",
"[dungeon-L2-B1] Desert Palace - compass room": "Five Rupees",
"Heart Container - Lanmolas": "Progressive Sword"
},
"Death Mountain": {
"Ether Tablet": "Ether",
"Old Mountain Man": "Nothing",
"Piece of Heart (Spectacle Rock Cave)": "Nothing",
"Piece of Heart (Spectacle Rock)": "Nothing"
},
"East Death Mountain": {
"[cave-012-1F] Death Mountain - wall of caves - left cave": "Bottle (Bee)",
"[cave-013] Mimic cave (from Turtle Rock)": "Bomb",
"[cave-009-1F] Death Mountain - wall of caves - right cave [top left chest]": "Rupoor",
"[cave-009-1F] Death Mountain - wall of caves - right cave [top left middle chest]": "Arrow",
"[cave-009-1F] Death Mountain - wall of caves - right cave [top right middle chest]": "Nothing",
"[cave-009-1F] Death Mountain - wall of caves - right cave [top right chest]": "Bow",
"[cave-009-1F] Death Mountain - wall of caves - right cave [bottom chest]": "Rupoor",
"[cave-009-B1] Death Mountain - wall of caves - right cave [left chest]": "Five Rupees",
"[cave-009-B1] Death Mountain - wall of caves - right cave [right chest]": "Nothing",
"Piece of Heart (Death Mountain - floating island)": "Twenty Rupees"
},
"Tower of Hera": {
"[dungeon-L3-1F] Tower of Hera - first floor": "Flippers",
"[dungeon-L3-1F] Tower of Hera - freestanding key": "Nothing",
"[dungeon-L3-2F] Tower of Hera - Entrance": "Five Rupees",
"[dungeon-L3-4F] Tower of Hera - 4F [small chest]": "Big Key",
"[dungeon-L3-4F] Tower of Hera - big chest": "Key",
"Heart Container - Moldorm": "Nothing"
},
"Hyrule Castle Tower": {
"[dungeon-A1-2F] Hyrule Castle Tower - 2 knife guys room": "Key",
"[dungeon-A1-3F] Hyrule Castle Tower - maze room": "Key"
},
"Dark World": {
"[cave-055] Spike cave": "Rupoor",
"[cave-071] Misery Mire west area [left chest]": "Twenty Rupees",
"[cave-071] Misery Mire west area [right chest]": "Piece Of Heart",
"[cave-057-1F] Dark World Death Mountain - cave from top to bottom [top chest]": "Nothing",
"[cave-057-1F] Dark World Death Mountain - cave from top to bottom [bottom chest]": "Five Rupees",
"[cave-056] Dark World Death Mountain - cave under boulder [top right chest]": "Five Rupees",
"[cave-056] Dark World Death Mountain - cave under boulder [top left chest]": "Five Rupees",
"[cave-056] Dark World Death Mountain - cave under boulder [bottom left chest]": "Nothing",
"[cave-056] Dark World Death Mountain - cave under boulder [bottom right chest]": "Five Rupees"
},
"North East Dark World": {
"Catfish": "Piece Of Heart",
"Piece of Heart (Pyramid)": "Book Of Mudora",
"Pyramid - Sword": "Fighters Sword",
"Pyramid - Bow": "Bow And Arrows",
"Pyramid Fairy - Left": "Nothing",
"Pyramid Fairy - Right": "Fire Rod"
},
"North West Dark World": {
"[cave-063] doorless hut": "Arrow",
"[cave-062] C-shaped house": "Piece Of Heart",
"Piece of Heart (Treasure Chest Game)": "Hammer",
"Piece of Heart (Dark World blacksmith pegs)": "Arrow",
"Piece of Heart (Dark World - bumper cave)": "Five Rupees"
},
"South Dark World": {
"[cave-073] cave northeast of swamp palace [top chest]": "Arrow",
"[cave-073] cave northeast of swamp palace [top middle chest]": "Nothing",
"[cave-073] cave northeast of swamp palace [bottom middle chest]": "Piece Of Heart",
"[cave-073] cave northeast of swamp palace [bottom chest]": "Rupoor",
"Flute Boy": "Five Rupees",
"[cave-073] cave northeast of swamp palace - generous guy": "Ten Arrows",
"Piece of Heart (Digging Game)": "Cane Of Somaria"
},
"Palace of Darkness": {
"[dungeon-D1-1F] Dark Palace - big key room": "Nothing",
"[dungeon-D1-1F] Dark Palace - jump room [right chest]": "Key",
"[dungeon-D1-1F] Dark Palace - jump room [left chest]": "Big Key",
"[dungeon-D1-1F] Dark Palace - big chest": "Key",
"[dungeon-D1-1F] Dark Palace - compass room": "Nothing",
"[dungeon-D1-1F] Dark Palace - spike statue room": "Piece Of Heart",
"[dungeon-D1-B1] Dark Palace - turtle stalfos room": "Key",
"[dungeon-D1-B1] Dark Palace - room leading to Helmasaur [left chest]": "Nothing",
"[dungeon-D1-B1] Dark Palace - room leading to Helmasaur [right chest]": "Key",
"[dungeon-D1-1F] Dark Palace - statue push room": "Key",
"[dungeon-D1-1F] Dark Palace - maze room [top chest]": "Five Rupees",
"[dungeon-D1-1F] Dark Palace - maze room [bottom chest]": "Nothing",
"[dungeon-D1-B1] Dark Palace - shooter room": "Five Rupees",
"Heart Container - Helmasaur King": "Key"
},
"Swamp Palace": {
"[dungeon-D2-1F] Swamp Palace - first room": "Bomb",
"[dungeon-D2-B1] Swamp Palace - big chest": "Rupoor",
"[dungeon-D2-B1] Swamp Palace - big key room": "Nothing",
"[dungeon-D2-B1] Swamp Palace - map room": "Nothing",
"[dungeon-D2-B1] Swamp Palace - push 4 blocks room": "Nothing",
"[dungeon-D2-B1] Swamp Palace - south of hookshot room": "Rupoor",
"[dungeon-D2-B2] Swamp Palace - flooded room [left chest]": "Bomb",
"[dungeon-D2-B2] Swamp Palace - flooded room [right chest]": "Big Key",
"[dungeon-D2-B2] Swamp Palace - hidden waterfall door room": "Key",
"Heart Container - Arrghus": "Arrow"
},
"Skull Woods": {
"[dungeon-D3-B1] Skull Woods - big chest": "Rupoor",
"[dungeon-D3-B1] Skull Woods - Big Key room": "Key",
"[dungeon-D3-B1] Skull Woods - Compass room": "Rupoor",
"[dungeon-D3-B1] Skull Woods - east of Fire Rod room": "Key",
"[dungeon-D3-B1] Skull Woods - Entrance to part 2": "Big Key",
"[dungeon-D3-B1] Skull Woods - Gibdo/Stalfos room": "Nothing",
"[dungeon-D3-B1] Skull Woods - south of Fire Rod room": "Key",
"Heart Container - Mothula": "Piece Of Heart"
},
"Thieves Town": {
"[dungeon-D4-1F] Thieves' Town - Room above boss": "Nothing",
"[dungeon-D4-B1] Thieves' Town - Bottom left of huge room [bottom right chest]": "Bomb",
"[dungeon-D4-B1] Thieves' Town - Bottom left of huge room [top left chest]": "Key",
"[dungeon-D4-B1] Thieves' Town - Bottom right of huge room": "Big Key",
"[dungeon-D4-B1] Thieves' Town - Top left of huge room": "Progressive Glove",
"[dungeon-D4-B2] Thieves' Town - big chest": "Nothing",
"[dungeon-D4-B2] Thieves' Town - next to Blind": "Quake",
"Heart Container - Blind": "Piece Of Heart"
},
"Ice Palace": {
"[dungeon-D5-B1] Ice Palace - Big Key room": "Arrow",
"[dungeon-D5-B1] Ice Palace - compass room": "Five Rupees",
"[dungeon-D5-B2] Ice Palace - map room": "Key",
"[dungeon-D5-B3] Ice Palace - spike room": "Big Key",
"[dungeon-D5-B4] Ice Palace - above Blue Mail room": "Key",
"[dungeon-D5-B5] Ice Palace - b5 up staircase": "Fifty Rupees",
"[dungeon-D5-B5] Ice Palace - big chest": "Nothing",
"Heart Container - Kholdstare": "Arrow"
},
"Misery Mire": {
"[dungeon-D6-B1] Misery Mire - big chest": "Twenty Rupees",
"[dungeon-D6-B1] Misery Mire - big hub room": "Nothing",
"[dungeon-D6-B1] Misery Mire - big key": "Rupoor",
"[dungeon-D6-B1] Misery Mire - compass": "Key",
"[dungeon-D6-B1] Misery Mire - end of bridge": "Big Key",
"[dungeon-D6-B1] Misery Mire - map room": "Five Rupees",
"[dungeon-D6-B1] Misery Mire - spike room": "Key",
"Heart Container - Vitreous": "Key"
},
"Turtle Rock": {
"[dungeon-D7-1F] Turtle Rock - Chain chomp room": "Key",
"[dungeon-D7-1F] Turtle Rock - compass room": "Nothing",
"[dungeon-D7-1F] Turtle Rock - Map room [left chest]": "Three Bombs",
"[dungeon-D7-1F] Turtle Rock - Map room [right chest]": "Key",
"[dungeon-D7-B1] Turtle Rock - big chest": "Nothing",
"[dungeon-D7-B1] Turtle Rock - big key room": "Mushroom",
"[dungeon-D7-B1] Turtle Rock - Roller switch room": "Key",
"[dungeon-D7-B2] Turtle Rock - Eye bridge room [bottom left chest]": "Big Key",
"[dungeon-D7-B2] Turtle Rock - Eye bridge room [bottom right chest]": "Key",
"[dungeon-D7-B2] Turtle Rock - Eye bridge room [top left chest]": "Nothing",
"[dungeon-D7-B2] Turtle Rock - Eye bridge room [top right chest]": "Nothing",
"Heart Container - Trinexx": "Nothing"
},
"Ganons Tower": {
"[dungeon-A2-1F] Ganon's Tower - down left staircase from entrance": "Five Rupees",
"[dungeon-A2-1F] Ganon's Tower - north of gap room [top left chest]": "Arrow",
"[dungeon-A2-1F] Ganon's Tower - north of gap room [top right chest]": "Five Rupees",
"[dungeon-A2-1F] Ganon's Tower - north of gap room [bottom left chest]": "Key",
"[dungeon-A2-1F] Ganon's Tower - north of gap room [bottom right chest]": "Key",
"[dungeon-A2-1F] Ganon's Tower - west of teleport room [top left chest]": "Key",
"[dungeon-A2-1F] Ganon's Tower - west of teleport room [top right chest]": "Nothing",
"[dungeon-A2-1F] Ganon's Tower - west of teleport room [bottom left chest]": "Bomb",
"[dungeon-A2-1F] Ganon's Tower - west of teleport room [bottom right chest]": "Fifty Rupees",
"[dungeon-A2-1F] Ganon's Tower - north of teleport room": "Rupoor",
"[dungeon-A2-1F] Ganon's Tower - map room": "Bottle (Bee)",
"[dungeon-A2-1F] Ganon's Tower - big chest": "Nothing",
"[dungeon-A2-1F] Ganon's Tower - down right staircase from entrance [left chest]": "Nothing",
"[dungeon-A2-1F] Ganon's Tower - down right staircase from entrance [right chest]": "Nothing",
"[dungeon-A2-1F] Ganon's Tower - above Armos": "Big Key",
"[dungeon-A2-1F] Ganon's Tower - east of down right staircase from entrance": "Key",
"[dungeon-A2-1F] Ganon's Tower - compass room [top left chest]": "Five Rupees",
"[dungeon-A2-1F] Ganon's Tower - compass room [top right chest]": "One Rupee",
"[dungeon-A2-1F] Ganon's Tower - compass room [bottom left chest]": "Rupoor",
"[dungeon-A2-1F] Ganon's Tower - compass room [bottom right chest]": "Rupoor",
"[dungeon-A2-B1] Ganon's Tower - north of Armos room [bottom chest]": "Nothing",
"[dungeon-A2-B1] Ganon's Tower - north of Armos room [left chest]": "Magic Mirror",
"[dungeon-A2-B1] Ganon's Tower - north of Armos room [right chest]": "Five Rupees",
"[dungeon-A2-6F] Ganon's Tower - north of falling floor four torches [top left chest]": "Nothing",
"[dungeon-A2-6F] Ganon's Tower - north of falling floor four torches [top right chest]": "Nothing",
"[dungeon-A2-6F] Ganon's Tower - before Moldorm": "Bomb",
"[dungeon-A2-6F] Ganon's Tower - Moldorm room": "Three Hundred Rupees"
},
"Pendants": {
"Eastern Palace Pendant": "Pendant Of Wisdom",
"Desert Palace Pendant": "Pendant Of Power",
"Tower of Hera Pendant": "Crystal 4"
},
"Crystals": {
"Palace of Darkness Crystal": "Pendant Of Courage",
"Swamp Palace Crystal": "Crystal 1",
"Skull Woods Crystal": "Crystal 7",
"Thieves Town Crystal": "Crystal 6",
"Ice Palace Crystal": "Crystal 2",
"Misery Mire Crystal": "Crystal 3",
"Turtle Rock Crystal": "Crystal 5"
},
"Medallions": {
"Turtle Rock Medallion": "Ether",
"Misery Mire Medallion": "Bombos"
},
"Fountains": {
"Waterfall Bottle": "Bottle (Bee)",
"Pyramid Bottle": "Bottle (Bee)"
},
"playthrough": {
"1": {
"Light World": {
"[cave-035] Sahasrahla's Hut [left chest]": "Progressive Glove"
},
"Hyrule Castle": {
"[dungeon-C-1F] Sanctuary": "Pegasus Boots",
"[dungeon-C-B1] Escape - final basement room [middle chest]": "Moon Pearl",
"[dungeon-C-B1] Hyrule Castle - map room": "Hookshot",
"[dungeon-C-B3] Hyrule Castle - next to Zelda": "Bombos"
},
"Eastern Palace": {
"[dungeon-L1-1F] Eastern Palace - big chest": "Lamp"
},
"Death Mountain": {
"[cave-009-1F] Death Mountain - wall of caves - right cave [top right chest]": "Bow"
}
},
"2": {
"Light World": {
"[cave-016] cave under rocks west of Santuary": "Ice Rod",
"Piece of Heart (Zora's River)": "Progressive Sword"
},
"Desert Palace": {
"Heart Container - Lanmolas": "Progressive Sword"
},
"Dark World": {
"Piece of Heart (Treasure Chest Game)": "Hammer",
"Piece of Heart (Digging Game)": "Cane Of Somaria"
},
"Thieves Town": {
"[dungeon-D4-B1] Thieves' Town - Top left of huge room": "Progressive Glove",
"Thieves Town Crystal": "Crystal 6"
}
},
"3": {
"Tower Of Hera": {
"[dungeon-L3-1F] Tower of Hera - first floor": "Flippers",
"Tower of Hera Pendant": "Crystal 4"
},
"Ganons Tower": {
"[dungeon-A2-B1] Ganon's Tower - north of Armos room [left chest]": "Magic Mirror"
},
"Ice Palace": {
"Ice Palace Crystal": "Crystal 2"
},
"Misery Mire": {
"Misery Mire Crystal": "Crystal 3"
}
},
"4": {
"Dark World": {
"Pyramid Fairy - Right": "Fire Rod"
},
"Swamp Palace": {
"Swamp Palace Crystal": "Crystal 1"
}
},
"5": {
"Skull Woods": {
"Skull Woods Crystal": "Crystal 7"
},
"Turtle Rock": {
"Turtle Rock Crystal": "Crystal 5"
}
},
"longest_item_chain": 5,
"regions_visited": 16
},

Softlocked in Skull Woods

Seed: 445327878
Logic: web-14
Rules: v8
Game Mode: Casual (NMG)

Description of Problem:
Possible glitch in seed generation - Softlocked. Skull Woods Big Key room did not contain Big Key in chest. Chest contained Compass instead.

Spoiler (if available):
"[dungeon-D3-B1] Skull Woods - big chest": "Key",
"[dungeon-D3-B1] Skull Woods - Big Key room": "Big Key",
"[dungeon-D3-B1] Skull Woods - Compass room": "Dungeon Map",
"[dungeon-D3-B1] Skull Woods - east of Fire Rod room": "Key",
"[dungeon-D3-B1] Skull Woods - Entrance to part 2": "Bomb Upgrade (5)",
"[dungeon-D3-B1] Skull Woods - Gibdo/Stalfos room": "Three Bombs",
"[dungeon-D3-B1] Skull Woods - south of Fire Rod room": "Key",
"Heart Container - Mothula": "Compass"

Unable to complete Seed

Hello,

I would like to report a seed issue. Checked the spoilers .

275927691
No Glitches
Normal
Standard
Description of Problem: Unable to complete seed.

Hammer is Currently in Graveyard Which needs Titan Mitts
Titan Mitts is in NE Swamp Cave in Dark Work Which you need either Titans mitts or Hammer to Access

Let me know if you have any questions.

Skoo10

Silver Arrow upgrade missing

Seed:119406529
Logic:16
Rules:no-glitches
Game Mode:

Description of Problem:
Silver arrows not in seed
Spoiler (if available):

Music

Hey
Well I don't actually have a problem, but I do have a suggestion or a request. I recently heard a great interpretation of the link to the past zelda themes, and I was wondering if there is a way to substitute these into the randomizer. Here they are.

Switched On: Zelda - A Link To The Past
https://www.youtube.com/watch?v=IOhE-nkJxwM

Thanks for entertaining my request. I hope this is possible.

Can not Progress

Seed:C6921549
Game Mode:Casual

Description of Problem:Sick Kid has the flippers but i am not able to obtain them by talking to him. Any suggestions?

Ice Palace Potential Soft Lock

Seed: 196197479
Logic: No Glitches
Rules: Normal
Game Mode: Standard

Description of Problem: If Kholdstare holds the key its possible for a player to use keys in a way that stops them from getting to Kholdstare without using the Cane Of Somaria or bomb jumps. In this seed the Cane Of Somaria is gated by the completion of Ice Palace.

Spoiler (if available):
ALttP - VT_no-glitches-18_normal-standard_196197479.txt

Possible softlock on a glitchless rules.

Seed: 69697072
Logic: no-glitches-18
Rules: normal difficulty
Game Mode: Standard

Description of Problem: In the Ice Palace (which holds Crystal 6), it is possible to be unable to continue without the use of bomb jumping because the locked room that has the crystal switch near the end has its key guarded by the boss. The Red Cane is in a Pyramid Fairy chest and that chest cannot be obtained without the crystal from Ice Palace.

Spoiler (if available):
{
"[dungeon-D5-B1] Ice Palace - Big Key room": "Compass",
"[dungeon-D5-B1] Ice Palace - compass room": "Fifty Rupees",
"[dungeon-D5-B2] Ice Palace - map room": "Dungeon Map",
"[dungeon-D5-B3] Ice Palace - spike room": "Three Hundred Rupees",
"[dungeon-D5-B4] Ice Palace - above Blue Mail room": "Big Key",
"[dungeon-D5-B5] Ice Palace - b5 up staircase": "Key",
"[dungeon-D5-B5] Ice Palace - big chest": "Arrow Upgrade (5)",
"Heart Container - Kholdstare": "Key"
}

Two Golden Swords in the same run.

Seed: 606188709
Logic: no-glitches
Rules: Normal
Game Mode: standard

Description of Problem: Two Golden Swords, one run. First sword in links house, second copy in middle chest in sewer bomb door location during the zelda escape just before the sanctuary. The web client was used to make the seed (http://vt.alttp.run/) on 4/5/2017.

Spoiler (if available): This issue does not prevent the seed from being completed. I stopped two crystals away from the end (Ice palace and misery mire).

image

image

Problem with credits and checked item locations (Hyrule castle item count 7/8)

Seed: 488239823
Difficulty: Normal
Logic: No Glitches
Mode: Standard

Description of Problem: After I finished the run I noticed that I have only 7/8 items checked in Hyrule castle while I'm quite sure I have checked everything. I created another file on the same seed and played through escape. I checked the file with http://smallhacker.com/alttp/stats/ after picking the chest in Sanctuary and it said 7/8 for both of the saves. After this I ran through the escape on another seed while doing things the same way. Checking this save files stats told that I found 8/8 of the items.

Spoiler (if available): I attached the generated .zip and added my .srm file in there.
VT-alttp-roms.zip

Changelog in readme.md or project homepage

I love that you guys update so frequently, but I can't easily tell what changed. I can laboriously go through the github commit history and guess, but really, when there's a new build, you ought to list the differences somewhere. Some of the changes are small things that you don't mention anywhere I can see, like what items got removed from the pool to make room for the swords.

SD2SNES Silver Arrows

Seed: Any / 1604695
Logic No Glitches
Rules: Standard
Game Mode: Normal

Arrows on SD2SNES don't work properly

I use an SD2SNES (http://www.stoneagegamer.com/sd2snes-deluxe.html). Which uses a SD card to store roms and inserts into snes as an snes cartridge. Everything in the rando works and plays great except for Silver Arrows. I can pick up silver arrows and the icon and everything/AG show up. but in the menu and top arrow count do not update. Also the damage does not change after picking them up.

Obviously this in VERY LOW priority. I was merely making folks aware. I have no idea how many other players even own one of these, if any.

Other details:
SD2SNES
Firmware Ver. 0.1.7d
CPU Rev,: 2 PPU1 Rev,: 1 PPU2 Rev,: 3
Configuration default

SNES Version: (American)NTSC SNS-001 model

Thanks!

Cutting tapestries and vines with the bug net

Game Mode: Open
Label: Feature Request

Would it be possible to allow the bug net to cut tapestries, like in the castle to get to Aganim, or vines, like the vine door in skull woods?

Right now, even if you get the cape to enter the castle early, before getting a level 2+ sword, you cannot fight him because you cannot cut the tapestry. It would be awesome if you could cut the tapestry with the bug net and still fight him, with the bug net as usual. Skull woods is similar where you could fight the boss w/o a sword.

I wouldn't mind looking into this code change myself. But, I don't know where to start. Any tips? Thoughts?

Minor soundtrack bug

Seed: 281107777
Logic: No glitches
Rules: Standard
Game Mode: Normal

Description of Problem: When I got the digging game item (20 rupees), the music changed to hyrule light world overworld music as if I had just acquired the master sword. The game hadn't finished coutning down yet.

Spoiler (if available): (in attachment)
ALttP - VT_no-glitches-17_normal-standard_281107777.txt

Unbeatable seed

Seed: 45981209
Logic: no-glitches-18
Rules: normal
Game Mode: standard

Description of Problem:

Fire rod is in the basement of turtle rock according to spoiler log, and it's literally the only place in the game I haven't been able to access (other than the main area of skull woods obviously, due to no fire rod). Skull woods and turtle rock are crystal dungeons. Unless I'm a complete moron, there is no way to light the torches which open the door leading to the map room on the first floor of turtle rock without the fire rod (or some sort of glitch), though I tried pretty hard with the lantern just to make sure.

So there are two keys available without the fire rod on the first floor (one in the compass room, one from the enemy behind the first locked door, but three keys are needed to progress, and the third key is, again, locked in the map room behind the torch door.

I'm actually very interested as to what the logic failure would be here, or if I am indeed missing something. I don't understand how the fire rod could be generated at the end of turtle rock when a puzzle at the beginning seemingly requires it, and required keys are locked behind said puzzle. Also just seems odd in general to have the fire rod in turtle rock at all when skull woods is also a crystal and has fewer requirements to access.

Sorry, for whatever reason, the spoiler is saved as a notepad file for me and is essentially illegible. I normally check it on the site if I ever use it. Here's the portion for turtle rock, which should (?) pretty much show the issue anyway. Obviously you can look up the seed to see the problem as well.

Also, just wanted to say thanks to all who worked on this randomizer. Been having an absolute blast playing through it as well as watching the races on twitch.

Thanks again, sorry if I rambled a bit.

Spoiler (if available):

"[dungeon-D7-1F] Turtle Rock - Chain chomp room": "Compass",
"[dungeon-D7-1F] Turtle Rock - compass room": "Key",
"[dungeon-D7-1F] Turtle Rock - Map room [left chest]": "Three Bombs",
"[dungeon-D7-1F] Turtle Rock - Map room [right chest]": "Key",
"[dungeon-D7-B1] Turtle Rock - big chest": "Key",
"[dungeon-D7-B1] Turtle Rock - big key room": "Big Key",
"[dungeon-D7-B1] Turtle Rock - Roller switch room": "Key",
"[dungeon-D7-B2] Turtle Rock - Eye bridge room [bottom left chest]": "Twenty Rupees",
"[dungeon-D7-B2] Turtle Rock - Eye bridge room [bottom right chest]": "Piece Of Heart",
"[dungeon-D7-B2] Turtle Rock - Eye bridge room [top left chest]": "Three Bombs",
"[dungeon-D7-B2] Turtle Rock - Eye bridge room [top right chest]": "Fire Rod",
"Heart Container - Trinexx": "Dungeon Map"

"Palace of Darkness Crystal": "Crystal 5",
"Swamp Palace Crystal": "Crystal 2",
"Skull Woods Crystal": "Crystal 6",
"Thieves Town Crystal": "Crystal 7",
"Ice Palace Crystal": "Pendant Of Wisdom",
"Misery Mire Crystal": "Pendant Of Courage",
"Turtle Rock Crystal": "Crystal 1"

Recommend Projects

  • React photo React

    A declarative, efficient, and flexible JavaScript library for building user interfaces.

  • Vue.js photo Vue.js

    ๐Ÿ–– Vue.js is a progressive, incrementally-adoptable JavaScript framework for building UI on the web.

  • Typescript photo Typescript

    TypeScript is a superset of JavaScript that compiles to clean JavaScript output.

  • TensorFlow photo TensorFlow

    An Open Source Machine Learning Framework for Everyone

  • Django photo Django

    The Web framework for perfectionists with deadlines.

  • D3 photo D3

    Bring data to life with SVG, Canvas and HTML. ๐Ÿ“Š๐Ÿ“ˆ๐ŸŽ‰

Recommend Topics

  • javascript

    JavaScript (JS) is a lightweight interpreted programming language with first-class functions.

  • web

    Some thing interesting about web. New door for the world.

  • server

    A server is a program made to process requests and deliver data to clients.

  • Machine learning

    Machine learning is a way of modeling and interpreting data that allows a piece of software to respond intelligently.

  • Game

    Some thing interesting about game, make everyone happy.

Recommend Org

  • Facebook photo Facebook

    We are working to build community through open source technology. NB: members must have two-factor auth.

  • Microsoft photo Microsoft

    Open source projects and samples from Microsoft.

  • Google photo Google

    Google โค๏ธ Open Source for everyone.

  • D3 photo D3

    Data-Driven Documents codes.