![]()


SideMenuController is a custom container view controller written in Swift which will display the main content within a center panel and the secondary content (option menu, navigation menu, etc.) within a side panel when triggered. The side panel can be displayed either on the left or on the right side, under or over the center panel.
 |
 |
 |
 |
- Features
- Installation
- Supported OS & SDK versions
- Usage
- Customisation
- Implementing custom transitions
- Public interface
- [Delegation] (#delegation)
- License
- Contact
## Features
- Easy to use, fully customisable
- Left and Right side positioning
- Over and Under center positioning
- Automatic orientation change adjustments.
- Fully customisable transition animations
- Custom status bar behaviour (see Customisation for details):
 |
 |
 |
 |
CocoaPods is a dependency manager for Cocoa projects.
CocoaPods 0.36 adds supports for Swift and embedded frameworks. You can install it with the following command:
$ gem install cocoapodsTo integrate SideMenuController into your Xcode project using CocoaPods, specify it in your Podfile:
source 'https://github.com/CocoaPods/Specs.git'
platform :ios, '8.0'
use_frameworks!

pod 'SideMenuController', '~> 0.1.5'
Then, run the following command:
$ pod installCarthage is a decentralized dependency manager that builds your dependencies and provides you with binary frameworks.
You can install Carthage with Homebrew using the following command:
$ brew update
$ brew install carthage
To integrate SideMenuController into your Xcode project using Carthage, specify it in your Cartfile:
github "teodorpatras/SideMenuController"
Run carthage update to build the framework and drag the built SideMenuController.framework into your Xcode project.
If you prefer not to use either of the aforementioned dependency managers, you can integrate EasyTipView into your project manually.
- Supported build target - iOS 8.0 (Xcode 7.x)
You can get started using SideMenuController in 4 basic steps:
Step 1. In case you want the status bar to be automatically hidden when the side panel is revealed, you should append the following to your Info.plist:
<key>UIViewControllerBasedStatusBarAppearance</key>
<false/>
Step 2. First of all, you should add a menu button image and specify the position of the side panel. Optionally, you can customise other preferences as well:
func application(application: UIApplication, didFinishLaunchingWithOptions launchOptions: [NSObject: AnyObject]?) -> Bool {
    // Override point for customization after application launch.

    SideMenuController.preferences.drawing.menuButtonImage = UIImage(named: "menu")
    SideMenuController.preferences.drawing.sidePanelPosition = .OverCenterPanelLeft
    SideMenuController.preferences.drawing.sidePanelWidth = 300
    SideMenuController.preferences.drawing.centerPanelShadow = true
    SideMenuController.preferences.animating.statusBarBehaviour = .ShowUnderlay
}
If you do not specify a menu button image, SideMenuController will not add one by default and you will have to manually add one whenever transitioning to a new center view controller.
Step 3. SideMenuController can be used with storyboard segues, or you can programmatically transition to a new center view controller.
####Using storyboard segues####
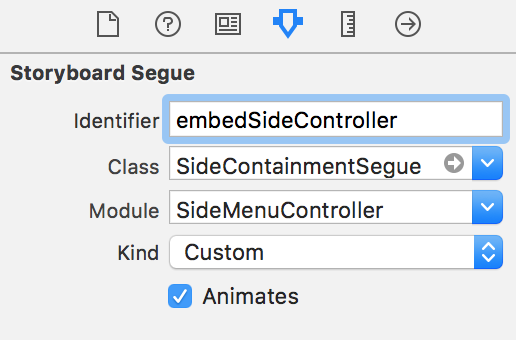
SideMenuController defines two custom segues:
SideContainmentSegue- which transitions to a new side controller (triggersembedSideController)CenterContainmentSegue- which transitions to a new center controller (triggersembedCenterController)
In the storyboard file, add initially two segues from the SideMenuController scene, one for the center view controller, and another for the side menu view controller. Later on, you can add more CenterContainmentSeuges depending on how many scenes you want to transition to.
Remember to set all the appropriate attributes of each segue in the Attributes Inspector:
| SideContainmentSegue | CenterContainmentSegue |
|----------|:-------------:|------:|
|  |
|  |
|
In order to embed the inital view controlles inside the SideMenuController you will have to call performSegue(withIdentifier:sender:). Easiest way is to subclass SideMenuController and override viewDidLoad:
override func viewDidLoad() {
    super.viewDidLoad()
    performSegueWithIdentifier("embedInitialCenterController", sender: nil)
    performSegueWithIdentifier("embedSideController", sender: nil)
}
####Programmatically####
You can perform all the above mentioned transitions programmatically, without using segues, by calling one of the two public methods:
public func embed(sideViewController: UIViewController)
public func embed(centerViewController: UViewController)
Important Note: In case you want the center view controller to be of different type than UINavigationController, you'll have to add the menu button to one/all of its children navigation controllers programmatically. SideMenuController defines an extension to UINavigationController in order to make it easy to do that. Just call navigationController.addSideMenuButton(). Before calling that method, make sure the navigation controller is already embedded inside the SideMenuController's child controller hierarchy.
Example with UITabBarController:
let sideMenuViewController = SideMenuController()

// create the view controllers for center containment
let vc1 = UIViewController()
vc1.view.backgroundColor = UIColor.redColor()
vc1.title = "first"
let nc1 = UINavigationController(rootViewController: vc1)
vc1.navigationItem.title = "first"

let vc2 = UIViewController()
vc2.view.backgroundColor = UIColor.yellowColor()
vc2.title = "second"
let nc2 = UINavigationController(rootViewController: vc2)
vc2.navigationItem.title = "second"

let vc3 = UIViewController()
vc3.view.backgroundColor = UIColor.blueColor()
vc3.title = "third"
let nc3 = UINavigationController(rootViewController: vc3)
vc3.navigationItem.title = "third"

let tabBarController = UITabBarController()
tabBarController.viewControllers = [nc1, nc2, nc3]

// create the side controller
let sideController = UITableViewController()

// embed the side and center controllers
sideMenuViewController.embed(sideViewController: sideController)
sideMenuViewController.embed(centerViewController: tabBarController)

// add the menu button to each view controller embedded in the tab bar controller
[nc1, nc2, nc3].forEach({ controller in
    controller.addSideMenuButton()
})

showViewController(sideMenuViewController, sender: nil)
Step 4. You're almost set now. Last step is to know how to transition to new center view controllers.
Important Note: SideMenuController defines an extension to UIViewController in order to make it more accessible via the computed property public var sideMenuController: SideMenuController?. From any UIViewController instance, you can access the SideMenuController by typing: self.sideMenuController. This will return the SideMenuController if the caller is one of its child view controllers or otherwise nil.
From here onwards, whenever the user selects an option in the side menu controller, you can easily perform the segue like so:
####Using storyboard segues####
override func tableView(tableView: UITableView, didSelectRowAtIndexPath indexPath: NSIndexPath) {
	sideMenuController?.performSegueWithIdentifier(segues[indexPath.row], sender: nil)
}
####Programmatically####
override func tableView(tableView: UITableView, didSelectRowAtIndexPath indexPath: NSIndexPath) {
	sideMenuController?.embedCenterController(someUIViewControllerInstance)
}
In order to customise the SideMenuController appearance and behaviour, you can play with the SideMenuController .Preferences structure. It is split into three sub structures:
Drawing- encapsulates custom attributes specifying howSideMenuControllerwill adjust its layout, positioning on screen.Animating- encapsulates custom attributes specifying which animations will be used for different components.Interaction- encapsulates custom attributes specifying how the user is allowed to interract with the side panel
| Drawing attribute | Description |
|----------|-------------|------|
| menuButtonImage | In case this attribute is set, SideMenuController will add a button on the left or right side of the navigation bar of the center view controller (in case it is a subclass of UINavigationController) in order to trigger the slide animation. If the attribute is missing, or the center view controller is not a subclass of UINavigationController, you'll have to add the menu button by yourself to all the UINavigationControllers that will be embedded. |
| sidePanelPosition | Specifies the positioning of the side panel. This attribute can take one of the four values: .UnderCenterPanelLeft, .UnderCenterPanelRight, .OverCenterPanelLeft, . OverCenterPanelRight |
| sidePanelWidth | The width of the side panel. |
| centerPanelOverlayColor | When the side panel is either .OverCenterPanelLeft or . OverCenterPanelRight, an overlay will be shown on top of the center panel when the side is revealed. Pass the preferred color of this overlay. |
| centerPanelShadow | When the side panel is either . UnderCenterPanelRight or . UnderCenterPanelLeft you can opt in or out to draw a side shadow for the center panel. |
| Animating attribute | Description |
|----------|-------------|------|
| statusBarBehaviour | The animating style of the status bar when the side panel is revealed. This can be:
+ .SlideAnimation: the status bar will be hidden using the UIStatusBarAnimation.Slide animation
+ .FadeAnimation: the status bar will be hidden using the UIStatusBarAnimation.Fade animation
+ .HorizontalPan: the status bar will slide along with the center panel horizontally.
+ .ShowUnderlay: a layer with the same color as the navigation bar will be displayed under the status bar |
| reavealDuration | Reveal animation duration. |
| hideDuration | Hide animation duration. |
| transitionAnimator | TransitionAnimatable subtype which defines how the new center view controller will be animated on screen. |
Interaction attribute |
Description | Discussion |
|---|---|---|
panningEnabled |
Default value is true |
When the side panel is positioned under the center panel, the panning is recognized on the center panel. When the side panel is positoned over the center panel, the panning is recognized on the side panel. |
swipingEnabled |
Default value is true |
There is no swipe gesture recognizer instantiated when the side panel is positioned under the center panel. When the side panel is positioned over the center panel, the swipe is going to recognized on the center panel. |
menuButtonAccessibilityIdentifier |
Accessibility identifier to be set on the menu button. |
In order to implement custom transition animations for the center view controller, you have to create a struct that conforms to the TransitionAnimatable protocol and implement:
static func performTransition(forView view: UIView, completion: () -> Void)
Example:
public struct FadeAnimator: TransitionAnimatable {
    public static func performTransition(forView view: UIView, completion: () -> Void) {
        CATransaction.begin()
        CATransaction.setCompletionBlock(completion)
        let fadeAnimation = CABasicAnimation(keyPath: "opacity")
        fadeAnimation.duration = 0.35
        fadeAnimation.fromValue = 0
        fadeAnimation.toValue = 1
        fadeAnimation.fillMode = kCAFillModeForwards
        fadeAnimation.removedOnCompletion = true
        view.layer.addAnimation(fadeAnimation, forKey: "fade")
        CATransaction.commit()
    }
}
For more examples, check TransitionAnimator.swift.
##Public methods##
/**
 Toggles the side pannel visible or not.
*/
public func toggle()

/**
 Embeds a new side controller
*/
public func embed(sideViewController: UIViewController)

/**
 Embeds a new side controller
*/
public func embed(centerViewController: UIViewController)
##Public properties##
public static var preferences: Preferences - use this static variable to customise the SideMenuController preferences
private(set) public var sidePanelVisible - use this instance variable to check at any time if the side panel is visible or not.
SideMenuController defines a delegate protocol which you can use if you want to be announced when the side panel has been revealed or hidden:
public protocol SideMenuControllerDelegate: class {
    func sideMenuControllerDidHide(sideMenuController: SideMenuController)
    func sideMenuControllerDidReveal(sideMenuController: SideMenuController)
}
In order to receive the aforementioned callbacks, simply assign the delegate property to the SideMenuController instance.
SideMenuController is developed by Teodor Patraş and is released under the MIT license. See the LICENSE file for details. Logo graphic created with Logo Maker.
You can follow or drop me a line on my Twitter account. If you find any issues on the project, you can open a ticket. Pull requests are also welcome.


