A method for Fine-Grained image classification implemented by TensorFlow. The best accuracy we have got are 73.33%(Bird-200), 91.03%(Car-196), 72.23%(Dog-120), 96.27%(Flower-102), 86.07%(Pet-37).
Note: For Fine-Grained image classification problem, our solution is combining deep model and transfer learning. Firstly, the deep model, e.g., vgg-16, vgg-19, inception-v1, inception-v2, inception-v3, inception-v4, inception-resnet-v2, resnet50, is pretrained in ImageNet dataset to gain the feature extraction abbility. Secondly, transfer the pretrained model to Fine-Grained image dataset, e.g., 🕊️Bird-200, 🚗Car-196, 🐶Dog-120, 🌸Flower-102, 🐶🐱Pet-37.
- Install the requirments:
- Ubuntu 16.04+
- TensorFlow 1.5.0+
- Python 3.5+
- NumPy
- Nvidia GPU(optional)
- Clone the repository
$ git clone https://github.com/MacwinWin/Deep-Model-Transfer.gitSlim provide a log of pretrained models. What we need is just downloading the .ckpt files and then using them. Make a new folder, download and extract the .ckpt file to the folder.
pretrained
├── inception_v1.ckpt
├── inception_v2.ckpt
├── inception_v3.ckpt
├── inception_v4.ckpt
├── inception_resnet_v2.ckpt
|   └── ...
- set environment variables
-
Edit the set_train_env.sh and set_eval_env.sh files to specify the "DATASET_NAME", "DATASET_DIR", "CHECKPOINT_PATH", "TRAIN_DIR", "MODEL_NAME".
-
"DATASET_NAME" and "DATASET_DIR" define the dataset name and location. For example, the dataset structure is shown below. "DATASET_NAME" is "origin", "DATASET_DIR" is "/../Flower_102"
Flower_102
├── _origin
|   ├── _class1
|            ├── image1.jpg
|            ├── image2.jpg
|            └── ...
|   └── _class2
|   └── ...
- "CHECKPOINT_PATH" is the path to pretrained model. For example, '/../pretrained/inception_v1.ckpt'.
- "TRAIN_DIR" stores files generated during training.
- "MODEL_NAME" is the name of pretrained model, such as resnet_v1_50, vgg_19, vgg_16, inception_resnet_v2, inception_v1, inception_v2, inception_v3, inception_v4.
- Source the set_train_env.sh and set_eval_env.sh
$ source set_train_env.sh- prepare data
We use the tfrecord format to feed the model, so we should convert the .jpg file to tfrecord file.
- After downloading the dataset, arrange the iamges like the structure below.
Flower_102
├── _origin
|   ├── _class1
|            ├── image1.jpg
|            ├── image2.jpg
|            └── ...
|   └── _class2
|   └── ...

Flower_102_eval
├── _origin
|   ├── _class1
|            ├── image1.jpg
|            ├── image2.jpg
|            └── ...
|   └── _class2
|   └── ...

Flower_102_test
├── _origin
|   ├── _class1
|            ├── image1.jpg
|            ├── image2.jpg
|            └── ...
|   └── _class2
|   └── ...
If the dataset doesn't have validation set, we can extract some images from test set. The percentage or quantity is defined at ./datasets/convert_tfrecord.py line 170 171.
- Run ./convert_data.py
$ python convert_data.py \
     --dataset_name=$DATASET_NAME \
--dataset_dir=$DATASET_DIR- train and evaluate
- Edit ./train.py to specify "image_size", "num_classes".
- Edit ./train.py line 162 to selecet image preprocessing method.
- Edit ./train.py line 203 to create the model inference.
- Edit ./train.py line 219 to define the scopes that you want to exclude for restoration
- Edit [./set_train_env.sh]
- Run script./run_train.sh to start training.
- Create a new terminal window and set the ./set_eval_env.sh to satisfy validation set.
- Create a new terminal, edit ./set_eval_env.sh, and run script./run_eval.sh as the following command.
Note: If you have 2 GPU, you can evaluate with GPU by changing [./eval.py] line 175-line196 as shown below
 #config = tf.ConfigProto(device_count={'GPU':0})
 if not FLAGS.eval_interval_secs:
   slim.evaluation.evaluate_once(
       master=FLAGS.master,
       checkpoint_path=checkpoint_path,
       logdir=FLAGS.eval_dir,
       num_evals=num_batches,
       eval_op=list(names_to_updates.values()),
       variables_to_restore=variables_to_restore
       #session_config=config)
       )
 else:
   slim.evaluation.evaluation_loop(
       master=FLAGS.master,
       checkpoint_dir=checkpoint_path,
       logdir=FLAGS.eval_dir,
       num_evals=num_batches,
       eval_op=list(names_to_updates.values()),
       eval_interval_secs=60,
       variables_to_restore=variables_to_restore
       #session_config=config)
)- test
The ./test.py looks like ./train.py, so edit [./set_test_env.sh] as shown before to satisfy your environment. Then run ./run_test.py. Note: After test, you can get 2 .txt file. One is ground truth lable, another is predicted lable. Edit line303 and line304 to change the store path.
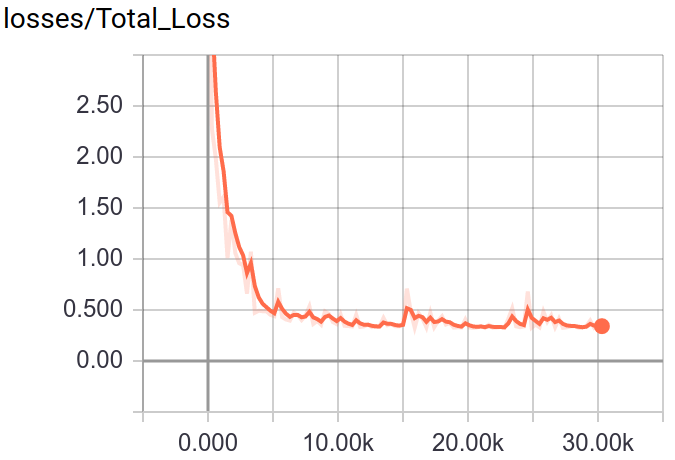
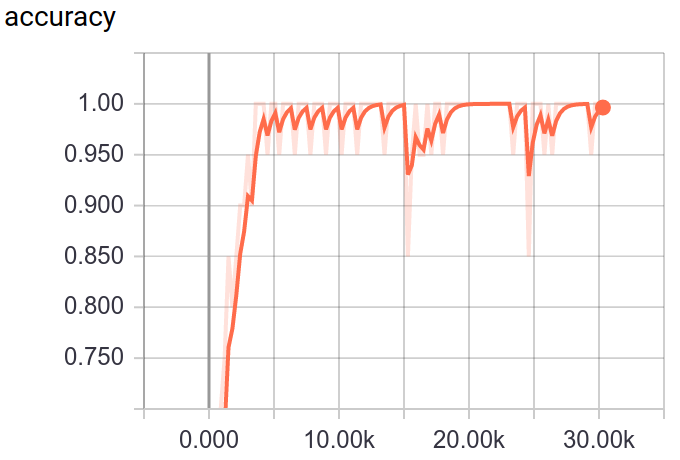
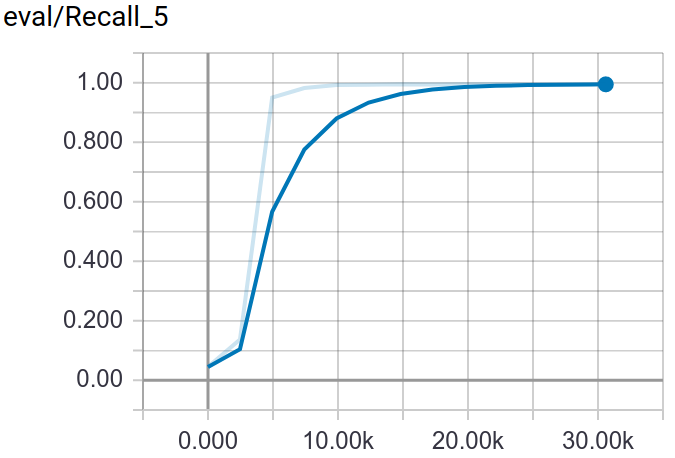
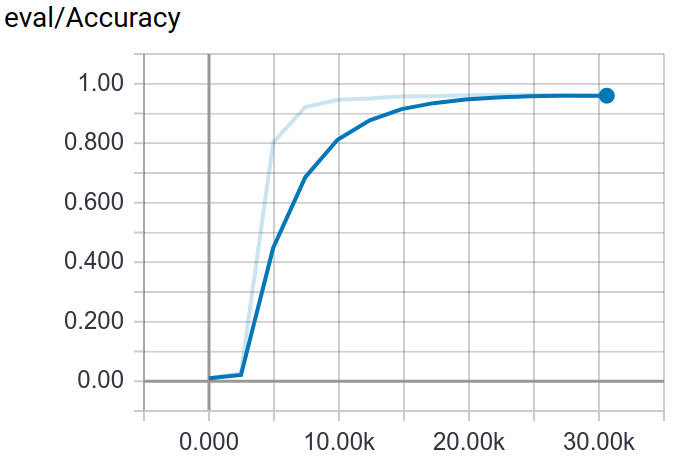
Through tensorboard, you can visualization the training and testing process.
$ tensorboard --logdir $TRAIN_DIR👇Screenshot: