This repo is a part of the Software for Portable Devices (CS F314) course. In this project, you will take input from the GPIO pins of the Raspberry Pi, and make the TRex jump based on that. It should be similar to the demo done in the lab.
- Install node.js (v6.x.x LTS) from https://nodejs.org/en/
- npm should also have been installed. Run
npm install npm@latest -gto update npm to the latest version. If you get an error, trysudo npm install npm@latest -g. - Run
git clone https://github.com/thepulkitagarwal/sdpd-t-rex-runner.gitor download a zip of this repository. cdinto the local copy of this repo on your terminal.- Run
npm install. (Note:npm warnis not a problem. You can go ahead with the next step.) - Run
npm start. - Open a separate terminal,
cdinto the local copy of this repo, and runpython raspiController.py. (You might have a problem if you are using python3. In that case, comment out the python 2 libraries, and uncomment the python 3 libraries in theraspiController.pyfile.) - Open your browser and go to http://localhost:3000 and press space.
- The TRex should automatically jump every 0.5 seconds.
Now you can make changes in the raspiController.py file to interface to the raspberry pi.
You will copy the raspiController.py file to the raspberry pi provided.
As stated earlier, the aim is to make the TRex jump based on the GPIO pin inputs from the raspberry pi.
Setup the hardware as required. Be extremely careful not to damage any of the devices.
Use the jump() function call to send a request to the server to make the TRex jump, whenever the GPIO Pins have the correct signal. You should provide the IP address of your laptop (on which the node.js server is running) in the jump() function call. For instance, if the IP address is 10.42.0.100 do jump('10.42.0.100').
Please read https://learn.sparkfun.com/tutorials/raspberry-gpio for a more comprehensive tutorial.
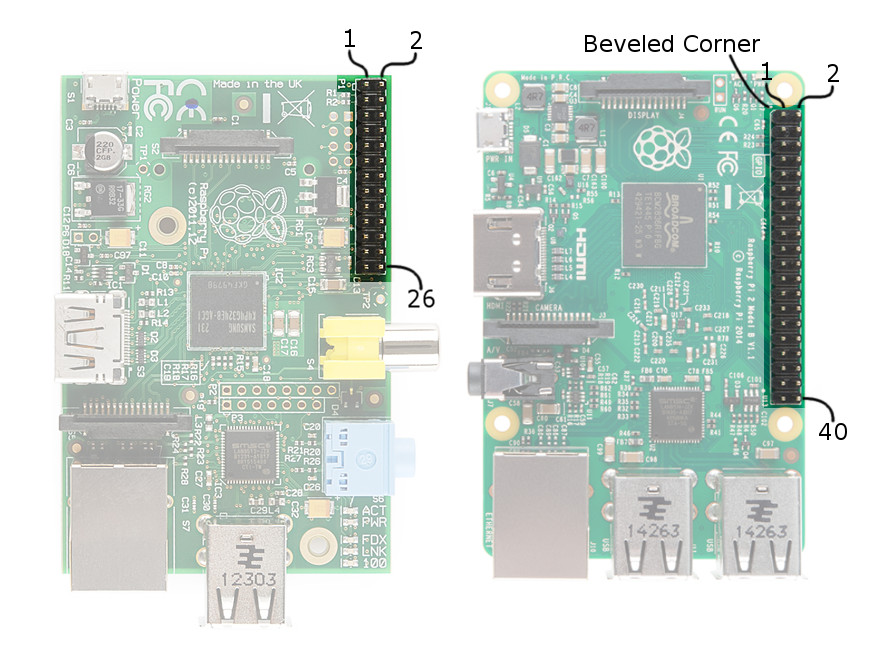
The raspberry pi that you are provided with has 26 GPIO Pins. The newer versions have 40 pins, but the first 26 pins of those behave in the same manner.
This shows the layout of the pins on the board:
This shows the pinout:
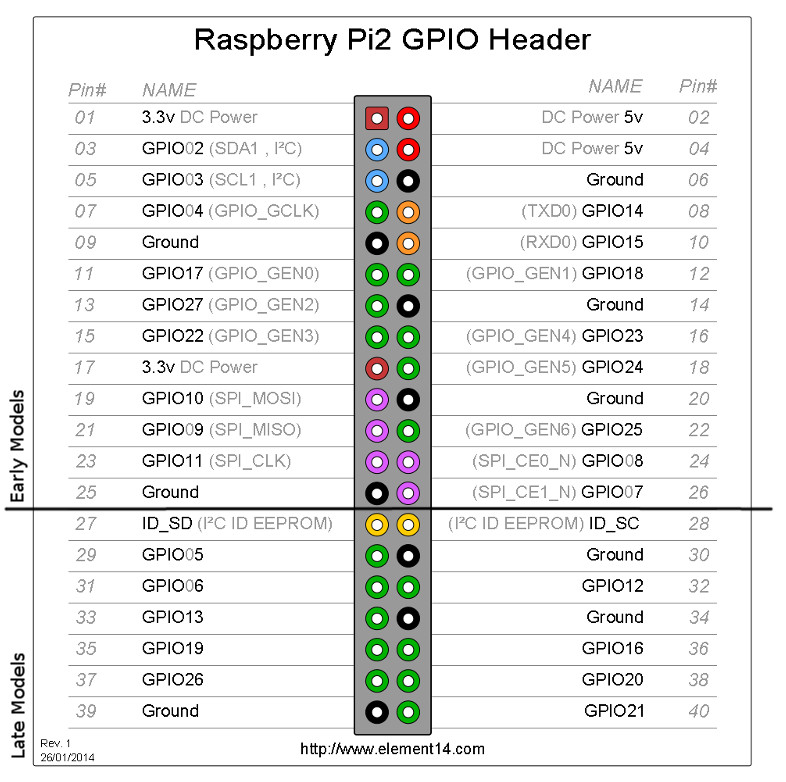
You can ignore everything after pin 26. Pins 2 and 4 provide 5V DC voltage, and all pins labeled 'Ground' act as the ground. This is what we'll be using to power our project. For example, if you connect an LED and resistor to Pin 2 (5V DC) and Pin 6 (Ground) in series, it should make the LED glow.
The pins labeled GPIO (or, BCM in some other places) can act as either input or output pins depending on how you configure it in your code. For this project, you will use one of these pins as input.
To use the GPIO pins, you need to add the following code:
import RPi.GPIO as GPIO
GPIO.setmode(GPIO.BOARD)
You can set the mode as either GPIO.BCM or GPIO.BOARD.
GPIO.BOARDmeans that pin number 18, which is labeledGPIO24, will be pin 18.GPIO.BCMmeans that pin number 18, which is labeledGPIO24, will be pin 24.
After setting up the board, you have to declare the pins that you want to use as input or output
# 18 is the pin number (BCM or BOARD)
GPIO.setup(18, GPIO.IN) # as input
GPIO.setup(18, GPIO.OUT) # as output
For the input pins, you can check the value using GPIO.input(18), where 18 is the pin number.
For the output pins, you can set the value using GPIO.output(18, GPIO.HIGH), where 18 is the pin number. You can choose either GPIO.HIGH or GPIO.LOW as the value.


