HYF JavaScript 2 / Week 1 classwork
• Basic DOM manipulations
• Capturing user input through forms
• Events
• Code debugging using the browser
• Code commenting
Before going straight into DOM manipulations using JavaScript, a couple of important things to understand is:
-
Why use JavaScript for HTML?
We can always write our application using just HTML and CSS but that application wouldn't be useful after a certain point of time. This is because all users of the app would see the same website with only a limited number of interactions available.
In order to write modern interactive web applications, using JavaScript in combination with HTML & CSS is not just a nice to have but a crucial thing to do.
For example, we wouldn't be able to build a banking app using just HTML and CSS. Each user would have a different number of accounts, different bank balances and different number of transactions. All this implies that the user data is dynamic in nature and we need to write our apps in such a way that we cater to this dynamicity. Thus, JavaScript is used to create HTML and applying CSS to it during runtime.
-
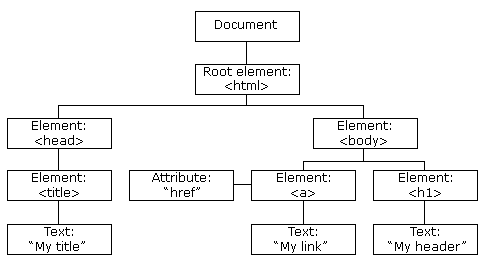
What is DOM?
The Document Object Model (DOM) is an object-oriented representation of a web page(HTML document) which the web browsers make available to JavaScript for manipulation. Inside a JavaScript file, we can access the DOM through a global object called
documentorwindow.document.It is not a programming language but without it JavaScript would not have any knowledge of our web page/HTML document.
Example:
<!DOCTYPE html>
<html>
<head>
  <title>My title</title>
</head>

<body>
  <h1>My header</h1>
  <a href="https://www.w3schools.com/js/pic_htmltree.gif">My link</a>
</body>
</html>
We now know that we can access DOM using document object in JavaScript and this object exposes plenty methods and properties(also known as APIs) for manipulation. Some of those commonly used APIs are:
-
Finding DOM elements in HTML page
document.getElementById(id)- Find an element by element iddocument.getElementsByTagName(name)- Find elements by tag namedocument.getElementsByClassName(name)- Find elements by class name
-
Adding and Deleting elements in HTML page
document.createElement(element)- Create a new HTML elementdocument.removeChild(element)- Remove an HTML elementdocument.appendChild(element)- Add an HTML element
-
Changing existing HTML elements
element.innerHTML- Change the content/layout of the elementelement.innerText- Change just the text of the elementelement.setAttribute(attribute, value)- Set/Change attribute of an element
- Note:
getElementsByTagNameandgetElementsByClassNamereturns a list of all matched elements. However, this is not the usual JavaScript array but an HTMLCollection List. A detailed list of APIs available on the DOM can be found here.
Exercise time
-
Create an HTML form element
-
Create an HTML input(type text) element and set its placeholder as "First Name"
-
Create another HTML input(type text) element and set its placeholder as "Last Name"
-
Add both these elements to the form element
-
Create a button element and add these properties to it:
a. Set its text to "Click Me"
b. Set its id to "button"
c. Set its type to "button"
-
Add button element to the form
-
Add the form element to main element
Events are actions or occurrences that happen inside the web browser which the system tells you about so you can respond to them in some way if desired. Think of it as a signal notifying something has happened. All DOM objects have the ability to generate such signals (but events are not limited to DOM) e.g window.onload generates a signal when the entire window has been loaded inside the browser.
For example, if the user clicks a button on a webpage, you might want to respond to that action by displaying an information box.
There are a lot of different types of events that can occur, for example:
- The user clicking the mouse over a certain element or hovering the cursor over a certain element.
- The user pressing a key on the keyboard.
- The user resizing or closing the browser window.
- A web page finishing loading.
- A form being submitted.
- User scrolling through the web app.
You can find a detailed list of all possible events here. However, you shouldn't worry about knowing all these events.
In order to be able to react on events generated in our application, we need to make use of handlers which is nothing but a simple JavaScript function that is executed when an event is fired.
Possible ways of handling an event:
-
Using HTML-attribute
A handler on a DOM element can be set inside the HTML itself using the attribute named
on<event>.For example, if we have a button inside our HTML document, we can set a
clickhandler to it which would respond to the event that button is clicked.<input id="btn" value="Click me" onclick="alert('Click!')" type="button">
Or, you can have an event handler on a heading element which is fired whenever we hover on the element.
<h1 id="heading" onmouseover="alert('Mouse over');">
-
Using DOM property
Similar to HTML attributes, we can set event handlers on an element inside the JavaScript file.
For example, rewriting above HTML handler to JavaScript would look like:
const button = document.getElementById('btn');
button.onclick = (event) => {
  alert('Click!');
};
Or
const heading = document.getElementById('heading');
heading.onmouseover = (event) => {
  alert('Mouse over');
};
-
Using addEventListener
A fundamental problem with using HTML-attributes or DOM property for event handlers is that we can't assign multiple event handlers to the element.
For example, we can't assign two separate event handlers on the button element above.
button.onclick = (event) => {
  alert('Click from first handler');
};

button.onclick = (event) => {
  alert('Click from second handler);
};
The second handler would override the first handler and you can guess now what would be alerted when the button is clicked. In order to overcome this limitation, we make use of addEventListener method on the element.
Thus, we can write an event handler on the same button as
const button = document.getElementById('btn');
button.addEventListener('click', (event) => {
  alert('Clicked');
});
To properly handle an event we’d want to know more about what’s happened. Not just a “click” or a “keypress”, but what were the pointer coordinates? Which key was pressed? And so on. The event argument which you see above is the object which the browser creates and puts all information about it inside it.
Event Propagation
When an event happens on an element, it first runs the handlers on it, then on its parent, then all the way up on other ancestors. This can also be thought as event bubbling. Although a feature provided by web browsers, it doesn't always have the desired effect.
For example, consider the following markup. We have three elements with their respective handlers. Guess what would happen if:
-
we click on the paragraph element
-
we click on the div element
-
we click on the form element
<form id="form">FORM
  <div id="container">DIV
    <p id="paragraph">PARAGRAPH</p>
  </div>
</form>
const form = document.getElementById('form');
form.addEventListener('click', (event) => {
console.log('INSIDE FORM HANDLER');
});
const div = document.getElementById('div');
div.addEventListener('click', (event) => {
console.log('INSIDE DIV HANDLER');
});
const paragraph = document.getElementById('paragraph');
paragraph.addEventListener('click', (event) => {
console.log('INSIDE PARAGRAPH HANDLER');
});Event.stopPropagation
As the name suggests, this method of the Event interface prevents further propagation of the current event in the capturing and bubbling phases.
References:
- https://javascript.info/bubbling-and-capturing
- https://developer.mozilla.org/en-US/docs/Web/API/Event/stopPropagation
- https://www.freecodecamp.org/news/a-simplified-explanation-of-event-propagation-in-javascript-f9de7961a06e/
Exercise time

