以下内容都是自己学习过程中记录的笔记
1.继承
2.闭包
2.使用requestAnimationFrame实现倒计时
1.HTML、CSS和JavaScript,是如何变成页面的
1.Vue开发技巧
4.生命周期
5.合并策略
7.组件注册
8.异步组件
3.git常用命令
4.CLI相关
5.git提交规范
1.基础类型
1.单例模式
2.策略模式
3.职责链模式
4.观察者模式
4.发布订阅模式
1.排序相关
2.数组相关
3.链表相关
4.栈与队列相关
学习笔记


使用基础 Vue 构造器,创建一个“子类”。参数是一个包含组件选项的对象。他的源代码在src/core/global-api/extend.js
  Vue.extend = function (extendOptions: Object): Function {
    extendOptions = extendOptions || {}
    const Super = this
    const SuperId = Super.cid
    const cachedCtors = extendOptions._Ctor || (extendOptions._Ctor = {})
    if (cachedCtors[SuperId]) {
      return cachedCtors[SuperId]
    }

    const name = extendOptions.name || Super.options.name
    if (process.env.NODE_ENV !== 'production' && name) {
      validateComponentName(name)
    }

    const Sub = function VueComponent (options) {
      this._init(options)
    }
    Sub.prototype = Object.create(Super.prototype)
    Sub.prototype.constructor = Sub
    Sub.cid = cid++
    Sub.options = mergeOptions(
      Super.options,
      extendOptions
    )
    Sub['super'] = Super

    // For props and computed properties, we define the proxy getters on
    // the Vue instances at extension time, on the extended prototype. This
    // avoids Object.defineProperty calls for each instance created.
    if (Sub.options.props) {
      initProps(Sub)
    }
    if (Sub.options.computed) {
      initComputed(Sub)
    }

    // allow further extension/mixin/plugin usage
    Sub.extend = Super.extend
    Sub.mixin = Super.mixin
    Sub.use = Super.use

    // create asset registers, so extended classes
    // can have their private assets too.
    ASSET_TYPES.forEach(function (type) {
      Sub[type] = Super[type]
    })
    // enable recursive self-lookup
    if (name) {
      Sub.options.components[name] = Sub
    }

    // keep a reference to the super options at extension time.
    // later at instantiation we can check if Super's options have
    // been updated.
    Sub.superOptions = Super.options
    Sub.extendOptions = extendOptions
    Sub.sealedOptions = extend({}, Sub.options)

    // cache constructor
    cachedCtors[SuperId] = Sub
    return Sub
  }
}他创建一个Sub函数,然后使用原型继承方法使Sub继承于 Vue.prototype,让Sub的实例可以访问到Vue原型上的方法,然后在Sub上扩展Vue构造函数上的一些静态方法,并对配置中的 props 和 computed 做了初始化工作,然后对于这个 Sub 构造函数做了缓存,避免重复创建,最后返回这个Sub构造函数
当我们去实例化这个构造函数的时候,就会执行 this._init 逻辑再次走到了 Vue 实例的初始化逻辑
const Sub = function VueComponent (options) {
  this._init(options)
}Vue组件注册有两种方式
1.全局注册
Vue.component('my-component', {
  // 选项
})
2.局部注册
import HelloWorld from './components/HelloWorld.vue'
export default {
  name: 'App',
  components: {
    HelloWorld
  },
}Vue.components方法得以在src/core/global-api/assets.js
export const ASSET_TYPES = [
  'component',
  'directive',
  'filter'
]
export function initAssetRegisters (Vue: GlobalAPI) {
  /**
   * Create asset registration methods.
   */
  ASSET_TYPES.forEach(type => {
    Vue[type] = function (
      id: string,
      definition: Function | Object
    ): Function | Object | void {
      if (!definition) {
        return this.options[type + 's'][id]
      } else {
        /* istanbul ignore if */
        if (process.env.NODE_ENV !== 'production' && type === 'component') {
          validateComponentName(id)
        }
        if (type === 'component' && isPlainObject(definition)) {
          definition.name = definition.name || id
          definition = this.options._base.extend(definition)
        }
        if (type === 'directive' && typeof definition === 'function') {
          definition = { bind: definition, update: definition }
        }
        this.options[type + 's'][id] = definition
        return definition
      }
    }
  })
}validateComponentName用来判断组件名是否合法,然后会走到(type === 'component' && isPlainObject(definition)判断中,然后会用this.options._base.extend把这个对象转换成一个继承于 Vue 的构造函数,最后通过 this.options[type + 's'][id] = definition 把它挂载到 Vue.options.components 上
由于每个组件都是通过Vue.extend()创建出来的,其中有一个mergeOptions操作,
    Sub.options = mergeOptions(
      Super.options,
      extendOptions
) Super.options是指Vue.options,extendOptions是指当前组件option,他会吧当前组件的options跟Vue上的options进行合并,以下是component的合并操作
function mergeAssets (
  parentVal: ?Object,
  childVal: ?Object,
  vm?: Component,
  key: string
): Object {
  const res = Object.create(parentVal || null)
  if (childVal) {
    process.env.NODE_ENV !== 'production' && assertObjectType(key, childVal, vm)
    return extend(res, childVal)
  } else {
    return res
  }
}
他创建了一个对象,原型是指向Vue.options.components,然后把当前组件的components合并到这个对象上,最后返回
// 全局注册后
const baseVueOptions = {
  components: {
    HelloWorld: function VueComponent () { ... }
  }
}

// 合并后
const childOptions = {
  components: {
    __proto__: {
      HelloWorld: function VueComponent () { ... }
    }
  }
}在创建vnode的时候,执行_createElement方法中,有这一段代码
  if (typeof tag === 'string') {
    let Ctor
    ns = (context.$vnode && context.$vnode.ns) || config.getTagNamespace(tag)
    if (config.isReservedTag(tag)) {
      // platform built-in elements
      if (process.env.NODE_ENV !== 'production' && isDef(data) && isDef(data.nativeOn) && data.tag !== 'component') {
        warn(
          `The .native modifier for v-on is only valid on components but it was used on <${tag}>.`,
          context
        )
      }
      vnode = new VNode(
        config.parsePlatformTagName(tag), data, children,
        undefined, undefined, context
      )
    } else if ((!data || !data.pre) && isDef(Ctor = resolveAsset(context.$options, 'components', tag))) {
      // component
      vnode = createComponent(Ctor, data, context, children, tag)
    } else {
      // unknown or unlisted namespaced elements
      // check at runtime because it may get assigned a namespace when its
      // parent normalizes children
      vnode = new VNode(
        tag, data, children,
        undefined, undefined, context
      )
    }
} 当我们遇到组件时会走到(!data || !data.pre) && isDef(Ctor = resolveAsset(context.$options, 'components', tag))这个判断,当没使用v-pre才会走后面的判断,
Vue组件注册有两种方式
1.全局注册
Vue.component('my-component', {
  // 选项
})
2.局部注册
import HelloWorld from './components/HelloWorld.vue'
export default {
  name: 'App',
  components: {
    HelloWorld
  },
}Vue.components方法得以在src/core/global-api/assets.js
export const ASSET_TYPES = [
  'component',
  'directive',
  'filter'
]
export function initAssetRegisters (Vue: GlobalAPI) {
  /**
   * Create asset registration methods.
   */
  ASSET_TYPES.forEach(type => {
    Vue[type] = function (
      id: string,
      definition: Function | Object
    ): Function | Object | void {
      if (!definition) {
        return this.options[type + 's'][id]
      } else {
        /* istanbul ignore if */
        if (process.env.NODE_ENV !== 'production' && type === 'component') {
          validateComponentName(id)
        }
        if (type === 'component' && isPlainObject(definition)) {
          definition.name = definition.name || id
          definition = this.options._base.extend(definition)
        }
        if (type === 'directive' && typeof definition === 'function') {
          definition = { bind: definition, update: definition }
        }
        this.options[type + 's'][id] = definition
        return definition
      }
    }
  })
}validateComponentName用来判断组件名是否合法,然后会走到(type === 'component' && isPlainObject(definition)判断中,然后会用this.options._base.extend把这个对象转换成一个继承于 Vue 的构造函数,最后通过 this.options[type + 's'][id] = definition 把它挂载到 Vue.options.components 上
由于每个组件都是通过Vue.extend()创建出来的,其中有一个mergeOptions操作,
    Sub.options = mergeOptions(
      Super.options,
      extendOptions
) Super.options是指Vue.options,extendOptions是指当前组件option,他会吧当前组件的options跟Vue上的options进行合并,以下是component的合并操作
function mergeAssets (
  parentVal: ?Object,
  childVal: ?Object,
  vm?: Component,
  key: string
): Object {
  const res = Object.create(parentVal || null)
  if (childVal) {
    process.env.NODE_ENV !== 'production' && assertObjectType(key, childVal, vm)
    return extend(res, childVal)
  } else {
    return res
  }
}
他创建了一个对象,原型是指向Vue.options.components,然后把当前组件的components合并到这个对象上,最后返回
// 全局注册后
const baseVueOptions = {
  components: {
    HelloWorld: function VueComponent () { ... }
  }
}

// 合并后
const childOptions = {
  components: {
    __proto__: {
      HelloWorld: function VueComponent () { ... }
    }
  }
}在创建vnode的时候,执行_createElement方法中,有这一段代码
  if (typeof tag === 'string') {
    let Ctor
    ns = (context.$vnode && context.$vnode.ns) || config.getTagNamespace(tag)
    if (config.isReservedTag(tag)) {
      // platform built-in elements
      if (process.env.NODE_ENV !== 'production' && isDef(data) && isDef(data.nativeOn) && data.tag !== 'component') {
        warn(
          `The .native modifier for v-on is only valid on components but it was used on <${tag}>.`,
          context
        )
      }
      vnode = new VNode(
        config.parsePlatformTagName(tag), data, children,
        undefined, undefined, context
      )
    } else if ((!data || !data.pre) && isDef(Ctor = resolveAsset(context.$options, 'components', tag))) {
      // component
      vnode = createComponent(Ctor, data, context, children, tag)
    } else {
      // unknown or unlisted namespaced elements
      // check at runtime because it may get assigned a namespace when its
      // parent normalizes children
      vnode = new VNode(
        tag, data, children,
        undefined, undefined, context
      )
    }
} 当我们遇到组件时会走到(!data || !data.pre) && isDef(Ctor = resolveAsset(context.$options, 'components', tag))这个判断,当没使用v-pre才会走后面的判断,resolveAsset方法定义在src/core/utils/options.js
export function resolveAsset (
  options: Object,
  type: string,
  id: string,
  warnMissing?: boolean
): any {
  /* istanbul ignore if */
  if (typeof id !== 'string') {
    return
  }
  const assets = options[type]
  // check local registration variations first
  if (hasOwn(assets, id)) return assets[id]
  const camelizedId = camelize(id)
  if (hasOwn(assets, camelizedId)) return assets[camelizedId]
  const PascalCaseId = capitalize(camelizedId)
  if (hasOwn(assets, PascalCaseId)) return assets[PascalCaseId]
  // fallback to prototype chain
  const res = assets[id] || assets[camelizedId] || assets[PascalCaseId]
  if (process.env.NODE_ENV !== 'production' && warnMissing && !res) {
    warn(
      'Failed to resolve ' + type.slice(0, -1) + ': ' + id,
      options
    )
  }
  return res
}先通过options[type]拿到当前组件的components对象,然后通过hasOwn(assets, id)获取,再尝试把 id变成驼峰的形式再拿,再尝试在驼峰的基础上把首字母再变成大写的形式再拿,如果再拿不到就去原型上拿,最后还拿不到就会报错
前面说过全局组件会合并到当前组件options的compents的原型上,所以全局组件可以在任何地方用,而局部组件时在当前组件的options.compoents里面所以只能在当前组件里面用
initWatch在initState里面执行了初始化,把vm跟写的watch对象传了进去
export function initState (vm: Component) {
  vm._watchers = []
  const opts = vm.$options
  if (opts.props) initProps(vm, opts.props)
  if (opts.methods) initMethods(vm, opts.methods)
  if (opts.data) {
    initData(vm)
  } else {
    observe(vm._data = {}, true /* asRootData */)
  }
  if (opts.computed) initComputed(vm, opts.computed)
  if (opts.watch && opts.watch !== nativeWatch) {
    initWatch(vm, opts.watch)
  }
}
然后在initWatch里面做了一些写法判断
function initWatch (vm: Component, watch: Object) {
  for (const key in watch) {
    const handler = watch[key]
    if (Array.isArray(handler)) {
      for (let i = 0; i < handler.length; i++) {
        createWatcher(vm, key, handler[i])
      }
    } else {
      createWatcher(vm, key, handler)
    }
  }
}
从这里可以看出我们watch可以写成一个数组格式
watch:{
    name:[
        function (newVal,oldVal){

        },
        function (newVal,oldVal){

        }
    ]
}然后都是调用了createWatcher(vm, key, handler)
function createWatcher (
  vm: Component,
  expOrFn: string | Function,
  handler: any,
  options?: Object
) {
  if (isPlainObject(handler)) {
    options = handler
    handler = handler.handler
  }
  if (typeof handler === 'string') {
    handler = vm[handler]
  }
  return vm.$watch(expOrFn, handler, options)
}在createWatcher里面做了handler是对象或者字符串处理,最终调用vm.$watch(expOrFn, handler, options)
  Vue.prototype.$watch = function (
    expOrFn: string | Function,
    cb: any,
    options?: Object
  ): Function {
    const vm: Component = this
    if (isPlainObject(cb)) {
      return createWatcher(vm, expOrFn, cb, options)
    }
    options = options || {}
    options.user = true
    const watcher = new Watcher(vm, expOrFn, cb, options)
    if (options.immediate) {
      const info = `callback for immediate watcher "${watcher.expression}"`
      pushTarget()
      invokeWithErrorHandling(cb, vm, [watcher.value], vm, info)
      popTarget()
    }
    return function unwatchFn () {
      watcher.teardown()
    }
  }
然后又对手写的$watch的cb做了参数判断,之后在options添加user标识为用户watcher,最终执行new Watcher()
let uid = 0

/**
 * A watcher parses an expression, collects dependencies,
 * and fires callback when the expression value changes.
 * This is used for both the $watch() api and directives.
 */
export default class Watcher {
  vm: Component;
  expression: string;
  cb: Function;
  id: number;
  deep: boolean;
  user: boolean;
  lazy: boolean;
  sync: boolean;
  dirty: boolean;
  active: boolean;
  deps: Array<Dep>;
  newDeps: Array<Dep>;
  depIds: SimpleSet;
  newDepIds: SimpleSet;
  before: ?Function;
  getter: Function;
  value: any;

  constructor (
    vm: Component,
    expOrFn: string | Function,
    cb: Function,
    options?: ?Object,
    isRenderWatcher?: boolean
  ) {
    this.vm = vm
    if (isRenderWatcher) {
      vm._watcher = this
    }
    vm._watchers.push(this)
    // options
    if (options) {
      this.deep = !!options.deep
      this.user = !!options.user
      this.lazy = !!options.lazy
      this.sync = !!options.sync
      this.before = options.before
    } else {
      this.deep = this.user = this.lazy = this.sync = false
    }
    this.cb = cb
    this.id = ++uid // uid for batching
    this.active = true
    this.dirty = this.lazy // for lazy watchers
    this.deps = []
    this.newDeps = []
    this.depIds = new Set()
    this.newDepIds = new Set()
    this.expression = process.env.NODE_ENV !== 'production'
      ? expOrFn.toString()
      : ''
    // parse expression for getter
    if (typeof expOrFn === 'function') {
      this.getter = expOrFn
    } else {
      this.getter = parsePath(expOrFn)
      if (!this.getter) {
        this.getter = noop
        process.env.NODE_ENV !== 'production' && warn(
          `Failed watching path: "${expOrFn}" ` +
          'Watcher only accepts simple dot-delimited paths. ' +
          'For full control, use a function instead.',
          vm
        )
      }
    }
    this.value = this.lazy
      ? undefined
      : this.get()
  }

  /**
   * Evaluate the getter, and re-collect dependencies.
   */
  get () {
    pushTarget(this)
    let value
    const vm = this.vm
    try {
      value = this.getter.call(vm, vm)
    } catch (e) {
      if (this.user) {
        handleError(e, vm, `getter for watcher "${this.expression}"`)
      } else {
        throw e
      }
    } finally {
      // "touch" every property so they are all tracked as
      // dependencies for deep watching
      if (this.deep) {
        traverse(value)
      }
      popTarget()
      this.cleanupDeps()
    }
    return value
  }

  /**
   * Add a dependency to this directive.
   */
  addDep (dep: Dep) {
    const id = dep.id
    if (!this.newDepIds.has(id)) {
      this.newDepIds.add(id)
      this.newDeps.push(dep)
      if (!this.depIds.has(id)) {
        dep.addSub(this)
      }
    }
  }

  /**
   * Clean up for dependency collection.
   */
  cleanupDeps () {
    let i = this.deps.length
    while (i--) {
      const dep = this.deps[i]
      if (!this.newDepIds.has(dep.id)) {
        dep.removeSub(this)
      }
    }
    let tmp = this.depIds
    this.depIds = this.newDepIds
    this.newDepIds = tmp
    this.newDepIds.clear()
    tmp = this.deps
    this.deps = this.newDeps
    this.newDeps = tmp
    this.newDeps.length = 0
  }

  /**
   * Subscriber interface.
   * Will be called when a dependency changes.
   */
  update () {
    /* istanbul ignore else */
    if (this.lazy) {
      this.dirty = true
    } else if (this.sync) {
      this.run()
    } else {
      queueWatcher(this)
    }
  }

  /**
   * Scheduler job interface.
   * Will be called by the scheduler.
   */
  run () {
    if (this.active) {
      const value = this.get()
      if (
        value !== this.value ||
        // Deep watchers and watchers on Object/Arrays should fire even
        // when the value is the same, because the value may
        // have mutated.
        isObject(value) ||
        this.deep
      ) {
        // set new value
        const oldValue = this.value
        this.value = value
        if (this.user) {
          const info = `callback for watcher "${this.expression}"`
          invokeWithErrorHandling(this.cb, this.vm, [value, oldValue], this.vm, info)
        } else {
          this.cb.call(this.vm, value, oldValue)
        }
      }
    }
  }

  /**
   * Evaluate the value of the watcher.
   * This only gets called for lazy watchers.
   */
  evaluate () {
    this.value = this.get()
    this.dirty = false
  }

  /**
   * Depend on all deps collected by this watcher.
   */
  depend () {
    let i = this.deps.length
    while (i--) {
      this.deps[i].depend()
    }
  }

  /**
   * Remove self from all dependencies' subscriber list.
   */
  teardown () {
    if (this.active) {
      // remove self from vm's watcher list
      // this is a somewhat expensive operation so we skip it
      // if the vm is being destroyed.
      if (!this.vm._isBeingDestroyed) {
        remove(this.vm._watchers, this)
      }
      let i = this.deps.length
      while (i--) {
        this.deps[i].removeSub(this)
      }
      this.active = false
    }
  }
}
在Watcher类里面,如果是通过$watch执行的new Watcher,标识this.user为true,然后判断expOrFn,这是$watch传过来的key值,如果他不是一个函数就会执行parsePath方法解析路径,最终赋值给this.getter
const bailRE = new RegExp(`[^${unicodeRegExp.source}.$_\\d]`)
export function parsePath (path: string): any {
  if (bailRE.test(path)) {
    return
  }
  const segments = path.split('.')
  return function (obj) {
    for (let i = 0; i < segments.length; i++) {
      if (!obj) return
      obj = obj[segments[i]]
    }
    return obj
  }
}
就是通过split弄出数组然后循环去取值,最后执行this.get赋值给this.value,this.get方法就是执行this.getter方法然后返回结果value,这样this.value就是得到当前watch的值,在执行this.getter方法的时候就会触发值的依赖收集,那么该值就会收集当前的 user Watcher,当该值变化时,就会触发watcher的run方法,
然后执行this.get方法,得到新的value值,最后执行 invokeWithErrorHandling(this.cb, this.vm, [value, oldValue], this.vm, info)
export function invokeWithErrorHandling (
  handler: Function,
  context: any,
  args: null | any[],
  vm: any,
  info: string
) {
  let res
  try {
    res = args ? handler.apply(context, args) : handler.call(context)
    if (res && !res._isVue && isPromise(res) && !res._handled) {
      res.catch(e => handleError(e, vm, info + ` (Promise/async)`))
      // issue #9511
      // avoid catch triggering multiple times when nested calls
      res._handled = true
    }
  } catch (e) {
    handleError(e, vm, info)
  }
  return res
}
这个里面就是执行this.cb方法,然后做一些错误处理,在执行this.cb方法的时候把this.value跟value,传了进去,这样我们在写watch的时候就能拿到新值旧值了,
然后还有watch的选项deep跟immediate,deep就是在执行this.get的时候,如果设置了deep为true,就会执行 traverse(value)去循环访问就会去进行依赖收集,所以对象里面有数据改动就会重新执行,
然后immediate设置为true的时候,在执行$watch的时候就会直接执行invokeWithErrorHandling(cb, vm, [watcher.value], vm, info)
真题描述: 给定一个整数数组 nums 和一个目标值 target,请你在该数组中找出和为目标值的那 两个 整数,并返回他们的数组下标。
给定 nums = [2, 7, 11, 15], target = 9
因为 nums[0] + nums[1] = 2 + 7 = 9 所以返回 [0, 1]
  const nums = [2, 7, 11, 15],
    target = 9;
  const twoSum = function (nums, target) {
    const map = {};
    const len = nums.length;

    for (let i = 0; i < len; i++) {
      if (map[target - nums[i]] !== undefined) {
        return [map[target - nums[i]], i];
      }
      map[nums[i]] = i;
    }
  };
console.log(twoSum(nums, target));真题描述:给你两个有序整数数组 nums1 和 nums2,请你将 nums2 合并到 nums1 中,使 nums1 成为一个有序数组。
输入:
nums1 = [1,2,3,0,0,0], m = 3
nums2 = [2,5,6], n = 3
输出: [1,2,2,3,5,6]
function merge(nums1, nums2, m, n) {
  let i = m - 1;
  let j = n - 1;
  let k = m + n - 1;

  while (i >= 0 && j >= 0) {
    if (nums1[i] <= nums2[j]) {
      nums1[k] = nums2[j];
      j--;
      k--;
    } else {
      nums1[k] = nums1[i];
      i--;
      k--;
    }
  }
  while (j >= 0) {
    nums1[k] = nums2[j];
    j--;
    k--;
  }
  console.log(nums1);
}

let nums1 = [1, 2, 3, 0, 0, 0],
  m = 3,
  nums2 = [2, 5, 6],
  n = 3;
merge(nums1, nums2, m, n);真题描述:给你一个包含 n 个整数的数组 nums,判断 nums 中是否存在三个元素 a,b,c ,使得 a + b + c = 0 ?请你找出所有满足条件且不重复的三元组。
示例:
给定数组 nums = [-1, 0, 1, 2, -1, -4], 满足要求的三元组集合为: [ [-1, 0, 1], [-1, -1, 2] ]
const threeSum = function (nums) {
  nums = nums.sort((a, b) => a - b);
  const res = [];
  const len = nums.length;

  for (let i = 0; i < nums.length; i++) {
    let j = i + 1;
    let k = len - 1;

    if (i > 0 && nums[i] === nums[i - 1]) {
      continue;
    }
    while (j < k) {
      if (nums[i] + nums[j] + nums[k] > 0) {
        k--;
        while (j < k && nums[k] === nums[k + 1]) {
          k--;
        }
      } else if (nums[i] + nums[j] + nums[k] < 0) {
        j++;
        while (j < k && nums[j] === nums[j - 1]) {
          j++;
        }
      } else {
        res.push([nums[i], nums[j], nums[k]]);
        k--;
        j++;
        while (j < k && nums[k] === nums[k + 1]) {
          k--;
        }
        while (j < k && nums[j] === nums[j - 1]) {
          j++;
        }
      }
    }
  }
  return res;
};链接本地脚手架
cd your-cli-dir
npm link
链接本地库文件
cd your-lib-dir
npm link
cd your-cli-dir
npm link your-lib
取消链接本地库文件
cd your-lib-dir
npm unlink
cd your-cli-dir
npm unlink you-lib-dir
理解npm link:
npm link your-lib:将当前项目中node_modules下指定的库文件链接到node全局node_modules下的库文件npm link:讲当前项目链接到node全局node_modules中作为一个库文件,并解析bin配置创建可执行文件理解npm unlink:
npm unlink:将当前项目从node全局node_modules中移除npm unlink your-lib:将当前项目中的库文件依赖移除const { execSync } = require('child_process')
const inquirer = require('inquirer')
function logFn(git) {
console.log(git)
execSync(git)
}
function pusBranch(env, message, currentBranchName) {
try {
if (env === 'dev') {
console.log('\x1b[36m', `提交代码中...`)
execSync(`git pull && git add . && git commit -m "${message}" && git push`)
console.log('\x1b[36m', '提交完成...', '\x1b[0m')
} else {
console.log('\x1b[36m', `合并目标分支为:${env} 提交代码中...`)
const mergeEnv = env.includes('qa') ? `qa/${env}` : env
logFn(`git stash && git checkout ${mergeEnv}`)
logFn(`git pull`)
logFn(`git merge ${currentBranchName}`)
logFn(`git push`)
logFn(`git checkout ${currentBranchName}`)
console.log('\x1b[36m', '提交完成...', '\x1b[0m')
}
} catch (e) {
console.log('\x1b[36m', '提交失败', '\x1b[0m')
console.log(e)
}
}
async function inputCommitMsg() {
const reg = /^(mod|feat|fix)\w*/ig
return await inquirer.prompt({
type: 'input',
name: 'commit',
message: '请输入 commit 信息',
default: 'mod 新增功能',
validate: function(input) {
const done = this.async()
if (reg.test(input)) {
done(null, true)
} else {
done('请使用正确的格式提交commit')
}
}
})
}
async function selectReleaseEnv() {
const platformQues = [
{
type: 'list',
name: 'env',
message: '请选择提交代码环境',
default: '',
choices: ['dev', 'qa1', 'qa2', 'qa3', 'qa4', 'release', 'master']
}
]
return await inquirer.prompt(platformQues)
}
async function release() {
// 获取当前分支名
const currentBranchName = execSync('git rev-parse --abbrev-ref HEAD', { 'encoding': 'utf8' })
console.log('\x1b[36m', `当前分支:${currentBranchName}`)
const { commit } = await inputCommitMsg()
const { env } = await selectReleaseEnv()
pusBranch(env, commit, currentBranchName)
}
release()HTML:(超文本标记语言——HyperText Markup Language)是构成 Web 世界的一砖一瓦。它定义了网页内容的含义和结构
CSS:层叠样式表 (Cascading Style Sheets,缩写为 CSS),是一种 样式表 语言,用来描述 HTML 或 XML(包括如 SVG、MathML、XHTML 之类的 XML 分支语言)文档的呈现。CSS 描述了在屏幕、纸质、音频等其它媒体上的元素应该如何被渲染的问题
JavaScript:是一种具有函数优先的轻量级,解释型或即时编译型的编程语言。作为开发Web 页面的脚本语言而出名的,也被用到了很多非浏览器环境中
以上来自mdn文档
我们浏览器上显示出来各种各样的页面,都是html、css、js通过浏览器转化出来的

由于渲染机制过于复杂,所以渲染模块在执行过程中会被划分为很多子阶段,输入的 HTML 经过这些子阶段,最后输出像素。我们把这样的一个处理流程叫做渲染流水线,其大致流程如下图所示:
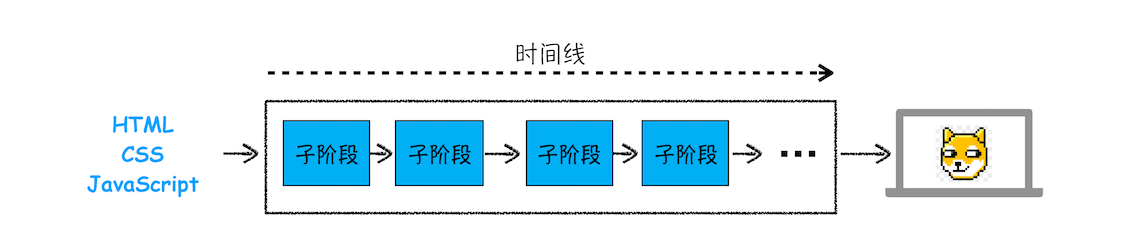
按照渲染的时间顺序,流水线可分为如下几个子阶段:构建 DOM 树、样式计算、布局阶段、分层、绘制、分块、光栅化和合成。内容比较多,我会用两篇文章来为你详细讲解这各个子阶段。接下来,在介绍每个阶段的过程中,你应该重点关注以下三点内容:
为什么要构建 DOM 树呢?这是因为浏览器无法直接理解和使用 HTML,所以需要将 HTML 转换为浏览器能够理解的结构——DOM 树。
一个包含一些文本和一幅图片的普通 HTML 页面。浏览器如何处理此页面?

<html>、<body>,以及其他尖括号内的字符串。每个令牌都具有特殊含义和一组规则。
/* @flow */
/* globals MutationObserver */

import { noop } from 'shared/util'
import { handleError } from './error'
import { isIE, isIOS, isNative } from './env'

export let isUsingMicroTask = false

const callbacks = []
let pending = false

function flushCallbacks () {
  pending = false
  const copies = callbacks.slice(0)
  callbacks.length = 0
  for (let i = 0; i < copies.length; i++) {
    copies[i]()
  }
}

// Here we have async deferring wrappers using microtasks.
// In 2.5 we used (macro) tasks (in combination with microtasks).
// However, it has subtle problems when state is changed right before repaint
// (e.g. #6813, out-in transitions).
// Also, using (macro) tasks in event handler would cause some weird behaviors
// that cannot be circumvented (e.g. #7109, #7153, #7546, #7834, #8109).
// So we now use microtasks everywhere, again.
// A major drawback of this tradeoff is that there are some scenarios
// where microtasks have too high a priority and fire in between supposedly
// sequential events (e.g. #4521, #6690, which have workarounds)
// or even between bubbling of the same event (#6566).
let timerFunc

// The nextTick behavior leverages the microtask queue, which can be accessed
// via either native Promise.then or MutationObserver.
// MutationObserver has wider support, however it is seriously bugged in
// UIWebView in iOS >= 9.3.3 when triggered in touch event handlers. It
// completely stops working after triggering a few times... so, if native
// Promise is available, we will use it:
/* istanbul ignore next, $flow-disable-line */
if (typeof Promise !== 'undefined' && isNative(Promise)) {
  const p = Promise.resolve()
  timerFunc = () => {
    p.then(flushCallbacks)
    // In problematic UIWebViews, Promise.then doesn't completely break, but
    // it can get stuck in a weird state where callbacks are pushed into the
    // microtask queue but the queue isn't being flushed, until the browser
    // needs to do some other work, e.g. handle a timer. Therefore we can
    // "force" the microtask queue to be flushed by adding an empty timer.
    if (isIOS) setTimeout(noop)
  }
  isUsingMicroTask = true
} else if (!isIE && typeof MutationObserver !== 'undefined' && (
  isNative(MutationObserver) ||
  // PhantomJS and iOS 7.x
  MutationObserver.toString() === '[object MutationObserverConstructor]'
)) {
  // Use MutationObserver where native Promise is not available,
  // e.g. PhantomJS, iOS7, Android 4.4
  // (#6466 MutationObserver is unreliable in IE11)
  let counter = 1
  const observer = new MutationObserver(flushCallbacks)
  const textNode = document.createTextNode(String(counter))
  observer.observe(textNode, {
    characterData: true
  })
  timerFunc = () => {
    counter = (counter + 1) % 2
    textNode.data = String(counter)
  }
  isUsingMicroTask = true
} else if (typeof setImmediate !== 'undefined' && isNative(setImmediate)) {
  // Fallback to setImmediate.
  // Technically it leverages the (macro) task queue,
  // but it is still a better choice than setTimeout.
  timerFunc = () => {
    setImmediate(flushCallbacks)
  }
} else {
  // Fallback to setTimeout.
  timerFunc = () => {
    setTimeout(flushCallbacks, 0)
  }
}

export function nextTick (cb?: Function, ctx?: Object) {
  let _resolve
  callbacks.push(() => {
    if (cb) {
      try {
        cb.call(ctx)
      } catch (e) {
        handleError(e, ctx, 'nextTick')
      }
    } else if (_resolve) {
      _resolve(ctx)
    }
  })
  if (!pending) {
    pending = true
    timerFunc()
  }
  // $flow-disable-line
  if (!cb && typeof Promise !== 'undefined') {
    return new Promise(resolve => {
      _resolve = resolve
    })
  }
}先定义了一个timerFunc变量,然后判断当前浏览器是否支持Promise,如果不支持,则降级到判断是否支持MutationObserver,如果还不支持,则继续降级到判断是否支持setImmediate,最后降级使用setTimeout。
然后我们看一下nextTick方法的实现,我们会把传进来的cb函数push到callbacks数组里面,然后判断pending为false的时候,把pending改为true然后执行timerFunc方法,就是执行flushCallbacks方法,这个方法把pending改成false,然后循环callbacks把里面的cb方法逐一执行
git init   把这个目录变成Git可以管理的仓库
git add index.html 把文件添加搭配暂存区
git commit -m "描述提交的内容“
git status 查看仓库当前的状态
git diff index.html 查看修改的内容
git log 查看提交的历史记录
git log --pretty=oneline 查看简单的历史记录
git reset --hard HEAD^ 回到上一个版本
git reset --hard 1094a 回到指定版本(写版本号的前几位)
git reflog 记录了你的每次命令,可以查看版本号
git checkout -- index.html 把index.html文件在工作区的修改全部撤销,两种情况,可以撤销修改也可以撤销文件删除
一种是index.html 自修改后还没有被放到暂存区,现在,撤销修改就回到和版本库一模一样的状态;
一种是index.html 已经添加到暂存区后,又作了修改,现在,撤销修改就回到添加到暂存区后的状态。

git reset HEAD index.html 把暂存区的修改撤销掉(unstage),重新放回工作区

git branch dev     创建dev分支
git checkout dev   切换到dev分支
git checkout -b dev    创建dev分支并切换到dev分支
git branch    命令会列出所有分支,当前分支前面会标一个*号。
git checkout master   切换回master分支
git merge dev   合并dev分支到当前分支
git merge --no-ff -m "merge with no-ff" dev   合并dev分支到当前分支,禁用Fast forward(快进模式),可以看到历史合并
git branch -d dev   删除dev分支
git branch -D feature  强行删除feature分支(还没有合并)
git log --graph   命令可以看到分支合并图
git stash   可以把当前工作现场“储藏”起来,等以后恢复现场后继续工作
git stash apply  把储藏(stash)的恢复
git stash drop   把储藏(stash)起来的删除
git stash pop  把储藏(stash)的恢复之后然后直接删除
git stash list  查看储藏内容(stash)
git stash apply stash@{0} 恢复指定的stash
git stash show -p stash@{1} 是查看第二最近stash的变化
git commit之后撤回
git reset --soft HEAD^ 这样就撤回了上一次的commit
意思是:不删除工作空间改动代码,撤销commit,并且撤销git add . 操作
这个为默认参数,git reset --mixed HEAD^ 和 git reset HEAD^ **效果是一样的
不删除工作空间改动代码,撤销commit,不撤销git add .
删除工作空间改动代码,撤销commit,撤销git add .
注意完成这个操作后,就恢复到了上一次的commit状态。
commit注释写错了,只是想改一下注释
git commit --amend
此时会进入默认vim编辑器,修改注释完毕后保存就好了。
我们在用git提交代码的时候,希望生成规范的commit message,所以我们需要借用根据工具规范我们的提交信息
目前社区用的最广泛的就是Angular 规范,
<type, 必填>(<scope,可省略>): <subject,必填>
// 空一行
<body,可省略>
// 空一行
<footer,可省略>
commitizen/cz-cli, 我们需要借助它提供的 git cz 命令替代我们的 git commit 命令, 帮助我们生成符合规范的 commit message.
除此之外, 我们还需要为 commitizen 指定一个 Adapter 比如: cz-conventional-changelog (一个符合 Angular团队规范的 preset). 使得 commitizen 按照我们指定的规范帮助我们生成 commit message.
安装
npm install -D commitizen cz-conventional-changelog
package.json配置
  "config": {
    "commitizen": {
      "path": "./node_modules/cz-conventional-changelog"
    }
  }
commitlint: 可以帮助我们 lint commit messages, 如果我们提交的不符合指向的规范, 直接拒绝提交, 比较狠.
同样的, 它也需要一份校验的配置, 这里推荐 @commitlint/config-conventional (符合 Angular团队规范).
npm i -D @commitlint/config-conventional @commitlint/cli
同时需要在项目目录下创建配置文件 .commitlintrc.js, 写入:
module.exports = {
  extends: [
    ''@commitlint/config-conventional''
  ],
  rules: {
  }
};
校验 commit message 的最佳方式是结合 git hook, 所以需要配合 Husky.
npm install husky --save-dev
npx husky install
要在安装后自动启用 Git 挂钩,请编辑package.json
  "scripts": {
    "prepare": "husky install"
  },
添加钩子
npx husky add .husky/commit-msg 'npx --no-install commitlint --edit "$1"'
这时你根目录就有有个.husky文件,里面有配置
现在如果是你commit message 不规范的话就会拒绝提交,husky还能配合Eslint限制eslint报错拒绝提交
在初始化的时候会执行initComputed方法
function initComputed (vm: Component, computed: Object) {
  // $flow-disable-line
  const watchers = vm._computedWatchers = Object.create(null)
  // computed properties are just getters during SSR
  const isSSR = isServerRendering()

  for (const key in computed) {
    const userDef = computed[key]
    const getter = typeof userDef === 'function' ? userDef : userDef.get
    if (process.env.NODE_ENV !== 'production' && getter == null) {
      warn(
        `Getter is missing for computed property "${key}".`,
        vm
      )
    }

    if (!isSSR) {
      // create internal watcher for the computed property.
      watchers[key] = new Watcher(
        vm,
        getter || noop,
        noop,
        computedWatcherOptions
      )
    }

    // component-defined computed properties are already defined on the
    // component prototype. We only need to define computed properties defined
    // at instantiation here.
    if (!(key in vm)) {
      defineComputed(vm, key, userDef)
    } else if (process.env.NODE_ENV !== 'production') {
      if (key in vm.$data) {
        warn(`The computed property "${key}" is already defined in data.`, vm)
      } else if (vm.$options.props && key in vm.$options.props) {
        warn(`The computed property "${key}" is already defined as a prop.`, vm)
      } else if (vm.$options.methods && key in vm.$options.methods) {
        warn(`The computed property "${key}" is already defined as a method.`, vm)
      }
    }
  }
}
首先给watchers 创建了一个空对象,然后通过循环拿到getter函数,为每个getter创建watcher,这个watcher跟组件的渲染watcher不一样,他传了一个computedWatcherOptions对象 { lazy: true },标识他是一个computer watcher,最后调用defineComputed(vm, key, userDef)方法
export function defineComputed (
  target: any,
  key: string,
  userDef: Object | Function
) {
  const shouldCache = !isServerRendering()
  if (typeof userDef === 'function') {
    sharedPropertyDefinition.get = shouldCache
      ? createComputedGetter(key)
      : createGetterInvoker(userDef)
    sharedPropertyDefinition.set = noop
  } else {
    sharedPropertyDefinition.get = userDef.get
      ? shouldCache && userDef.cache !== false
        ? createComputedGetter(key)
        : createGetterInvoker(userDef.get)
      : noop
    sharedPropertyDefinition.set = userDef.set || noop
  }
  if (process.env.NODE_ENV !== 'production' &&
      sharedPropertyDefinition.set === noop) {
    sharedPropertyDefinition.set = function () {
      warn(
        `Computed property "${key}" was assigned to but it has no setter.`,
        this
      )
    }
  }
  Object.defineProperty(target, key, sharedPropertyDefinition)
}
defineComputed方法主要通过 Object.defineProperty给对应的key添加get、set方法,get定义是通过createComputedGetter方法
function createComputedGetter (key) {
  return function computedGetter () {
    const watcher = this._computedWatchers && this._computedWatchers[key]
    if (watcher) {
      if (watcher.dirty) {
        watcher.evaluate()
      }
      if (Dep.target) {
        watcher.depend()
      }
      return watcher.value
    }
  }
}
当我们访问计算属性的时候其实就是执行这个方法,
下面通过一个例子讲下computed是怎么缓存的
<template>
  <div id="app">
   <div>
     {{count}}
   </div>
   <p>{{lastName}}</p>
    <button @click="change">change</button>
    <button @click="changeLast">changeLast</button>
  </div>
</template>

<script>
export default {
  name: 'App',

  data(){
    return {
      lastName:'tang',
      useless:0
    }
  },
  computed:{
    count(){
      return this.useless
    }
  },
  methods:{
    change(){
      this.useless ++
    },
    changeLast(){
      this.lastName = 'Zhang'
    }
  }
}
</script>
当组件渲染的时候,碰到{{count}}会执行count的计算属性方法
    const watcher = this._computedWatchers && this._computedWatchers[key]
    if (watcher) {
      if (watcher.dirty) {
        watcher.evaluate()
      }
      if (Dep.target) {
        watcher.depend()
      }
      return watcher.value
    }
也就是这段代码,之前初始化的时候,watcher.dirty的值是设置为true的,然后就会执行watcher.evaluate()方法,
  evaluate () {
    this.value = this.get()
    this.dirty = false
  }
这个方法就是执行get方法,然后把dirty 改成false
  get () {
    pushTarget(this)
    let value
    const vm = this.vm
    try {
      value = this.getter.call(vm, vm)
    } catch (e) {
      if (this.user) {
        handleError(e, vm, `getter for watcher "${this.expression}"`)
      } else {
        throw e
      }
    } finally {
      // "touch" every property so they are all tracked as
      // dependencies for deep watching
      if (this.deep) {
        traverse(value)
      }
      popTarget()
      this.cleanupDeps()
    }
    return value
  }
get方法会执行 pushTarget(this),在这之前是进行组件渲染,所以Dep.target是渲染watcher,执行 pushTarget(this)之后 Dep.target会变成computer watcher,当执行 this.getter.call(vm, vm)会访问到 this.useless属性,然后就会执行useless的get方法
get: function reactiveGetter () {
      const value = getter ? getter.call(obj) : val
      if (Dep.target) {
        dep.depend()
        if (childOb) {
          childOb.dep.depend()
          if (Array.isArray(value)) {
            dependArray(value)
          }
        }
      }
      return value
    },
这个时候useless会把computer watcher收集为依赖,当count的getter方法执行之后,会执行popTarget()方法,让Dep.target又变成渲染watcher,然后会判断Dep.target然后执行 watcher.depend(),这个方法useless会把渲染watcher也收集成依赖
这个时候useless的dep.subs为[computer watcher,渲染 watcher]
当我们通过change方法去修改useless的时候,会执行dep.notify方法
 notify () {
    // stabilize the subscriber list first
    const subs = this.subs.slice()
    if (process.env.NODE_ENV !== 'production' && !config.async) {
      // subs aren't sorted in scheduler if not running async
      // we need to sort them now to make sure they fire in correct
      // order
      subs.sort((a, b) => a.id - b.id)
    }
    for (let i = 0, l = subs.length; i < l; i++) {
      subs[i].update()
    }
  }
他就会把useless 的dep.subs循环执行一次,也就是把[computer watcher,渲染 watcher]的update方法执行一次
  update () {
    /* istanbul ignore else */
    if (this.lazy) {
      this.dirty = true
    } else if (this.sync) {
      this.run()
    } else {
      queueWatcher(this)
    }
  }
当执行第一个computer watcher方法的时候,lazy是为true然后把dirty改为true
执行第二个渲染 watcher的时候就会执行queueWatcher方法,就是去重新渲染视图,重新渲染视图的时候,肯定又会访问到{{count}},然后又会去执行count的getter方法
  const watcher = this._computedWatchers && this._computedWatchers[key]
    if (watcher) {
      if (watcher.dirty) {
        watcher.evaluate()
      }
      if (Dep.target) {
        watcher.depend()
      }
      return watcher.value
    }
这个时候watcher.dirty是为true了,所以就会重新求值,获取新的值,然后渲染的时候就是新值了,计算属性的流程就结束了
我们知道当第一次访问计算属性的之后dirty会改成false,只有当我们计算属性依赖的响应式值发生变化的时候执行computer watcher的update方法之后把dirty改成true,(上面例子的useless更新值),在watcher.evaluate()才会重新求值,如果我们修改的不是计算属性依赖的响应式值,比如执行上面例子的changeLast方法,dirty就一直是false,就不会重新求值,起到了缓存的作用
响应式的Vue框架独特的特性,当我们将一个JavaScript对象传给Vue的data选项,Vue将会递归遍历此对象的所有属性,并使用Object.defineProperty把这些属性转为getter/setter(这也是Vue不支持ie8以及更低版本浏览器的原因)
我们先创建一个Vue的构造函数
function Vue(options){
    let data = options.data; // 用户传入的数据
    // vm._data 就是检测后的数据了
    data = vm._data = typeof data === 'function' ? data.call(vm) : data;
    observe(data)
}使用Observer类是为了可以看到当前数据是否被观测过,防止对象重复观测
function observe(data){
      // 如果这个数据不是对象 或者是null 那就不用监控了
    if(!(typeof data === 'object' && data !== null)){
        return;
    }
   if(data.__ob__ instanceof Observer){ // 防止对象被重复观测
        return ;
    }
  //对数据进行defineProperty
   return new Observer(data) // 可以看到当前数据是否被观测过
}Object.defineProperty本身是可以观察数组的,但是为了性能考虑只是劫持了数组的方法
class Observer{
    constructor(data){

        Object.defineProperty(data,'__ob__',{ // __ob__ 是一个响应式表示 对象数组都有
            enumerable:false, // 不可枚举
            configurable:false,
            value:this
        })
        // data.__ob__ = this; // 相当于在数据上可以获取到__ob__这个属性 指代的是Observer的实例
        //  Object.defineProperty本身是可以观察数组的,但是为了性能考虑只是劫持了数组的方法
        if(Array.isArray(data)){
            // vue如何对数组进行处理呢? 数组用的是重写数组的方法  函数劫持
            // 改变数组本身的方法我就可以监控到了
            data.__proto__ = arrayMethods; // 通过原型链 向上查找的方式
            this.observeArray(data);
        }else{
            this.walk(data); // 可以对数据一步一步的处理
        }
    }
    observeArray(data){
        for(let i =0 ; i< data.length;i++){
            observe(data[i]);// 检测数组的对象类型
        }
    }
    walk(data){
        // 对象的循环   data:{name:'蜡笔小新',age:18}
        Object.keys(data).forEach(key=>{
            defineReactive(data,key,data[key]);// 定义响应式的数据变化
        })
    }
}function defineReactive(data,key,value){
observe(value); // 如果传入的值还是一个对象的话 就做递归循环检测
Object.defineProperty(data,key,{
get(){
return value
},
set(newValue){
if(newValue == value) return;
observe(newValue); // 监控当前设置的值,有可能用户给了一个新值是对象,让它也变成可观察
value = newValue;
}
})
}
劫持了数组的七个方法,并在方法里面执行自己改造的逻辑,再执行数组默认的方法
let oldArrayMethods = Array.prototype; // 获取数组原型上的方法

// 创建一个全新的对象 可以找到数组原型上的方法,而且修改对象时不会影响原数组的原型方法
let arrayMethods = Object.create(oldArrayMethods);

let methods = [ // 这七个方法都可以改变原数组
    'push',
    'pop',
    'shift',
    'unshift',
    'sort',
    'reverse',
    'splice'
]
methods.forEach(method=>{
    arrayMethods[method] = function (...args) { // 函数劫持 AOP
        // 当用户调用数组方法时 会先执行我自己改造的逻辑 在执行数组默认的逻辑
        const ob = this.__ob__; //获取当前实例
        let result  = oldArrayMethods[method].apply(this,args);  //调用数组原型自带的方法
        let inserted;
        // push unshift splice 都可以新增属性  (新增的属性可能是一个对象类型)
        // 内部还对数组中引用类型也做了一次劫持  [].push({name:'zf'})
        switch (method) {
            case 'push':
            case 'unshift':
                inserted = args
                break;
            case 'splice': // 也是新增属性  可以修改 可以删除  [].splice(arr,1,'div')
                inserted = args.slice(2);
                break;
            default:
                break;
        }
        inserted && ob.observeArray(inserted);
        return result;
    }
})冒泡排序的过程,就是从第一个元素开始,重复比较相邻的两个项,若第一项比第二项更大,则交换两者的位置;反之不动。
每一轮操作,都会将这一轮中最大的元素放置到数组的末尾。假如数组的长度是 n,那么当我们重复完 n 轮的时候,整个数组就有序了
  function bubbleSort(arr) {
    arr = [...arr];
    const len = arr.length;
    let flag = false;
    for (let i = 0; i < len; i++) {
      for (let j = 0; i < len - 1 - i; i++) {
        if (arr[j] > arr[j + 1]) {
          [arr[j], arr[j + 1]] = [arr[j + 1], arr[j]];
          flag = true;
        }
      }
      if (flag === false) return arr;
    }
    return arr;
}选择排序的关键字是“最小值”:循环遍历数组,每次都找出当前范围内的最小值,把它放在当前范围的头部;然后缩小排序范围,继续重复以上操作,直至数组完全有序为止。
function selectSort(arr) {
  arr = [...arr];
  const len = arr.length;
  let minIndex;
  for (let i = 0; i < len - 1; i++) {
    minIndex = i;
    for (let j = i; j < len; j++) {
      if (arr[j] < arr[minIndex]) {
        minIndex = j;
      }
    }
    if (i !== minIndex) {
      [arr[i], arr[minIndex]] = [arr[minIndex], arr[i]];
    }
  }
  return arr;
}let age:number = 23
let name:string = 'tangxianwen'
let isTrue:boolean = truelet list:string[] = ['苹果','梨子']
//或者
let numbers:Array<number> = [1,2,3,4]let obj:any = {a:1}你可以开启编译项 noImplicitAny,当被隐式推断为 any 时,TypeScipt 就会报错
function greet(name: string):string {
    return "Hello, " + name.toUpperCase() + "!!"
}const names = ["Alice", "Bob", "Eve"];
names.forEach((s) => {
console.log(s.toUppercase());
});function printCoord(pt:{x:number;y:number}){
console.log('the coordinates x value is'+pt.x)
console.log('the coordinates y value is'+pt.y)
}
printCoord({x:3,y:7})function printName(obj:{first:string;last?:string}){
if(obj.last !== undefined){
console.log(obj.last.toUpperCase())
}
//或者使用可选连
console.log(obj.last?.toUpperCase())
}function printId(id:number|string){
console.log('your id is' + id)
if(typeof id === 'string'){
console.log(id.toUpperCase())
}else {
console.log(id)
}
}
printId(1)
printId('1')
function welcomePeople(x:string[]|string){
if(Array.isArray(x)){
console.log(x.join('and'))
}else {
console.log(x)
}
}type Point = {
x:number;
y:number;
}
type ID = number | stringinterface Point {
x:number;
y:number
}类型别名与接口的不同
类型别名和接口非常相似,大部分时候,你可以任意选择使用。接口的几乎所有特性都可以在 type 中使用,两者最关键的差别在于类型别名本身无法添加新的属性,而接口是可以扩展的
// 通过继承扩展类型
interface Animal {
    name: string
}

interface Bear extends Animal {
    honey: boolean
}

const bear = getBear()
bear.name
bear.honey

 //Type

// 通过交集扩展类型
type Animal = {
    name: string
}

type Bear = Animal & {
    honey: boolean
}

const bear = getBear();
bear.name;
bear.honey;
// Interface
// 对一个已经存在的接口添加新的字段
interface Window {
title: string
}
interface Window {
ts: TypeScriptAPI
}
const src = 'const a = "Hello World"';
window.ts.transpileModule(src, {});
// Type
// 创建后不能被改变
type Window = {
title: string
}
type Window = {
ts: TypeScriptAPI
}
// Error: Duplicate identifier 'Window'.//你可以使用类型断言将其指定为一个更具体的类型:
const myCanvas = document.getElementById("main_canvas") as HTMLCanvasElement;
//或者
const myCanvas2 = <HTMLCanvasElement>document.getElementById("main_canvas");
//双重断言 当你不能直接断言成某种类型时
function handler(event: Event) {
const element = (event as any) as HTMLElement; // ok
}let x: "hello" = "hello";
// OK
x = "hello";
// ...
x = "howdy";
// Type '"howdy"' is not assignable to type '"hello"'.
function printText(s: string, alignment: "left" | "right" | "center") {
// ...
}declare function handleRequest(url: string, method: "GET" | "POST"): void;
const req = { url: "https://example.com", method: "GET" };
handleRequest(req.url, req.method);
// Argument of type 'string' is not assignable to parameter of type '"GET" | "POST"'.在上面这个例子里,req.method 被推断为 string ,而不是 "GET",因为在创建 req 和 调用 handleRequest 函数之间,可能还有其他的代码,或许会将 req.method 赋值一个新字符串比如 "Guess" 。所以 TypeScript 就报错了。
// Change 1:
const req = { url: "https://example.com", method: "GET" as "GET" };
// Change 2
handleRequest(req.url, req.method as "GET");
2.你也可以使用 as const 把整个对象转为一个类型字面量:
const req = { url: "https://example.com", method: "GET" } as const;
handleRequest(req.url, req.method);
as const 效果跟 const 类似,但是对类型系统而言,它可以确保所有的属性都被赋予一个字面量类型,而不是一个更通用的类型比如 string 或者 number 。
JavaScript 有两个原始类型的值,用于表示空缺或者未初始化,他们分别是 null 和 undefined 。
TypeScript 有两个对应的同名类型。它们的行为取决于是否打开了 strictNullChecks 选项。
当 strictNullChecks 选项关闭的时候,如果一个值可能是 null 或者 undefined,它依然可以被正确的访问,或者被赋值给任意类型的属性。这有点类似于没有空值检查的语言 (比如 C# ,Java) 。这些检查的缺少,是导致 bug 的主要源头,所以我们始终推荐开发者开启 strictNullChecks 选项。
当 strictNullChecks 选项打开的时候,如果一个值可能是 null 或者 undefined,你需要在用它的方法或者属性之前,先检查这些值,就像用可选的属性之前,先检查一下 是否是 undefined ,我们也可以使用类型收窄(narrowing)检查值是否是 null:
function doSomething(x: string | null) {
  if (x === null) {
    // do nothing
  } else {
    console.log("Hello, " + x.toUpperCase());
  }
}TypeScript 提供了一个特殊的语法,可以在不做任何检查的情况下,从类型中移除 null 和 undefined,这就是在任意表达式后面写上 ! ,这是一个有效的类型断言,表示它的值不可能是 null 或者 undefined:
function liveDangerously(x?: number | null) {
  // No error
  console.log(x!.toFixed());
}枚举是 TypeScript 添加的新特性,用于描述一个值可能是多个常量中的一个。不同于大部分的 TypeScript 特性,这并不是一个类型层面的增量,而是会添加到语言和运行时。因为如此,你应该了解下这个特性。但是可以等一等再用,除非你确定要使用它。你可以在枚举类型页面了解更多的信息。
enum Tristate {
  False,
  True,
  Unknown
}
其被编译成 JavaScript 后如下所示:
var Tristate;
(function(Tristate) {
  Tristate[(Tristate['False'] = 0)] = 'False';
  Tristate[(Tristate['True'] = 1)] = 'True';
  Tristate[(Tristate['Unknown'] = 2)] = 'Unknown';
})(Tristate || (Tristate = {}));const oneHundred:bigint = BigInt(100)
const anotherHundred:bigint = 100n这也是 JavaScript 中的一个原始类型,通过函数 Symbol(),我们可以创建一个全局唯一的引用:
const firstName = Symbol("name");
const secondName = Symbol("name");在vue源码里面,有许多地方用到了mergeOptions方法合并options
场景一:我们在实例执行_init(options)的时候会执行下面的代码进行options合并,if是创建组件实例执行的,else是new Vue执行的
Vue.prototype._init = function (options?: Object) {
  // merge options
  if (options && options._isComponent) {
    // optimize internal component instantiation
    // since dynamic options merging is pretty slow, and none of the
    // internal component options needs special treatment.
    initInternalComponent(vm, options)
  } else {
    vm.$options = mergeOptions(
      resolveConstructorOptions(vm.constructor),
      options || {},
      vm
    )
  }
  // ...
}
场景二:当我们构建组件的时候,vue内部是通过Vue.extend方法,使用了mergeOptions将Vue的options跟组件的extendOptions进行合并
  Vue.extend = function (extendOptions: Object): Function {
    extendOptions = extendOptions || {}
    const Super = this
    const Sub = function VueComponent (options) {
      this._init(options)
    }
    Sub.prototype = Object.create(Super.prototype)
    Sub.prototype.constructor = Sub
    Sub.cid = cid++
    Sub.options = mergeOptions(
      Super.options,
      extendOptions
    )
    .....
}
场景三:我们使用Vue.mixin的时候其实也是执行的mergeOptions进行合并
  Vue.mixin = function (mixin: Object) {
    this.options = mergeOptions(this.options, mixin)
    return this
  }
mergeOptions 源码 src/core/util/options.js
export function mergeOptions (
  parent: Object,
  child: Object,
  vm?: Component
): Object {
  if (process.env.NODE_ENV !== 'production') {
    checkComponents(child)
  }

  if (typeof child === 'function') {
    child = child.options
  }

  //对属性进行整理统一规范
  normalizeProps(child, vm)
  normalizeInject(child, vm)
  normalizeDirectives(child)

  // Apply extends and mixins on the child options,
  // but only if it is a raw options object that isn't
  // the result of another mergeOptions call.
  // Only merged options has the _base property.
  if (!child._base) {
    if (child.extends) {
      parent = mergeOptions(parent, child.extends, vm)
    }
    if (child.mixins) {
      for (let i = 0, l = child.mixins.length; i < l; i++) {
        parent = mergeOptions(parent, child.mixins[i], vm)
      }
    }
  }

  const options = {}
  let key
  for (key in parent) {
    mergeField(key)
  }
  for (key in child) {
    if (!hasOwn(parent, key)) {
      mergeField(key)
    }
  }
  function mergeField (key) {
    const strat = strats[key] || defaultStrat
    options[key] = strat(parent[key], child[key], vm, key)
  }
  return options
}
主要就是把 parent 和 child 这两个对象根据一些合并策略,合并成一个新对象并返回。如果组件对象上存在extends跟mixins则递归调用mergeOptions 把 extends 和 mixins 合并到 parent 上,然后遍历 parent,调用 mergeField,然后再遍历 child,如果 key 不在 parent 的自身属性上,则调用 mergeField。根据不同的key会有不同的合并策略,详细可以在src/core/util/options.js看
比如生命周期合并策略
function mergeHook (
  parentVal: ?Array<Function>,
  childVal: ?Function | ?Array<Function>
): ?Array<Function> {
  const res = childVal
    ? parentVal
      ? parentVal.concat(childVal)
      : Array.isArray(childVal)
        ? childVal
        : [childVal]
    : parentVal
  return res
    ? dedupeHooks(res)
    : res
}

function dedupeHooks (hooks) {
  const res = []
  for (let i = 0; i < hooks.length; i++) {
    if (res.indexOf(hooks[i]) === -1) {
      res.push(hooks[i])
    }
  }
  return res
}

LIFECYCLE_HOOKS.forEach(hook => {
  strats[hook] = mergeHook
})

export const LIFECYCLE_HOOKS = [
  'beforeCreate',
  'created',
  'beforeMount',
  'mounted',
  'beforeUpdate',
  'updated',
  'beforeDestroy',
  'destroyed',
  'activated',
  'deactivated',
  'errorCaptured'
]
在mergeHook 中,使用三元运算符进行判断,如果没有childVal直接返回 parentVal,如果有childVal,再判断有没有 parentVal,如果存在就把 parentVal 跟childVal进行合并,否则再判断childVal是不是数组,不是则包装成数组,最后调用dedupeHooks去除重复项
真题描述:将两个有序链表合并为一个新的有序链表并返回。新链表是通过拼接给定的两个链表的所有结点组成的。
示例:
输入:1->2->4, 1->3->4 输出:1->1->2->3->4->4
(function () {
  function ListNode(value) {
    this.val = value;
    this.next = null;
  }
  const l1 = new ListNode(1);
  const l11 = new ListNode(2);
  const l12 = new ListNode(4);
  l1.next = l11;
  l11.next = l12;

  const l2 = new ListNode(1);
  const l21 = new ListNode(3);
  const l22 = new ListNode(4);
  l2.next = l21;
  l21.next = l22;

  const mergeTwoLusts = function (l1, l2) {
    let head = new ListNode();
    let cur = head;
    while (l1 && l2) {
      if (l1.val > l2.val) {
        cur.next = l2;
        l2 = l2.next;
      } else {
        cur.next = l1;
        l1 = l1.next;
      }
      cur = cur.next;
    }
    cur.next = l1 !== null ? l1 : l2;
    return head.next;
  };
  console.log(JSON.stringify(mergeTwoLusts(l1, l2)));
})();真题描述:给定一个排序链表,删除所有重复的元素,使得每个元素只出现一次。
示例 1:
输入: 1->1->2
输出: 1->2
示例 2:
输入: 1->1->2->3->3
输出: 1->2->3
(function () {
  function ListNode(value) {
    this.val = value;
    this.next = null;
  }
  const l1 = new ListNode(1);
  const l2 = new ListNode(1);
  const l3 = new ListNode(2);
  l1.next = l2;
  l2.next = l3;

  const deleteDuplicates = function (head) {
    let cur = head;
    while (cur != null && cur.next != null) {
      if (cur.val === cur.next.val) {
        cur.next = cur.next.next;
      } else {
        cur = cur.next;
      }
    }
    return head;
  };
  console.log(JSON.stringify(deleteDuplicates(l1)));
})();真题描述:给定一个排序链表,删除所有含有重复数字的结点,只保留原始链表中 没有重复出现的数字。
示例 1:
输入: 1->2->3->3->4->4->5
输出: 1->2->5
示例 2:
输入: 1->1->1->2->3
输出: 2->3
(function () {
  function ListNode(value) {
    this.val = value;
    this.next = null;
  }
  const l1 = new ListNode(1);
  const l2 = new ListNode(2);
  const l3 = new ListNode(3);
  const l4 = new ListNode(3);
  const l5 = new ListNode(4);
  const l6 = new ListNode(4);
  const l7 = new ListNode(5);
  l1.next = l2;
  l2.next = l3;
  l3.next = l4;
  l4.next = l5;
  l5.next = l6;
  l6.next = l7;
  // dummy-> 1->2->3->3->4->4->5
  const deleteDuplicates = function (head) {
    if (!head && !head.next) return;

    const dummy = new ListNode();
    dummy.next = head;
    const cur = dummy;
    while (cur.next && cur.next.next) {
      if (cur.next.val === cur.next.next.val) {
        let val = cur.next.val;
        while (cur.next && cur.next.val === val) {
          cur.next = cur.next.next;
        }
      } else {
        cur = cur.next;
      }
    }
    return dummy;
  };
})();Jenkins是一款开源 CI&CD 软件,用于自动化各种任务,包括构建、测试和部署软件。
首先安装java依赖包
yum install java
添加jenkins源
wget -O /etc/yum.repos.d/jenkins.repo http://pkg.jenkins-ci.org/redhat/jenkins.repo
rpm --import https://jenkins-ci.org/redhat/jenkins-ci.org.key
yum install jenkins
jenkins修改权限
vim /etc/sysconfig/jenkins
找到$JENKINS_USER 改为 “root”:
service jenkins start
然后在浏览器输入你的ip:8080就可以看到解锁页面(如果启动成功但是不能访问,可能是安全组规则没配置配置,还有防火墙的原因,百度解决)

然后会叫我们输入管理员密码,页面上会有提示指定文件,我们用vim打开
vim /var/lib/jenkins/secrets/initialAdminPassword
然后复制密码到输入框执行下一步

选择安装推荐的插件即可(可能有的人插件安装失败,可以后面解决)

创建管理员用户

填好之后下一步就好了,开始使用jenkins
我们在(系统管理-插件管理-高级标签页)替换升级站点为:http://mirror.xmission.com/jenkins/updates/update-center.json 提交就可以了,然后重新安装插件
.jpg)
新建jenkins任务

创建一个自由风格的软件项目
.jpg)
我们初始化一个项目,react/vue都可以,我这里使用的react

1、打开刚创建的任务,选择配置,添加远程仓库地址,配置登录名及密码及分支。

2、安装Generic Webhook Trigger Plugin插件
该插件功能很强大,可以根据不同的触发参数触发不同的构建操作,比如我向远程仓库提交的是master分支的代码,就执行代码部署工作,我向远程仓库提交的是某个feature分支,就执行单元测试,单元测试通过后合并至dev分支。灵活性很高,可以自定义配置适合自己公司的方案,这里方便演示我们不做任何条件判断,只要有提交就触发。在任务配置里勾选Generic Webhook Trigger即可

3、仓库配置钩子,当本地向远端仓库发起push时,远端仓库会向配置的Jenkins服务器的接口地址发起一个带参数的请求,jenkins收到后开始工作

URL格式为 http://:@<Jenkins IP地址>:端口/generic-webhook-trigger/invoke
userid和api token在jenkins的系统管理-管理用户-admin-设置里,你可以新增token

Jenkins IP地址和端口是你部署jenkins服务器的ip地址,端口号没改过的话就是8080。
密码填你和上面userid对应的密码
填完之后点击add webhook,下面就会出现记录,显示绿色的√就是没问题,你可以点击Redeliver再次递交代码,或者修改本地代码git push测试一下

如果没问题,你的Jenkins左侧栏构建执行状态里将会出现一个任务

当我们git push触发钩子之后,jenkins就开始工作了,我们可以配置node环境,然后安装依赖-->打包
npm install
npm run build
1、安装nvm wrappe插件使用node环境
2、打开我们我们的任务配置,点击构建环境,勾选这个,并填写一个node版本(可以查看自己本地node版本)

3、点击构建,输入要执行的命令
.jpg)
4、保存,然后你可以修改下本地代码git push测试一下,也可以在github中点击Redeliver再次递交代码
5、查看jenkins任务,如果成功了,点击项目的工作空间,将会发现多了build和node_modules两个文件夹。
.jpg)
自动化部署才是我们最需要的,我们只要git push,然后jenkins就会帮我们自动部署
我们只需要在之前的执行命令后面加这几行命令就可以了
tar czvf build.tar.gz * &&
mv -f build.tar.gz /root/www/pc &&
cd /root/www/pc &&
tar -xzvf build.tar.gz &&
rm -rf build.tar.gz
/root/www/pc是我放项目的目录(可以通过nginx配置)
.jpg)
点击保存之后我们可以测试一下,当构建完成时,我们就可以在服务器目录/root/www/pc下看到打包后的文件,并且用我们的域名就可以访问了
.jpg)
.jpg)
定义:指对象有某个行为,但是在不同的场景中,该行为有不同的实现算法
const activityObj = {
  special(price){
     return price * 0.6
  },
  secondsKill(price){
    return  price * 0.5
  },
  activity(price){
    return  price * 0.9
  }
}

const askPrice =function(type,money) {
  return activityObj[type](money);
};

console.log(askPrice('special',10000)); // 6000题目描述:给定一个只包括 '(',')','{','}','[',']' 的字符串,判断字符串是否有效。
示例1
输入: "()"
输出: true
示例2
输入: "()[]{}"
输出: true
示例3
输入: "([)]"
输出: false
const isValid = function (s) {
  const map = {
    "(": ")",
    "{": "}",
    "[": "]",
  };
  if (!s) return true;
  const stack = [];

  const len = s.length;
  for (let i = 0; i < len; i++) {
    const val = s[i];
    if (["(", "{", "["].indexOf(val) > -1) {
      stack.push(map[val]);
    } else {
      if (!stack.length || stack.pop() !== val) {
        return false;
      }
    }
  }
  return stack.length === 0;
};题目描述: 根据每日气温列表,请重新生成一个列表,对应位置的输出是需要再等待多久温度才会升高超过该日的天数。如果之后都不会升高,请在该位置用 0 来代替。
例如,给定一个列表 temperatures = [73, 74, 75, 71, 69, 72, 76, 73],你的输出应该是 [1, 1, 4, 2, 1, 1, 0, 0]。
提示:气温 列表长度的范围是 [1, 30000]。每个气温的值的均为华氏度,都是在 [30, 100] 范围内的整数。
const dailyTemperatures = function (T) {
  const len = T.length;
  const stack = [];
  const res = Array(len).fill(0);
  for (let i = 0; i < len; i++) {
    while (stack.length && T[i] > T[stack[stack.length - 1]]) {
      const top = stack.pop();
      res[top] = i - top;
    }

    stack.push(i);
  }
  return res;
};题目描述:给定一个数组 nums 和滑动窗口的大小 k,请找出所有滑动窗口里的最大值。
示例:
输入: nums = [1,3,-1,-3,5,3,6,7], 和 k = 3 输出: [3,3,5,5,6,7]
[1 3 -1] -3 5 3 6 7
1 [3 -1 -3] 5 3 6 7
1 3 [-1 -3 5] 3 6 7
1 3 -1 [-3 5 3] 6 7
1 3 -1 -3 [5 3 6] 7
1 3 -1 -3 5 [3 6 7]
const maxSlidingWindow = function (nums, k) {
  const len = nums.length;
  const res = [];
  let left = 0;
  let right = k - 1;
  while (right < len) {
    const max = getMax(nums, left, right);
    res.push(max);
    left++;
    right++;
  }
  return res;
};

function getMax(nums, left, right) {
  if (!nums || !nums.length) {
    return;
  }
  let maxVal = 0;
  for (let i = left; i <= right; i++) {
    if (nums[i] > maxVal) {
      maxVal = nums[i];
    }
  }
  return maxVal;
}
const nums = [1, 3, -1, -3, 5, 3, 6, 7],
  k = 3;
console.log(maxSlidingWindow(nums, k));题目描述:使用栈实现队列的下列操作:
push(x) -- 将一个元素放入队列的尾部。
pop() -- 从队列首部移除元素。
peek() -- 返回队列首部的元素。
empty() -- 返回队列是否为空。
const MyQueue = function () {
  this.stack1 = [];
  this.stack2 = [];
};
//将一个元素放入队列的尾部。
MyQueue.prototype.push = function (x) {
  this.stack1.push(x);
};
//从队列首部移除元素。
MyQueue.prototype.pop = function (x) {
  if (this.stack2.length === 0) {
    while (this.stack1.length) {
      this.stack2.push(this.stack1.pop());
    }
  }
  return this.stack2.pop();
};
//返回队列首部的元素。
MyQueue.prototype.peek = function () {
  if (this.stack2.length <= 0) {
    while (this.stack1.length != 0) {
      this.stack2.push(this.stack1.pop());
    }
  }
  const stack2Len = this.stack2.length;
  return stack2Len && this.stack2[stack2Len - 1];
};
// 返回队列是否为空。
MyQueue.prototype.empty = function () {
  return !this.stack1.length && !this.stack2.length;
};您的连接不是私密连接
攻击者可能会试图从 vitejs.dev 窃取您的信息(例如:密码、通讯内容或信用卡信息)。了解详情
NET::ERR_CERT_DATE_INVALID
vitejs.dev 通常会使用加密技术来保护您的信息。Chrome 此次尝试连接到 vitejs.dev 时,该网站发回了异常的错误凭据。这可能是因为有攻击者在试图冒充 vitejs.dev,或者 Wi-Fi 登录屏幕中断了此次连接。请放心,您的信息仍然是安全的,因为 Chrome 尚未进行任何数据交换便停止了连接。
您目前无法访问 vitejs.dev,因为此网站使用了 HSTS。网络错误和攻击通常是暂时的,因此,此网页稍后可能会恢复正常。
就是在当前页面用键盘输入 thisisunsafe ,不是在地址栏输入,就直接敲键盘就行了,页面即会自动刷新进入网页。
原因:因为Chrome不信任这些自签名ssl证书,为了安全起见,直接禁止访问了,thisisunsafe 这个命令,说明你已经了解并确认这是个不安全的网站,你仍要访问就给你访问了。
定义: 为解除请求的发送者和接收者之间耦合,而使多个对象都有机会处理这个请求。将这些对象连成一条链,并沿着这条链传递该请求,直到有一个对象处理它
下面模拟购物车提交订单流程
const UI = {
  Alert(options) {
    const msg = options.msg || '您确定吗'
    return new Promise((resolve, reject) => {
      var r = confirm(msg)
      if (r) {
        resolve(true)
      } else {
        reject(false)
      }
    })
  }
}

const validateHandler = {
  validateAddress() {
    if (true) {
      UI.Alert({
        msg: "您确定地址正确吗"
      })
      .then(() => {
        console.log(1111)
        this.next()
      })
      .catch(err => {
      })
    }
    return false
  },
  validateMoney() {
    if (true) {
      UI.Alert({
        msg: "您确定继续支付吗"
      })
      .then(() => {
        console.log(2222)
        this.next()
      })
      .catch(err => {
      })

    }
    return false
  },
  validateCoupon() {
    if (true) {
      console.log(3333)
      return true
    }
    return false
  }
}
class Chain {
  constructor(fn) {
    this.fn = fn
    this.sucessor = null
  }
  setNext(fnc) {
    this.sucessor = fnc
    return fnc
  }
  next() {
    this.sucessor.run.apply(this.sucessor, arguments)
  }
  run() {
    const result = this.fn.apply(this, arguments)
    if (result) {
      this.next()
    }
  }
}
const validateObj = {}

const validateArr = Object.keys(validateHandler)


for (const fnc of validateArr) { // 循环执行验证方法
  validateObj[fnc + 'Chain'] = new Chain(validateHandler[fnc])
}

const {
  validateAddressChain,
  validateMoneyChain,
  validateCouponChain
} = validateObj


validateAddressChain
  .setNext(validateMoneyChain)
  .setNext(validateCouponChain)

validateAddressChain.run()我们借用vscode自带的功能
文件 -> 首选项 -> 用户代码片段 -> 点击新建代码片段 -> 取名vue.json 确定编辑自己写的.vue模板,进行保存
{
  "Print to console": {
    "prefix": "vue",
    "body": [
      "<!-- $0 -->",
      "<template>",
      "  <div></div>",
      "</template>",
      "",
      "<script>",
      "export default {",
      "  components: {},",
      "",
      "  data () {",
      "    return {",
      "    }",
      "  },",
      "",
      "  computed: {},",
      "",
      "  created () {},",
      "",
      "  methods: {}",
      "}",
      "",
      "</script>",
      "<style lang='scss' scoped>",
      "",
      "</style>"
  ],
    "description": "Log output to console"
  }
}
我们新建.vue文件,在首行输入vue按键盘Enter就可以了
在某些情况我们可能要重置data上面的某些属性
this.$data //获取当前状态的data
this.$options.data() //获取该组件初始化状态下的data
Object.assign(this.$data,this.$options.data()) //重置datathis.$forceUpdate() //迫使 Vue 实例重新渲染。注意它仅仅影响实例本身和插入插槽内容的子组件,而不是所有子组件。
/*
强制替换元素/组件而不是重复使用它。当你遇到如下场景时它可能会很有用:
完整地触发组件的生命周期钩子
触发过渡
*/
<Component :key="key"/>
data(){
return{
key:0
}
}
//刷新key达到刷新组件的目的
key++;进行组件初始化、编译、渲染和打补丁的性能追踪
//main.js
const isDev = process.env.NODE_ENV !== "production";
Vue.config.performance = isDev;
当我们遇到很多的数据展示且不需要响应式变化时,我们就可以使用Object.freeze进行优化;
Object.freeze() 方法可以冻结一个对象。一个被冻结的对象再也不能被修改;
当我们把一个对象传给实例的data,Vue会使用Object.defineProperty把这些属性响应式,使用了 Object.freeze之后,不仅可以减少 observer 的开销,还能减少不少内存开销,Vue有人提了相关issue
export default {
  data(){
    return {
      list: []
    }
  },
  async created() {
    const list = await this.$axios.get("/goodsList");
    this.list = Object.freeze(list);
  }
};我们平时组件传值props跟emit用的比较多,但是有些时候他们不是父子组件就比较麻烦了
现在三个嵌套的组件, A -> B -> C ,我们现在要从A传值给C, 或者C通过emit传值给A

A组件
<template>
  <div>
    <B :name="name" @changeName="changeName"/>
  </div>
</template>

<script>
import B from './B'
export default {
  components: {
    B
  },
  data () {
    return {
      name:'蜡笔小新'
    }
  },
  methods: {
    changeName(msg){
      this.name = msg
    }
  }
}
</script>
B组件
<template>
  <div>
    <C v-bind="$attrs" v-on="$listeners"/>
  </div>
</template>
<script>
import C from './C'
export default {
  components: {
    C
  },
}
</script>
C组件
<template>
  <div>
    {{name}}
    <button @click="changeName">修改</button>
  </div>
</template>
<script>
export default {
  props:{
    // A组件传来的
    name:{
      type:String
    }
  },
  methods: {
    changeName(){
      this.$emit('changeName','coder') //传给A组件
    }
  }
}
</script>
这样我们就实现了跨组件传值,一般在对UI组件进行二次封装时,只写上常用的一些属性跟方法,然后写上$attrs和$listners,我们使用组件时就可以直接使用原组件的属性跟方法
因为vue带来的双向绑定给开发带来了便利,同时也带来了代码维护上的问题,我们可以在子组件直接修改父组件穿的prop,新版本直接修改会报warn,官方推荐以 update:myPropName 的模式触发事件取而代之
<text-document v-bind:title.sync="msg"></text-document>
//等同于
<text-document v-bind:title="value => msg = value"></text-document>

//子组件更新
this.$emit('update:title', newTitle)这是一个文档中没有的api,在源码中存在的,我们可以看vue源码_init函数中是通过callHook调用生命周期的
      vm._self = vm;
      initLifecycle(vm);
      initEvents(vm);
      initRender(vm);
      callHook(vm, 'beforeCreate');
      initInjections(vm); // resolve injections before data/props
      initState(vm);
      initProvide(vm); // resolve provide after data/props
      callHook(vm, 'created');
然后我们找到callHook,我们可以看到vm._hasHookEvent为true时就会执行 vm.$emit('hook:' + hook)
 function callHook (vm, hook) {
    // #7573 disable dep collection when invoking lifecycle hooks
    pushTarget();
    var handlers = vm.$options[hook];
    var info = hook + " hook";
    if (handlers) {
      for (var i = 0, j = handlers.length; i < j; i++) {
        invokeWithErrorHandling(handlers[i], vm, null, vm, info);
      }
    }
    if (vm._hasHookEvent) {
      vm.$emit('hook:' + hook);
    }
    popTarget();
} 然后我们通过_hasHookEvent找到相关代码,当通过$on去监听时,如果事件名以 hooks: 作为前缀,vm._hasHookEvent就会被置为true
    var hookRE = /^hook:/;
    Vue.prototype.$on = function (event, fn) {
      var vm = this;
      if (Array.isArray(event)) {
        for (var i = 0, l = event.length; i < l; i++) {
          vm.$on(event[i], fn);
        }
      } else {
        (vm._events[event] || (vm._events[event] = [])).push(fn);
        // optimize hook:event cost by using a boolean flag marked at registration
        // instead of a hash lookup
        if (hookRE.test(event)) {
          vm._hasHookEvent = true;
        }
      }
      return vm
    };
使用场景
 mounted(){
    let i = 0
    this.timer = setInterval(()=>{
      console.log(++i);
    },1000)

    this.$on('hook:beforeDestroy',()=>{
        clearInterval(this.timer)
    })
}v-model 文档一个组件上的 v-model 默认会利用名为 value 的 prop 和名为 input 的事件,但是像单选框、复选框等类型的输入控件可能会将 value 特性用于不同的目的。model 选项可以用来避免这样的冲突:
Vue.component('base-checkbox', {
  model: {
    prop: 'checked',
    event: 'change'
  },
  props: {
    checked: Boolean
  },
  template: `
    <input
      type="checkbox"
      v-bind:checked="checked"
      v-on:change="$emit('change', $event.target.checked)"
    >
  `
})
<base-checkbox v-model="lovingVue"></base-checkbox>
这里的 lovingVue 的值将会传入这个名为 checked 的 prop。同时当 触发一个 change事件并附带一个新的值的时候,这个 lovingVue 的属性将会被更新。
当我们项目比较大的时候,我们就会把路由文件根据不同的业务模块拆分

每个子模块导出一个路由配置数组
export default [
  {
    path: '/home/welcome',
    name: 'home',
    component: () => import(/* webpackChunkName: "home" */ '@/pages/home/index.vue')
  }
]我们现在要实现的是每增加一个模块自动引入,我们借用webpack的apirequire.context
//router/index.js
import Vue from 'vue'
import Router from 'vue-router'
Vue.use(Router)
let routes = []
const routerContext = require.context('./', true, /index\.js$/)
routerContext.keys().forEach(route => {
  if (route.startsWith('./index')) return
  const routerMoudle = routerContext(route).default || routerContext(route)
  routes = [...routes, ...routerMoudle]
})

export default new Router({
  mode: 'history',
  base: process.env.BASE_URL,
  routes: routes
})使用vue的生命周期函数activated
 它在keep-alive 组件激活时调用。
该钩子在服务器端渲染期间不被调用。1.当我们watch一个值时,第一次不会执行,只有值发生变化时才会执行,此时需要我们将immediate设为true
2.普通的watch方法无法无法监听对象内部属性的改变,我们把deep设为true时就能进行深度监听了
new Vue({
  el: '#app',
  data: {
    obj: { name: '蜡笔小新'}
  },
  watch: {
    obj: {
      handler(newName, oldName) {       },
      deep: true,
      immediate: true
    }
  }
})这是新手都会遇到的问题,父组件异步获取数据传给子组件,子组件拿不到值,下面是我平时的解决方案
在子组件使用watch监听propor
在父组件的data上定义一个Boolean值为flag:false,在使用的子组件时写上v-if="flag",当异步数据获取到时,把flag改成true插槽是一个很好用的api,特别是在封装组件的时候,让组件有更多扩展的空间
//封装通用header组件
<template>
  <div class="cc-header header">
    <cc-svg-icon
      @click="goback"
      icon-class="left-arrow"
      class-name="left-arrow"
      size=".2rem"
    ></cc-svg-icon>
    <div v-if="$slots.center" class="cc-header-center">
      <slot name="center"></slot>
    </div>
    <p class="cc-header-title" v-else>{{title}}</p>
    <div class="cc-header-right">
      <slot name="right"></slot>
    </div>
  </div>
</template>
//使用组件
<cc-header>
<template slot="center">
<van-search class="search-input" placeholder="通用名" v-model="params.search" />
</template>
<template slot="right">
<div class="search-btn" @click="toSearch">搜索</div>
</template>
</cc-header>Vue.js 的插件应该暴露一个 install 方法。这个方法的第一个参数是 Vue 构造器,第二个参数是一个可选的选项对象:
//MyPlugin.js
MyPlugin.install = function (Vue, options) {
  // 1. 添加全局方法或属性
  Vue.myGlobalMethod = function () {
    // 逻辑...
  }

  // 2. 添加全局资源
  Vue.directive('my-directive', {
    bind (el, binding, vnode, oldVnode) {
      // 逻辑...
    }
    ...
  })

  // 3. 注入组件选项
  Vue.mixin({
    created: function () {
      // 逻辑...
    }
    ...
  })

  // 4. 添加实例方法
  Vue.prototype.$myMethod = function (methodOptions) {
    // 逻辑...
  }
}
//main.js
Vue.use(MyPlugin)
然后在main.js引入, 通过全局方法 Vue.use() 使用插件,查看vue文档
ref 被用来给元素或子组件注册引用信息。引用信息将会注册在父组件的 $refs 对象上。如果在普通的 DOM 元素上使用,引用指向的就是 DOM 元素;如果用在子组件上,引用就指向组件实例
在操作dom的时候尽量使用ref去获取,因为它只作用于当前组件,而不是使用queryselector等全局选择器造成意外的bug
<p ref="p">hello</p>
<child-component ref="child"></child-component>让一个对象可响应。Vue 内部会用它来处理 data 函数返回的对象。当我们项目没使用vuex时,就可以使用这个api
import Vue from 'vue'
export const store = Vue.observable({ count: 0 })
export const mutations = {
  setCount (count) {
    store.count = count
  }
}跳过这个元素和它的子元素的编译过程。可以用来显示原始 Mustache 标签。跳过大量没有指令的节点会加快编译。
<span v-pre>{{ this will not be compiled }}</span>这个指令保持在元素上直到关联实例结束编译。和 CSS 规则如 [v-cloak] { display: none } 一起用时,这个指令可以隐藏未编译的 Mustache 标签直到实例准备完毕。
当网络较慢,网页还在加载 Vue.js ,而导致 Vue 来不及渲染,这时页面就会显示原始 Mustache 标签。我们可以使用 v-cloak 指令来解决这一问题。
<div v-cloak>
  {{ message }}
</div>[v-cloak] {
display: none;
}只渲染元素和组件一次。随后的重新渲染,元素/组件及其所有的子节点将被视为静态内容并跳过。这可以用于优化更新性能
<span v-once>This will never change: {{msg}}</span>/**
* Promise A+ 规范实现
**/
// 定义三个常量表示 Promise 的状态
// 等待状态 可以变更为成功或失败
const PENDING = 'pending'
// 成功状态
const FULFILLED = 'fulfilled'
// 失败状态
const REJECTED = 'rejected'
/**
* 工具方法
**/
function isFunction(value) {
return typeof value === 'function'
}
function isObject(value) {
return typeof value === 'object' && value !== null
}
function isIterator(value) {
return value && isFunction(value[Symbol.iterator])
}
// 定时器函数
// 为了确保 onFulfilled 和 onRejected 方法异步执行,且应该在 then 方法被调用的那一轮事件循环之后的新执行栈中执行
function nextTick(fn) {
setTimeout(fn, 0)
}
/**
* 规范 2.3
* 实现兼容多种 Promise 的 resolutionProcedure 函数
*/
function resolutionProcedure(promise2, x, resolve, reject) {
// 2.3.1 promise2 返回结果 x 为自身,应直接执行 reject
if (promise2 === x) {
return reject(new TypeError('Error 循环引用'))
}
// 2.3.2 如果 x 是一个 Promise 实例
if (x instanceof Promise) {
x.then(
// 继续调用 resolutionProcedure 解析
// 防止 value 的返回值还是一个 Promise
(value) => resolutionProcedure(promise2, value, resolve, reject),
reject
)
return
}
// 设置一个标志位,防止重复调用
let called = false
// 2.3.3 判断 x 是不是对象或函数
if (isObject(x) || isFunction(x)) {
// 防止取值时出错
try {
// 2.3.3.1 让 x 作为 x.then
let then = x.then
if (isFunction(then)) {
// 2.3.3.3 如果 then 是一个方法,把 x 当作 this 来调用它
// 其中第一个参数为 resolvePromise,第二个参数为 rejectPromise
then.call(
x,
(y) => {
if (called) return
called = true
// 防止 y 的返回值还是一个 Promise
resolutionProcedure(promise2, y, resolve, reject)
},
(r) => {
// 失败结果会向下传递
if (called) return
called = true
reject(r)
}
)
} else {
// 2.3.3.4 如果 then 不是一个函数,用 x 完成 promise
resolve(x)
}
} catch (error) {
// 2.3.3.2 如果取 x.then 的值时抛出错误 e 则以 e 为据因执行 reject
if (called) return
called = true
reject(error)
}
} else {
// 2.3.4 x 是一个普通值就直接调用 resolve(x)
resolve(x)
}
}
class Promise {
/**
* 在 new Promise 的时候会传入一个执行器 (executor) 同时这个执行器是立即执行的
* state Promise 的初始状态为等待状态
* value 成功的值
* reason 失败的原因
* resolvedCallbacks resolve 回调队列
* rejectedCallbacks reject 回调队列
**/
constructor(executor) {
this.state = PENDING
this.value = undefined
this.reason = undefined
this.resolvedCallbacks = []
this.rejectedCallbacks = []
/**
* 在 resolve 函数和 reject 函数中
* 只有等待状态 (pending) 下的 Promise 才能修改状态
*/
// 成功函数
const resolve = (value) => {
// 如果 value 是个 Promise 则递归执行
if (value instanceof Promise) {
return value.then(resolve, reject)
}
nextTick(() => {
if (this.state === PENDING) {
this.state = FULFILLED
this.value = value
// 执行 resolve 回调队列
this.resolvedCallbacks.forEach((fn) => fn())
}
})
}
// 失败函数
const reject = (reason) => {
nextTick(() => {
if (this.state === PENDING) {
this.state = REJECTED
this.reason = reason
// 执行 reject 回调队列
this.rejectedCallbacks.forEach((fn) => fn())
}
})
}
/**
* 执行器 (executor) 接收两个参数,分别是 resolve, reject
* 为了防止执行器 (executor) 在执行时出错,需要进行错误捕获,并将错误传入 reject 函数
*/
try {
executor(resolve, reject)
} catch (error) {
reject(error)
}
}
/**
* Promise.prototype.then() 实现
* then 方法接收两个参数 onFulfilled 和 onRejected
* onFulfilled 和 onRejected 均为可选参数
*/
then(onFulfilled, onRejected) {
onFulfilled = isFunction(onFulfilled) ? onFulfilled : (v) => v
onRejected = isFunction(onRejected)
? onRejected
: (e) => {
throw e
}
/**
* 在链式调用时需要返回一个新的 promise
* 在 then 函数中,无论是成功还是失败的回调,只要返回了结果就会传入下一个 then 的成功回调
* 如果出现错误就会传入下一个 then 的失败回调
* 即:下一个 then 的状态和上一个 then 执行时候的状态无关
* 所以在 then 执行的时候 onFulfilled, onRejected 可能会出现错误,需要捕获错误,并执行失败回调(处理成失败状态)
*/
const promise2 = new Promise((resolve, reject) => {
if (this.state === FULFILLED) {
nextTick(() => {
// 成功状态调用 onFulfilled
try {
// 为了链式调用,需要获取 onFulfilled 函数执行的返回值,通过 resolve 返回
const x = onFulfilled(this.value)
// 通过 resolutionProcedure 函数对 x 的返回值做处理
resolutionProcedure(promise2, x, resolve, reject)
} catch (error) {
reject(error)
}
})
}
if (this.state === REJECTED) {
// 失败状态调用 onRejected
nextTick(() => {
try {
// 为了链式调用,需要获取 onRejected 函数执行的返回值,通过 resolve 返回
const x = onRejected(this.reason)
resolutionProcedure(promise2, x, resolve, reject)
} catch (error) {
reject(error)
}
})
}
// 当 Promise 状态为等待状态 (pending) 时,将 onFulfilled 和 onRejected 存入对应的回调队列
if (this.state === PENDING) {
// 存入 onFulfilled 函数
this.resolvedCallbacks.push(() => {
try {
const x = onFulfilled(this.value)
// 通过 resolutionProcedure 函数对 x 的返回值做处理
resolutionProcedure(promise2, x, resolve, reject)
} catch (error) {
reject(error)
}
})
// 存入 onRejected 函数
this.rejectedCallbacks.push(() => {
try {
const x = onRejected(this.reason)
resolutionProcedure(promise2, x, resolve, reject)
} catch (error) {
reject(error)
}
})
}
})
return promise2
}
/**
* Promise.prototype.catch() 实现
* catch 用于指定发生错误时的回调函数,实际就是 .then(null, onRejected) 的别名
* https://es6.ruanyifeng.com/#docs/promise#Promise-prototype-catch
*/
catch(cb) {
return this.then(null, cb)
}
/**
* Promise.prototype.finally() 实现
* finally 方法用于指定不管 Promise 对象最后状态如何,都会执行的操作
* 在 finally 后还能继续 then ,并会将值原封不动的传递下去
* finally 本质上是 then 方法的特例
* 该方法由 ES2018 引入
* https://es6.ruanyifeng.com/#docs/promise#Promise-prototype-finally
*/
finally(cb) {
return this.then(
(value) => Promise.resolve(cb()).then(() => value),
(error) =>
Promise.resolve(cb()).then(() => {
throw error
})
)
}
/**
* Promise.resolve() 实现
* 将现有对象转为 Promise 实例,该实例的状态为 resolved
* https://es6.ruanyifeng.com/#docs/promise#Promise-resolve
*/
static resolve(value) {
// 如果参数是 Promise 实例,那么Promise.resolve将不做任何修改、原封不动地返回这个实例。
if (value instanceof Promise) {
return value
}
return new Promise((resolve, reject) => {
// 如果参数是一个 thenable 对象
// thenable 对象指的是具有 then 方法的对象
if (isObject(value) && isFunction(value.then)) {
value.then(resolve, reject)
} else {
// 如果参数是一个原始值,则返回一个新的 Promise 对象,状态为 resolved
resolve(value)
}
})
}
/**
* Promise.reject() 实现
* 将现有对象转为 Promise 实例,该实例的状态为 rejected
* https://es6.ruanyifeng.com/#docs/promise#Promise-reject
*/
static reject(error) {
return new Promise((resolve, reject) => {
reject(error)
})
}
/**
* Promise.all() 实现
* 用于将多个 Promise 实例,包装成一个新的 Promise 实例
* 只有所有的 Promise 状态成功才会成功,如果其中一个 Promise 的状态失败就会失败
* https://es6.ruanyifeng.com/#docs/promise#Promise-all
*/
static all(promises) {
return new Promise((resolve, reject) => {
// 参数不为 Iterator 时直接 reject
if (!isIterator(promises)) {
reject(new TypeError('参数必须为 Iterator'))
return
}
const result = []
// length 为 0 时直接返回
if (promises.length === 0) {
resolve(result)
return
}
// 记录当前已成功的 Promise 数量
let num = 0
// resolve 验证函数
function check(i, data) {
result[i] = data
num++
// 只有成功的 Promise 数量等于传入的数组长度时才调用 resolve
if (num === promises.length) {
resolve(result)
}
}
for (let i = 0; i < promises.length; i++) {
Promise.resolve(promises[i]).then(
(v) => {
check(i, v)
},
(e) => {
// 当其中一个 Promise 失败时直接调用 reject
reject(e)
return
}
)
}
})
}
/**
* Promise.race() 实现
* 用于将多个 Promise 实例,包装成一个新的 Promise 实例
* 新的 Promise 实例状态会根据最先更改状态的 Promise 而更改状态
* https://es6.ruanyifeng.com/#docs/promise#Promise-race
*/
static race(promises) {
return new Promise((resolve, reject) => {
// 参数不为 Iterator 时直接 reject
if (!isIterator(promises)) {
reject(new TypeError('参数必须为 Iterator'))
return
}
for (let i = 0; i < promises.length; i++) {
// 只要有一个 Promise 状态发生改变,就调用其状态对应的回调方法
Promise.resolve(promises[i]).then(resolve, reject)
}
})
}
/**
* Promise.allSettled() 实现
* 用于将多个 Promise 实例,包装成一个新的 Promise 实例
* 新的 Promise 实例只有等到所有这些参数实例都返回结果,不管是 resolved 还是 rejected ,包装实例才会结束,一旦结束,状态总是 resolved
* 该方法由 ES2020 引入
* https://es6.ruanyifeng.com/#docs/promise#Promise-allSettled
*/
static allSettled(promises) {
return new Promise((resolve, reject) => {
// 参数不为 Iterator 时直接 reject
if (!isIterator(promises)) {
reject(new TypeError('参数必须为 Iterator'))
return
}
const result = []
// length 为 0 时直接返回
if (promises.length === 0) {
resolve(result)
return
}
// 记录当前已返回结果的 Promise 数量
let num = 0
// resolve 验证函数
function check(i, data) {
result[i] = data
num++
// 只有已返回结果的 Promise 数量等于传入的数组长度时才调用 resolve
if (num === promises.length) {
resolve(result)
}
}
for (let i = 0; i < promises.length; i++) {
Promise.resolve(promises[i]).then(
(value) => {
check(i, {
status: FULFILLED,
value,
})
},
(reason) => {
check(i, {
status: REJECTED,
reason,
})
}
)
}
})
}
/**
* Promise.any() 实现
* 用于将多个 Promise 实例,包装成一个新的 Promise 实例
* 只要参数实例有一个变成 resolved 状态,包装实例就会变成 resolved 状态;如果所有参数实例都变成 rejected 状态,包装实例就会变成 rejected 状态
* https://es6.ruanyifeng.com/#docs/promise#Promise-any
*/
static any(promises) {
return new Promise((resolve, reject) => {
const rejects = []
// 如果 length 为 0 时直接 reject
if (promises.length === 0) {
/**
* https://developer.mozilla.org/zh-CN/docs/Web/JavaScript/Reference/Global_Objects/AggregateError
* reject(new AggregateError(rejects, 'All promises were rejected'))
*/
reject(new Error('All promises were rejected'))
return
}
// 记录当前已失败的 Promise 数量
let num = 0
// reject 验证函数
function check(i, data) {
rejects[i] = data
num++
// 只有失败的 Promise 数量等于传入的数组长度时才调用 reject
if (num === promises.length) {
reject(rejects)
}
}
for (let i = 0; i < promises.length; i++) {
// 当其中一个 Promise 成功时直接调用 resolve
Promise.resolve(promises[i]).then(resolve, (r) => {
check(i, r)
})
}
})
}
/**
* Promise.promisify() 实现
* 用于将回调函数转换为 promise 的辅助函数,适用于 error-first 回调模式(nodejs)
* error-first 模式的回调函数无论成功或者失败都会执行
* error-first 回调定义规则:
* 1. 回调函数的第一个参数保留给一个错误 error 对象,如果有错误发生,错误将通过第一个参数 err 返回。
* 2. 回调函数的第二个参数为成功响应的数据保留,如果没有错误发生,err将被设置为null, 成功的数据将从第二个参数返回。
*
*/
static promisify(func) {
return function (...options) {
return new Promise((resolve, reject) => {
func(...options, (err, ...data) => {
// 通过回调函数返回的参数来控制 promise 的状态
if (err) {
reject(err)
}
resolve(...data)
})
})
}
}
}
// promises-aplus-tests 测试方法
Promise.defer = Promise.deferred = function () {
const dfd = {}
dfd.promise = new Promise((resolve, reject) => {
dfd.resolve = resolve
dfd.reject = reject
})
return dfd
}
module.exports = Promise观察者模式定义了一种一对多的依赖关系,让多个观察者对象同时监听某一个目标对象,当这个目标对象的状态发生变化时,会通知所有观察者对象,使它们能够自动更新。 —— Graphic Design Patterns
在我们平时开发过程中,开发一个需求,产品经理把相关开发人员来到一个群,然后把相关需求通知到大家,然后相关人员接收到信息,进行开发,这就是类似一个观察者模式
// 定义发布者类
class Publisher {
  constructor() {
    this.observers = []
    console.log('Publisher created')
  }
  // 增加订阅者
  add(observer) {
    console.log('Publisher.add invoked')
    this.observers.push(observer)
  }
  // 移除订阅者
  remove(observer) {
    console.log('Publisher.remove invoked')
    this.observers.forEach((item, i) => {
      if (item === observer) {
        this.observers.splice(i, 1)
      }
    })
  }
  // 通知所有订阅者
  notify() {
    console.log('Publisher.notify invoked')
    this.observers.forEach((observer) => {
      observer.update(this)
    })
  }
}
// 定义订阅者类
class Observer {
constructor() {
console.log('Observer created')
}
update() {
console.log('Observer.update invoked')
}
}const 产品经理 = new Publisher ()
const 前端 = new Observer ()
const 后端 = new Observer ()
const UI = new Observer ()
产品经理.add(前端)
产品经理.add(后端)
产品经理.add(UI)
产品经理.notify()每当组件初始化、组件挂载、数据变化、组件摧毁的时候都会执行相应的钩子函数,就是我们平常使用的生命周期,他是通过callHook执行的
export function callHook (vm: Component, hook: string) {
  // #7573 disable dep collection when invoking lifecycle hooks
  pushTarget()
  const handlers = vm.$options[hook]
  const info = `${hook} hook`
  if (handlers) {
    for (let i = 0, j = handlers.length; i < j; i++) {
      invokeWithErrorHandling(handlers[i], vm, null, vm, info)
    }
  }
  if (vm._hasHookEvent) {
    vm.$emit('hook:' + hook)
  }
  popTarget()
}从合并策略中的mergeOptions里面知道,生命周期会合并成一个数组,vm.$options[hook]就是拿到对应的生命周期数组,然后存在的情况下通过for循环的invokeWithErrorHandling的方法去执行
export function invokeWithErrorHandling (
  handler: Function,
  context: any,
  args: null | any[],
  vm: any,
  info: string
) {
  let res
  try {
    res = args ? handler.apply(context, args) : handler.call(context)
    if (res && !res._isVue && isPromise(res) && !res._handled) {
      res.catch(e => handleError(e, vm, info + ` (Promise/async)`))
      // issue #9511
      // avoid catch triggering multiple times when nested calls
      res._handled = true
    }
  } catch (e) {
    handleError(e, vm, info)
  }
  return res
}
res = args ? handler.apply(context, args) : handler.call(context)就是在执行生命周期函数
然后接下来有这样一段代码,
  if (vm._hasHookEvent) {
    vm.$emit('hook:' + hook)
}vm._hasHookEvent为真会执行下面的代码,这个在initEvent的方法中默认是为false的,只有在$on方法中满足某种格式就会为true
 const hookRE = /^hook:/
  Vue.prototype.$on = function (event: string | Array<string>, fn: Function): Component {
    const vm: Component = this
    if (Array.isArray(event)) {
      for (let i = 0, l = event.length; i < l; i++) {
        vm.$on(event[i], fn)
      }
    } else {
      (vm._events[event] || (vm._events[event] = [])).push(fn)
      // optimize hook:event cost by using a boolean flag marked at registration
      // instead of a hash lookup
      if (hookRE.test(event)) {
        vm._hasHookEvent = true
      }
    }
    return vm
}当(hookRE.test(event)满足时 vm._hasHookEvent = true,所以我们可以这样执行生命周期函数
  created () {
    const listenResize = () => {
      console.log('window resize callback')
    }
    window.addEventListener('resize', listenResize)
    this.$on('hook:destroyed', () => {
      window.removeEventListener('resize', listenResize)
    })
  }
接下来讲生命周期执行的时机
beforeCreate和created是在组件初始化的时候执行的,在Vue.prototype._init方法里面
export function initMixin (Vue: Class<Component>) {
  Vue.prototype._init = function (options?: Object) {

    // ...
    initLifecycle(vm)
    initEvents(vm)
    initRender(vm)
    callHook(vm, 'beforeCreate')
    initInjections(vm) // resolve injections before data/props
    initState(vm)
    initProvide(vm) // resolve provide after data/props
    callHook(vm, 'created')
    // ...
  }
}
在beforeCreate和created之间调用了initInjections、initState、initState,这几个方法是用来初始化inject、data、props、methods、computed、watch以及provide等这些配置,所以这些属性我们在beforeCreate访问不到,只有到了created中才能访问
在组件初始化之后就会执行组件的mount,在mountComponent中执行挂载相关的钩子函数
export function mountComponent (
  vm: Component,
  el: ?Element,
  hydrating?: boolean
): Component {
  // ...
  callHook(vm, 'beforeMount')
  let updateComponent
  if (process.env.NODE_ENV !== 'production' && config.performance && mark) {
    // ...
  } else {
    updateComponent = () => {
      vm._update(vm._render(), hydrating)
    }
  }
  // ...
  if (vm.$vnode == null) {
    vm._isMounted = true
    callHook(vm, 'mounted')
  }
  return vm
}在mountComponent执行首先调用了mountComponent ,然后就会执行 vm._update,去挂载组件,当组件渲染完成之后判断vm.$vnode == null,这个只有在new Vue的时候vm.$vnode == null才会为true,我们组件的mount不是执行的这个,当我们组件通过patch方法成DOM的时候会执行以下代码
function createComponent (vnode, insertedVnodeQueue, parentElm, refElm) {
    let i = vnode.data
    if (isDef(i)) {
      const isReactivated = isDef(vnode.componentInstance) && i.keepAlive
      if (isDef(i = i.hook) && isDef(i = i.init)) {
        i(vnode, false /* hydrating */)
      }
      // after calling the init hook, if the vnode is a child component
      // it should've created a child instance and mounted it. the child
      // component also has set the placeholder vnode's elm.
      // in that case we can just return the element and be done.
      if (isDef(vnode.componentInstance)) {
        initComponent(vnode, insertedVnodeQueue)
        insert(parentElm, vnode.elm, refElm)
        if (isTrue(isReactivated)) {
          reactivateComponent(vnode, insertedVnodeQueue, parentElm, refElm)
        }
        return true
      }
    }
  }

  function initComponent (vnode, insertedVnodeQueue) {
    if (isDef(vnode.data.pendingInsert)) {
      insertedVnodeQueue.push.apply(insertedVnodeQueue, vnode.data.pendingInsert)
      vnode.data.pendingInsert = null
    }
    vnode.elm = vnode.componentInstance.$el
    if (isPatchable(vnode)) {
      invokeCreateHooks(vnode, insertedVnodeQueue)
      setScope(vnode)
    } else {
      // empty component root.
      // skip all element-related modules except for ref (#3455)
      registerRef(vnode)
      // make sure to invoke the insert hook
      insertedVnodeQueue.push(vnode)
    }
}通过initComponent 方法把vnode push到insertedVnodeQueue数组中,因为我们组件patch的时候,遇到子组件会递归调用子组件的patch,所以insertedVnodeQueue.push(vnode)是先push的子组件vnode,然后再push父组件的vnode
[childVnode,parentVnode]然后会在patch的最后调用invokeInsertHook这个方法
  function invokeInsertHook (vnode, queue, initial) {
    // delay insert hooks for component root nodes, invoke them after the
    // element is really inserted
    if (isTrue(initial) && isDef(vnode.parent)) {
      vnode.parent.data.pendingInsert = queue
    } else {
      for (let i = 0; i < queue.length; ++i) {
        queue[i].data.hook.insert(queue[i])
      }
    }
}最后会执行data.hook的insert方法,在src\core\vdom\create-component.js中
  insert (vnode: MountedComponentVNode) {
    const { context, componentInstance } = vnode
    if (!componentInstance._isMounted) {
      componentInstance._isMounted = true
      callHook(componentInstance, 'mounted')
    }
    if (vnode.data.keepAlive) {
      if (context._isMounted) {
        // vue-router#1212
        // During updates, a kept-alive component's child components may
        // change, so directly walking the tree here may call activated hooks
        // on incorrect children. Instead we push them into a queue which will
        // be processed after the whole patch process ended.
        queueActivatedComponent(componentInstance)
      } else {
        activateChildComponent(componentInstance, true /* direct */)
      }
    }
  },
我们看到这里执行了callHook(componentInstance, 'mounted')
在我们执行组件挂载的时候,执行了new Watcher,在before函数中判断vm._isMounted跟 !vm._isDestroyed,说明组件已经挂载没有被摧毁,然后执行了beforeUpdate钩子函数
export function mountComponent (
  vm: Component,
  el: ?Element,
  hydrating?: boolean
): Component {
  // ...

  // we set this to vm._watcher inside the watcher's constructor
  // since the watcher's initial patch may call $forceUpdate (e.g. inside child
  // component's mounted hook), which relies on vm._watcher being already defined
  new Watcher(vm, updateComponent, noop, {
    before () {
       if (vm._isMounted && !vm._isDestroyed) {
        callHook(vm, 'beforeUpdate')
      }
    }
  }, true /* isRenderWatcher */)
  // ...
}每当我们修改数据的时候都会执行flushSchedulerQueue,在这个方法里面执行了 callUpdatedHooks(updatedQueue)
function callUpdatedHooks (queue) {
  let i = queue.length
  while (i--) {
    const watcher = queue[i]
    const vm = watcher.vm
    if (vm._watcher === watcher && vm._isMounted && !vm._isDestroyed) {
      callHook(vm, 'updated')
    }
  }
}
判断了他如果是渲染watcher并且已经挂载没有被摧毁就会执行 callHook(vm, 'updated')
这个两个钩子函数执行在组件的摧毁前后,组件摧毁调用的是$destroy方法
  Vue.prototype.$destroy = function () {
    const vm: Component = this
    if (vm._isBeingDestroyed) {
      return
    }
    callHook(vm, 'beforeDestroy')
    vm._isBeingDestroyed = true
    // remove self from parent
    const parent = vm.$parent
    if (parent && !parent._isBeingDestroyed && !vm.$options.abstract) {
      remove(parent.$children, vm)
    }
    // teardown watchers
    if (vm._watcher) {
      vm._watcher.teardown()
    }
    let i = vm._watchers.length
    while (i--) {
      vm._watchers[i].teardown()
    }
    // remove reference from data ob
    // frozen object may not have observer.
    if (vm._data.__ob__) {
      vm._data.__ob__.vmCount--
    }
    // call the last hook...
    vm._isDestroyed = true
    // invoke destroy hooks on current rendered tree
    vm.__patch__(vm._vnode, null)
    // fire destroyed hook
    callHook(vm, 'destroyed')
    // turn off all instance listeners.
    vm.$off()
    // remove __vue__ reference
    if (vm.$el) {
      vm.$el.__vue__ = null
    }
    // release circular reference (#6759)
    if (vm.$vnode) {
      vm.$vnode.parent = null
    }
  }
}在方法执行的开始调用了callHook(vm, 'beforeDestroy')生命周期,然后执行了一系列的销毁操作,通过vm.__patch__(vm._vnode, null)触发子组件的摧毁操作,一层层递归调用,然后执行 callHook(vm, 'destroyed'),所以 destroy 钩子函数执行顺序是先子后父
新建一个vue项目,因为vue脚手架搭建的项目是不包含compiler的,因为开发环境中,vue-loader已经帮我们做了这事,我们学习的时候,肯定需要完整版本,我们在项目的node_modules里面vue/dist里面,有打包出来的很多版本,我们需要使用vue.esm.js,只需要在vue.comfig.js写以下代码就行,然后重新运行项目
module.exports = {
  transpileDependencies: true,
  configureWebpack:{
    resolve:{
      alias:{
        vue$: 'vue/dist/vue.esm.js'
      }
    }

  }
}
接着我们打开node_module/vue/vue.esm.js文件打个断点就可以开始调试了
function initMixin (Vue) {
  Vue.prototype._init = function (options) {
    debugger
   //...
  }
}
CSRF 英文全称是 Cross-site request forgery,所以又称为“跨站请求伪造”,是指黑客引诱用户打开黑客的网站,在黑客的网站中,利用用户的登录状态发起的跨站请求。简单来讲,CSRF 攻击就是黑客利用了用户的登录状态,并通过第三方的站点来做一些坏事。
黑客页面的HTML代码
<!DOCTYPE html>
<html>
  <body>
    <h1>黑客的站点:CSRF攻击演示</h1>
    <img src="https://www.xxx.com/sendmsg?user=xxx&number=100">
  </body>
</html>
在这段代码中,黑客将转账的请求接口隐藏在 img 标签内,欺骗浏览器这是一张图片资源。当该页面被加载时,浏览器会自动发起 img 的资源请求
如果服务器没有对该请求做判断的话,那么服务器就会认为该请求是一个正常的请求,如果是转账那么钱就被转移到黑客的账户上去了。
有些服务器的接口是使用 POST 方法的,所以黑客还需要在他的站点上伪造 POST 请求,当用户打开黑客的站点时,是自动提交 POST 请求
<!DOCTYPE html>
<html>
<body>
  <h1>黑客的站点:CSRF攻击演示</h1>
  <form id='hacker-form' action="https://www.xxx.com/sendmsg" method=POST>
    <input type="hidden" name="user" value="xxx" />
    <input type="hidden" name="number" value="100" />
  </form>
  <script> document.getElementById('hacker-form').submit(); </script>
</body>
</html>
在这段代码中,我们可以看到黑客在他的页面中构建了一个隐藏的表单,该表单的内容假如是转账接口。当用户打开该站点之后,这个表单会被自动执行提交;当表单被提交之后,服务器就会执行转账操作。因此使用构建自动提交表单这种方式,就可以自动实现跨站点 POST 数据提交。
诱惑用户点击黑客站点上的链接,这种方式通常出现在论坛或者恶意邮件上。黑客会采用很多方式去诱惑用户点击链接,示例代码如下所示
<div>
  <img width=150 src=http://images.xuejuzi.cn/1612/1_161230185104_1.jpg> </img> </div> <div>
  <a href="https://www.xxx.com/sendmsg?user=xxx&number=100" taget="_blank">
    点击下载美女照片
  </a>
</div>
这段黑客站点代码,页面上放了一张美女图片,下面放了图片下载地址,而这个下载地址实际上是黑客用来转账的接口,一旦用户点击了这个链接,那么他的money就被转到黑客账户上了。
以上三种就是黑客经常采用的攻击方式。如果当用户登录了www.xxx.com,以上三种 CSRF 攻击方式中的任何一种发生时,那么服务器都会执行黑客的一些请求。
到这里,相信你已经知道什么是 CSRF 攻击了。和 XSS 不同的是,CSRF 攻击不需要将恶意代码注入用户的页面,仅仅是利用服务器的漏洞和用户的登录状态来实施攻击。
黑客会利用用户的登录状态来发起 CSRF 攻击,而 Cookie 正是浏览器和服务器之间维护登录状态的一个关键数据,因此要阻止 CSRF 攻击,我们首先就要考虑在 Cookie 上来做文章
Strict、Lax 和 None 三个值。Strict 最为严格。如果 SameSite 的值是 Strict,那么浏览器会完全禁止第三方 Cookie。简言之,比如请求a.com域名下的接口只会在a.com网站下的请求才会携带cookie
Lax 相对宽松一点。在跨站点的情况下,从第三方站点的链接打开和从第三方站点提交 Get 方式的表单这两种方式都会携带 Cookie。但如果在第三方站点中使用 Post 方法,或者通过 img、iframe 等标签加载的 URL,这些场景都不会携带 Cookie。
而如果使用 None 的话,在任何情况下都会发送 Cookie 数据
在服务器端验证请求来源的站点,禁止来自第三方站点的请求
需要使用HTTP 请求头中的 Referer 和 Origin
Origin只包含了域名信息,Referer包含了具体的URL路径
在浏览器向服务器发起请求时,服务器生成一个 CSRF Token,然后返回给前端,前端保存下来,前端请求接口的时候带上CSRF Token,然后服务端会验证该 Token 是否合法,
缺点:过多的继承链没用的属性
     Grand.prototype.lastName = '张三';
     function Grand(){

     }
     var grand = new Geand();
     Father.prototype = grand;
     function Father(){
         this.name = '王五';
     }
     var father = new Father();
     Son.prototype = father;
     function Son(){
         this.hobbit = '赵六';
     }
var son = new Son()缺点:
1.不能继承借用构造函数的原型
2.每次构造函数都要多走一个函数 (每次执行了两个方法)
    function Person(name,age,sex){
         this.name = name;
         this.age = age;
         this.sex = sex;
     }
     function Student(name,age,sex,grade){
         Person.call(this,name,age,sex);
         this.grade = grade;
     }
     var student = new Student();
缺点:不能随便改动自己的原型
    Father.prototype.lastName = '张三';
    function Father(){

    }
    function Son(){

    }
    Son.prototype = Father.prototype;
    var son = new Son();
var father = new Father(); Father.prototype.lastName = '张三';
function Father(){
}
function Son(){
}
var inherit = (function(){
var F = function(){};
return function(Target,Origin){
F.prototype = Origin.prototype;
Target.prototype = new F();
Target.prototype.constructor = Target; //Target的constructor方法归位
Target.prototype.uber = Origin.prototype;// 超类,真正继承的来源
}
}())
inherit(Son,Father)
var son = new Son();
var father = new Father();循环引用问题
每次加载模块的时候会先判断缓存里面有没有,没有的话就缓存下来,下次加载直接去缓存里面取
通过文件读写的方式,读取 入口的文件内容,记录到 ESModule 中
逐行解析 JS 代码,获取依赖的 ESModule 的地址
然后继续加载对应依赖的模块,重复第一步的操作,直到所有的 ESModule 都完成了加载
然后会得到一个建立模块之间依赖关系的图
const inBrowser = typeof window !== 'undefined';


let prev = Date.now();
function fallback(fn) {
    const curr = Date.now();
    const ms = Math.max(0, 16 - (curr - prev));
    const id = setTimeout(fn, ms);
    prev = curr + ms;
    return id;
}

const iRaf = window.requestAnimationFrame || fallback;
const iCancel = window.cancelAnimationFrame || window.clearTimeout;

function raf(fn) {
    return iRaf(fn)
}

function cancelRaf(id) {
    iCancel(id)
}
function isSameSecond(time1, time2) {
    return Math.floor(time1 / 1000) === Math.floor(time2 / 1000);
}

const SECOND = 1000;
const MINUTE = 60 * SECOND;
const HOUR = 60 * MINUTE;
const DAY = 24 * HOUR;

function parseTimeData(time) {
    const days = Math.floor(time / DAY);
    const hours = Math.floor((time % DAY) / HOUR);
    const minutes = Math.floor((time % HOUR) / MINUTE);
    const seconds = Math.floor((time % MINUTE) / SECOND);
    const milliseconds = Math.floor(time % SECOND);

    return {
        days,
        hours,
        minutes,
        seconds,
        milliseconds,
    };
}
function noop() {

}
const DEFAULT_OPTIONS = {
    time: 30 * 60 * 60 * 1000,
    autoStart: true,
    millisecond: false,
    changeFn: noop,
    finishFn: noop
}
class CountDown {
    constructor(options) {
        const { time, autoStart, millisecond, changeFn, finishFn } = { ...DEFAULT_OPTIONS, ...options }
        this.remain = 0
        this.time = time
        this.autoStart = autoStart
        this.millisecond = millisecond
        this.changeFn = changeFn
        this.finishFn = finishFn
        this.reset()
    }
    start() {
        if (this.counting) {
            return;
        }
        this.counting = true;
        this.endTime = Date.now() + this.remain;
        this.tick();
    }
    pause() {
        this.counting = false;
        cancelRaf(this.rafId);
    }
    reset() {
        this.pause();
        this.remain = +this.time;

        if (this.autoStart) {
            this.start();
        }

    }
    tick() {
        if (!inBrowser) {
            return;
        }

        if (this.millisecond) {
            this.microTick();
        } else {
            this.macroTick();
        }
    }
    microTick() {
        this.rafId = raf(() => {
            if (!this.counting) {
                return;
            }

            this.setRemain(this.getRemain());

            if (this.remain > 0) {
                this.microTick();
            }
        });
    }
    macroTick() {
        this.rafId = raf(() => {
            if (!this.counting) {
                return;
            }

            const remain = this.getRemain();

            if (!isSameSecond(remain, this.remain) || remain === 0) {
                this.setRemain(remain);
            }

            if (this.remain > 0) {
                this.macroTick();
            }
        });
    }

    getRemain() {
        return Math.max(this.endTime - Date.now(), 0);
    }

    setRemain(remain) {
        this.remain = remain;
        this.changeFn(remain)
        if (remain === 0) {
            this.pause();
            this.finishFn()
        }
    }


}
在大型应用中,我们可能需要将应用分割成小一些的代码块,并且只在需要的时候才从服务器加载一个模块。为了简化,Vue 允许你以一个工厂函数的方式定义你的组件,这个工厂函数会异步解析你的组件定义。Vue 只有在这个组件需要被渲染的时候才会触发该工厂函数,且会把结果缓存起来供未来重渲染,他有三种写法
1.工厂函数
Vue.component('async-webpack-example', function (resolve) {
  // 这个特殊的 `require` 语法将会告诉 webpack
  // 自动将你的构建代码切割成多个包,这些包
  // 会通过 Ajax 请求加载
  require(['./my-async-component'], resolve)
})
2.Promise
Vue.component(
  'async-webpack-example',
  // 这个动态导入会返回一个 `Promise` 对象。
  () => import('./my-async-component')
)
3.高级写法
Vue.component('MyComponent', () => ({
  // 需要加载的组件 (应该是一个 `Promise` 对象)
  component: import('./MyComponent.vue'),
  // 异步组件加载时使用的组件
  loading: LoadingComponent,
  // 加载失败时使用的组件
  error: ErrorComponent,
  // 展示加载时组件的延时时间。默认值是 200 (毫秒)
  delay: 200,
  // 如果提供了超时时间且组件加载也超时了,
  // 则使用加载失败时使用的组件。默认值是:`Infinity`
  timeout: 3000
}))
而且我们也可以使用局部注册
new Vue({
  // ...
  components: {
    'my-component': () => import('./my-async-component')
  }
})
我们在注册组件的时候会执行以下代码
export function initAssetRegisters (Vue: GlobalAPI) {
  /**
   * Create asset registration methods.
   */
  ASSET_TYPES.forEach(type => {
    Vue[type] = function (
      id: string,
      definition: Function | Object
    ): Function | Object | void {
      if (!definition) {
        return this.options[type + 's'][id]
      } else {
        /* istanbul ignore if */
        if (process.env.NODE_ENV !== 'production' && type === 'component') {
          validateComponentName(id)
        }
        if (type === 'component' && isPlainObject(definition)) {
          definition.name = definition.name || id
          definition = this.options._base.extend(definition)
        }
        if (type === 'directive' && typeof definition === 'function') {
          definition = { bind: definition, update: definition }
        }
        this.options[type + 's'][id] = definition
        return definition
      }
    }
  })
}因为异步组件是一个函数所以就不会走type === 'component' && isPlainObject(definition)这个判断,他执行 this.options[type + 's'][id] = definition这个会以函数的形式保存在components里面,然后我们在创建组件的时候会执行以下代码
export function createComponent (
  Ctor: Class<Component> | Function | Object | void,
  data: ?VNodeData,
  context: Component,
  children: ?Array<VNode>,
  tag?: string
): VNode | Array<VNode> | void {
  if (isUndef(Ctor)) {
    return
  }

  const baseCtor = context.$options._base

  // plain options object: turn it into a constructor
  if (isObject(Ctor)) {
    Ctor = baseCtor.extend(Ctor)
  }

  // if at this stage it's not a constructor or an async component factory,
  // reject.
  if (typeof Ctor !== 'function') {
    if (process.env.NODE_ENV !== 'production') {
      warn(`Invalid Component definition: ${String(Ctor)}`, context)
    }
    return
  }

  // async component
  let asyncFactory
  if (isUndef(Ctor.cid)) {
    asyncFactory = Ctor
    Ctor = resolveAsyncComponent(asyncFactory, baseCtor)
    if (Ctor === undefined) {
      // return a placeholder node for async component, which is rendered
      // as a comment node but preserves all the raw information for the node.
      // the information will be used for async server-rendering and hydration.
      return createAsyncPlaceholder(
        asyncFactory,
        data,
        context,
        children,
        tag
      )
    }
  }
//...因为他是异步组件,所以Ctor是一个构造函数不是一个普通对象,所以他会走isUndef(Ctor.cid)这个判断里面,然后执行resolveAsyncComponent方法
export function resolveAsyncComponent (
  factory: Function,
  baseCtor: Class<Component>
): Class<Component> | void {
  if (isTrue(factory.error) && isDef(factory.errorComp)) {
    return factory.errorComp
  }

  if (isDef(factory.resolved)) {
    return factory.resolved
  }

  const owner = currentRenderingInstance
  if (owner && isDef(factory.owners) && factory.owners.indexOf(owner) === -1) {
    // already pending
    factory.owners.push(owner)
  }

  if (isTrue(factory.loading) && isDef(factory.loadingComp)) {
    return factory.loadingComp
  }

  if (owner && !isDef(factory.owners)) {
    const owners = factory.owners = [owner]
    let sync = true
    let timerLoading = null
    let timerTimeout = null

    ;(owner: any).$on('hook:destroyed', () => remove(owners, owner))

    const forceRender = (renderCompleted: boolean) => {
      for (let i = 0, l = owners.length; i < l; i++) {
        (owners[i]: any).$forceUpdate()
      }

      if (renderCompleted) {
        owners.length = 0
        if (timerLoading !== null) {
          clearTimeout(timerLoading)
          timerLoading = null
        }
        if (timerTimeout !== null) {
          clearTimeout(timerTimeout)
          timerTimeout = null
        }
      }
    }

    const resolve = once((res: Object | Class<Component>) => {
      // cache resolved
      factory.resolved = ensureCtor(res, baseCtor)
      // invoke callbacks only if this is not a synchronous resolve
      // (async resolves are shimmed as synchronous during SSR)
      if (!sync) {
        forceRender(true)
      } else {
        owners.length = 0
      }
    })

    const reject = once(reason => {
      process.env.NODE_ENV !== 'production' && warn(
        `Failed to resolve async component: ${String(factory)}` +
        (reason ? `\nReason: ${reason}` : '')
      )
      if (isDef(factory.errorComp)) {
        factory.error = true
        forceRender(true)
      }
    })

    const res = factory(resolve, reject)

    if (isObject(res)) {
      if (isPromise(res)) {
        // () => Promise
        if (isUndef(factory.resolved)) {
          res.then(resolve, reject)
        }
      } else if (isPromise(res.component)) {
        res.component.then(resolve, reject)

        if (isDef(res.error)) {
          factory.errorComp = ensureCtor(res.error, baseCtor)
        }

        if (isDef(res.loading)) {
          factory.loadingComp = ensureCtor(res.loading, baseCtor)
          if (res.delay === 0) {
            factory.loading = true
          } else {
            timerLoading = setTimeout(() => {
              timerLoading = null
              if (isUndef(factory.resolved) && isUndef(factory.error)) {
                factory.loading = true
                forceRender(false)
              }
            }, res.delay || 200)
          }
        }

        if (isDef(res.timeout)) {
          timerTimeout = setTimeout(() => {
            timerTimeout = null
            if (isUndef(factory.resolved)) {
              reject(
                process.env.NODE_ENV !== 'production'
                  ? `timeout (${res.timeout}ms)`
                  : null
              )
            }
          }, res.timeout)
        }
      }
    }

    sync = false
    // return in case resolved synchronously
    return factory.loading
      ? factory.loadingComp
      : factory.resolved
  }
}我们以普通的工厂函数来讲,他会直接执行factory(resolve, reject),这个就是我们写的工厂函数,因为他是异步的,要他加载成功再执行resolve方法,所以现在返回的res是undefined,然后直接执行最后的return代码,因为我们是普通的工厂函数,factory上什么都没有,所以返回的是undefined,所以这个方法就执行完了,跳出这个方法
  if (isUndef(Ctor.cid)) {
    asyncFactory = Ctor
    Ctor = resolveAsyncComponent(asyncFactory, baseCtor)
    if (Ctor === undefined) {
      // return a placeholder node for async component, which is rendered
      // as a comment node but preserves all the raw information for the node.
      // the information will be used for async server-rendering and hydration.
      return createAsyncPlaceholder(
        asyncFactory,
        data,
        context,
        children,
        tag
      )
}然后就会执行Ctor === undefined这个里面的代码执行createAsyncPlaceholder
export function createAsyncPlaceholder (
  factory: Function,
  data: ?VNodeData,
  context: Component,
  children: ?Array<VNode>,
  tag: ?string
): VNode {
  const node = createEmptyVNode()
  node.asyncFactory = factory
  node.asyncMeta = { data, context, children, tag }
  return node
}
这个很多就是生成一个空的注释节点
同步的代码就执行完了,然后我们就等工厂函数里面的require组件成功
当组件加载成功会执行resolveAsyncComponent里面的resolve方法
    const resolve = once((res: Object | Class<Component>) => {
      // cache resolved
      factory.resolved = ensureCtor(res, baseCtor)
      // invoke callbacks only if this is not a synchronous resolve
      // (async resolves are shimmed as synchronous during SSR)
      if (!sync) {
        forceRender(true)
      } else {
        owners.length = 0
      }
})通常我们resolve到的res是一个对象,我们通过ensureCtor里面的Vue.extend转成构造函数并赋值给 factory.resolved
function ensureCtor (comp: any, base) {
  if (
    comp.__esModule ||
    (hasSymbol && comp[Symbol.toStringTag] === 'Module')
  ) {
    comp = comp.default
  }
  return isObject(comp)
    ? base.extend(comp)
    : comp
}然后我们会执行forceRender方法,把当前实例强制重新渲染($forceUpdate迫使 Vue 实例重新渲染)
    const forceRender = (renderCompleted: boolean) => {
      for (let i = 0, l = owners.length; i < l; i++) {
        (owners[i]: any).$forceUpdate()
      }

      if (renderCompleted) {
        owners.length = 0
        if (timerLoading !== null) {
          clearTimeout(timerLoading)
          timerLoading = null
        }
        if (timerTimeout !== null) {
          clearTimeout(timerTimeout)
          timerTimeout = null
        }
      }
}重新渲染之后他又会重新走到resolveAsyncComponent方法里面,这个时候factory.resolved已经有值了就直接返回跳出这个方法了,然后进入createComponent方法里面,按照以前同步的逻辑执行
XSS 全称是 Cross Site Scripting,为了与“CSS”区分开来,故简称 XSS,翻译过来就是“跨站脚本”。XSS 攻击是指黑客往 HTML 文件中或者 DOM 中注入恶意脚本,从而在用户浏览页面时利用注入的恶意脚本对用户实施攻击的一种手段。
如果页面被注入了恶意 JavaScript 脚本,恶意脚本都能做哪些事情。
通常情况下,主要有存储型 XSS 攻击、反射型 XSS 攻击和基于 DOM 的 XSS 攻击三种方式来注入恶意脚本
在一个反射型 XSS 攻击过程中,恶意 JavaScript 脚本属于用户发送给网站请求中的一部分,随后网站又把恶意 JavaScript 脚本返回给用户。当恶意 JavaScript 脚本在用户页面中被执行时,黑客就可以利用该脚本做一些恶意操作
比如我们访问
http://localhost:3000/?xss=<script>alert('你被xss攻击力')</script>
通过这个操作,我们会发现用户将一段含有恶意代码的请求提交给 Web 服务器,Web 服务器接收到请求时,又将恶意代码反射给了浏览器端,浏览器当做HTML解析,发现是script,直接执行,这就是反射型 XSS 攻击
另外需要注意的是,Web 服务器不会存储反射型 XSS 攻击的恶意脚本,这是和存储型 XSS 攻击不同的地方。
基于 DOM 的 XSS 攻击是不牵涉到页面 Web 服务器的。具体来讲,黑客通过各种手段将恶意脚本注入用户的页面中,比如通过网络劫持在页面传输过程中修改 HTML 页面的内容,这种劫持类型很多,有通过 WiFi 路由器劫持的,有通过本地恶意软件来劫持的,它们的共同点是在 Web 资源传输过程或者在用户使用页面的过程中修改 Web 页面的数据。
我们知道存储型 XSS 攻击和反射型 XSS 攻击都是需要经过 Web 服务器来处理的,因此可以认为这两种类型的漏洞是服务端的安全漏洞。而基于 DOM 的 XSS 攻击全部都是在浏览器端完成的,因此基于 DOM 的 XSS 攻击是属于前端的安全漏洞。
但无论是何种类型的 XSS 攻击,它们都有一个共同点,那就是首先往浏览器中注入恶意脚本,然后再通过恶意脚本将用户信息发送至黑客部署的恶意服务器上
常用的阻止 XSS 攻击的策略。
<script>alert('你被xss攻击力')</script>
过滤
<script>标签被过滤掉,所以这段脚本不可能被执行
<script>alert('你被xss攻击力')</script>
转码
<script>alert('你被xss攻击了')</script>
<script>标签被转换为<script>,因此即使这段脚本返回给页面,页面也不会执行这段脚本。
严格的 CSP 可以有效地防范 XSS 攻击,具体来讲 CSP 有如下几个功能:
内容安全策略( CSP ):https://developer.mozilla.org/zh-CN/docs/Web/HTTP/CSP
由于很多 XSS 攻击都是来盗用 Cookie 的,因此还可以通过使用 HttpOnly 属性来保护我们 Cookie 的安全。使用 HttpOnly 标记的 Cookie 只能使用在 HTTP 请求过程中,所以无法通过 JavaScript 来读取这段 Cookie
ESLint是一种用于识别和报告ECMAScript / JavaScript代码中的模式的工具,目的是使代码在团队中更加一致并避免错误
module.exports = {
root: true,
globals: { wx: true },
parser: 'babel-eslint',
parserOptions: {
sourceType: 'module'
},
env: {
browser: true
},
// https://github.com/feross/standard/blob/master/RULES.md#javascript-standard-style
extends: ['plugin:vue/essential', '@vue/standard'],
// required to lint *.wpy files
plugins: [
'html',
'vue'
],
// add your custom rules here
'rules': {
// 强制"for"循环中更新子句的计算器朝着正确的方向移动
'for-direction': 0,
// 禁止function定义中出现重名参数
'no-dupe-args': 2,
// 禁止对象字面量中出现重复的key
'no-dupe-keys': 2,
// 禁止出现重复的case标签
'no-duplicate-case': 2,
// 禁止对catch子句的参数重新赋值
'no-ex-assign': 2,
// 禁止对关系运算符的左操作数使用否定操作符
'no-unsafe-negation': 2,
// 禁止出现令人困惑的多行表达式
'no-unexpected-multiline': 2,
// 禁止在return、throw、continue、break语句之后出现不可达代码
'no-unreachable': 2,
// 禁止在finally语句块中出现控制流语句
'no-unsafe-finally': 2,
// 要求使用isNaN()检查NaN
'use-isnan': 2,
// 强制typeof表达式与有效的字符串进行比较
'valid-typeof': 2,
// 还可以写表达式,厉害了~
'no-debugger': process.env.NODE_ENV === 'production' ? 'error': 'off',
'no-console': process.env.NODE_ENV === 'production' ? 'error': 'off',
/**
\* 【================================================ Best Practices ================================================】
\* 这些规则是关于最佳实践的,帮助你避免一些问题。
*/
// 强制 getter 和 setter在对象中成对出现
'accessor-pairs': 2,
// 强制所有控制语句使用一致的括号风格
'curly': [2, 'multi-line'],
// 强制在点号之前和之后一致的换行
'dot-location': [2, 'property'],
// 要求使用 ===和 !==
'eqeqeq': [2, 'allow-null'],
// 禁用arguments.caller 或 arguments.callee
'no-caller': 2,
// 禁止使用空解构模式
'no-empty-pattern': 2,
// 禁止eval()
'no-eval': 2,
// 禁止使用类似eval()的方法
'no-implied-eval': 2,
// 禁止扩展原生类型
'no-extend-native': 2,
// 禁止不必要的.bind()调用
'no-extra-bind': 2,
// 禁止case语句落空
'no-fallthrough': 2,
// 禁止数字字面量中使用前导和末尾小数点
'no-floating-decimal': 2,
// 禁用__iterator__属性
'no-iterator': 2,
// 禁用标签语句
'no-labels': [2, {
'allowLoop' : false,
'allowSwitch': false
}],
// 禁用不必要嵌套块
'no-lone-blocks': 2,
// 禁止使用多个空格
'no-multi-spaces': 2,
// 禁止使用多行字符串
'no-multi-str': 2,
// 禁止对String,Number 和 Boolean 使用new操作符
'no-new-wrappers': 2,
// 禁用八进制字面量
'no-octal': 2,
// 禁止在字符串中使用八进制转义序列
'no-octal-escape': 2,
// 禁止使用__proto__属性
'no-proto': 2,
// 禁止多次声明同一变量
'no-redeclare': 2,
// 禁止在return语句中使用赋值语句
'no-return-assign': [2, 'except-parens'],
// 禁止自我赋值
'no-self-assign': 2,
// 禁止自我比较
'no-self-compare': 2,
// 禁用逗号操作符
'no-sequences': 2,
// 禁止抛出异常字面量
'no-throw-literal': 2,
// 禁止一成不变的循环条件
'no-unmodified-loop-condition': 2,
// 禁止不必要的.call()和.apply()
'no-useless-call': 2,
// 禁止不必要的转义字符
'no-useless-escape': 2,
// 禁用with语句
'no-with': 2,
// 要求IIFE使用括号括起来
'wrap-iife': 2,
// 要求或禁止Yoda条件。 if("red" === color) { //字面量在前,变量在后 }
'yoda': [2, 'never'], // 比较绝不能是Yoda条件(需要变量在前,字面量在后)
/**
\* 【================================================ ECMAScript 6 ================================================】
\* 这些规则只与ES6有关,即通常所说的ES2015。
*/
// 强制箭头函数前后使用一致的空格
'arrow-spacing': [2, {
'before': true,
'after' : true
}],
// 要求在构造函数中有super()调用
'constructor-super': 2,
// 强制generator函数中*号周围使用一致的空格
'generator-star-spacing': [2, {
'before': true,
'after' : true
}],
// 禁止修改类声明的变量
'no-class-assign': 2,
// 禁止修改const声明的变量
'no-const-assign': 2,
// 禁止类成员中出现重复的名称
'no-dupe-class-members': 2,
// 禁止 Symbolnew 操作符和 new 一起使用
'no-new-symbol': 2,
// 禁止在构造函数中,在调用super()之前使用 this 或 super
'no-this-before-super': 2,
// 禁止在对象中使用不必要的计算属性
'no-useless-computed-key': 2,
// 禁止不必要的构造函数
'no-useless-constructor': 2,
// 禁止模板字符串中嵌入表达式周围空格的使用
'template-curly-spacing': [2, 'never'],
// 强制yield*表达式中的*周围使用空格
'yield-star-spacing': [2, 'both'],
// 要求使用const声明那些声明后不再被修改的变量
'prefer-const': 2,
/**
\* 【================================================ Stylistic Issues ================================================】
\* 这些规则是关于代码风格的。
*/
// 获取当前执行环境的上下文时,强制使用一致的命名(此处强制使用 'that')。
'consistent-this': [2, 'that'],
// 禁止或强制在代码块中开括号前和闭括号后有空格 { return 11 }
'block-spacing': [2, 'always'],
// 强制在代码块中使用一致的大括号风格
'brace-style': [2, '1tbs', {
'allowSingleLine': true
}],
// 强制使用驼峰拼写法命名规定
'camelcase': [0, {
'properties': 'always'
}],
// 要求或禁止末尾逗号
'comma-dangle': [2, 'never'],
// 强制在逗号前后使用一致的空格
'comma-spacing': [2, {
'before': false,
'after' : true
}],
// 强制在逗号前后使用一致的空格
'comma-style': [2, 'last'],
// 要求或禁止文件末尾存在空行
'eol-last': 2,
// 强制使用一致的缩进
'indent': [2, 2, {
'SwitchCase': 1
}],
// 强制在JSX属性中一致地使用双引号或单引号
'jsx-quotes': [2, 'prefer-single'],
// 要求构造函数首字母大写
'new-cap': [2, {
'newIsCap': true,
'capIsNew': false
}],
// 要求构造无参构造函数时有圆括号
'new-parens': 2,
// 禁用Array构造函数
'no-array-constructor': 2,
// 禁止空格和tab的混合缩进
'no-mixed-spaces-and-tabs': 2,
// 禁止出现多行空行
'no-multiple-empty-lines': [2, {
// 最大连续空行数
max: 2
}],
// 禁止在函数标识符和其调用之间有空格
'func-call-spacing': 2,
// 禁止行尾空格
'no-trailing-spaces': 2,
// 禁止可以在有更简单的可替代的表达式时使用三元操作符
'no-unneeded-ternary': [2, {
// 允许表达式作为默认的赋值模式
'defaultAssignment': true
}],
// 禁止属性前有空白
'no-whitespace-before-property': 2,
// 强制函数中的变量要么一起声明要么分开声明
'one-var': [2, {
'initialized': 'never'
}],
// 强制操作符使用一致的换行符
'operator-linebreak': [2, 'after', {
'overrides': {
'?': 'before',
':': 'before'
}
}],
// 要求或禁止块内填充
'padded-blocks': [2, 'never'],
// 强烈使用一致的反勾号``、双引号""或单引号''
'quotes': [2, 'single', {
// 允许字符串使用单引号或者双引号,只要字符串中包含了一个其他引号,否则需要转义
'avoidEscape': true,
// 允许字符串使用反勾号
'allowTemplateLiterals': true
}],
// 禁止使用分号代替ASI(自动分号插入)
'semi': ["error", "always"],
// 强制分号之前和之后使用一致的空格
'semi-spacing': [2, {
'before': false,
'after' : true
}],
// 强制在块之前使用一致的空格
'space-before-blocks': [2, 'always'],
// 强制在圆括号内使用一致的空格
'space-in-parens': [2, 'never'],
// 要求操作符周围有空格
'space-infix-ops': 2,
// 强制在一元操作符前后使用一致的空格
'space-unary-ops': [2, {
'words' : true,
'nonwords': false
}],
// 强制在注释// 或/*使用一致的空格
'spaced-comment': [1, 'always', {
'markers': ['global', 'globals', 'eslint', 'eslint-disable', '*package', '!', ',']
}],
// 强制在大括号中使用一致的空格
'object-curly-spacing': [2, 'always', {
'objectsInObjects': false
}],
// 禁止或强制在括号内使用空格
'array-bracket-spacing': [2, 'never'],
// 强制要求在对象字面量的属性中键和值之间使用一致的间距
'key-spacing': [2, {
'beforeColon': false,
'afterColon' : true
}],
/**
\* 【================================================ Node.js and CommonJS ================================================】
\* 这些规则是关于Node.js 或 在浏览器中使用CommonJS的。
*/
// 要求回调函数中有容错处理
'handle-callback-err': [2, '^(err|error)$'],
// 禁止调用 require 时使用new操作符
'no-new-require': 2,
// 禁止对__dirname和__filename进行字符串连接
'no-path-concat': 1,
// 强制在function的左括号之前使用一致的空格
'space-before-function-paren': [2, 'never'],
/**
\* 【================================================ Possible Errors ================================================】
\* 这些规则与JavaScript代码中可能的错误或逻辑错误有关。
*/
// 禁止条件表达式中出现赋值操作符
'no-cond-assign': 2,
// 禁止在正则表达式中使用控制字符
'no-control-regex': 0,
// 禁止在正则表达式中使用空字符集
'no-empty-character-class': 2,
// 禁止不必要的布尔转换
'no-extra-boolean-cast': 2,
// 禁止不必要的括号
'no-extra-parens': [2, 'functions'],
// 禁止对function声明重新赋值
'no-func-assign': 2,
// 禁止在嵌套块中出现变量声明或function声明
'no-inner-declarations': [2, 'functions'],
// 禁止RegExp构造函数中存在无效的正则表达式字符串
'no-invalid-regexp': 2,
// 禁止在字符串和注释之外不规则的空白
'no-irregular-whitespace': 2,
// 禁止把全局对象作为函数调用
'no-obj-calls': 2,
// 禁止正则表达式字面量中出现多个空格
'no-regex-spaces': 2,
// 禁用稀疏数组
'no-sparse-arrays': 2,
/**
\* 【================================================ Variables ================================================】
\* 这些规则与变量声明有关。
*/
// 禁止删除变量
'no-delete-var': 2,
// 不允许标签与变量同名
'no-label-var': 2,
// 禁止将标识符定义为受限的名字
'no-shadow-restricted-names': 2,
// 禁止未声明的变量,除非它们在/*global */注释中被提到
'no-undef': 2,
// 禁止将变量初始化为undefined
'no-undef-init': 2,
// 禁止出现未使用的变量
'no-unused-vars': [2, {
'var' : 'all',
'args': 'none'
}],
/**
\* 【================================================ 配置定义在插件中的规则 ================================================】
\* 格式: 插件名/规则ID
*/
//
'vue/no-parsing-error': ["off"]
}
}mdn的定义:https://developer.mozilla.org/zh-CN/docs/Web/JavaScript/Closures
函数和对其周围状态(lexical environment,词法环境)的引用捆绑在一起构成闭包(closure)。也就是说,闭包可以让你从内部函数访问外部函数作用域。在 JavaScript 中,每当函数被创建,就会在函数生成时生成闭包。
function init() {
    var name = "蜡笔小新"; // name 是一个被 init 创建的局部变量
    function showName() { // displayName() 是内部函数,一个闭包
        alert(name); // 使用了父函数中声明的变量
    }
    showName();
}
init();init函数创建了一个name的局部变量和showName的局部函数,showName没有自己的局部变量,所以它会访问外部函数的变量,如果init函数里面也没有name,他就会去window全局找,我们把这个查找的链条就称为作用域链
function bar() {
   console.log(name )
}
function foo() {
   var name = "蜡笔小新"
   bar()
}
var name = "樱桃丸子"
foo()可以看到全局执行上下文跟foo函数执行上下文都有变量name,我们按照作用域链来分析
1.bar函数内部没有变量,他在foo内部执行,我们去查找 foo函数中的变量
2.我们在foo函数内部找到了name变量,然后使用它
按照这样的查找方式,打印的应该是蜡笔小新,但是结果并非如此,其实打印的是樱桃丸子,要搞清楚这个我们还需要了解词法作用域
他是根据源代码中声明变量的位置来确定的,所以,其实bar函数的外部引用是全局执行上下文,所以打印出来的是樱桃丸子
了解的作用域链就能更好的理解闭包
function markClosure() {
    var name = "蜡笔小新";
    function showName() {
        alert(name);
    }
   return showName
}
var myFuc = markClosure();
myFuc()正常情况下,一个函数中的局部变量仅存在于此函数的执行期间,当函数markClosure一执行完毕之后,name就不能访问了,但是由于JavaScript会形成闭包,当markClosure执行之后showName被返回出去了,由于showName使用了markClosure函数内部的name变量,所以name依然保存在内存中,当我们调用myFuc的时候,name依然可以用
我们可以用一句话总结:当调用一个外部函数返回一个内部函数后,即使该外部函数已经执行结束了,但是内部函数引用外部函数的变量依然保存在内存中,我们就把这些变量的集合称为闭包。
Event Bus就是一个发布订阅模式
class EventEmitter {
  constructor() {
    // handlers是一个map,用于存储事件与回调之间的对应关系
    this.handlers = {}
  }

  // on方法用于安装事件监听器,它接受目标事件名和回调函数作为参数
  on(eventName, cb) {
    // 先检查一下目标事件名有没有对应的监听函数队列
    if (!this.handlers[eventName]) {
      // 如果没有,那么首先初始化一个监听函数队列
      this.handlers[eventName] = []
    }

    // 把回调函数推入目标事件的监听函数队列里去
    this.handlers[eventName].push(cb)
  }

  // emit方法用于触发目标事件,它接受事件名和监听函数入参作为参数
  emit(eventName, ...args) {
    // 检查目标事件是否有监听函数队列
    if (this.handlers[eventName]) {
      // 这里需要对 this.handlers[eventName] 做一次浅拷贝,主要目的是为了避免通过 once 安装的监听器在移除的过程中出现顺序问题
      const handlers = this.handlers[eventName].slice()
      // 如果有,则逐个调用队列里的回调函数
      handlers.forEach((callback) => {
        callback(...args)
      })
    }
  }

  // 移除某个事件回调队列里的指定回调函数
  off(eventName, cb) {
    const callbacks = this.handlers[eventName]
    const index = callbacks.indexOf(cb)
    if (index !== -1) {
      callbacks.splice(index, 1)
    }
  }

  // 为事件注册单次监听器
  once(eventName, cb) {
    // 对回调函数进行包装,使其执行完毕自动被移除
    const wrapper = (...args) => {
      cb(...args)
      this.off(eventName, wrapper)
    }
    this.on(eventName, wrapper)
  }
}module.exports = {
mode: 'production'
}| 选项 | 描述 |
|---|---|
| development | 会将 process.env.NODE_ENV 的值设为 development。启用 NamedChunksPlugin 和 NamedModulesPlugin。 |
| production | 会将 process.env.NODE_ENV 的值设为 production。启用 FlagDependencyUsagePlugin, FlagIncludedChunksPlugin, ModuleConcatenationPlugin, NoEmitOnErrorsPlugin, OccurrenceOrderPlugin, SideEffectsFlagPlugin 和 UglifyJsPlugin. |
让webpack能够识别css
module.exports = {
  module: {
    rules: [
      {
        test: /\.css$/,
        use: [ 'css-loader' ]
      }
    ]
  }
}将css写入style标签并插入head中(下面loader顺序不能换,因为loader加载顺序从右到左)
module.exports = {
  module: {
    rules: [
      {
        test: /\.css$/,
        use: ['style-loader', 'css-loader' ]
      }
    ]
  }
}用来处理文件
module.exports = {
  module: {
    rules: [
      {
        test: /\.(png|jpg|gif)$/,
        use: [
          {
            loader: 'file-loader',
            options: {}
          }
        ]
      }
    ]
  }
}可以将小图片转为base64字符串,减小请求
module.exports = {
  module: {
    rules: [
      {
        test: /\.(png|jpg|gif)$/,
        use: [
          {
            loader: 'url-loader',
            options: {
              limit: 10240
            }
          }
        ]
      }
    ]
  }
}自动给css属性添加浏览器前缀
npm install --save-dev postcss-loader autoprefixer

module.exports = {
    module: {
        rules: [
          {
            loader: "postcss-loader",
            options: {
                plugins: [
                    require("autoprefixer") /*在这里添加*/
                ]
            }
          }
       ]
    }
}将es6+编译成浏览器兼容的 JavaScript 代码
npm install -D babel-loader @babel/core @babel/preset-env

module.exports = {
    module: {
      rules: [
        {
          test: /\.js$/,
          exclude: /node_modules/,
          use: {
            loader: 'babel-loader',
            options: {
              presets: ['@babel/preset-env']
            }
          }
        }
      ]
    }
}该插件将为你生成一个 HTML5 文件, 其中包括使用 script 标签的 body 中的所有 webpack 包。下面的将会在dist下产生一个index.html并引入index.js
const HtmlWebpackPlugin = require('html-webpack-plugin');
const path = require('path');

module.exports  = {
  entry: 'index.js',
  output: {
    path: path.resolve(__dirname, './dist'),
    filename: 'index.js'
  },
  plugins: [new HtmlWebpackPlugin()]
};其作用就是每次打包前先先将输出目录中的内容进行清空,然后再将打包输出的文件输出到输出目录中
const {CleanWebpackPlugin} = require("clean-webpack-plugin");

module.exports = {
    plugins: [
        new CleanWebpackPlugin() // 打包前清空输出目录
    ]
}其作用就是打包的时候copy单个文件或整个目录一起输出到输出目录中。
module.exports = {
    plugins: [
        new CopyWebpackPlugin([
            {
                from: "./static", // 将项目根目录下的static文件夹一起拷贝到输出目录中
                to: "" // 属性值为空字符串则表示是输出目录
            }
        ])
    ]
}进行打包文件分析
const BundleAnalyzerPlugin = require('webpack-bundle-analyzer').BundleAnalyzerPlugin;

module.exports = {
  plugins: [
    new BundleAnalyzerPlugin()
  ]
}和整个项目的构建有关,只要项目文件有修改,整个项目构建的hash值就会改变
和webpack打包的chunk有关,不同的entry会生成不同的chunkhash值
根据文件内容来定义hash,文件内容不变,则contenthash不变
| 模式 | 解释 |
|---|---|
| eval | 每个module会封装到 eval 里包裹起来执行,并且会在末尾追加注释 //@ sourceURL. |
| source-map | 生成一个SourceMap文件. |
| hidden-source-map | 和 source-map 一样,但不会在 bundle 末尾追加注释. |
| inline-source-map | 生成一个 DataUrl 形式的 SourceMap 文件. |
| eval-source-map | 每个module会通过eval()来执行,并且生成一个DataUrl形式的SourceMap. |
| cheap-source-map | 生成一个没有列信息(column-mappings)的SourceMaps文件,不包含loader的 sourcemap(譬如 babel 的 sourcemap) |
| cheap-module-source-map | 生成一个没有列信息(column-mappings)的SourceMaps文件,同时 loader 的 sourcemap 也被简化为只包含对应行的。 |
开发环境推荐:
cheap-module-eval-source-map
生产环境推荐:
cheap-module-source-map
单例模式之所以这么叫,是因为它限制一个类只能有一个实例化对象。经典的实现方式是,创建一个类,这个类包含一个方法,这个方法在没有对象存在的情况下,将会创建一个新的实例对象。如果对象存在,这个方法只是返回这个对象的引用。
class Singleton {
    static getInstance() {
        // 判断是否已经new过1个实例
        if (!Singleton.instance) {
            // 若这个唯一的实例不存在,那么先创建它
            Singleton.instance = new Singleton()
        }
        // 如果这个唯一的实例已经存在,则直接返回
        return Singleton.instance
    }
}

const s1 = SingleDog.getInstance()
const s2 = SingleDog.getInstance()

// true
s1 === s2
因为我们得到的是一个引用,所以 s1 === s2
es5实现
var mySingleton = (function () {

  var instance;

  function init() {

    // 单例

    // 私有方法和变量
    function privateMethod(){
        console.log( "I am private" );
    }

    var privateVariable = "Im also private";

    return {

      // 共有方法和变量
      publicMethod: function () {
        console.log( "The public can see me!" );
      },

      publicVariable: "I am also public",


    };

  };
  return {
    // 如果存在获取此单例实例,如果不存在创建一个单例实例
    getInstance: function () {

      if ( !instance ) {
        instance = init();
      }

      return instance;
    }

  };

})();


// 使用:

var singleA = mySingleton.getInstance();
var singleB = mySingleton.getInstance();
console.log( singleA === singleB ); // true
https://www.w3cschool.cn/zobyhd/tqlv9ozt.html
https://juejin.im/book/5c70fc83518825428d7f9dfb/section/5c83d5b3e51d453a8a24d3a1
A declarative, efficient, and flexible JavaScript library for building user interfaces.
🖖 Vue.js is a progressive, incrementally-adoptable JavaScript framework for building UI on the web.
TypeScript is a superset of JavaScript that compiles to clean JavaScript output.
An Open Source Machine Learning Framework for Everyone
The Web framework for perfectionists with deadlines.
A PHP framework for web artisans
Bring data to life with SVG, Canvas and HTML. 📊📈🎉
JavaScript (JS) is a lightweight interpreted programming language with first-class functions.
Some thing interesting about web. New door for the world.
A server is a program made to process requests and deliver data to clients.
Machine learning is a way of modeling and interpreting data that allows a piece of software to respond intelligently.
Some thing interesting about visualization, use data art
Some thing interesting about game, make everyone happy.
We are working to build community through open source technology. NB: members must have two-factor auth.
Open source projects and samples from Microsoft.
Google ❤️ Open Source for everyone.
Alibaba Open Source for everyone
Data-Driven Documents codes.
China tencent open source team.
