Giter VIP home page Giter VIP logo

quiz-app's Introduction

SkillUP

GitHub issues GitHub pull requests GitHub forks GitHub stars GitHub watchers GitHub contributors

logo

Most good programmers do programming not because they expect to get paid or get adulation by the public, but because it is fun to program. - Linus Torvalds

Table of contents

Introduction

This application is a collaborative project made by the Google Udacity Front-End Web Development students during the Scholarship phase.

Technologies

The technologies which will be used in developing this application are as follows:

To know more about the above mentioned technologies, please refer to the project guidelines.

Mockups

Data Model

View data model

  • Helpful in understanding the workflow of Redux/React application.
  • Demonstrates the data flow in the application.

ER Diagram

View ERD
This entity-relationship diagram is a visual representation of the database design for the application.

Collaborators

Moderator

The moderator of this project is @ezioda004.

Co-Moderators

The co-moderators of this project are:

Contributing Guidelines

Refer to this link CONTRIBUTING.md

  • Please make sure to read this before getting started.
  • These guidelines will help us in keeping track of who is contributing and what is being contributed to the project.

Thanksgiving

We would like to express our gratitude to the Google Udacity Scholarship team for this idea of collaborative projects. It is a huge step towards improving the learning curve.

Special thanks to @akshit.udacity.

quiz-app's People

Contributors

abhishekakade avatar ajayjam97 avatar ezioda004 avatar fayazara avatar goss-gowtham avatar jibin2706 avatar kadumuri1994 avatar lalitmee avatar muditasisodia avatar padhma avatar parulbindal avatar pben369 avatar sb39 avatar suhas023 avatar sukhjinderarora avatar v3dant avatar vanisha27 avatar vsuguna avatar

Stargazers

 avatar  avatar  avatar  avatar  avatar  avatar  avatar  avatar  avatar  avatar  avatar  avatar  avatar  avatar  avatar  avatar  avatar  avatar  avatar  avatar  avatar  avatar  avatar  avatar  avatar  avatar  avatar  avatar  avatar  avatar  avatar  avatar  avatar  avatar  avatar  avatar  avatar  avatar  avatar  avatar  avatar  avatar  avatar  avatar  avatar  avatar

Watchers

 avatar  avatar  avatar  avatar  avatar  avatar  avatar  avatar  avatar  avatar  avatar  avatar  avatar  avatar  avatar

quiz-app's Issues

Update the Header for Dashboard

Implement the navbar as shown in this image.
image

You'll be making changes in Header.js/Header.css
Head down to `quiz-app => src => Components => Header => Header.js/Header.css

Important instructions to follow before you start working because this requires you to be authenticated and added to the database.

Step 1. In the project directory, open terminal and do npm install
Step 2. Now do npm install -g nodemon
Step 3. Run nodemon server/server.js
Step 4. Open another terminal window in the same directory (DO NOT close the other one)
Step 5. Run npm start

You'll see that webpack has opened the frontend server at http://localhost:3000, open another tab and type http://localhost:5000, this is port where the server is running.

Step 6. Now, open open the link https://localhost:3000/auth/google which will authenticate you and add your basic information to the database.
Step 7 Now head to https://localhost:3000/dashboard , you should be able to see your google profile image here.
This is where you'll see the changes you'll be making.

In the Header Component, you should see a switch statement. You'll need to write JSX ie HTML inside the return statement. Bootstrap4 is already imported so need to worry about that as well.

Please comment on this issue and I'll assign it to you.

Create a Navbar for Signup/Signin Page

Create a navbar as shown in this picture

How to get started? Read our project setup instructions.
Fork the project, navigate to directory quiz-app => src => Component => Header.js

All you need to do is write HTML inside the <header> </header> element.

Note:

  1. If you use any self closing tags such as <img>, <input>, <br>
    Make sure you always close them like this <img />, <input />, <br />

  2. If you add a class to an element example

<div  class = "nav navbar"> 
    <!-- rest of your code -->
</div>

Make sure you use className instead of class. Example

<div  className = "nav navbar"> 
    <!-- rest of your code -->
</div>

You only need to create the elements, please don't style them yet. I'll create different issue for that after this one is resolved.

This is fairly easy and straightforward to do, please comment on this issue and I'll assign it to you.

Create a SignUp form for Signup/Signin Page

Create a Signup form as shown in this picture

How to get started? Read our project setup instructions.
Fork the project, navigate to directory quiz-app => src => Component => Signup.js

All you need to do is write HTML inside the <main> </main> element.

Note:

  1. If you use any self closing tags such as <img>, <input>, <br>
    Make sure you always close them like this <img />, <input />, <br />

  2. If you add a class to an element example

<div  class = "nav navbar"> 
    <!-- rest of your code -->
</div>

Make sure you use className instead of class. Example

<div  className = "nav navbar"> 
    <!-- rest of your code -->
</div>

You only need to create the elements, please don't style them yet. I'll create different issue for that after this one is resolved.

This is fairly easy and straightforward to do, please comment on this issue and I'll assign it to you.

Path issue in website/app URL

As I can see this as single page application but I am getting different URL path when I click on Log in and Sign up link on homepage, please find below screenshot :

image
Click on Login
image

Click on Signup
image

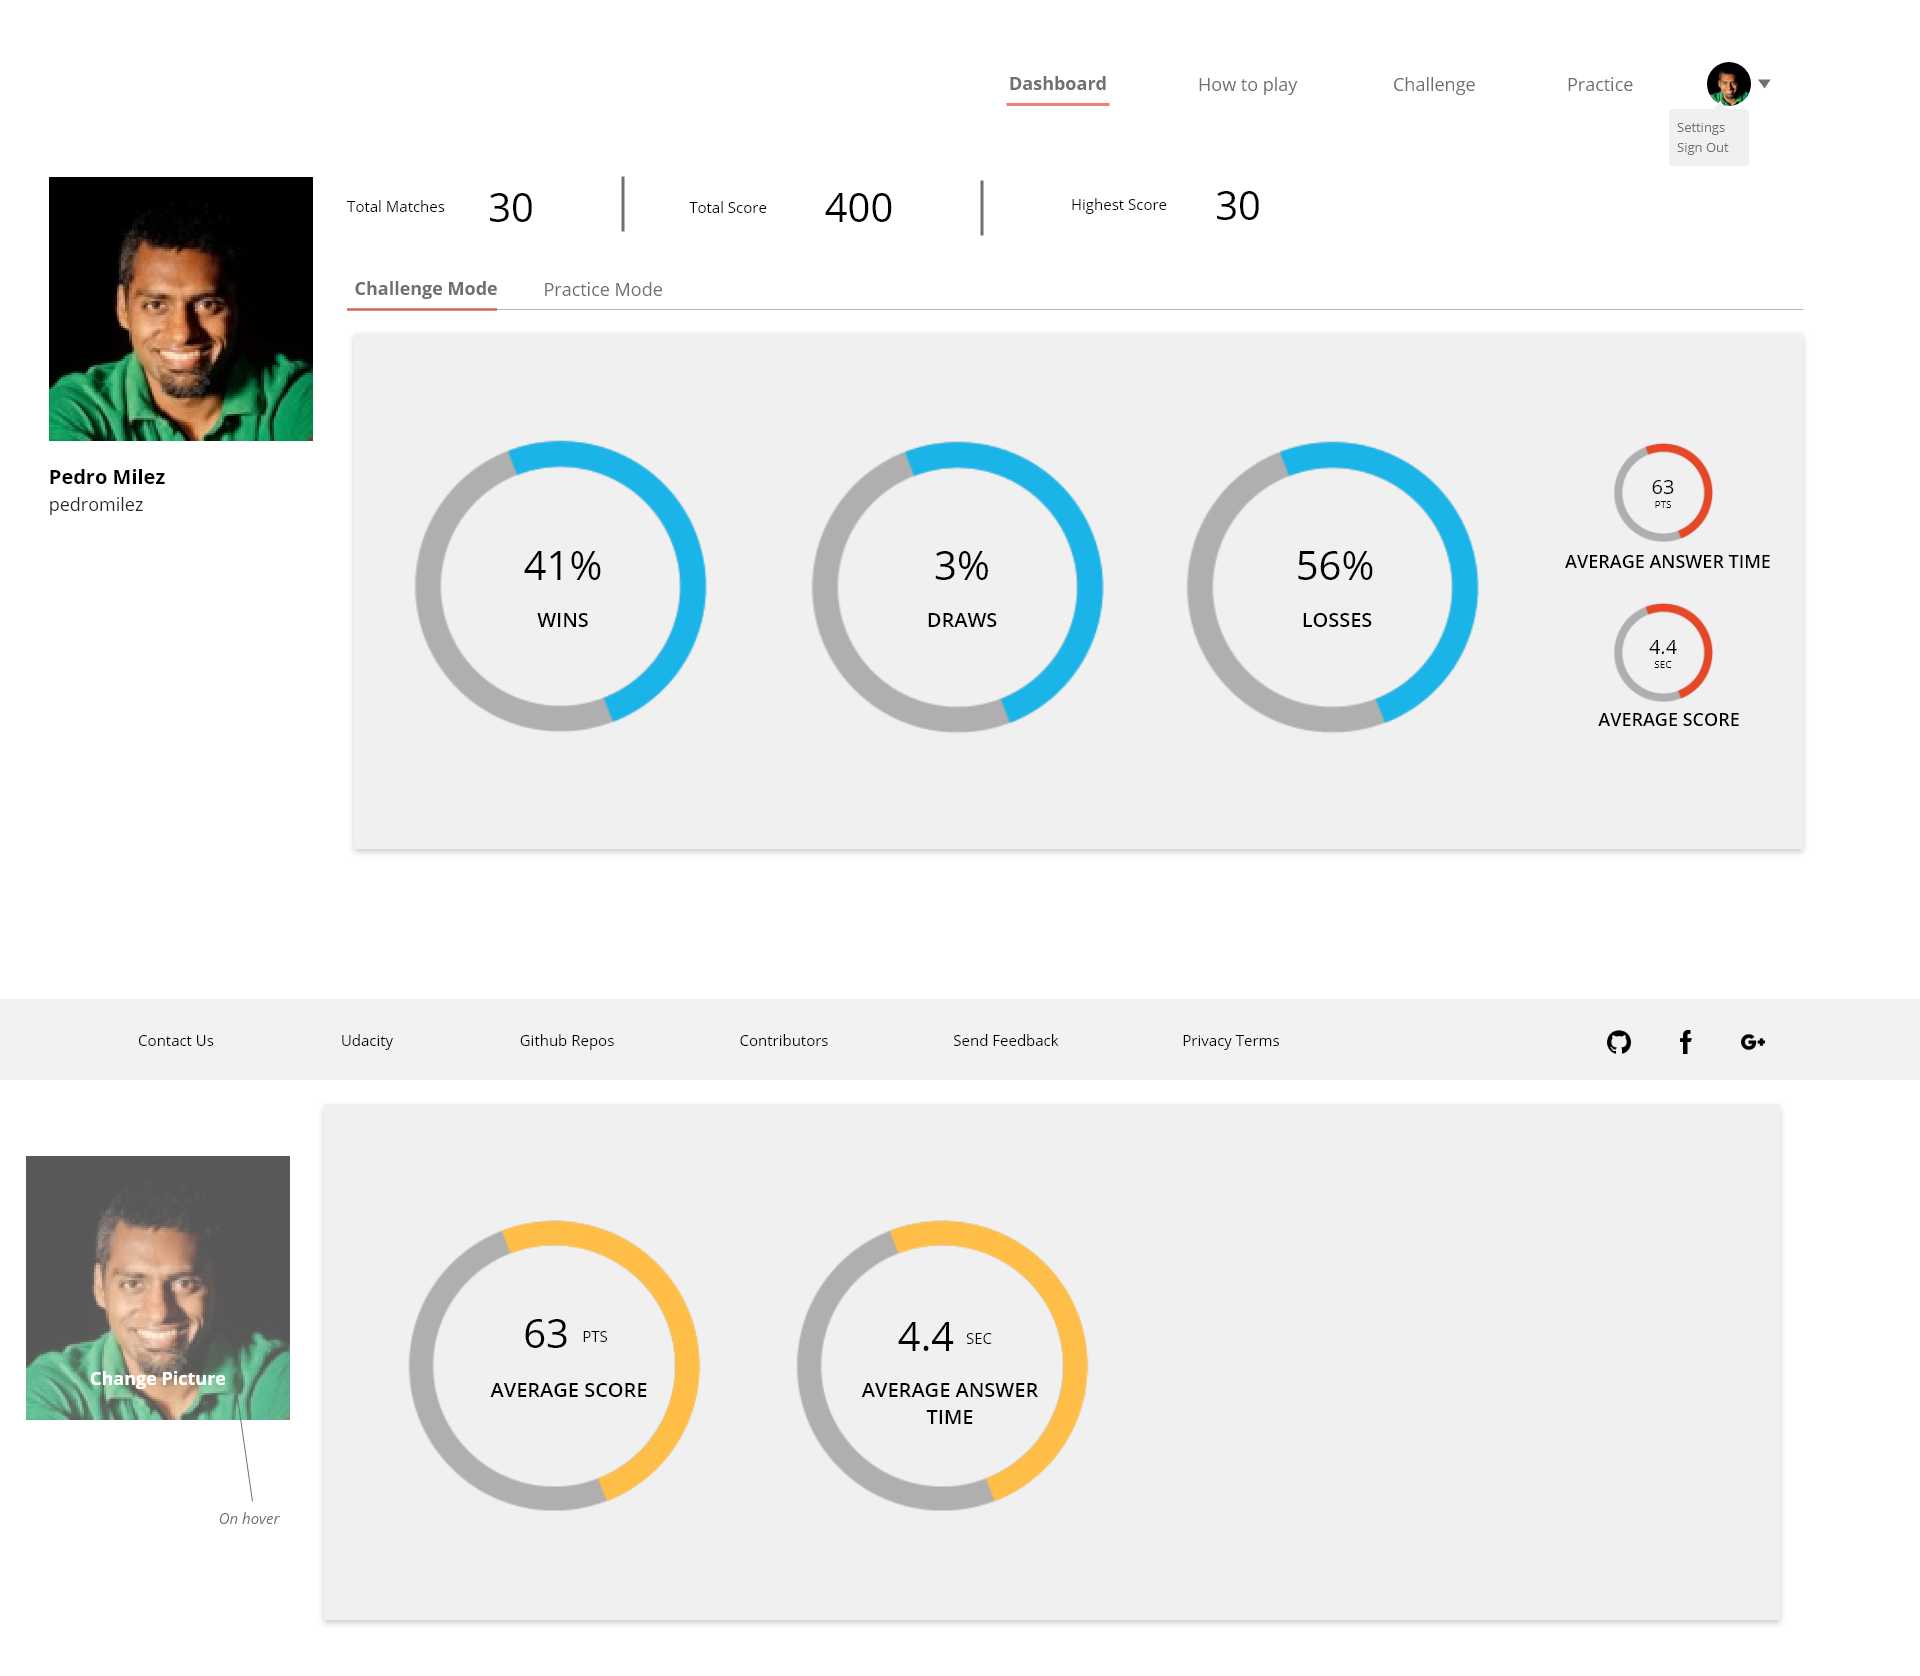
UI Design for Dashboard

Help us with the design of our dashboard.

The dashboard would include few details about the user and the statistics regarding their current progress in the quizzes.

This is a basic mockup of the same.
image

Here are a few things to be included on this page -

  1. User's profile picture
  2. Full Name
  3. Username
  4. Statistics for Practice, Single Player and Challenge mode.
  5. Progress in quiz
  6. Settings option

Apart from the things mentioned above, you can include other elements which could be relevant here.

Feel free to use your creativity! ๐Ÿ™‚

Style the Form, Signup, Signin Components

Style the Form, Signup and Signin Component as shown in this picture.

image

Special note on this one.
You'll have to style in 3 CSS files because we have 3 components.

  1. Signup Component - contains Signup form
  2. Signin Component - contains Signin form
  3. Forms Component - renders and contains both forms, also switches between Signup/Signin forms on click.

All 3 CSS files are found respectively in their Component folder, so you only need to navigate to the component folder and open their CSS files respectively to get started.
quiz-app => src => Component =>Signup => Signup.js and Signup.css
quiz-app => src => Component =>Signin => Signin.js and Signin.css
quiz-app => src => Component =>Form => Form.js and Signup.css

How to get started? Read our project setup instructions.
Fork the project and setup as posted above.

All you need to do is write normal CSS inside the CSS files mentioned above.

We are using Bootstrap-4 for this project but feel free to use native CSS wherever required.

Note:

  1. If you use any self closing tags such as <img>, <input>, <br>
  2. Make sure you always close them like this <img />, <input />, <br />

If you add a class to an element example

<div  class = "nav navbar"> 
    <!-- rest of your code -->
</div>

Make sure you use className instead of class. Example

<div  className = "nav navbar"> 
    <!-- rest of your code -->
</div>

If you have any doubts regarding this issue, feel free to post it here or contact us on slack.

Please comment on this issue and I'll assign it to you.

Create a Footer for the Signup/Signin Page

Create a Footer as shown in this picture

How to get started? Read our project setup instructions.
Fork the project, navigate to directory quiz-app => src => Component => Footer.js

All you need to do is write HTML inside the <footer> </footer> element.

Note:

  1. If you use any self closing tags such as <img>, <input>, <br>
    Make sure you always close them like this <img />, <input />, <br />

  2. If you add a class to an element example

<div  class = "nav navbar"> 
    <!-- rest of your code -->
</div>

Make sure you use className instead of class. Example

<div  className = "nav navbar"> 
    <!-- rest of your code -->
</div>

You only need to create the elements, please don't style them yet. I'll create different issue for that after this one is resolved.

Don't worry about links, just add href = "#" for now. We'll do the rest!

This is fairly easy and straightforward to do, please comment on this issue and I'll assign it to you.

Change the color of Active and Inactive Tab of Forms

The color of the active tab of the SignUp Form and SignIn Form should be same as it is in this figure.

The border around the inputs should be not this much dark black. I think this #c4c8cc color value will be good for border color of all the inputs in the forms.

Style Header Component

Style the Header Component as shown in this picture.

image

For the logo use this image.

image

How to get started? Read our project setup instructions.
Fork the project, navigate to directory quiz-app => src => Component => Header.css and Header.js

All you need to do is write normal CSS inside Header.css.

We are using Bootstrap-4 for this project but feel free to use native CSS wherever required.

Note:

  1. If you use any self closing tags such as <img>, <input>, <br>
  2. Make sure you always close them like this <img />, <input />, <br />

If you add a class to an element example

<div  class = "nav navbar"> 
    <!-- rest of your code -->
</div>

Make sure you use className instead of class. Example

<div  className = "nav navbar"> 
    <!-- rest of your code -->
</div>

This is fairly easy and straightforward to do, please comment on this issue and I'll assign it to you.

Create and Style Welcome page content

Create and Style Welcome page content

image

Here are the images used.

How to get started? Read our project setup instructions.
Fork the project, navigate to directory
quiz-app => src => Component => Home => Home.js and Home.css

You may also need to style the main container component. Its located in
quiz-app => src => Component => Welcome Page =>Welcome.css

You need to do write HTML inside the <main></main> element and style inside Page.css
We're using Bootstrap4 for this project but feel free to use native CSS wherever you require.

Note:

  1. If you use any self closing tags such as <img>, <input>, <br>
    Make sure you always close them like this <img />, <input />, <br />

  2. If you add a class to an element example

<div  class = "nav navbar"> 
    <!-- rest of your code -->
</div>

Make sure you use className instead of class. Example

<div  className = "nav navbar"> 
    <!-- rest of your code -->
</div>

Feel free to ask any question regarding this to us here or over slack.

This is fairly easy and straightforward to do, please comment on this issue and I'll assign it to you.

Make the Welcome Page Responsive

Make the Welcome Page Responsive

The images arent scaling properly and the sections can be made to be stack on one another rather than on side with the images for mobile.

screenshot 69
screenshot 70

How to get started? Read our project setup instructions.
Fork the project, navigate to directory
quiz-app => src => Component => Home => Home.js and Home.css

You may also need to style the main container component. Its located in
quiz-app => src => Component => Welcome Page =>Welcome.css

We're using Bootstrap-4 for this project but feel free to use native CSS wherever you require.

Note:

  1. If you use any self closing tags such as <img>, <input>, <br>
    Make sure you always close them like this <img />, <input />, <br />

  2. If you add a class to an element example

<div  class = "nav navbar"> 
    <!-- rest of your code -->
</div>

Make sure you use className instead of class. Example

<div  className = "nav navbar"> 
    <!-- rest of your code -->
</div>

Feel free to ask any question regarding this to us here or over slack.

Comment on this issue and we'll assign this to you.

Create a Navbar and Style it for Welcome Page

Create a Navbar and Style it as shown in below

image

Here's the logo

How to get started? Read our project setup instructions.
Fork the project, navigate to directory quiz-app => src => Component => Navbar => Navbar.js and Navbar.css

All you need to do is write HTML inside the <nav> </nav> element and style inside Navbar.css
We're using Bootstrap4 for this project but feel free to use native CSS wherever you require.

Note:

  1. If you use any self closing tags such as <img>, <input>, <br>
    Make sure you always close them like this <img />, <input />, <br />

  2. DO NOT TOUCH <Link>:
    This element is responsible for seamless routing without backend, if you want to work with it. Think of it as <a href = ""> </a>. If you want to add a class to it you can do

<Link className = "whatever-class"> </Link>
  1. If you add a class to an element example
<div  class = "nav navbar"> 
    <!-- rest of your code -->
</div>

Make sure you use className instead of class. Example

<div  className = "nav navbar"> 
    <!-- rest of your code -->
</div>

You only need to create the elements and style the navbar

This is fairly easy and straightforward to do, please comment on this issue and I'll assign it to you.

Complete the Profile Component for Dashboard

Implement the profile as shown in this image.
image

You'll be making changes in Profile.js/Profile.css
Head down to `quiz-app => src => Components => Profile => Profile.js/Profile.css

Important instructions to follow before you start working because this requires you to be authenticated and added to the database.

Step 1. In the project directory, open terminal and do npm install
Step 2. Now do npm install -g nodemon
Step 3. Run nodemon server/server.js
Step 4. Open another terminal window in the same directory (DO NOT close the other one)
Step 5. Run npm start

You'll see that webpack has opened the frontend server at http://localhost:3000, open another tab and type http://localhost:5000, this is port where the server is running.

Step 6. Now, open open the link https://localhost:3000/auth/google which will authenticate you and add your basic information to the database.
Step 7 Now head to https://localhost:3000/dashboard , you should be able to see your google profile image here.
This is where you'll see the changes you'll be making.

The profile data is passed as this.auth.props and you should be able to see your data here.

The user statistics aren't there yet but you can use dummy data. If you're going to use a library to implement the charts and so on, please do let us know.
This is a bit complex issue so I'd prefer if any individual with some experience takes it on.

Please comment on this issue and I'll assign it to you.

Create a SignIn form for Signup/Signin Page

Create a Signin form as shown in this picture

How to get started? Read our project setup instructions.
Fork the project, navigate to directory quiz-app => src => Component => Signin.js

All you need to do is write HTML inside the <main> </main> element.

Note:

  1. If you use any self closing tags such as <img>, <input>, <br>
    Make sure you always close them like this <img />, <input />, <br />

  2. If you add a class to an element example

<div  class = "nav navbar"> 
    <!-- rest of your code -->
</div>

Make sure you use className instead of class. Example

<div  className = "nav navbar"> 
    <!-- rest of your code -->
</div>

You only need to create the elements, please don't style them yet. I'll create different issue for that after this one is resolved.

Don't worry about authentication, you only need to create buttons. We'll do the rest!

This is fairly easy and straightforward to do, please comment on this issue and I'll assign it to you.

Style Footer Component

Style the Footer Component as shown in this picture.

image

Make sure the Footer is responsive as well.

How to get started? Read our project setup instructions.
Fork the project, navigate to directory quiz-app => src => Component => Footer.css and Footer.js

All you need to do is write normal CSS inside Footer.css.

We are using Bootstrap-4 for this project but feel free to use native CSS wherever required.

Note:

  1. If you use any self closing tags such as <img>, <input>, <br>
  2. Make sure you always close them like this <img />, <input />, <br />

If you add a class to an element example

<div  class = "nav navbar"> 
    <!-- rest of your code -->
</div>

Make sure you use className instead of class. Example

<div  className = "nav navbar"> 
    <!-- rest of your code -->
</div>

This is fairly easy and straightforward to do, please comment on this issue and I'll assign it to you.

Data Model for the app.

Come up with the data model for the app.
You should consider these features while working on it.

A Single Page Application which has:

  1. Dashboard for separate users (Users can access their profile, see their previous challenge score etc)
  2. A Player vs Player mode, where users can challenge random users.
  3. A Practice mode, where users will be tested with their preferred language against the greatest enemy of all- time itself.
  4. A leader-board system where users can see who has won the most challenges and has the most experience in the progression system.

Name and logo for the application

Guys, I think name and logo are very important for any application. So we should discuss it and find a nice name and let's also design a nice logo for our application.

Hamburger menu icon is not working on mobile view

Hamburger menu icon is not working on mobile view, hence cannot see any navigation to homepage screen. Also, the Skill Up anchor link on Login and Signup page is not working but its working on the homepage.

Mobile view
image

Desktop View
image

Improve the footer style

Some padding should be given to the footer content. Currently, the content of the footer is touching the upper line of the footer (as shown in the Fig-1).

  • Fig-1
    screenshot from 2018-04-16 22-30-39

When the SignIn Tab is active the footer is detaching from the bottom of the page(as shown in the Fig-2). This should not happen. The footer should always be touching the bottom most of the page.

High level design of quiz app

This would certainly help the developers/contributors understand the architecture of the web application (using a diagram) detailing the interaction of each component (using an underlying technology) of the product.
An example of such would be as below:
https://goo.gl/images/eCfxoT

Recommend Projects

  • React photo React

    A declarative, efficient, and flexible JavaScript library for building user interfaces.

  • Vue.js photo Vue.js

    ๐Ÿ–– Vue.js is a progressive, incrementally-adoptable JavaScript framework for building UI on the web.

  • Typescript photo Typescript

    TypeScript is a superset of JavaScript that compiles to clean JavaScript output.

  • TensorFlow photo TensorFlow

    An Open Source Machine Learning Framework for Everyone

  • Django photo Django

    The Web framework for perfectionists with deadlines.

  • D3 photo D3

    Bring data to life with SVG, Canvas and HTML. ๐Ÿ“Š๐Ÿ“ˆ๐ŸŽ‰

Recommend Topics

  • javascript

    JavaScript (JS) is a lightweight interpreted programming language with first-class functions.

  • web

    Some thing interesting about web. New door for the world.

  • server

    A server is a program made to process requests and deliver data to clients.

  • Machine learning

    Machine learning is a way of modeling and interpreting data that allows a piece of software to respond intelligently.

  • Game

    Some thing interesting about game, make everyone happy.

Recommend Org

  • Facebook photo Facebook

    We are working to build community through open source technology. NB: members must have two-factor auth.

  • Microsoft photo Microsoft

    Open source projects and samples from Microsoft.

  • Google photo Google

    Google โค๏ธ Open Source for everyone.

  • D3 photo D3

    Data-Driven Documents codes.