Giter VIP home page Giter VIP logo

single-image-svbrdf-capture-rendering-loss's Introduction

Single-Image SVBRDF Capture with a Rendering-Aware Deep Network

teaser This repository contains the code for our paper "Single-Image SVBRDF Capture with a Rendering-Aware Deep Network, Valentin Deschaintre, Miika Aittala, Fredo Durand, George Drettakis, Adrien Bousseau. Transactions on graphics (Siggraph Conference Proceedings), aug 2018".

The project webpage can be found here: https://team.inria.fr/graphdeco/projects/deep-materials/

The data for the pre-training can be found on the project webpage.

Paper abstract

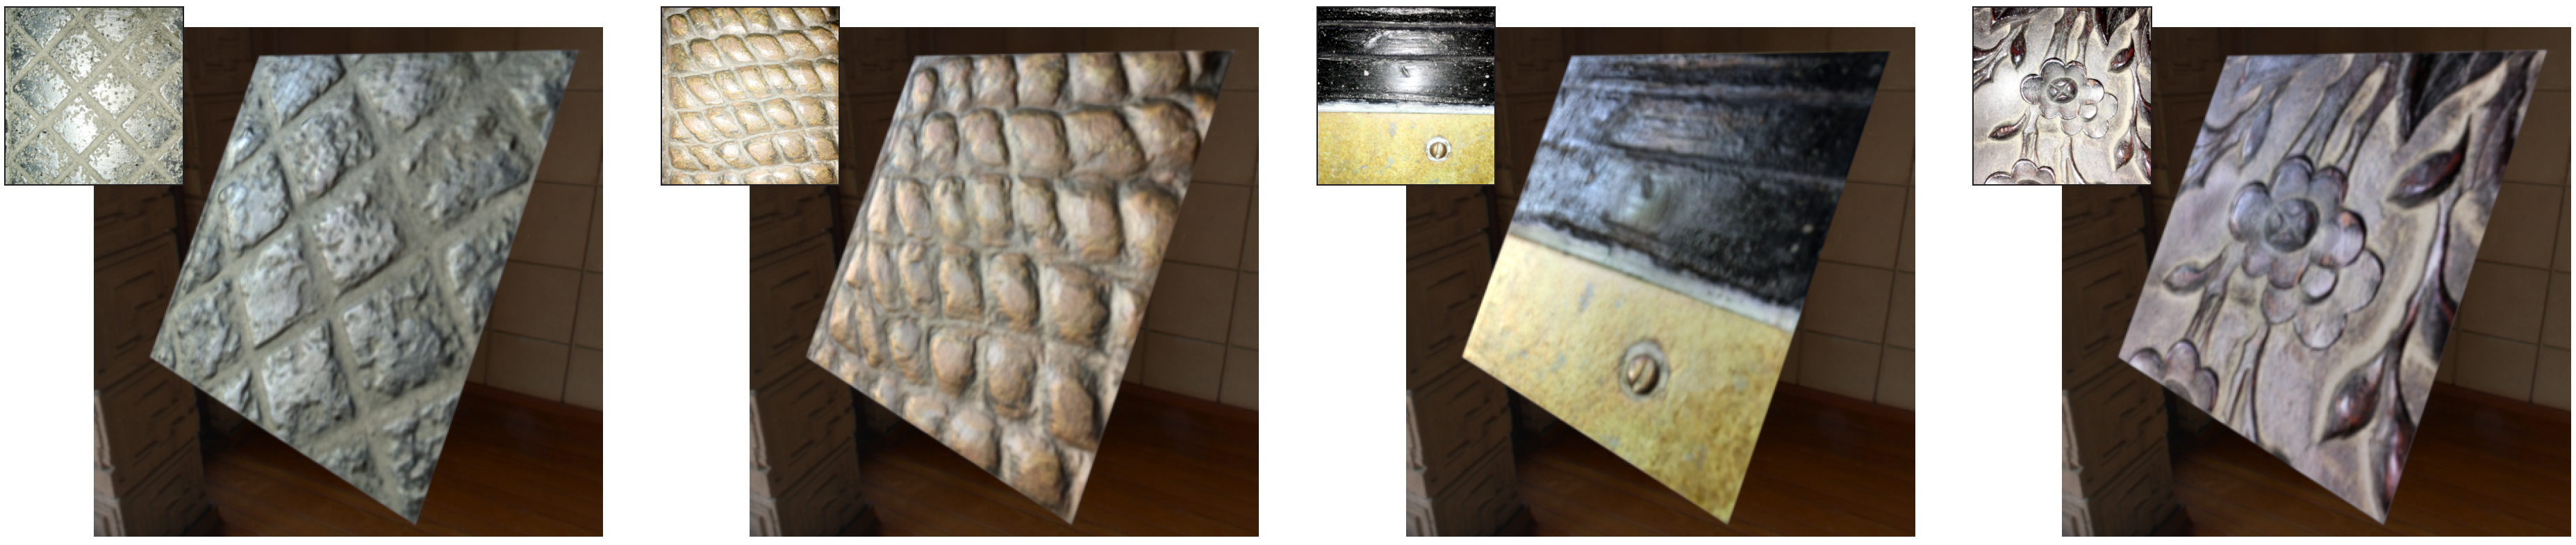
Texture, highlights, and shading are some of many visual cues that allow humans to perceive material appearance in single pictures. Yet, recovering spatially-varying bi-directional reflectance distribution functions (SVBRDFs) from a single image based on such cues has challenged researchers in computer graphics for decades. We tackle lightweight appearance capture by training a deep neural network to automatically extract and make sense of these visual cues. Once trained, our network is capable of recovering per-pixel normal, diffuse albedo, specular albedo and specular roughness from a single picture of a flat surface lit by a hand-held flash. We achieve this goal by introducing several innovations on training data acquisition and network design. For training, we leverage a large dataset of artist-created, procedural SVBRDFs which we sample and render under multiple lighting directions. We further amplify the data by material mixing to cover a wide diversity of shading effects, which allows our network to work across many material classes. Motivated by the observation that distant regions of a material sample often offer complementary visual cues, we design a network that combines an encoder-decoder convolutional track for local feature extraction with a fully-connected track for global feature extraction and propagation. Many important material effects are view-dependent, and as such ambiguous when observed in a single image. We tackle this challenge by defining the loss as a differentiable SVBRDF similarity metric that compares the renderings of the predicted maps against renderings of the ground truth from several lighting and viewing directions. Combined together, these novel ingredients bring clear improvement over state of the art methods for single-shot capture of spatially varying BRDFs.

Software requirements

This code relies on Tensorflow 1.X but can be adapted to TF 2.X with the following compatibility code:

Replace tensorflow import everywhere by:
import tensorflow.compat.v1 as tf
tf.disable_v2_behavior()

It is based on python 3.X, numpy, imageio and opencv for python.

/!\Material model

This network is trained to use 256x256 linear input pictures (please use ---correctGamma if your input still has gamma correction, this option assumes gamma 2.2) and output linear parameters. Higher resolution tend to work less well despite the convolutional nature of the network (see https://team.inria.fr/graphdeco/projects/large-scale-materials/ supplemental materials).

The model used is the one described in this paper (similar to Adobe Substance), changing the rendering model implementation to render the results will cause strong appearance difference as different implementations use the parameters differently (despite sharing their names, for example diffuse and specular will be controled for light conservation or roughness will be squared)!

This method is based purely on the rendering loss, so you should be able to retrain the network using the same dataset but a different rendering loss material model implementation if you need.

Re-training the network

To retrain the network, the basic version is: python3 material_net.py --mode train --output_dir $outputDir --input_dir $inputDir/trainBlended --batch_size 8 --loss render --useLog You can find the training data (85GB) here: https://repo-sam.inria.fr/fungraph/deep-materials/DeepMaterialsData.zip

There are a lot of options to explore in the code if you are curious.

Running the network inference

First download the trained weights here: https://repo-sam.inria.fr/fungraph/deep-materials/InferenceCode_DeepMaterials.zip

INPUT-OUTPUTS: This code takes pictures of material taken with a cellphone (Fov ~ 45 °) and flash approximately in the middle (be careful not to entirerly burn the picture on very specular materials). It outputs a set of 4 maps (diffuse, specular, roughness and normal) corresponding to a Cook-Torrance GGX implementation described in the paper (similar to the one of Adobe Substance for coherence).

PRE-REQUISITE(install):

Python (including numpy) Tensorflow 1.X or 2.X (tested on 1.4, 1.12.1, 2.1.0) /!\ Uncomment 2 lines at the very top of the code file to run this with TF 2.0+ /!\

Run the test folder: python3 material_net.py --input_dir inputExamples/ --mode eval --output_dir examples_outputs --checkpoint . --imageFormat png --scale_size 256 --batch_size 1

HOW TO USE:

Run it as a python script in a command invite:

python material_net.py --input_dir $INPUT_DIR --mode eval --output_dir $OUTPUT_DIR --checkpoint $CHECKPOINT_LOCATION --imageFormat $YOURIMAGEFORMAT --scale_size $SIZEOFIMAGESIDE

These are the most interesting parameters.

Here is a description of all useful parameters for inference :

--input_dir help="path to xml file, folder or image (defined by --imageFormat) containing information images"

--mode required=True choices=["test", "eval"]) help="Defines the mode of inference (test expect inputs with ground truth, eval expect single pictures )

--output_dir required=True, help="where to put output files"

--checkpoint required=True, default=None, help="directory with checkpoint to use for testing "

--testMode type=str, default="auto" choices=["auto", "xml", "folder", "image"], help="What kind of input should be used (auto should automatically determine)"

--imageFormat type=str, default="png choices=["jpg", "png", "jpeg", "JPG", "JPEG", "PNG"], help="Which format have the input files"

--batch_size type=int, default=1, help="number of images in batch to process parallely"

--scale_size type=int, default=288, help="scale images to this size before cropping to 256x256. Should be used carefully, it's best to use the actual size of your images here"

--logOutputAlbedos "Log the output albedos diffuse and specular default is false, to use just add "--logOutputAlbedos""

Bibtex

If you use our code, please cite our paper:

@Article{DADDB18, author = "Deschaintre, Valentin and Aittala, Miika and Durand, Fr'edo and Drettakis, George and Bousseau, Adrien", title = "Single-Image SVBRDF Capture with a Rendering-Aware Deep Network", journal = "ACM Transactions on Graphics (SIGGRAPH Conference Proceedings)", number = "128", volume = "37", pages = "15", month = "aug", year = "2018", keywords = "material capture, appearance capture, SVBRDF, deep learning", url = "http://www-sop.inria.fr/reves/Basilic/2018/DADDB18" }

single-image-svbrdf-capture-rendering-loss's People

Contributors

valentin-deschaintre avatar

Stargazers

 avatar  avatar  avatar  avatar  avatar  avatar  avatar  avatar  avatar  avatar  avatar  avatar  avatar  avatar  avatar  avatar  avatar  avatar  avatar  avatar  avatar  avatar  avatar  avatar  avatar  avatar  avatar  avatar  avatar  avatar  avatar  avatar  avatar  avatar  avatar  avatar  avatar  avatar  avatar  avatar  avatar  avatar  avatar  avatar  avatar  avatar  avatar  avatar  avatar  avatar  avatar  avatar  avatar  avatar  avatar  avatar  avatar  avatar  avatar  avatar  avatar  avatar  avatar  avatar  avatar

Watchers

 avatar  avatar  avatar

single-image-svbrdf-capture-rendering-loss's Issues

how to do if I want to input a image that I take by myself?

Hello, thanks for your project. I had run the test examples successsfully and it worked well. But now i want to get the result of my own test image, which seems to be wrong if i just add the picture to the imput dir directly. So I need to train for my own test image and then I can get the reuslts? I am looking forward to your reply. Thx.

Some questions about dataset.

Hi,

Thanks for your inspiring works and the large-scale dataset. We are implementing a new method, which requires us to make a new dataset. I'm interested in data generation and have a few questions.

  1. I reimplemented the renderer used in [Deschaintre et al. 2019] in PyTorch. And I find that sometimes the reflected light spot is larger compared to the images provided in [Deschaintre et al. 2018], or the light spot is outside the image, causing most areas of the image to be dark. Is this normal? Is the on-the-fly renderer equivalent to the Mitsuba renderer?
  2. As described in the paper, the SVBRDF maps provided in [Deschaintre et al. 2018] are randomly scaled and rotated using Mitsuba, while the on-the-fly renderer only performs rendering. Also, you mentioned in another question that the visualization of the paper was generated using Mitsuba. Is it possible to provide the Mitsuba renderer with Cook-Torrance BRDF model and GGX normal distribution? This will certainly help us a lot.
  3. When exporting SVBRDF maps in Substance Designer (I'm not sure if you did it in this way), are the normal and roughness maps exported in sRGB (or raw) space, while the diffuse and specular maps are exported in linear space? When only base color and metallic maps are provided, did you use the basecolor_metallic_to_diffuse_specular converter to get the diffuse and specular maps? These may be silly questions, but I'm still not 100% sure after a lot of Googling.

Computer graphics and material design are completely new to me and I hope you don't mind me asking so many questions. Thank you for your efforts and time!

Best,
Kakei

Fresnel term

Hi, thanks for your excellent work and the results are fascinating.
I have a question though: The diffuse term is calculated as: diffuse * (1.0 - specular) / math.pi. So this is a Lambertian diffuse with a kd = (1-ks).
The thing is, Fresnel term 𝐹 determines how much light will be reflected off the surface, so kd should be assigned to (1 - F), rather than (1 - specular)? F could be computed through Schlick’s Fresnel approximation.

Exception: input_dir does not exist

Hi,
We are a student group looking into the paper and we are trying to make the code work and retrain the network on Google Colab (maybe with smaller dataset).

We added the untrained network on Google Colab, changed paths to match the input, output directories.
We selected "train" as a parameter but we are getting this error:

image

Any idea what is happening?

here is the code beginning and folder structure
image

Best regards,
Alin.

Cannot reproduce the results shown in the paper

Hi Velentin,

I ran your pretrained model with the file 'material_net.py' with the command ( python3 material_net.py --input_dir inputExamples/ --mode eval --output_dir examples_outputs --checkpoint . --imageFormat png --scale_size 256 --batch_size 1). The results I got are a bit different from the results shown in the paper. The input images I used are from the supplemental files that downloaded from this link: https://dl.acm.org/doi/10.1145/3197517.3201378.
This is the results I got:
image
This the results shown in the paper:
image

So I was wondering do I run the pretrained model with the right command? Thanks in advance.

Best,
Xuejiao

Where is the ground truth for SVBRDF?

Hi,

Thanks for you nice work! I have read your code, but I have several questions during reading.

  1. Why should the input images be seperated into nbtargets+1 parts based on image width, and set one of them as input and the others as targets?
  2. Why the rerender loss are computed between the svbrdf albedos and original image regions? From my understanding, question 1 is just to crop the images and then after preprocessing, resize them all to 256*256. The input will be sent to the network and output the svbrdf albedo. Then outputs(four svbrdf albedos) and targets(nbtargets parts of original images) will be both rerendered and the loss will be computed. However, in your paper, in Figure 5, you mentioned the ground truth of SVBRDF for rerendering, but I didn't find where the gt is loaded.
  3. I want to visualize the rerendered results of the input, how should I get it?

Sorry for being novel in compter graphics and maybe the questions are a little bit stupid..
Hope for your kind response.

BR,
Humphrey

No such file or directory: './options.json'

Hi,
Thank you for this interesting research, I want to reproduce the results by running the shell script you provided, I see the following issue though, how can I resolve that? I am using a recent version of TensorFlow on Ubuntu on WSL on Windows 11 and I am NOT using CUDA for testing.

Traceback (most recent call last):
File "Single-Image-SVBRDF-Capture-rendering-loss/material_net.py", line 1162, in
main()
File "Single-Image-SVBRDF-Capture-rendering-loss/material_net.py", line 861, in main
with open(os.path.join(a.checkpoint, "options.json")) as f:
FileNotFoundError: [Errno 2] No such file or directory: './options.json'

Thanks in advance,
Nima

Recommend Projects

  • React photo React

    A declarative, efficient, and flexible JavaScript library for building user interfaces.

  • Vue.js photo Vue.js

    🖖 Vue.js is a progressive, incrementally-adoptable JavaScript framework for building UI on the web.

  • Typescript photo Typescript

    TypeScript is a superset of JavaScript that compiles to clean JavaScript output.

  • TensorFlow photo TensorFlow

    An Open Source Machine Learning Framework for Everyone

  • Django photo Django

    The Web framework for perfectionists with deadlines.

  • D3 photo D3

    Bring data to life with SVG, Canvas and HTML. 📊📈🎉

Recommend Topics

  • javascript

    JavaScript (JS) is a lightweight interpreted programming language with first-class functions.

  • web

    Some thing interesting about web. New door for the world.

  • server

    A server is a program made to process requests and deliver data to clients.

  • Machine learning

    Machine learning is a way of modeling and interpreting data that allows a piece of software to respond intelligently.

  • Game

    Some thing interesting about game, make everyone happy.

Recommend Org

  • Facebook photo Facebook

    We are working to build community through open source technology. NB: members must have two-factor auth.

  • Microsoft photo Microsoft

    Open source projects and samples from Microsoft.

  • Google photo Google

    Google ❤️ Open Source for everyone.

  • D3 photo D3

    Data-Driven Documents codes.