Getting Started: Pong in XX minutes
You're going to need to have VWF installed in order to follow along with this guide. If you haven't installed it yet, check out our Installation Instructions.
We're going to walk through the step-by-step process of writing the classic game Pong as a collaborative, 3D application using VWF.
The VWF Application
From the command line, you can create an empty application using the vwf command:
$ vwf create vwf-pong
VWF application created at 'vwf-pong'.

To get started quickly:
  $ cd vwf-pong
  $ vwf

See the Getting Started documentation at:
http://www.virtual.wf/web/docs/readme.html
Change into the directory you just created.
In that directory you'll find a file called index.vwf.yaml, which describes the simplest possible VWF application.
If you've never heard of YAML before, it's a human-readable format for specifying data. Check out this guide for more info.
Run the server using the vwf command and check out the results of loading this file:
$ vwf
LogLevel = 1
Serving VWF applications from /path/to/vwf-pong
Serving on port 3000
Point your browser at http://localhost:3000. When the application loads, it loads all of the relevant JavaScript and CSS and creates a connection to the server.
But so far all we have is a black screen. Let's add some content to our application.
Displaying 3D Content
Displaying 3D models with VWF is really easy. For Pong, we'll need a board, a ball, and two paddles. Go ahead and download the Collada models from the following links and save them in your application's directory:
Setting Up A 3D Scene
In order to tell VWF that our application involves a 3D scene, we'll want the application to extend a special component called scene.vwf:
---
extends: http://vwf.example.com/scene.vwf
scene.vwf is an example of a component. Components are the VWF way of bundling behavior and appearance. By default, VWF includes a few dozen components which we will use throughout this tutorial. And of course, you can create your own as well.
For example, node3.vwf component represents a 3D node in the scene. We'll use the term node a lot, but it simply refers to any object in a VWF application.
Each node3 will be a child of the main application. The syntax looks like:
---
extends: http://vwf.example.com/scene.vwf
children:
board:
extends: http://vwf.example.com/node3.vwf
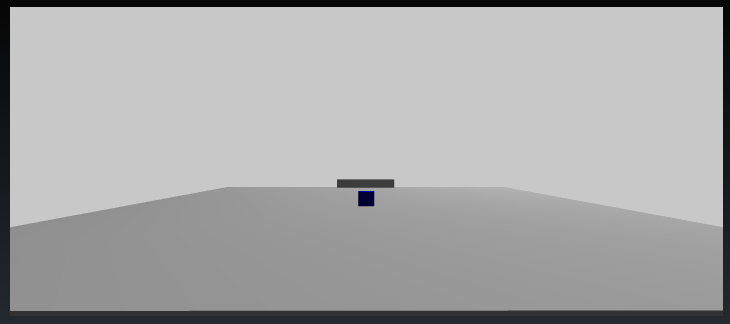
source: board.daeGo ahead and run the application. You should see something like the following:

The view starts out in the middle of our board object. You can use up, down, left, and right, as well as the scroll wheel, to navigate around the scene.
Let's add the rest of the 3D components to the scene.
---
extends: http://vwf.example.com/scene.vwf
children:
  board:
    extends: http://vwf.example.com/node3.vwf
    source: board.dae
  playerOne:
    extends: http://vwf.example.com/node3.vwf
    source: paddle.dae
  playerTwo:
    extends: http://vwf.example.com/node3.vwf
    source: paddle.dae
  ball:
    extends: http://vwf.example.com/node3.vwf
    source: ball.dae
Components are quite flexible little things. They provide complex functionality that can be utilized simply by creating a node that extends them. For example, we can add a child node that extends material.vwf to any node3.vwf. This node allows us to easily change the material of 3D objects, including their color. Let's add some color to the ball.
  # Beginning of app omitted
  ball:
    extends: http://vwf.example.com/node3.vwf
    source: ball.dae
    children:
      ballMaterial:
        extends: http://vwf.example.com/material.vwf
        properties:
          color: "#0000ff"
If you reload the application and look to the right (use the E key to rotate right), you'll see the ball is now a dark blue.

You'll notice that we set the value for the color by adding a properties section to the ballMaterial and setting the color property to a hexadecimal color value. Properties are like public variables. You can add whatever properties you would like to a node.
The material.vwf component uses the color property to determine the object's color. If you tried changing the name of the color property to myColor, you'll notice that the ball is still gray.
material.vwf does a whole lot more than just color. It can handle textures, opacity, and even shininess. Check out the Material Documentation for a proper rundown.
For more information on components, properties, and the extends keyword, see the Components Documentation.
Lighting Things Up
Things are looking rather dark. Let's shed some light on our subjects. Adding a light to the scene is similar to adding 3D objects: we simply add a child node that extends the light.vwf component.
---
extends: http://vwf.example.com/scene.vwf
children:
  # Other child nodes omitted
  light:
    extends: http://vwf.example.com/light.vwf
We've added a child node named light, but that doesn't make it a light. We could have named it anything. We make it a light by using extends to add the functionality from light.vwf. By default, the light will appear right in the middle of the scene, which will be pretty obnoxious lighting. Let's have the light shine down on the board instead.
  # Beginning of app omitted
  light:
    extends: http://vwf.example.com/light.vwf
    properties:
      distance: 2000
      translation: [ 400, -400, 900 ]
Much better!
Once again, we added a few special properties to light that light.vwf depends on.
translation does exactly what you would expect it to do in a 3D scene: it moves the light along the x, y, and z axes, respectively. We're moving our light to the corner of the board and then 900 units above to produce a nice gradient lighting effect on the board.
distance tells the light how far it's effective range is. Since we're moving ours about 1000 units or so from the board, let's make distance comfortably large, like 2000, to make sure it's lighting all the models in our scene.
Lights default to being point lights, meaning they shine in all directions simultaneously. VWF also supports directional and spot lights, as well as a host of properties for manipulating lighting including color, intensity, and softness. For more information on lighting in VWF, see the Lighting Documentation.
Positioning The Camera
So far, it's probably getting pretty annoying to have to navigate around using the arrow keys every time we reload the application. Let's position the camera so that it starts in an intelligent place each time.
Any time the application extends scene.vwf, you get a camera for free, so we don't need to add a child node in this case. Rather, we will need to do some trickery after the application loads. Due to a wrinkle in our camera code, we'll need to wait until the application loads before we move the camera. We'll improve this in the future. For now, it would be a good time to introduce two new sections: methods and scripts.
With methods, we declare functions which will exist at the application level and can be called by nodes or other methods. In our scripts section, we'll define each method's implementation using JavaScript. To move our camera, we need to add a method to initialize the camera and also define it.
# Beginning of app omitted
methods:
  initializeCamera:
scripts:
  - |
    this.initializeCamera = function() {
      this.camera.translation = [ 250, -600, 150 ];
      this.camera.rotation = [ 1, 0, 0, -10 ];
    }
Our new initializeCamera method is pretty simple. As I mentioned, the application will have a camera added it to it automagically due to extending scene.vwf. Also, we can access child nodes on the application from within JavaScript using this.nodeName where nodeName is the name of the node. (Duh.) We can then set any of the properties (remember those from above?) on that node.
So, this.camera.translation = [ x, y, z ] will move the camera to that point in the 3D scene. We're moving the camera out to the side of the board, and then up in the air to look down on the scene.
Also, it would be helpful to rotate the camera down towards the board a bit. We do that by setting the camera's rotation in the same way we set translation. The way to read the rotation array is as follows: [ rotateAroundX, rotateAroundY, rotateAroundZ, rotationAngle ]. So our rotation happens around the X axis only (thus the 1), and rotates it by -10 degrees.
But we're not done yet. The initializeCamera method isn't called automatically. We need to call it. To do that, we need to implement a special method called initialize.
# Beginning of app omitted
methods:
  initializeCamera:
scripts:
  - |
    this.initialize = function() {
      this.future( 0 ).initializeCamera();
    }
    this.initializeCamera = function() {
      this.camera.translation = [ 250, -600, 150 ];
      this.camera.rotation = [ 1, 0, 0, -10 ];
    }
initialize gets called each time the application loads. In the initialize method, we then call initializeCamera,
However, there is one wrinkle. We need to make sure to only initialize the camera after the scene is fully loaded. To ensure that, we use the future callback. future takes a single parameter, an integer, and waits until the specified number of seconds have passed before executing any methods chained off of it. future( 0 ) says "wait until the very next tick before executing." It's a shortcut to postpone function calls until the scene fully loads and the simulator starts the clock ticking.
Give that a reload, and you should have the board centered in your application's view.

For more information about manipulating the camera, see the Camera Documentation.
Position The Paddle
With your new and improved view of the scene, you'll notice that only one paddle appears, even though we're loading two of them. That's because they're on top of each other. Let's move one of the paddles to the other side of the board using... you guessed it: translation.
  # Beginning of app omitted
  playerOne:
    extends: http://vwf.example.com/node3.vwf
    source: paddle.dae
    properties:
      translation: [-470, 0, 0]
As you now know, simply setting the translation property will get that paddle right into place.

The stage is set. We've got a board, a ball, two paddles, and a camera directed at the lighted scene. It's time to get things moving by wiring up some actual behavior and animation.
Animating The Scene
Bouncing The Ball
Our scene will get a lot more interesting once things start moving. Let's start with the ball. We'll need to start by adding some properties on the ball that we can use to keep track of it's movement.
  # Beginning of app omitted
  ball:
    extends: http://vwf.example.com/node3.vwf
    source: ball.dae
    properties:
      xSpeed: 2
      ySpeed: 5
    # children: omitting material
We'll use xSpeed and ySpeed to keep track of how quickly the ball is moving on the x and y axes.
Next we'll need to add a method to the ball to handle actually moving it.
  # Beginning of app omitted
  ball:
    extends: http://vwf.example.com/node3.vwf
    source: ball.dae
    properties:
      xSpeed: 2
      ySpeed: 5
    methods:
      move:
    # children: omitting material
    scripts:
      - |
        this.move = function() {
          var newTrans = [
            this.translation[ 0 ] + this.xSpeed,
            this.translation[ 1 ] + this.ySpeed,
            this.translation[ 2 ]
          ];
          this.translation = newTrans;
        };
For a really simple start on moving the ball, we access the translation property, add some to it, and then set the ball's translation property to that new location. (Don't get too clever. If you try to set the translation array's individual elements directly, VWF won't pick up on the change. See this and other interesting twists in our Pitfalls Documentation.)
But that alone is not enough to get the ball moving. We need to kick off the move method once the application starts and then make sure it gets called regularly to keep the ball moving. Let's add a method called update to move the ball forward, so to speak.
methods:
  update:
# Some of the application omitted
scripts:
  - |
      this.initialize = function() {
        this.future( 0 ).initializeCamera();
        this.future( 0 ).update();
      }
      // Some functions omitted
      this.update = function() {
        this.ball.move();
        this.future( 1.0/60.0 ).update();  // schedule the next step
      }
Pretty simple, eh? initialize will be called while the application is loading, which will schedule the first call to update using our familar future( 0 ) syntax. When update gets called, it calls the ball's move method, and then schedules another call to update just a short time later, again using future(). 1/60th of a second later, to be precise. That should give us approximately 60 updates a second, which should be silky smooth.
Reload your application. It moves!

The Walls
But that's a pretty uninteresting move. It goes right off the edge of the board! We don't have Pong yet. Not even ping, really. Adding wall bounces is not too hard, though.
  # Beginning of app omitted
  ball:
    extends: http://vwf.example.com/node3.vwf
    source: ball.dae
    properties:
      xSpeed: 2
      ySpeed: 5
    methods:
      move:
    scripts:
      - |
        this.move = function() {
          var newTrans = [
            this.translation[ 0 ] + this.xSpeed,
            this.translation[ 1 ] + this.ySpeed,
            this.translation[ 2 ]
          ];

          // Did we hit a wall?
          var maxY = 145;
          var minY = -maxY;
          if ( newTrans[ 1 ] >= maxY ) {
            newTrans[ 1 ] = maxY;
            this.ySpeed = -this.ySpeed;
          } else if ( newTrans[ 1 ] <= minY ) {
            newTrans[ 1 ] = minY;
            this.ySpeed = -this.ySpeed;
          }

          this.translation = newTrans;
        };
We'll track the position of the walls in minY and maxY, and every time we contact one, we'll reverse the ySpeed, which will nicely simulate a bounce.
Reload again.
Now that's better. At least the ball doesn't tumble off the edges of the board. But we still pass right through our paddles. Sure would be nice to bounce off of those, too.
We'll need to be a little smarter when colliding with paddles.
  # Beginning of app omitted
  playerOne:
    extends: http://vwf.example.com/node3.vwf
    source: paddle.dae
    properties:
      xPos: -220
      translation: [ -470, 0, 0 ]
  playerTwo:
    extends: http://vwf.example.com/node3.vwf
    source: paddle.dae
    properties:
      xPos: 231
  ball:
    extends: http://vwf.example.com/node3.vwf
    source: ball.dae
    properties:
      xSpeed: 2
      ySpeed: 5
    methods:
      move:
      didHitPaddle:
    scripts:
    - |
      this.move = function() {
        var newTrans = [
          this.translation[ 0 ] + this.xSpeed,
          this.translation[ 1 ] + this.ySpeed,
          this.translation[ 2 ]
        ];

        // Did we hit a wall?
        var maxY = 145;
        var minY = -maxY;
        if ( newTrans[ 1 ] >= maxY ) {
          newTrans[ 1 ] = maxY;
          this.ySpeed = -this.ySpeed;
        } else if ( newTrans[ 1 ] <= minY ) {
          newTrans[ 1 ] = minY;
          this.ySpeed = -this.ySpeed;
        }

        // Did we hit a paddle?
        var ballAtRightSide = ( newTrans[ 0 ] >= this.parent.playerTwo.xPos );
        var ballAtLeftSide = ( newTrans[ 0 ] <= this.parent.playerOne.xPos );
        if ( ballAtRightSide ) {
          this.dealWithPaddleBounce( this.parent.playerTwo, newTrans );
        } else if ( ballAtLeftSide ) {
          this.dealWithPaddleBounce( this.parent.playerOne, newTrans );
        } else {
          this.translation = newTrans;
        }
      };
      this.dealWithPaddleBounce = function( paddle, translation ) {
        var yPos = paddle.translation[ 1 ];
        var paddleExtent = 36;
        if ( translation[ 1 ] > ( yPos + paddleExtent ) || translation[ 1 ] < ( yPos - paddleExtent ) ) {
          // Ball got past the paddle: reset the ball position and speed.
          this.translateTo( [ 0, 0, 0 ] );
          this.xSpeed = 2;
          this.ySpeed = 5;
          return true;
        } else {
          // Ball hit the paddle: just bounce.
          translation[ 0 ] = paddle.xPos;
          this.xSpeed = -this.xSpeed;
          return false;
        }
      };
First, we'll need each paddle to keep track of where it's located in terms of the ball's x coordinates. We can do this by adding an xPos property to each paddle.
Then we'll check in our move method to see if the ball has reached either paddle. If so, then we'll need to check the paddle's y position to see if the ball has collided with the paddle, or whether it's missed it. If the ball gets past the paddle, we'll reset it to the middle of the board and start it bouncing again. If the ball hits the paddle, we'll just do a regular bounce by reversing the xSpeed.
If all that seems quite overcomplicated, don't worry too much about it. The purpose of this guide is to get you started with VWF. For more detail on Pong, check out this Pong tutorial which goes more into the mechanics of Pong.

Awesome! Now we've got a ball bouncing up and down the board and bouncing off of the paddles, or getting past them as appropriate. Now how can we move those paddles up and down?
Pushing The Paddles
Moving our piddly widdle paddles will be a multi-step process. First, we need to capture keystrokes. Then, we need to assign movement up and down to specific keys. Finally, we need to actually move each paddle, being careful not to move our paddles off the edge of the board.
The first step, capturing keystrokes, is pretty straightforward in VWF.
properties:
  keyPressInfo:
scripts:
  - |
    // Other functions omitted
    this.keyDown = this.keyUp = function( input ) {
      this.keyPressInfo = input;
    }
First, we'll add a keyPressInfo property to track the current state of the keyboard - what's pressed, what's not pressed. Then we'll take advantage of two more special functions called keyDown and keyUp. Each of these functions is called whenever any key is pressed or released on the keyboard, respectively. We'll simply assign the keyboard's state to our property each time it changes.
Next, we'll need to assign specific keys to the movement function.
properties:
  keyPressInfo:
scripts:
  - |
    // Other functions omitted
    this.update = function() {
      if ( this.keyPressInfo ) {
        for ( var keyPress in this.keyPressInfo.keysDown ) {
          switch( keyPress ) {
            case 'R':
              console.log("Moving playerOne up");
              break;
            case 'F':
              console.log("Moving playerOne down");
              break;
            case 'O':
              console.log("Moving playerTwo up");
              break;
            case 'L':
              console.log("Moving playerTwo down");
              break;
            default:
              break;
          }
        }
      }
      this.ball.move();
      this.future( 1.0/60.0 ).update();  // schedule the next step
    }
    this.keyDown = this.keyUp = function( input ) {
      this.keyPressInfo = input;
    }
Each time our update method updates the application, we'll check to see what keys are down, then print a console statement when one of our special keys is pressed.
As you can see from the above switch statement, we chose the very significant 'R' and 'F' keys for Up and Down for Left Paddle and the almost-as-significant 'O' and 'L' for the Up and Down for Right Paddle. Excellent choices, if I do say so myself.
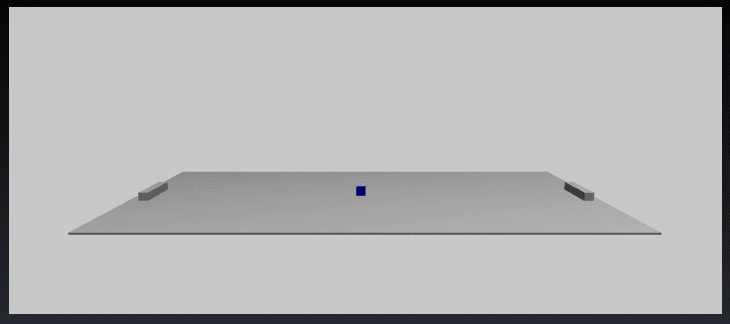
Give it a try. Should look something like the following.

Now we need to actually move the paddle each time the key is pressed.
properties:
  keyPressInfo:
  paddleSpeed: 2.5
scripts:
  - |
    this.update = function() {
      if ( this.keyPressInfo ) {
        for ( var keyPress in this.keyPressInfo.keysDown ) {
          switch( keyPress ) {
            case 'R':
              this.movePlayer( this.playerOne, +1 );
              break;
            case 'F':
              this.movePlayer( this.playerOne, -1 );
              break;
            case 'O':
              this.movePlayer( this.playerTwo, +1 );
              break;
            case 'L':
              this.movePlayer( this.playerTwo, -1 );
              break;
            default:
              break;
          }
        }
      }
      this.ball.move();
      this.future( 1.0/60.0 ).update();  // schedule the next step
    }
    this.keyDown = this.keyUp = function( input ) {
      this.keyPressInfo = input;
    }
    this.movePlayer = function( player, direction ) {
      var amount = direction * this.paddleSpeed;
      if ( player.translation[ 1 ] + amount >= 120 || player.translation[ 1 ] + amount <= -120 ) {
        player.translateTo( [ player.translation[ 0 ], 120 * direction, 0 ] );
        return;
      } else {
        player.translateBy( [ 0, direction * this.paddleSpeed, 0 ] );
      }
    }
Don't forget to add the property paddleSpeed to the properties section. If you feel like giving yourself a little boost, tweak that number a bit higher.
That's it!

Now for a little fun. Check out the URL line for your VWF application in the browser. It should be localhost, followed by a random string, such as http://localhost:3000/NQj7NrhyYhBw27eU/. Go ahead and copy the URL from your browser, open up another browser window, and paste it in.
Voila! Both browser windows are now engaged in the same epic game of Pong!
How does this work? VWF automatically synchronizes all of the application's state: nodes, children, properties and such, and "repeats" or "reflects" that state to each client that connects. The random string represents an "instance" of the application. VWF maintains separate state for each instance. It just works.
If you connect to an application without specifying which instance (by going to http://localhost:3000, for example), VWF creates a new instance of the application and redirects the user to the application URL with the instance string appended to it. Go ahead and give that a try.
This is part of the magic of VWF: seamlessly shared state. Simply structure your application using the VWF primitives such as properties and methods and you can create collaborative, immersive applications in the browser easily.
Well, now that it works, let's dress up the application a bit.
Customizing Our Pong Application
So far, we've focused on VWF's 3D capabilities via WebGL. But VWF isn't just for 3D applications: you have access to the application's HTML and CSS as well.
Adding HTML
VWF automatically generates an HTML frame and embeds the 3D canvas in that frame. However, you can add your own HTML as well. Create a file named index.vwf.html. VWF will pick up this HTML and insert it into the auto-generated application page.
Let's start with a simple title on our page: VWF Pong.
<style type="text/css">
  #overlay {
    position: absolute;
    width: 95%;
  }

  #overlay h1 {
    text-align: center;
  }
</style>

<div id="overlay">
  <h1>VWF Pong</h1>
</div>
In HTML, canvas elements automatically overlay everything else on the page. We need to tell our <div> to come to be in front, which we can accomplish with a simple position: absolute;. Now anything we place inside our overlay div will appear over the top of the canvas.
We start out with a very simple <h1> with a title of "VWF Pong."

It would be nice to let players of the game know which keys control the paddles so they don't have to blithely jab at keys until the paddles move.
<style type="text/css">
  #overlay {
    position: absolute;
    width: 95%;
  }
  #overlay h1 {
    text-align: center;
  }
  #player-one {
    position: absolute;
    left: 20px;
  }
  #player-two {
    position: absolute;
    right: 20px;
  }
</style>

<div id="overlay">
  <h1>VWF Pong</h1>

  <div id="player-one">
    <strong>Player 1</strong><br/>
    Paddle Up: R<br/>
    Paddle Down: F
  </div>
  <div id="player-two">
    <strong>Player 2</strong><br/>
    Paddle Up: O<br/>
    Paddle Down: L
  </div>
</div>
There. That's better.

Setting The Title
VWF also allows you to provide configuration for your application, including setting the title of the webpage. This is accomplished via a special file called index.vwf.config.yaml.
---
info:
  title: "VWF Pong"
This does exactly what you would expect. It sets the title of the webpage.
Wrapping It Up
That's it! In these past minutes, you've explored the basics of creating 3D, collaborative applications with VWF. As you can see, fairly complex applications can be created rather quickly. We're excited to see what you'll do with it.
Ideas for the future
Organizing Your Application
Extracting The JavaScripts and CSS
Refactoring With A Custom Component


