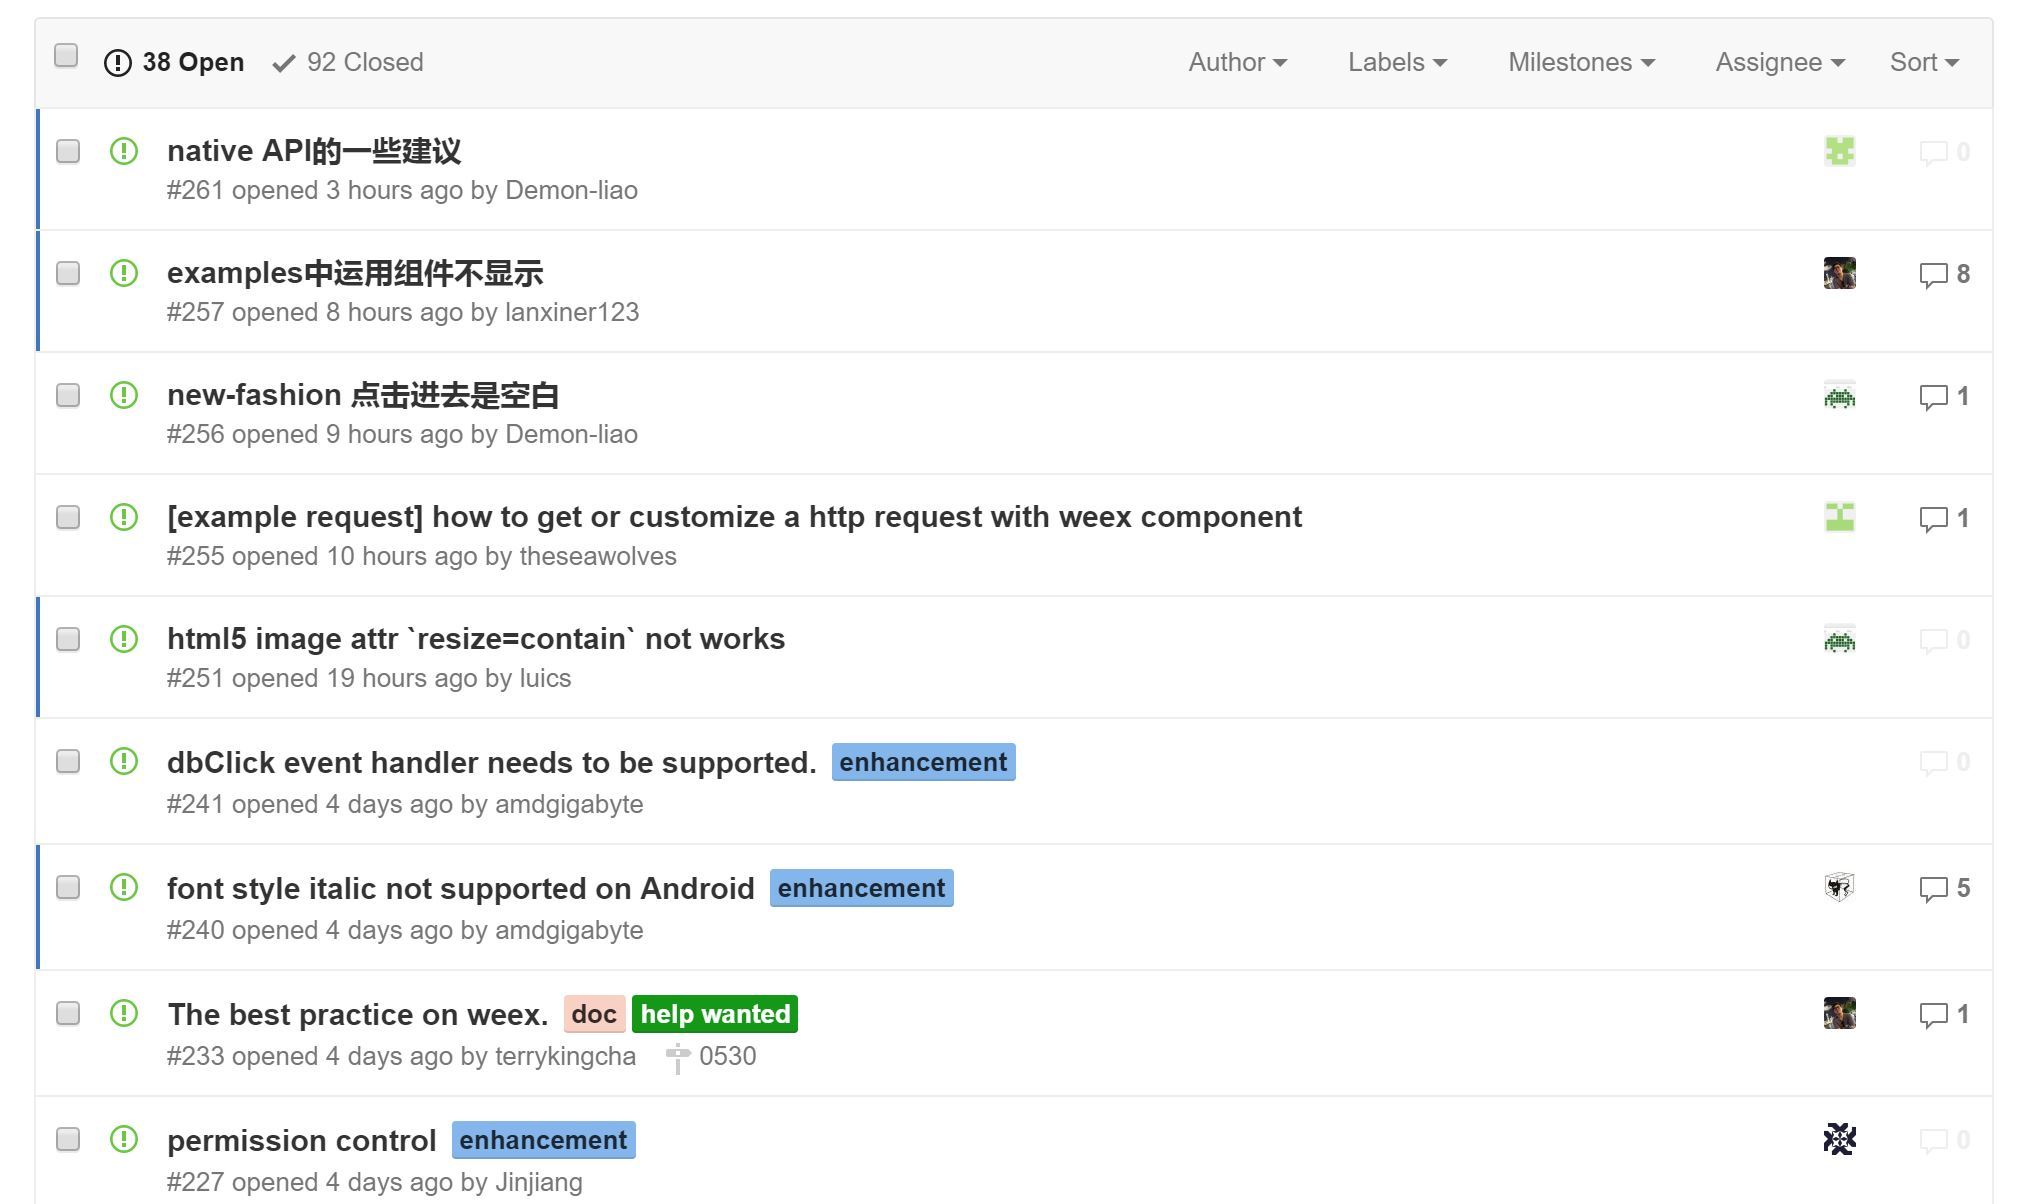
weexteam / article Goto Github PK
View Code? Open in Web Editor NEWThis repos is a third party collection, and is not developed nor maintained by Apache Weex.
This repos is a third party collection, and is not developed nor maintained by Apache Weex.


本文档已迁移至 https://weex-project.io/cn/references/components/switch.html ,此处不再维护,谢谢。
weex 构建了组件switch 用于创造和管理类似iOS样式的On/Off 开关按钮。举个例子,在app设置中的‘muted’和‘toggle color’设置。
这个组件不支持子组件。
checked:<布尔值> true | false.按钮初始值的状态是开或者关。其他属性请查阅基本属性
注释:这里有一些属性你不能用在此组件上,很有可能会影响布局。以下是所有非法属性:
widthheightmin-widthmin-heightmargin 和 margin-xxpadding 和 padding-xxborder 和 border-xx基础样式特别是width和height相关属性和尺寸不可配置,固定在100x60(750px尺寸设计下)
click:查阅基本事件基本事件:查阅基本事件
change事件:
value:组件布尔值真或假。
<div>
  <text>muted:</text>
  <switch checked="true">muted:</switch>
</div>
新版中文网站及文档已经上线,请访问 https://weex-project.io/cn/ , 此处后续不再维护,谢谢理解。
0.4
Weex是一个跨平台可扩展的动态化移动框架,能够真正帮助开发者实现'一次开发,到处运行'。由Weex提供的相关工具进行打包好的bundle文件可以运行在android, ios以及web(这里我们也称之为html5)平台的渲染器上。Weex HTML5是一个专用于在移动端webview以及各种现代浏览器上渲染weex文件的渲染器。
使用npm安装最新版本的Weex HTML5,并在你的项目中require进来。
请确保通过npm install或者npm update获取Weex HTML5的最新版本npm包。更多关于npm的信息情查阅npm官方网站。
npm install weex-html5
通过require引入weex-html5:
var weex = require('weex-html5')
注意: 介于Weex目前仍处于开源内测阶段,还没有完全开放源代码,因此weex-jsframework可能还没有在npm上发布。当前版本的weex-html5包含了weex-jsframework,你只需要require weex-html5即可暂时在web平台上运行weex代码。建议关注Weex的后续版本发布并做必要的引用方式调整。
你可以通过Weex暴露的API init来初始化一个Weex实例。这个方法需要传递一些配置信息已确定一些环境变量等信息,这些配置信息介绍如下:
appId: Weex实例的id,可以是任意字符串或者数字,并注意不要重复.source: 请求的Weex bundle文件地址,或者Weex bundle文件代码本身,取决于下面的loader配置.loader: 加载器类型,用于加载weex bundle,值可以是'xhr', 'jsonp'或者'source'.
xhr: 通过XMLHttpRequest加载source(即weex bundle的url地址).jsonp: 通过JSONP加载weex bundle.source: 直接接受weex bundle的代码作为参数.rootId: root容器的id,默认容器id是'weex'.以下是一个Weex初始化的示例:
function weexInit() {
  function getUrlParam (key) {
    var reg = new RegExp('[?|&]' + key + '=([^&]+)')
    var match = location.search.match(reg)
    return match && match[1]
  }

  var loader = getUrlParam('loader') || 'xhr'
  var page = getUrlParam('page')

  // 需要指定一个jsonp回调函数名称,如果没有则用默认值'weexJsonpCallback'
  var JSONP_CALLBACK_NAME = 'weexJsonpCallback'

  window.weex.init({
    jsonpCallback: JSONP_CALLBACK_NAME,
    appId: location.href,
    source: page,
    loader: loader,
    rootId: 'weex'
  })
}

weexInit()weex devtools是专门为weex定制的一款实现了Chrome Debugging Protocol的inspect/debug工具,能够帮助你快速查看app运行状态和调试weex中的Javascript代码,当前支持IOS和Android两个平台。
$ npm install -g weex-toolkit
weex debug [options] [we_file|bundles_dir]
选项:
-h, --help           显示帮助
-V, --verbose        显示debug服务器运行时的各种log
-v, --version        显示版本
-p, --port [port]    设置debug服务器端口号 默认为8088
-e, --entry [entry]  debug一个目录时,这个参数指定整个目录的入口bundle文件,这个bundle文件的地址会显示在debug主页上(作为二维码)
-m, --mode [mode]    设置构建we文件的方式,transformer 最基础的风格适合单文件,loader:wepack风格 适合模块化的多文件.默认为transformer
$weex debug
单纯启动一个调试服务器,并同时唤起chrome浏览器打开调试主页.
这个调试主页上会有一个二维码,使用Playground App扫这个二维码可以开启Playground调试.
开启调试后,设备列表中会出现您的设备,根据提示进行后续的调试操作
$weex debug your_weex.we
这个命令会将your_weex.we编译成bundlejs文件 部署到debug服务器
并启动debug服务器如上述命令那样.打开的调试主页会多显示一个二维码,使用playground app
扫这个码可以加载your_weex.we.(注意要先扫描开启调试的那个码)
这个命令会自动检测your_weex.we文件变动,如果发现内容被修改则立即重新编译部署,并刷新debugger页面
.
$weex debug your/we/path -e index.we
这个命令会编译你指定目录下的所有的we文件,并把编译好的bundlejs部署到debug服务器,他们的地址会映射到 http://lcoalhost:8088/weex/ 下
比如 your/we/path/index.we 可以通过http://lcoalhost:8088/weex/index.js访问
your/we/path/demo/test.we 可以通过http://lcoalhost:8088/weex/demo/index.js
-e参数可以指定一个入口的we文件,这个文件的地址会显示在调试主页上(作为二维码)
Inspector 能够用来查看 Element \ NetWork \ Console log \ ScreenCast \ BoxModel \ Native View 等。
调试器用来调试weex中的js代码,能够设置断点、查看调用栈。
本文档已迁移至 https://weex-project.io/cn/references/components/div.html ,此处不再维护,谢谢。
div是一个用于包装其它组件的最基本容器组件。支持所有的公共样式、 属性、 flexbox布局.
别名: <container> (弃用)
这类组件支持任意类型的weex组件作为其自组件,包括其自己。
仅包括 公共属性.
共公样式: 查阅 公共样式
公共事件: 查阅 公共事件
<div>
  <image src="..."></image>
  <text>...</text>
</div>伴随着weex的正式开源,对一款针对weex框架的简单易用的调试工具的呼声也日趋强烈。weex devtools就是为weex前端和native开发工程师服务的一款调试工具,可同时检查weex里DOM属性和Javascript 代码断点调试,支持IOS和Android两个平台。
Chrome devtools对于前端开发者来说最熟悉不过,有广泛的用户基础.weex devtools实现了Chrome Debugging Protocol,其使用体验和普通的web开发一致,对于前端开发者是零学习成本,其主要功能分为两大部分——Debugger和Inspector,第一个版本已经随weex0.6.1 发布, 手淘也已接入。
以下是Devtools的使用介绍,欢迎大家试用。有任何问题建议,请提交这里,会很快得到解答。
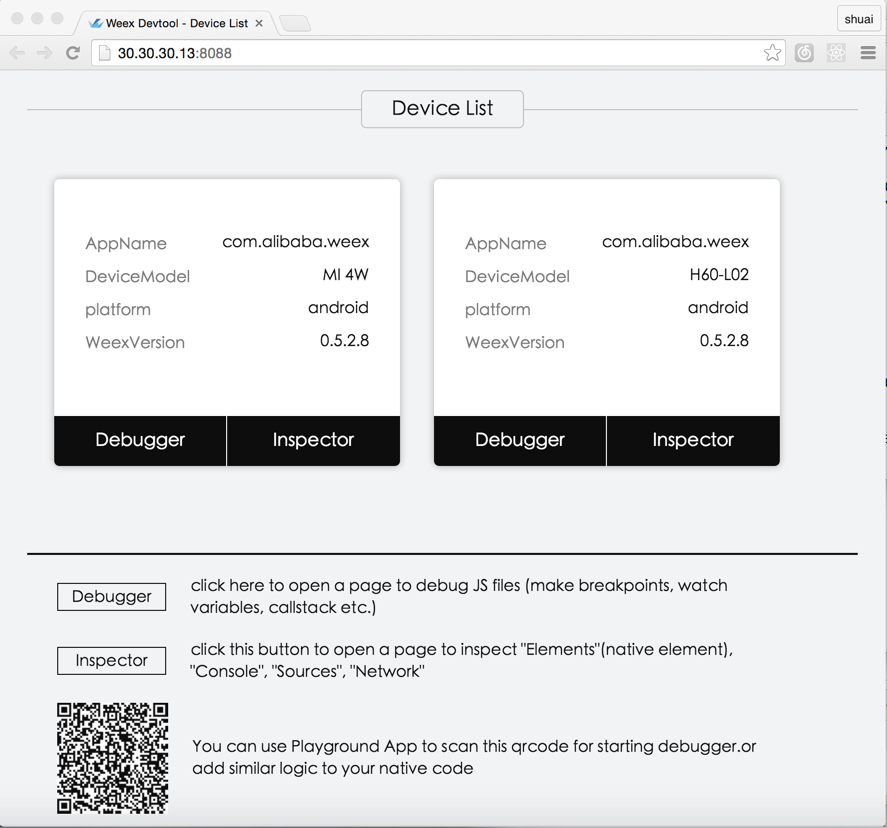
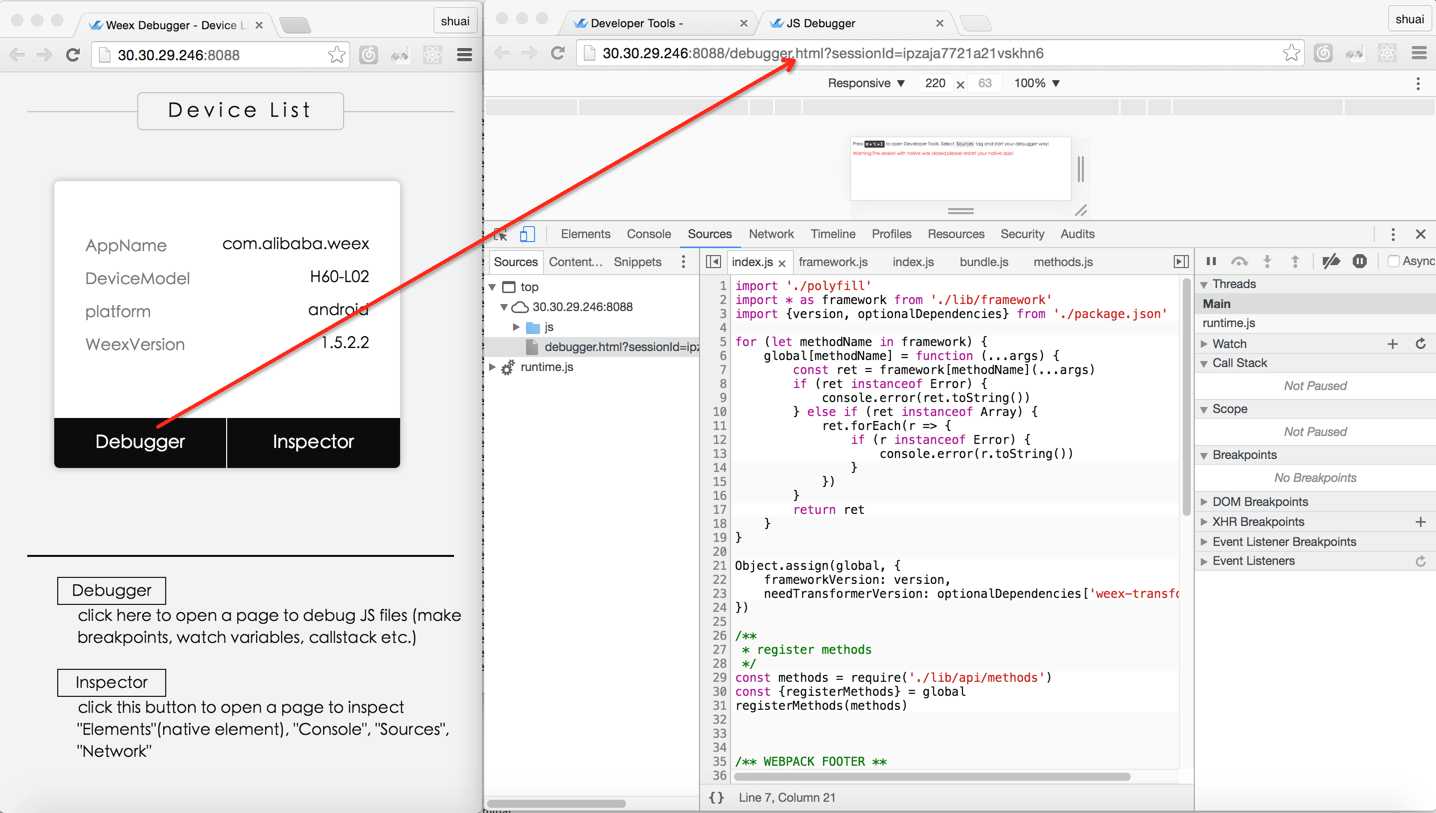
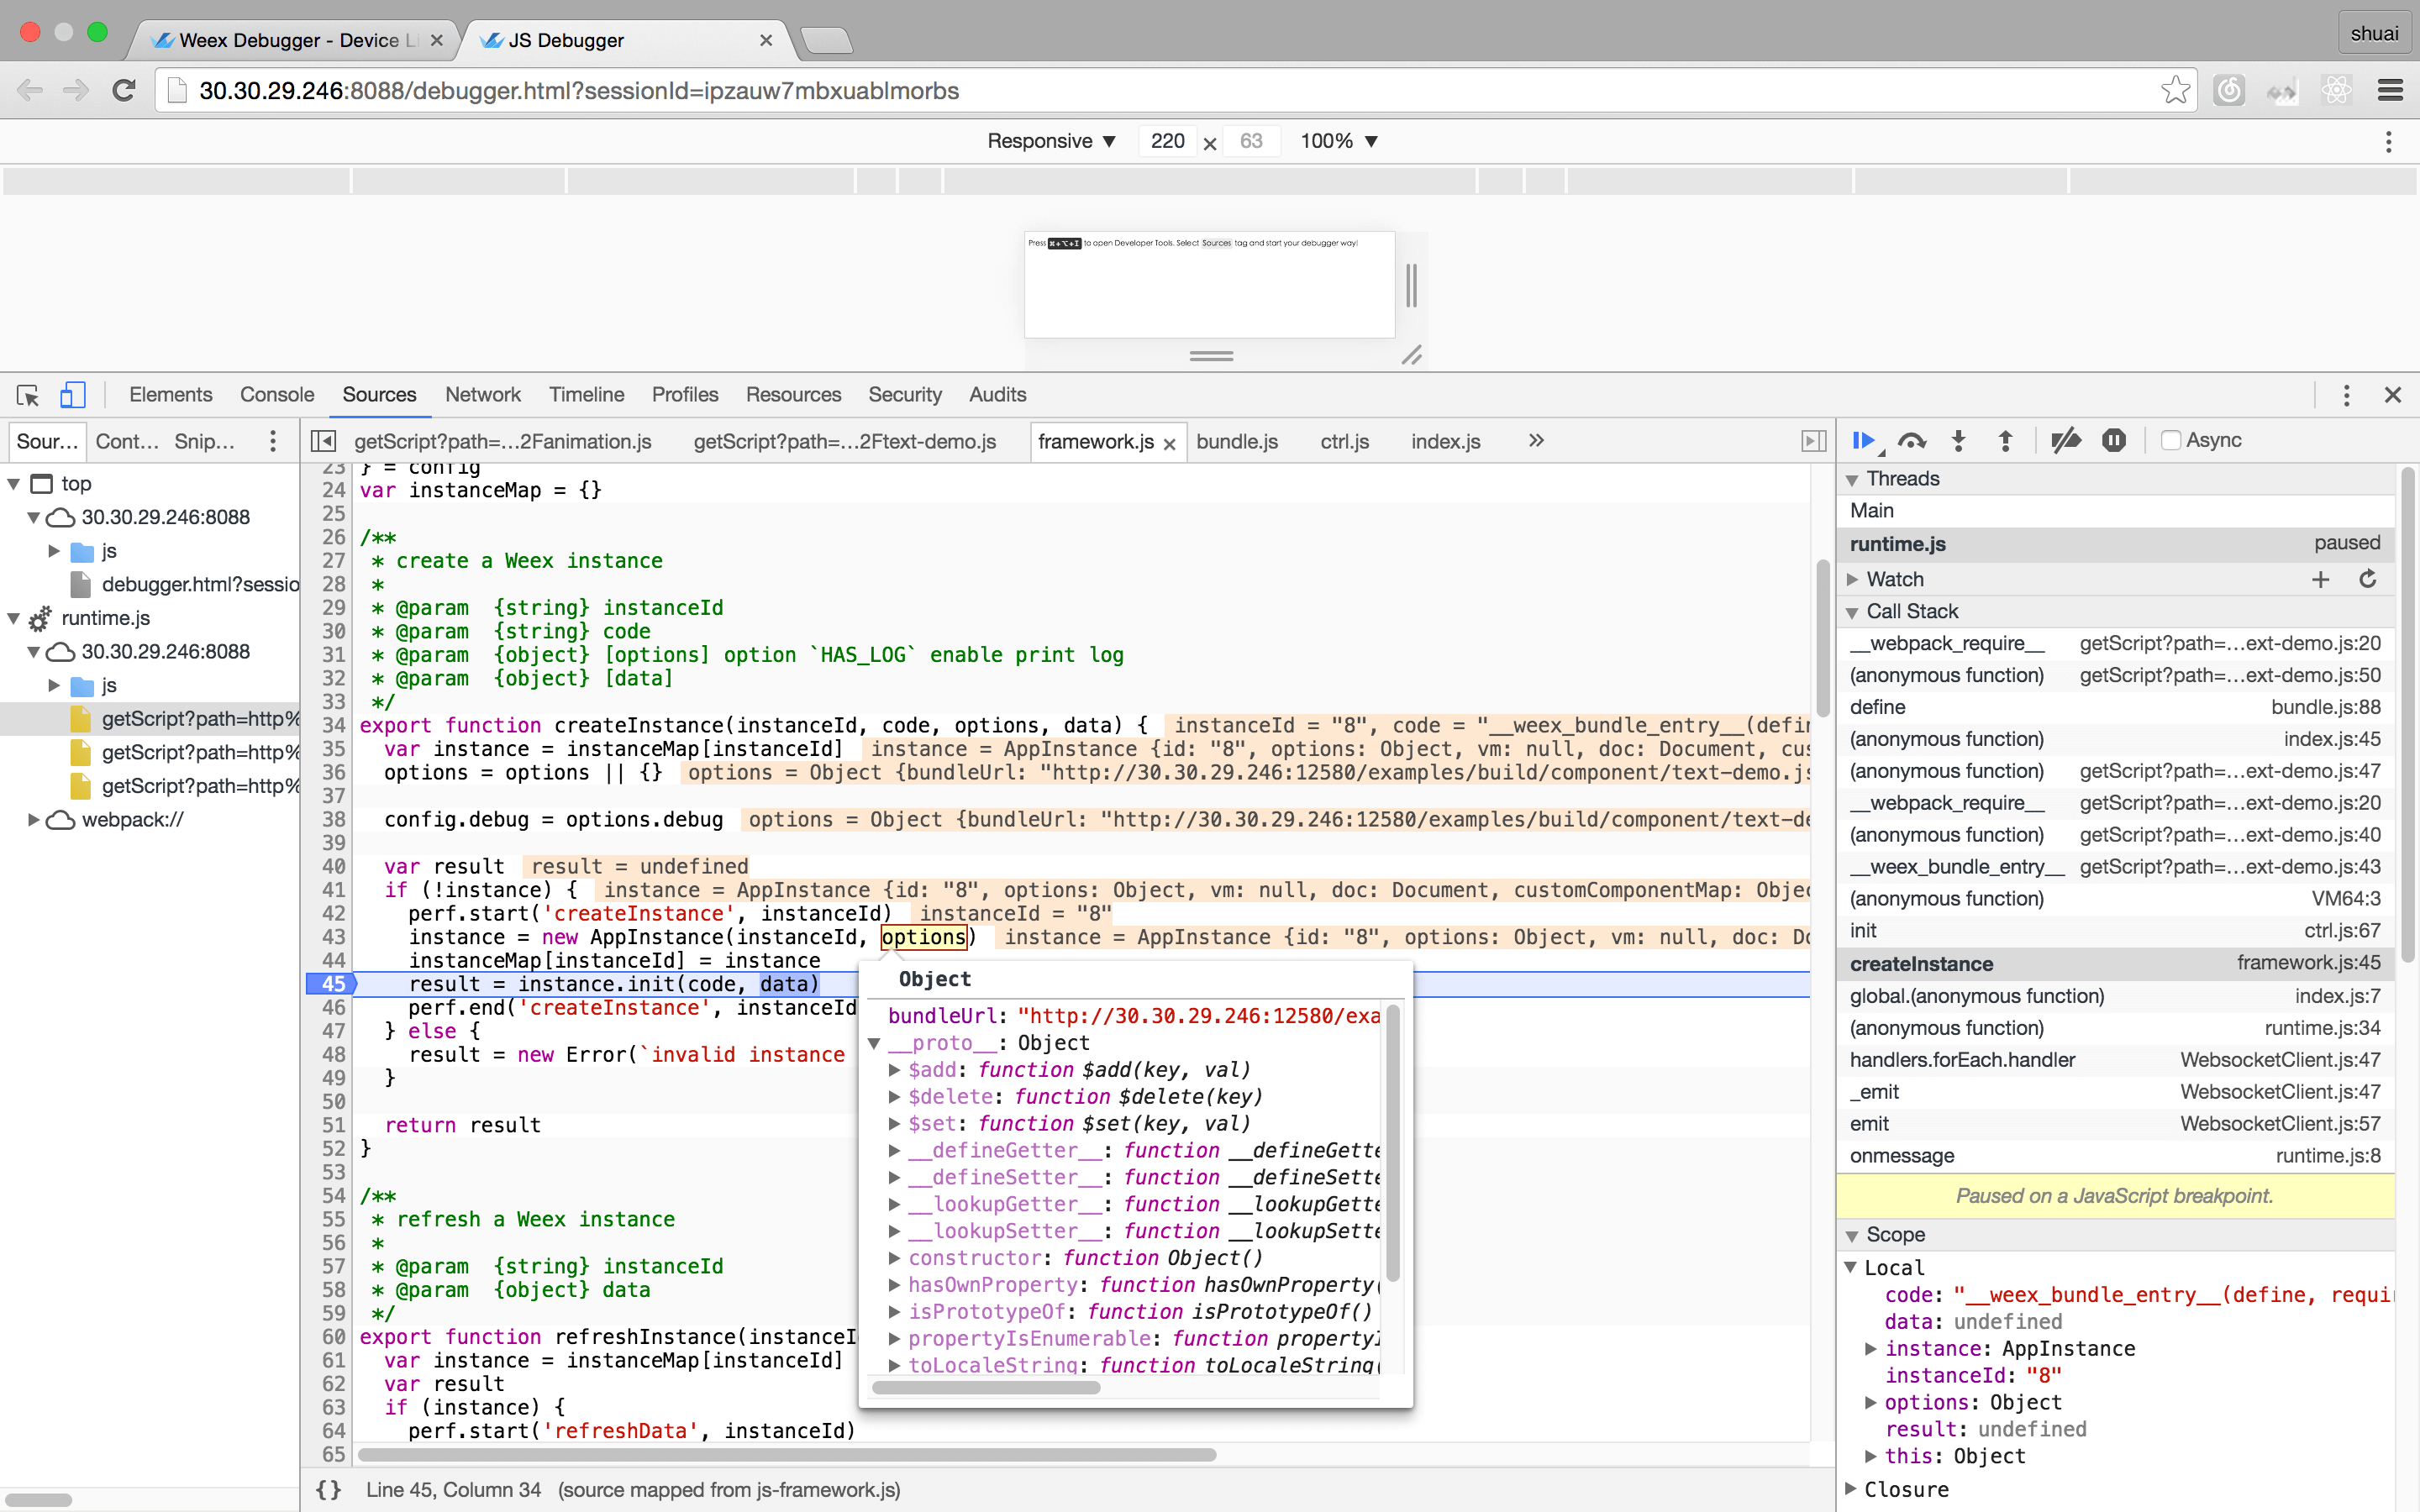
devtools可以动态检测客户端的连接绑定请求,同时连接/调试多个device(或者模拟器)是很容易的事情。连接的客户端显示在“Device List"界面,如下图所示。点击对应device的Debugger按钮即开始调试流程,并弹出JS断点调试的页面;随后点击Inspector按钮可弹出调试DOM的页面。
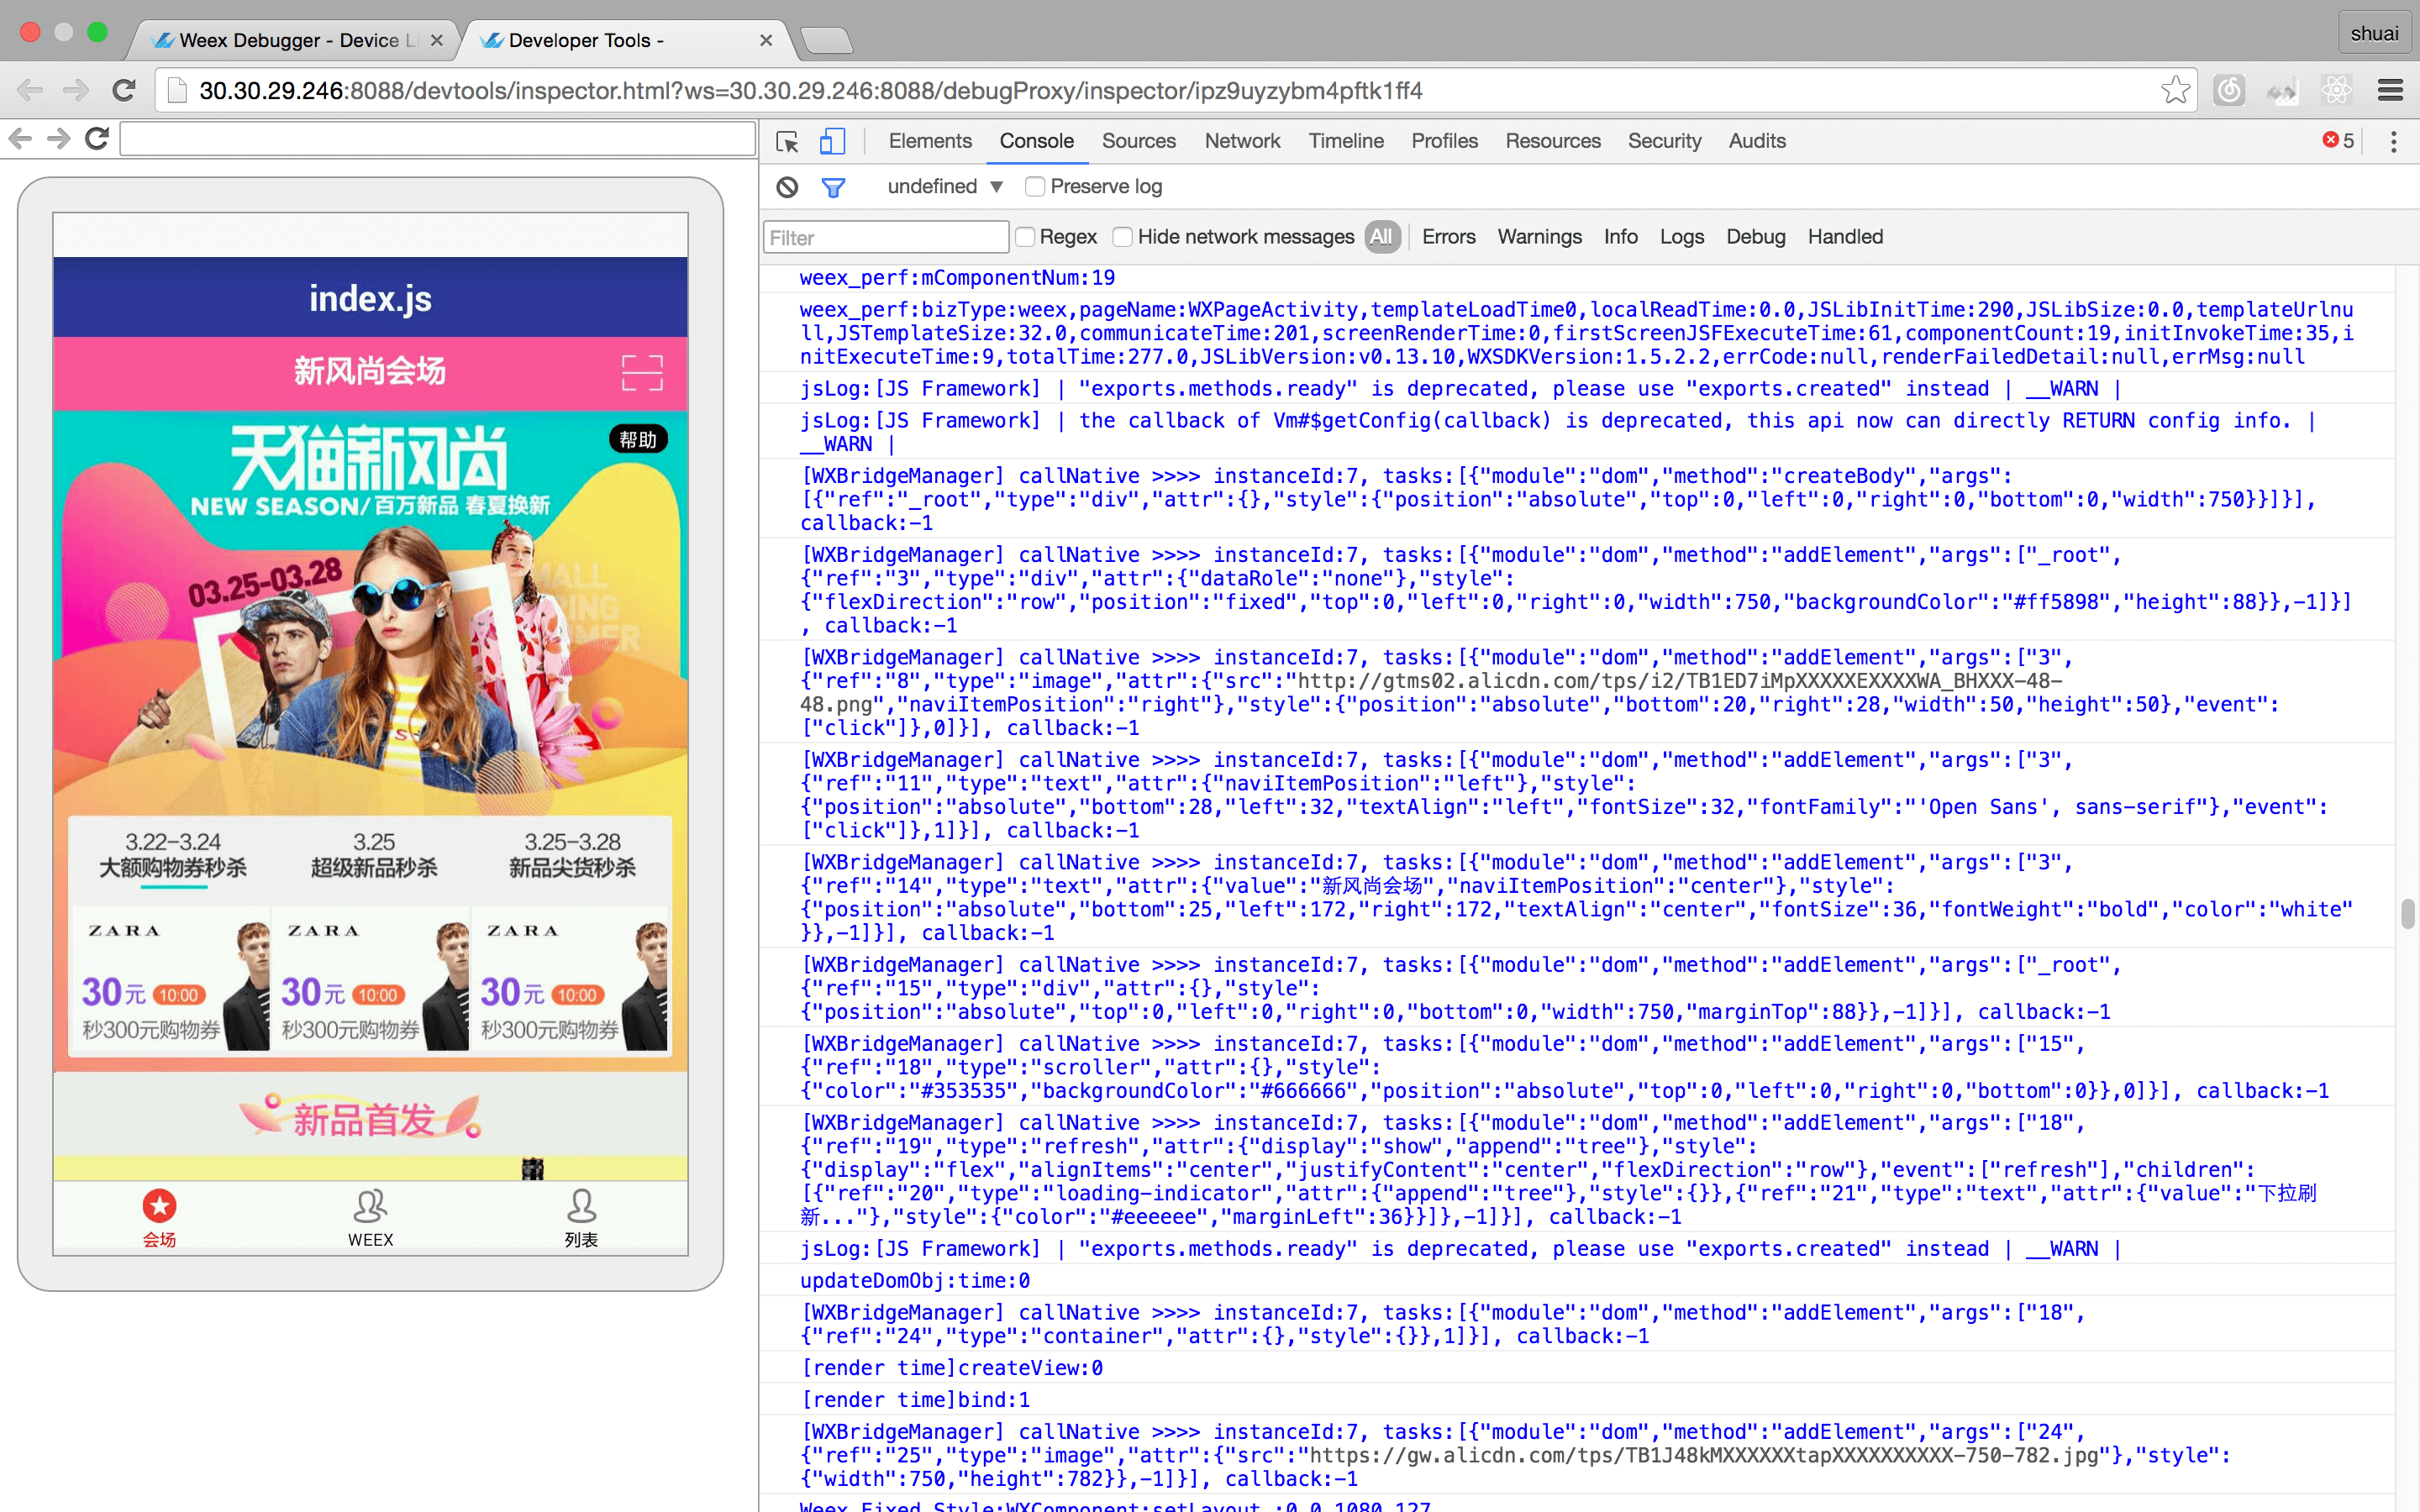
这个是用来调试weex中的js前端代码的页面,“Sources” tab能够显示所有JS源码,包括jsFramework和bundle代码。可以设置断点、查看调用栈,功能和普通的chrome浏览器调试一样。"Console" 控制台显示前端的Log信息,并能根据级别(info/warn/error等)和关键字过滤。
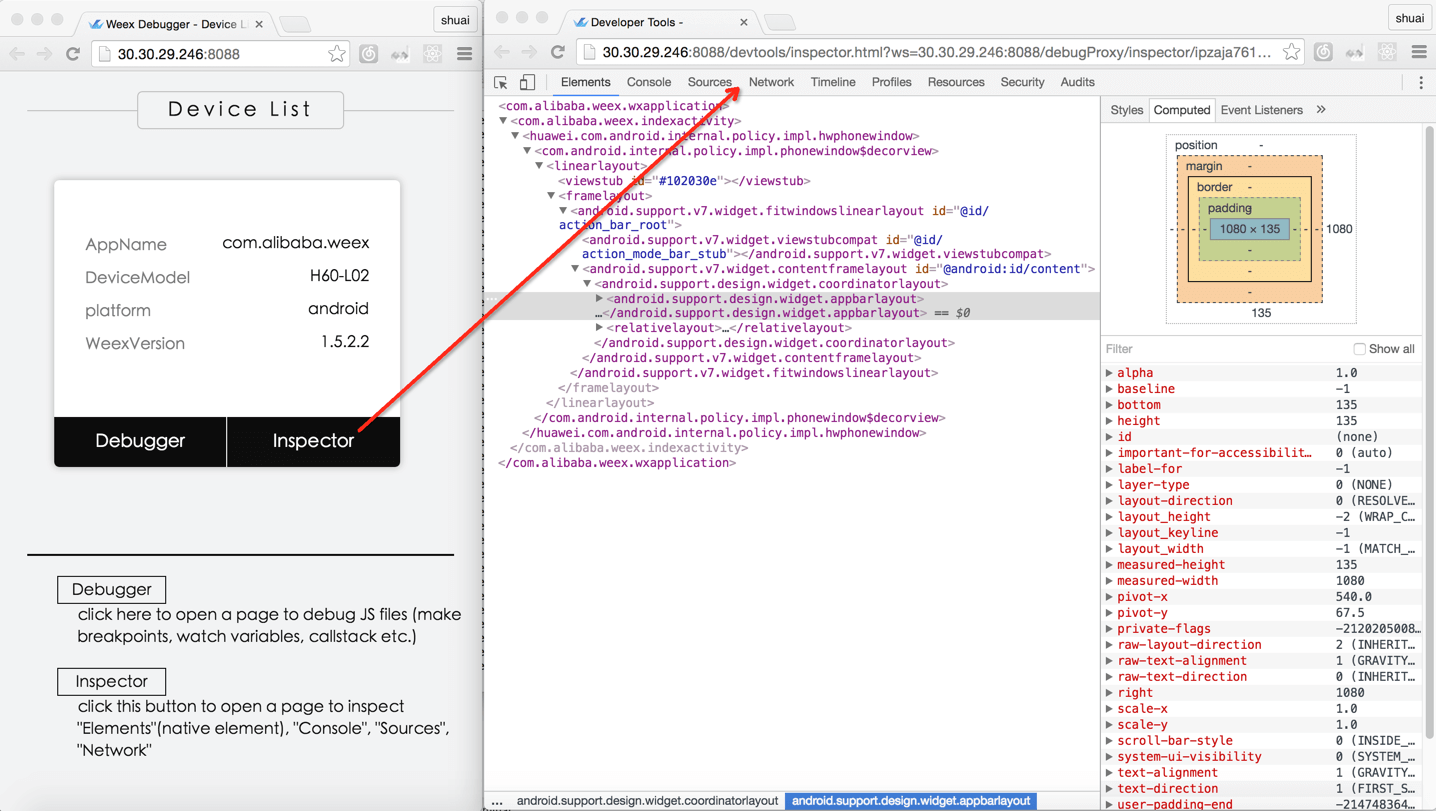
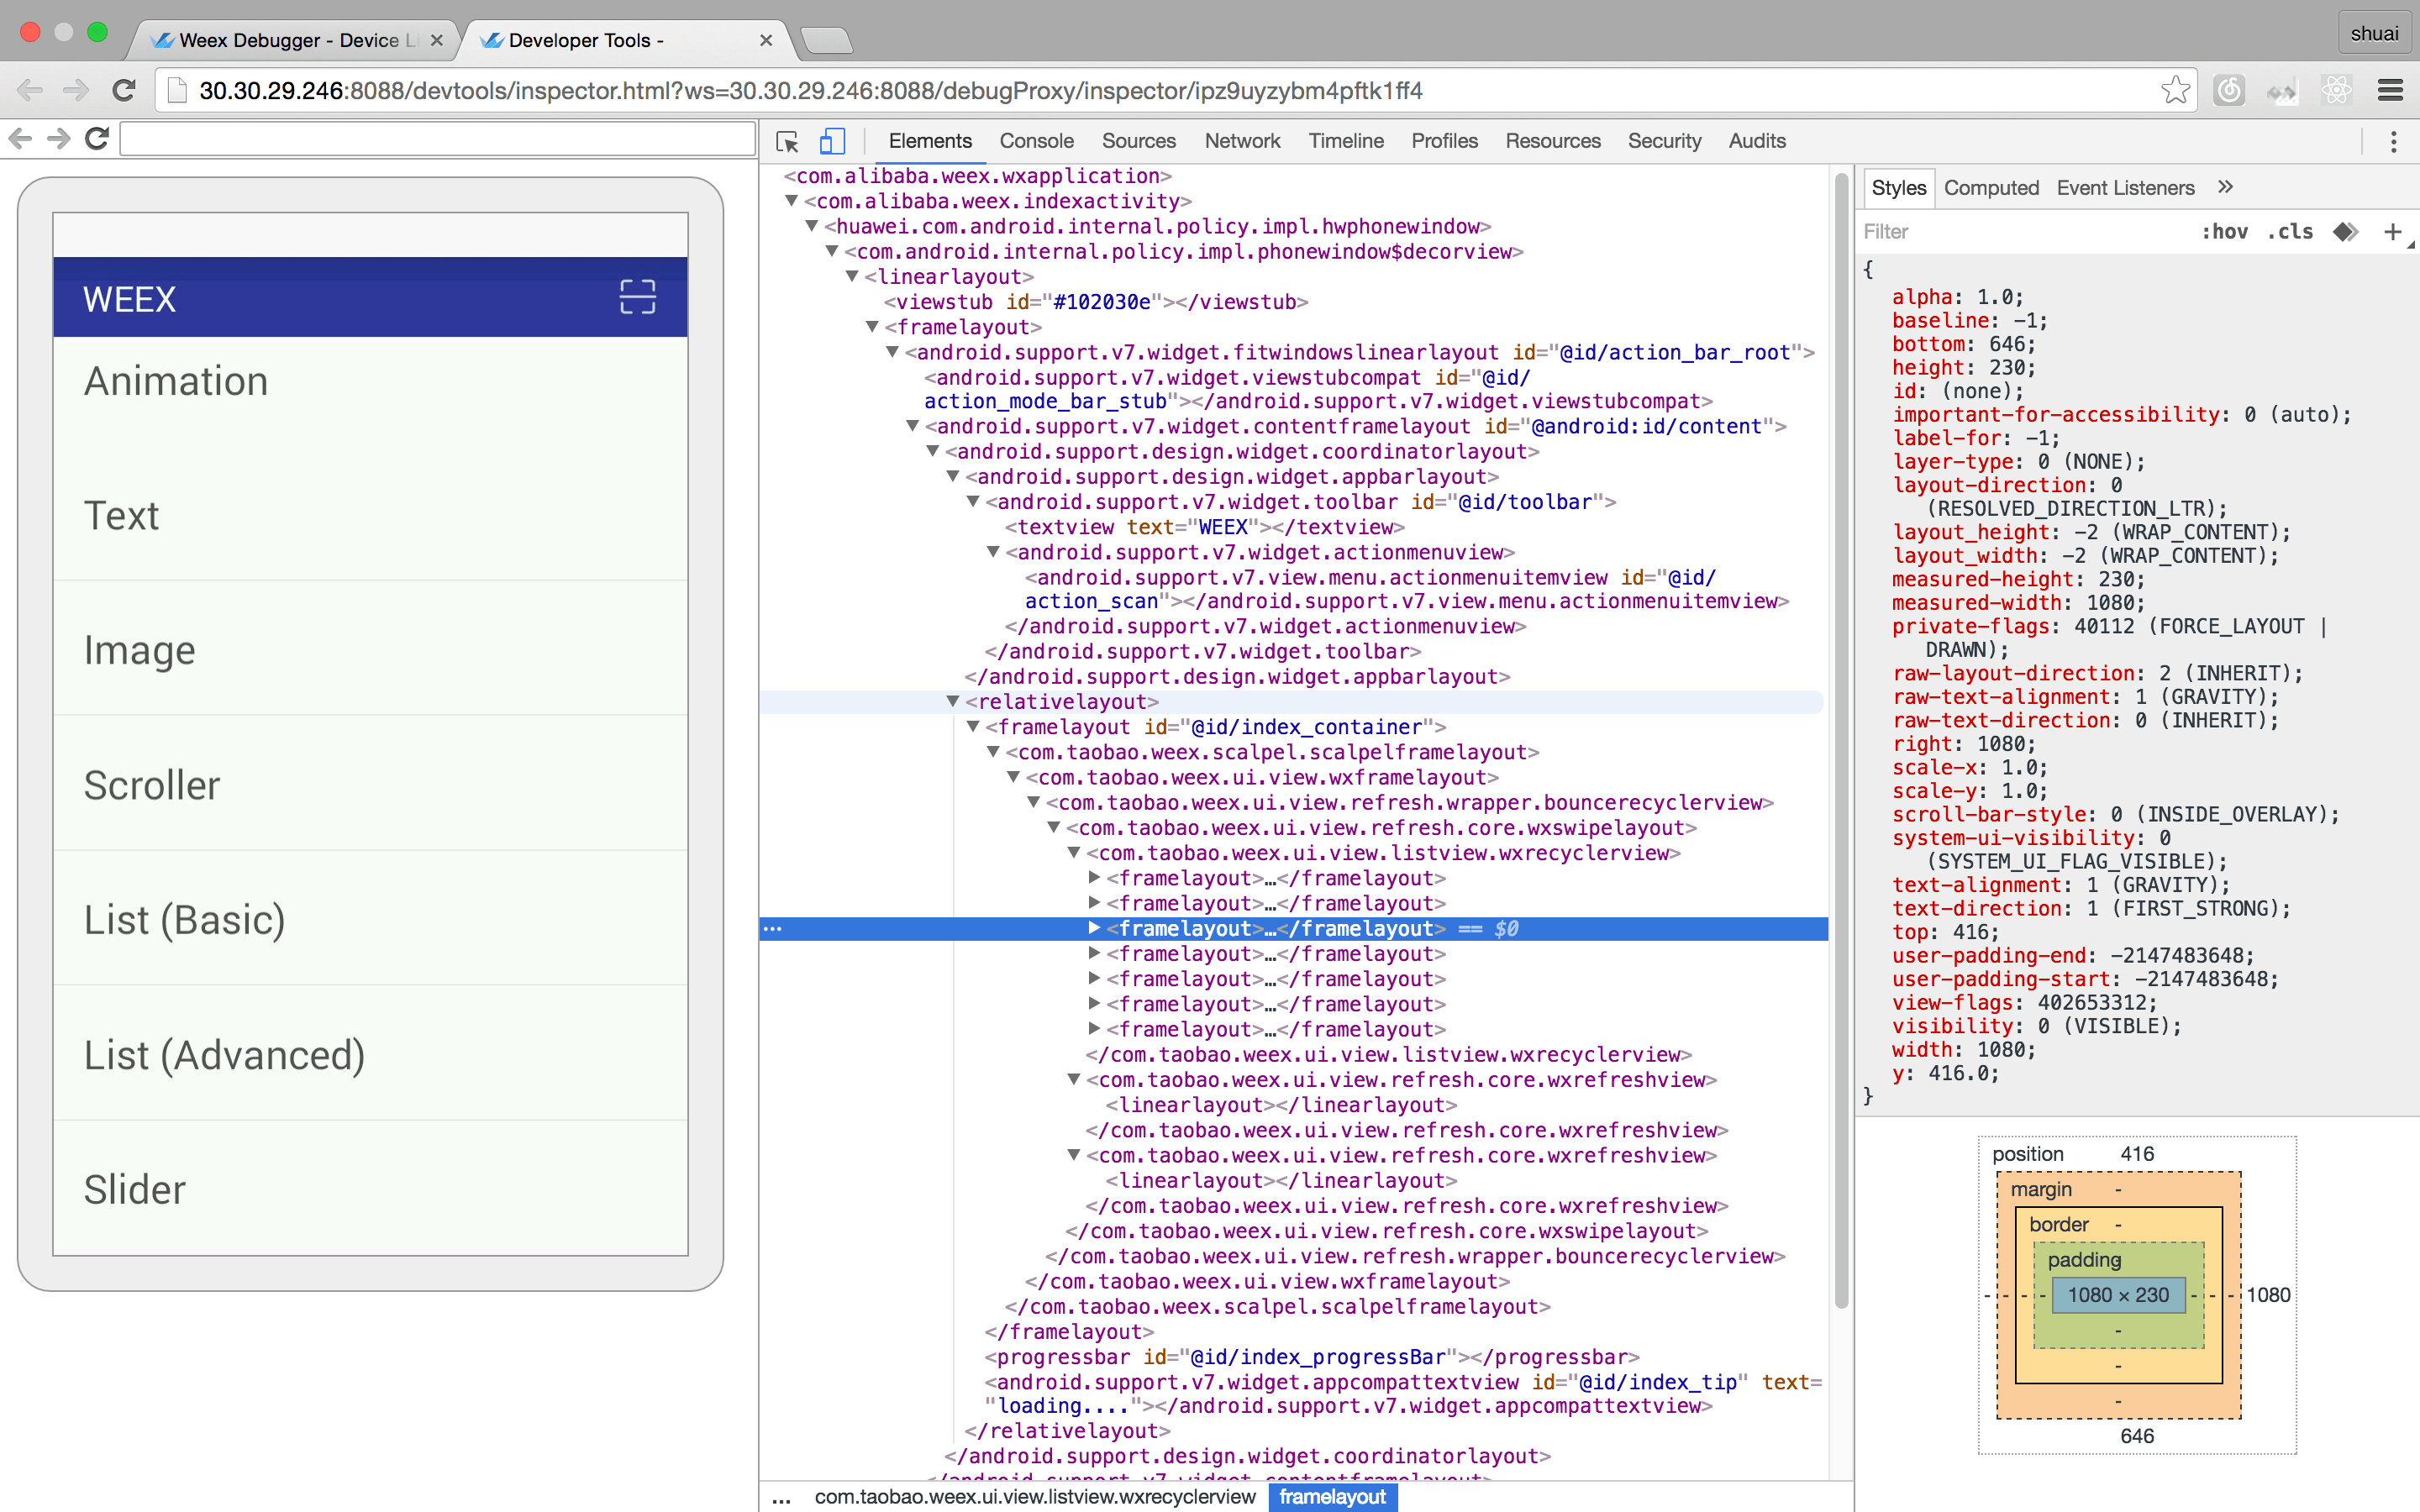
Inspector 功能丰富,能够用来查看 Element \ Network \ Console log \ ScreenCast \ BoxModel \ Native View 等。
这里展示的是在Android/iOS上的native DOM树,及其style属性,和layout图。鼠标在DOM 树移动时,在device(或模拟器)上对应节点会高亮显示,有助于native开发者定位和发现节点。screencast只是对屏幕图像拷贝,在远程调试时能看到远程设备界面,数据网络下screencast也将有较大流量花销,,如果设备就在手头儿则建议关掉。
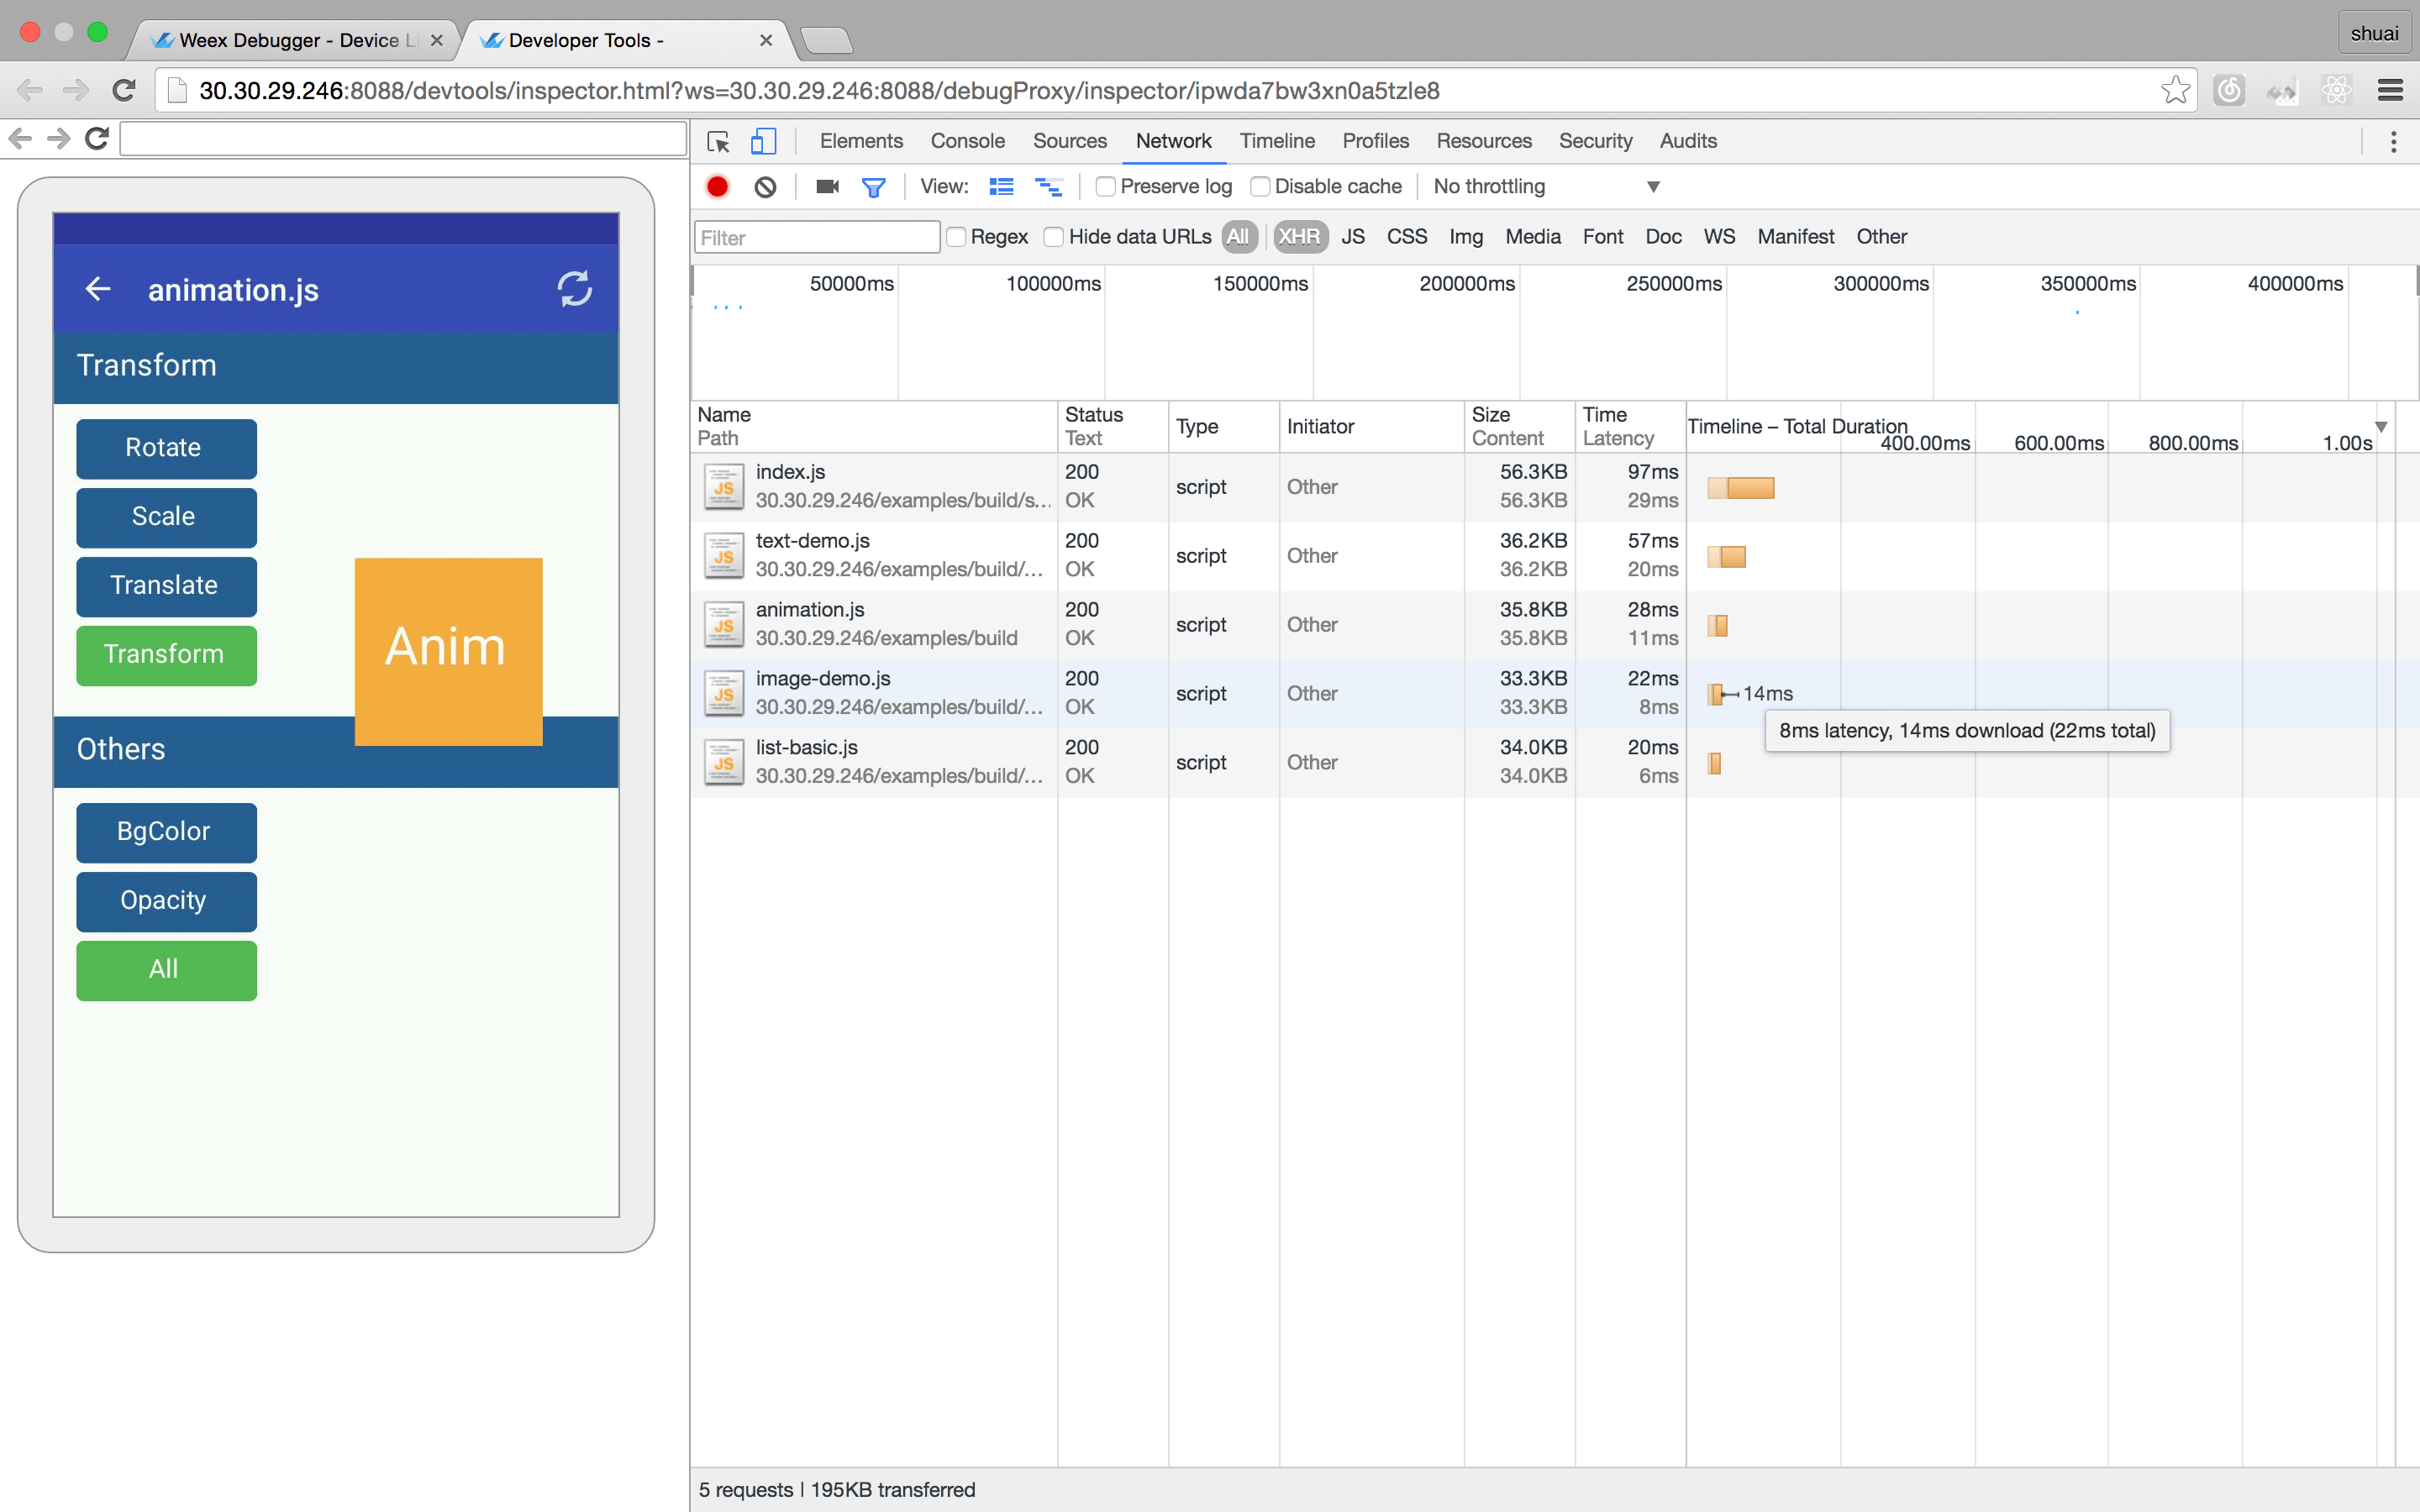
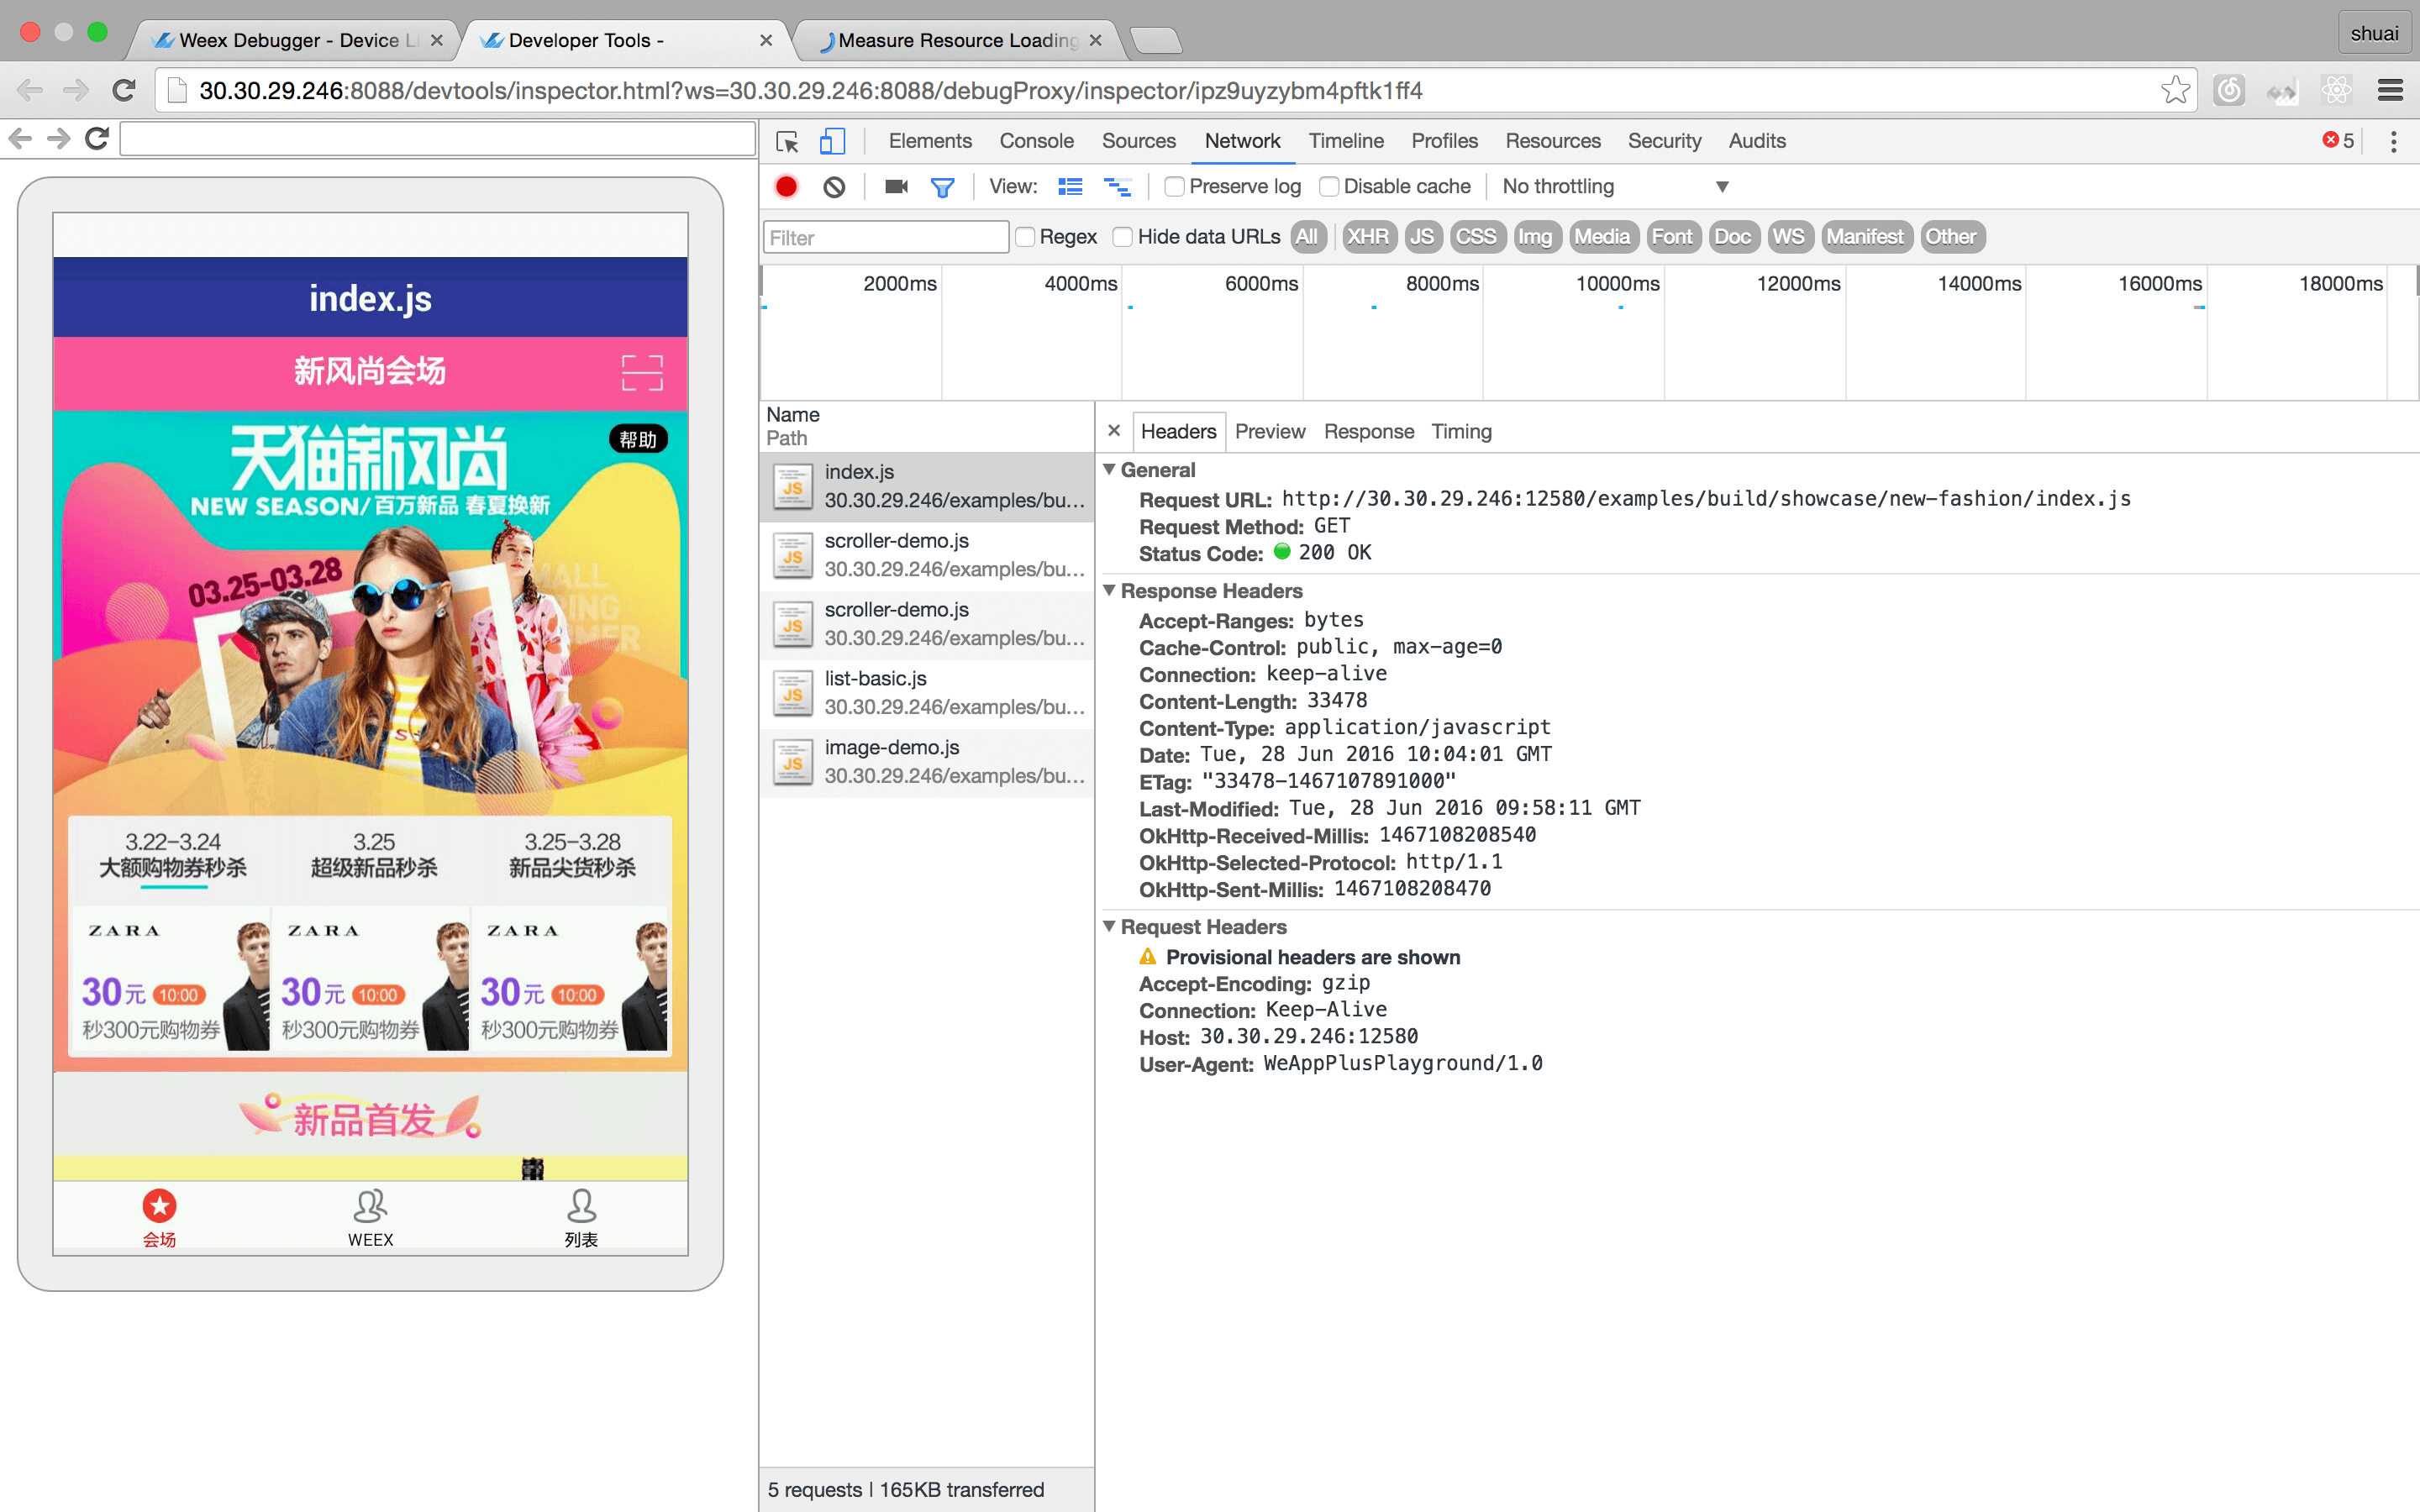
这里展示的是bundle资源加载网络访问的性能。所以如果bundle资源在device本地,Network是没有数据的。
这里显示的是Android/iOS上的native log,并不是前端log(显示在Debugger页面)。同样native log也有对应级别--warn/error等,和关键字过滤,native开发查询很方便。
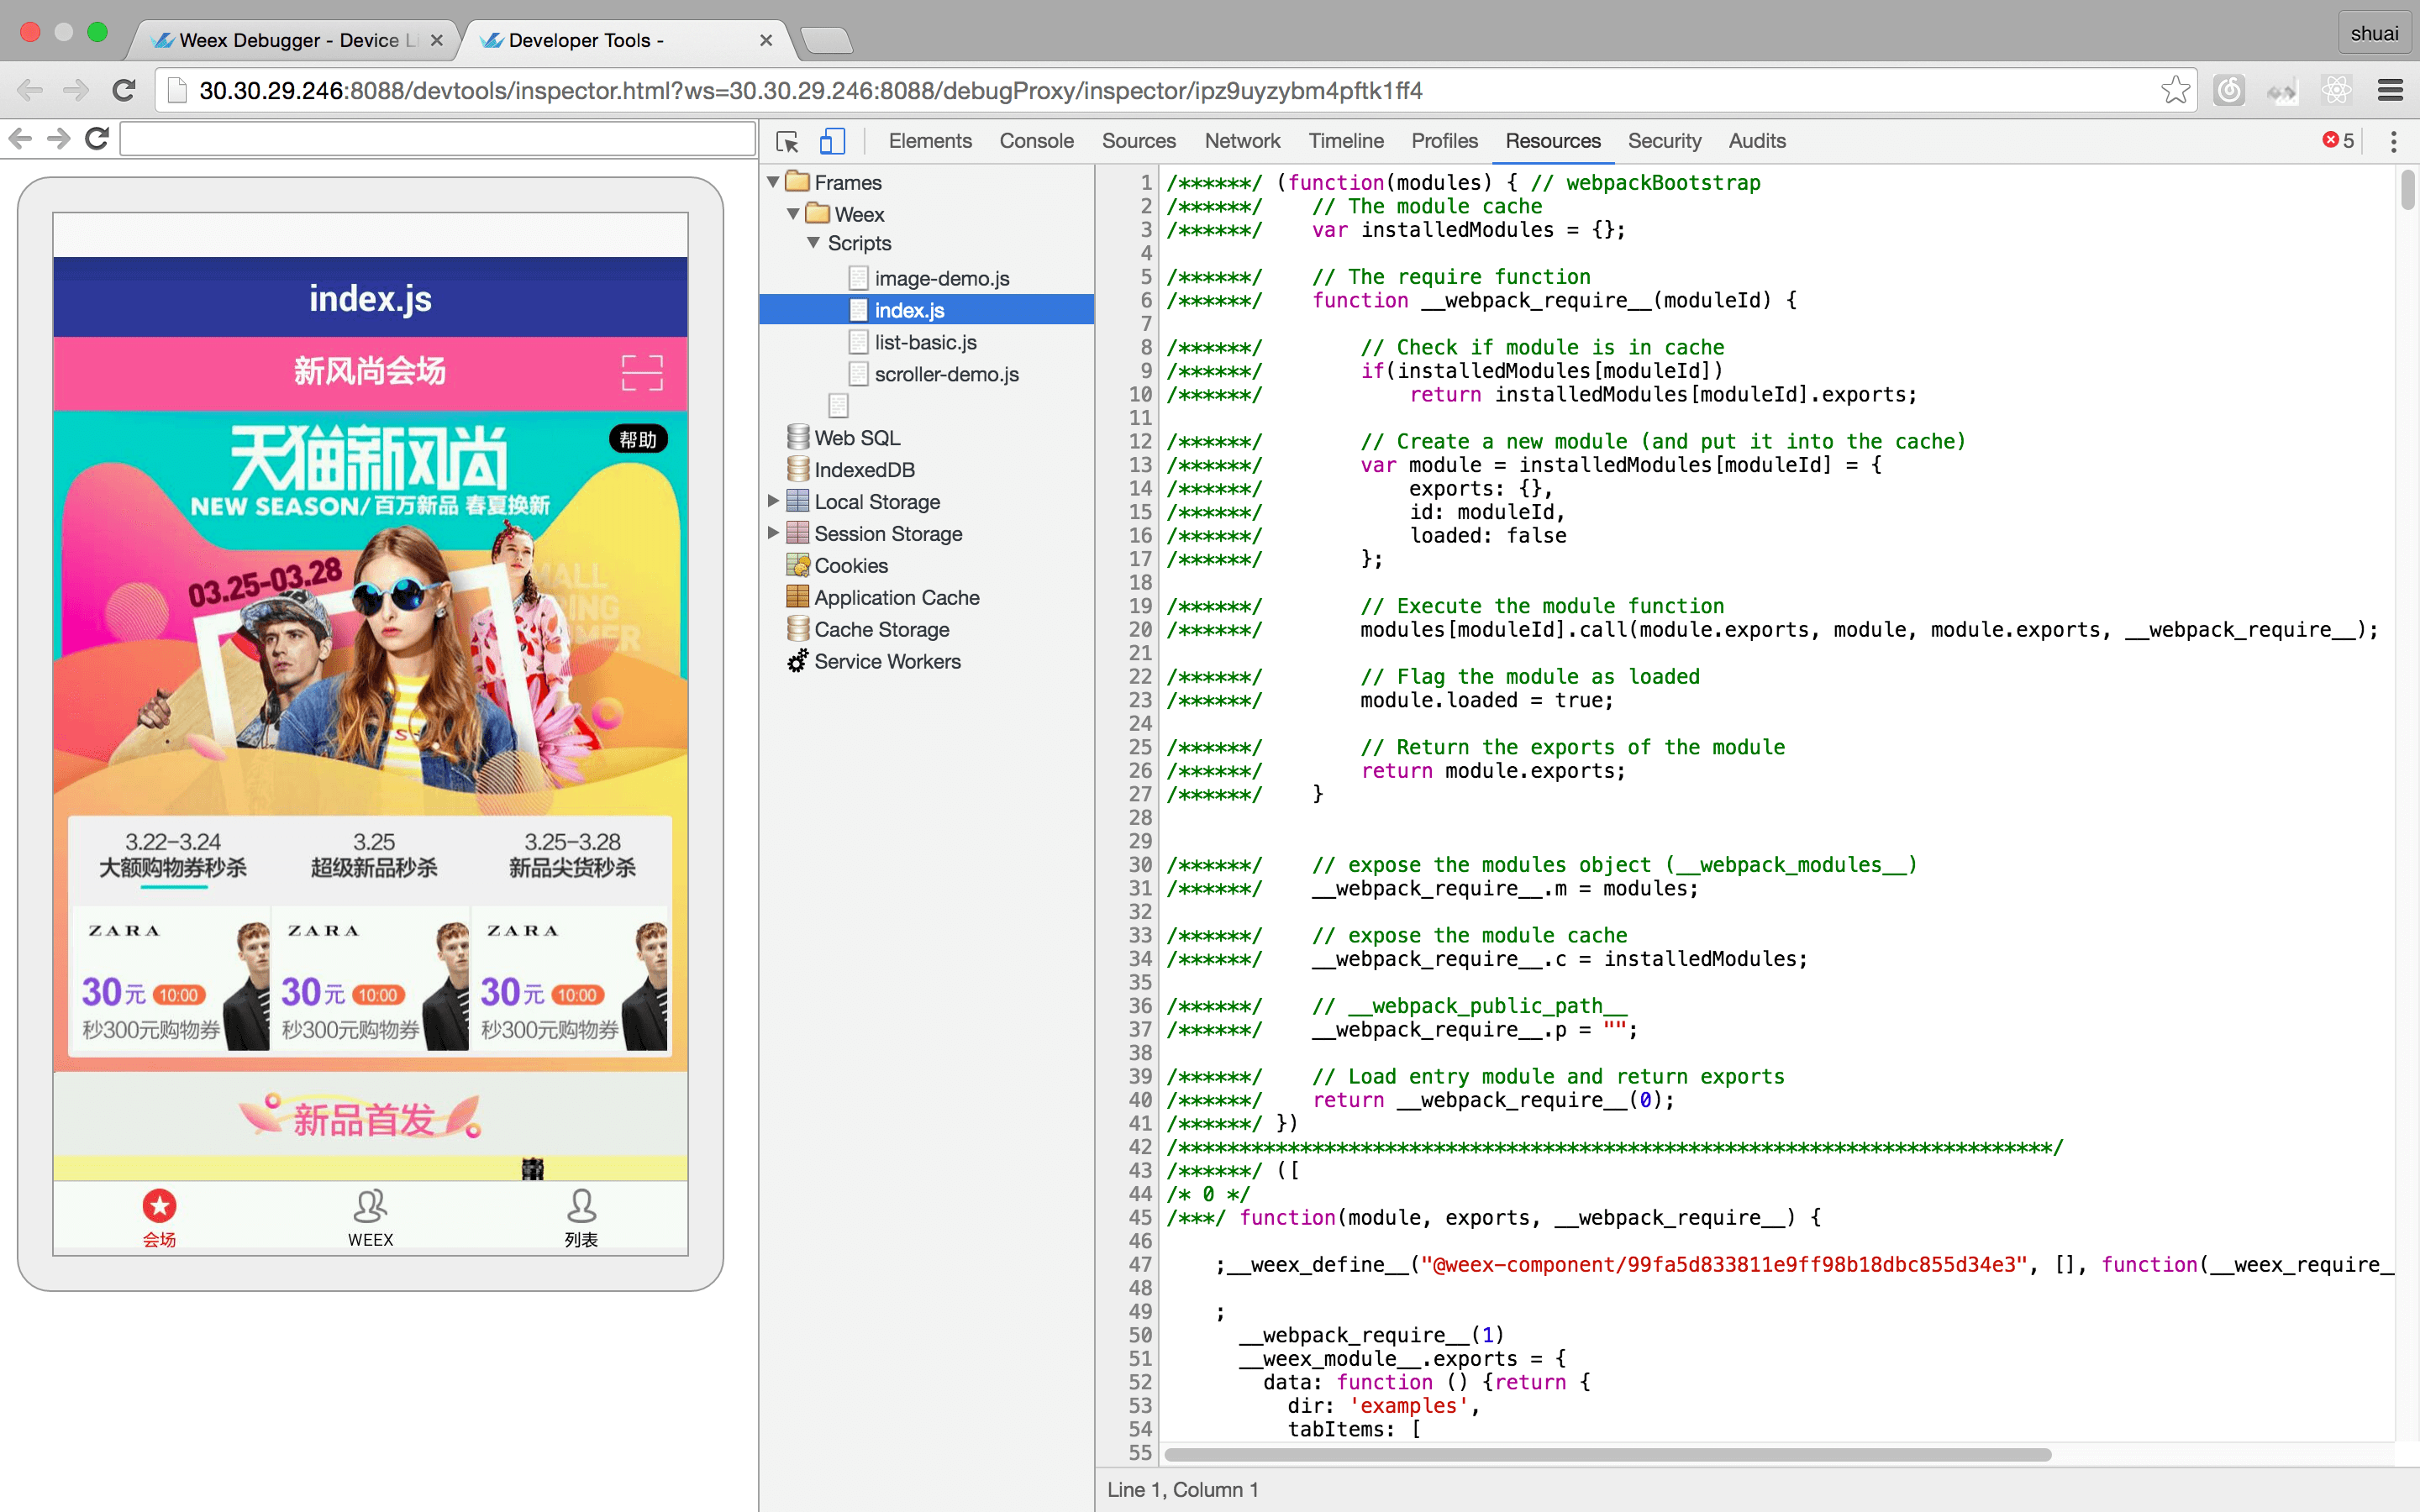
这里和Network一样,远端访问的资源文件会显示在这里,没有实际作用。因为在Debugger页面,"Sources"里已经有源码并可以断点调试。不过假如你的应用里有数据库文件,在这里可以方便的查看而无需root,这是非常有用的。
无论是跑在IOS或者Android端,weex-devtool都是必需的,用来启动服务器和chrome页面。
$ npm install -g weex-toolkit
weex debug [options] [we_file|bundles_dir]
选项:
-h, --help           显示帮助
-V, --verbose        显示debug服务器运行时的各种log
-v, --version        显示版本
-p, --port [port]    设置debug服务器端口号 默认为8088
-e, --entry [entry]  debug一个目录时,这个参数指定整个目录的入口bundle文件,这个bundle文件的地址会显示在debug主页上(作为二维码)
-m, --mode [mode]    设置构建we文件的方式,transformer 最基础的风格适合单文件,loader:wepack风格 适合模块化的多文件.默认为transformer
如果你是一名weex调试的新手,那么推荐你先下载playground体验一下devtools调试js bundle的基础流程.点击这里观看视频演示~
weex debug将启动 debug server.如果启动成功将会在chrome打开一个welcome页面,在网页下方有一个二维码.如果是接入weex的应用想调试自己的bundle代码,有以下几个方式:
// host 表示debug server的ip或域名
WXEnvironment.sRemoteDebugMode = enable;
WXEnvironment.sRemoteDebugProxyUrl = "ws://" + host + ":8088/debugProxy/native";
#import "WXDevTool.h"
[WXDevTool setDebug:YES];
[WXDevTool launchDevToolDebugWithUrl:@"ws://host:8088/debugProxy/native"];
本文档已迁移至 https://weex-project.io/cn/guide/ , 此处不再维护,谢谢。
我们将使用Weex编写一个简单的列表,类似的列表经常能在电商类移动应用中见到。
我们先编写一个列表项。
<template>
  <div class="container" >
    <div class="cell">
       <image class="thumb" src="http://t.cn/RGE3AJt"></image>
       <text class="title">JavaScript</text>
    </div>
  </div>
</template>

<style>
  .cell{margin-top:10 ; margin-left:10 ; flex-direction: row; }
  .thumb {width: 200; height: 200; }
  .title {text-align: center ; flex: 1; color: grey; font-size: 50; }
</style>
请创建一个名为 tech_list.we 的文件( .we 是Weex推荐的后缀名 ) ,请复制粘贴以上代码于其中。
因为Weex工具链使用Node.js构建,在进行后续步骤前,你需要先安装 Node.js, 在Node.js安装成功后,你可以执行下面的命令来安装Weex命令行程序 Weex Toolkit 。
npm install -g weex-toolkit
在安装结束后,你能通过在命令行窗口执行 weex 命令来检查工具是否安装正确。仅仅输入weex并敲击回车后,你应该看到如下内容显示:
Usage: weex foo/bar/your_next_best_weex_script_file.we  [options]

Options:
  --qr     display QR code for native runtime,
  -o,--output  transform weex we file to JS Bundle, output path (single JS bundle file or dir)
  -s,--server  start a http file server, weex .we file will be transforme to JS bundle on the server , specify local root path using the option
  ......
  --help  Show help
如果一切正常, 请在命令行中切换工作目录到刚才存储 tech_list.we 所用目录并输入如下命令:
weex tech_list.we
你系统默认浏览器的窗口将自动打开以显示如下内容。
(请使用 weex --version 命令检查你的weex-toolkit版本是否大于 0.1.0)
现在我们来了解下一些简单的语法概念。如 tech_list.we所示,Weex代码由三部分构成: template (模板), style (样式) 和 script (脚本) 。这三个概念之于Weex就如 html,css,javascript 之于Web。
模板部分赋予Weex以骨架,由标签以及标签包围的内容构成。Weex中的标签分为开放标签(eg: )和闭合标签(eg: )两种,我们把每一对开放&闭合标签称为一组Weex标签。标签中能添加 属性 ,不同的 属性 有不同的含义,例如 class属性让同样的样式可以作用于多组Weex标签, onclick 属性让标签能对用户点击事件作出回应。
样式部分描述Weex标签如何显示。和你一样,我们喜欢CSS,所以Weex中的样式尽量和CSS标准一致。Weex支持很多CSS中的特性: margin, padding, fixed...... 更好的是, flexbox布局模型在Weex中有着很好的支持。
脚本部分为Weex标签添加数据与逻辑,在这里你能方便的访问本地和远程的数据并更新标签。你还能定义方法并让这些方法响应不同的事件。Weex脚本的组织方式基本遵循于CommonJS module规范。
关于Weex语法的更多信息,你能在 Syntax chapter 查看。
单独一个列表项称不上”列表” , 所以让我们来添加更多的列表项。打开刚才的tech_list.we文件,更新其中的内容如下:
<template>
<div class="container">
<div class="cell">
<image class="thumb" src="http://t.cn/RGE3AJt"></image>
<text class="title">JavaScript</text>
</div>
<div class="cell">
<image class="thumb" src="http://t.cn/RGE3uo9"></image>
<text class="title">Java</text>
</div>
<div class="cell">
<image class="thumb" src="http://t.cn/RGE31hq"></image>
<text class="title">Objective C</text>
</div>
</div>
</template>
<style>
.cell{ margin-top:10 ; margin-left:10 ; flex-direction: row; }
.thumb { width: 200; height: 200; }
.title { text-align: center ; flex: 1; color: grey; font-size: 50; }
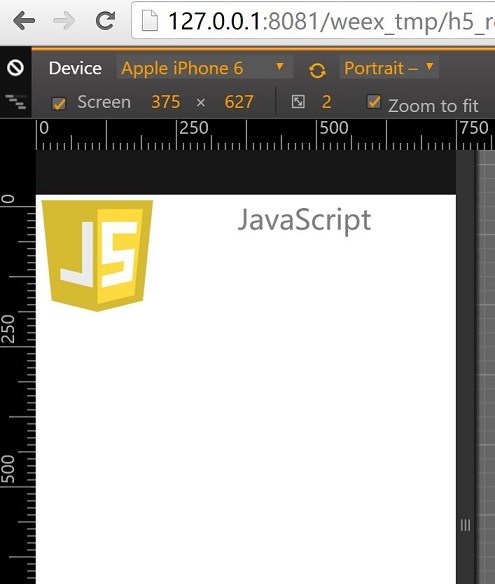
</style>现在,让我们来尝试使用Weex Native渲染器来渲染这个文件。打开终端,切换到保存该文件的目录,执行:
weex tech_list.we --qr
终端中将会出现一个二维码,类似如下这样:
这个二维码需要配合 Weex Playground App工作。下载安装后点击App中的扫码图标,然后用你的手机摄像头扫描终端中的二维码。一个漂亮的列表将出现在你的手机中。
这里我需要强调,这个列表是完全由native view(不是Webkit)来进行渲染的,相比Webkit渲染的界面,你的App能获得更快的页面加载速度和更少的内存开销。
现在你能尝试变更一些 tech_list.we中的内容,在保存变更内容之后, Weex Playground 将会立即在界面上反映出这些变化,这个特性常被称为 Hot-Reload ,希望能帮助你更方便的进行Weex开发。
除了自己动手从最基础的标签开始编写,Weex还提供很多内置组件。Slider(滑动器)在移动App和页面中很常见,所以我们提供了一个内置的Slider组件让你能在自己的界面里轻松的添加一个滑动器。打开 tech_list.we,把里面的内容变更如下:
<template>
  <div style="flex-direction: column;">
    <slider class="slider" interval="{{intervalValue}}" auto-play="{{isAutoPlay}}" >
      <div class="slider-pages" repeat="{{itemList}}" onclick="goWeexSite" >
        <image class="thumb" src="{{pictureUrl}}"></image>
        <text class="title">{{title}}</text>
      </div>
    </slider>

  <div class="container" onclick="goWeexSite" >
    <div class="cell">
        <image class="thumb" src="http://t.cn/RGE3AJt"></image>
        <text class="title">JavaScript</text>
    </div>
    <div class="cell">
        <image class="thumb" src="http://t.cn/RGE3uo9"></image>
        <text class="title">Java</text>
    </div>
    <div class="cell">
        <image class="thumb" src="http://t.cn/RGE31hq"></image>
        <text class="title">Objective C</text>
    </div>
  </div>
</template>

<style>
  .cell { margin-top:10 ; margin-left:10 ; flex-direction: row; }
  .thumb { width: 200; height: 200; }
  .title { text-align: center ; flex: 1; color: grey; font-size: 50; }
  .slider {
    margin: 18;
    width: 714;
    height: 230;
  }
  .slider-pages {
    flex-direction: row;
    width: 714;
    height: 200;
  }
</style>

<script>
module.exports = {
    data: {
      intervalValue:"1000",
      isShowIndicators:"true",
      isAutoPlay:"true",
      itemList: [
        {title: 'Java', pictureUrl: 'http://t.cn/RGE3uo9'},
        {title: 'Objective C', pictureUrl: 'http://t.cn/RGE31hq'},
        {title: 'JavaScript', pictureUrl: 'http://t.cn/RGE3AJt'}
      ]
    },
    methods: {
      goWeexSite: function () {
        this.$openURL('http://alibaba.github.io/weex/')
      }
    }
}
</script>
在终端中同一目录再次运行这个命令:
weex tech_list.we
一个漂亮的滑动器将会添加到我们之前编写列表的顶部。
更多有关滑动器组件的信息请在 这里 查看。
就像我们之前演示过的,这个界面也能用"Native View"的方式在 Weex Playground App中被渲染。如果你想让你自己的App也获得这样的能力,请访问这份文档学习如何把Weex集成进入你自己的App中。
本文档已迁移至 https://weex-project.io/cn/guide/integrate-to-your-app.html , 此处不再维护,谢谢。
注:以下文档都是假设您已经具备一定的Android开发经验。
build.gradle)build.gradle)如果你是尝鲜或者对稳定性要求比较高可以使用依赖SDK的方式。
步骤如下:
创建Android工程,没有什么要特别说明的,按照你的习惯来。
修改build.gradle 加入如下基础依赖
compile 'com.android.support:recyclerview-v7:23.1.1'
compile 'com.android.support:support-v4:23.1.1'
compile 'com.android.support:appcompat-v7:23.1.1'
compile 'com.alibaba:fastjson:1.1.46.android'
compile 'com.taobao.android:weex_sdk:0.5.1@aar'
注:版本可以高不可以低。
注:附录中有完整代码地址
package com.weex.sample;

import android.widget.ImageView;

import com.taobao.weex.adapter.IWXImgLoaderAdapter;
import com.taobao.weex.common.WXImageStrategy;
import com.taobao.weex.dom.WXImageQuality;

/**
 * Created by lixinke on 16/6/1.
 */
public class ImageAdapter implements IWXImgLoaderAdapter {


  @Override
  public void setImage(String url, ImageView view, WXImageQuality quality, WXImageStrategy strategy) {
    //实现你自己的图片下载,否则图片无法显示。
  }
}
package com.weex.sample;

import android.app.Application;

import com.taobao.weex.InitConfig;
import com.taobao.weex.WXSDKEngine;

/**
 * 注意要在Manifest中设置android:name=".WXApplication"
 * 要实现ImageAdapter 否则图片不能下载
 * gradle 中一定要添加一些依赖,否则初始化会失败。
 * compile 'com.android.support:recyclerview-v7:23.1.1'
 * compile 'com.android.support:support-v4:23.1.1'
 * compile 'com.android.support:appcompat-v7:23.1.1'
 * compile 'com.alibaba:fastjson:1.1.45'
 */
public class WXApplication extends Application {

  @Override
  public void onCreate() {
    super.onCreate();
    InitConfig config=new InitConfig.Builder().setImgAdapter(new ImageAdapter()).build();
    WXSDKEngine.initialize(this,config);
  }
}
package com.weex.sample;

import android.os.Bundle;
import android.support.v7.app.AppCompatActivity;
import android.view.View;

import com.taobao.weex.IWXRenderListener;
import com.taobao.weex.WXSDKInstance;
import com.taobao.weex.common.WXRenderStrategy;
import com.taobao.weex.utils.WXFileUtils;

public class MainActivity extends AppCompatActivity implements IWXRenderListener {

  WXSDKInstance mWXSDKInstance;

  @Override
  protected void onCreate(Bundle savedInstanceState) {
    super.onCreate(savedInstanceState);
    setContentView(R.layout.activity_main);

    mWXSDKInstance = new WXSDKInstance(this);
    mWXSDKInstance.registerRenderListener(this);
    /**
     * WXSample 可以替换成自定义的字符串,针对埋点有效。
     * template 是.we transform 后的 js文件。
     * option 可以为空,或者通过option传入 js需要的参数。例如bundle js的地址等。
     * jsonInitData 可以为空。
     * width 为-1 默认全屏,可以自己定制。
     * height =-1 默认全屏,可以自己定制。
     */
    mWXSDKInstance.render("WXSample", WXFileUtils.loadFileContent("hello.js", this), null, null, -1, -1, WXRenderStrategy.APPEND_ASYNC);
  }

  @Override
  public void onViewCreated(WXSDKInstance instance, View view) {
    setContentView(view);
  }

  @Override
  public void onRenderSuccess(WXSDKInstance instance, int width, int height) {

  }

  @Override
  public void onRefreshSuccess(WXSDKInstance instance, int width, int height) {

  }

  @Override
  public void onException(WXSDKInstance instance, String errCode, String msg) {

  }


  @Override
  protected void onResume() {
    super.onResume();
    if(mWXSDKInstance!=null){
      mWXSDKInstance.onActivityResume();
    }
  }

  @Override
  protected void onPause() {
    super.onPause();
    if(mWXSDKInstance!=null){
      mWXSDKInstance.onActivityPause();
    }
  }

  @Override
  protected void onStop() {
    super.onStop();
    if(mWXSDKInstance!=null){
      mWXSDKInstance.onActivityStop();
    }
  }

  @Override
  protected void onDestroy() {
    super.onDestroy();
    if(mWXSDKInstance!=null){
      mWXSDKInstance.onActivityDestroy();
    }
  }
}
WXSDKInstance 提供了加载远程URL的方法:
/**
url 为远程bundle的网络地址
其他参数和render方法一致
**/
  public void renderByUrl(String pageName, String url, Map<String, Object> options, final String jsonInitData, final int width, final int height, final WXRenderStrategy flag) {}
git clone https://github.com/alibaba/weexcompile project(':weex_sdk') defaultConfig {
ndk{
abiFilters "x86"
abiFilters "armeabi"
}
}
否则会出现如下异常:
No implementation found for int com.taobao.weex.bridge.WXBridge.initFramework(java.lang.String, com.taobao.weex.bridge.WXParams) (tried Java_com_taobao_weex_bridge_WXBridge_initFramework and Java_com_taobao_weex_bridge_WXBridge_initFramework__Ljava_lang_String_2Lcom_taobao_weex_bridge_WXParams_2)
12-28 20:10:53.069 19353-19374/com.ahai.weex_demo02 E/weex: [WXBridgeManager] invokeInitFramework java.lang.UnsatisfiedLinkError: No implementation found for int com.taobao.weex.bridge.WXBridge.initFramework(java.lang.String, com.taobao.weex.bridge.WXParams) (tried Java_com_taobao_weex_bridge_WXBridge_initFramework and Java_com_taobao_weex_bridge_WXBridge_initFramework__Ljava_lang_String_2Lcom_taobao_weex_bridge_WXParams_2)
                                                                at com.taobao.weex.bridge.WXBridge.initFramework(Native Method)
                                                                at com.taobao.weex.bridge.WXBridgeManager.initFramework(WXBridgeManager.java:1037)
                                                                at com.taobao.weex.bridge.WXBridgeManager.invokeCreateInstance(WXBridgeManager.java:839)
                                                                at com.taobao.weex.bridge.WXBridgeManager.access$200(WXBridgeManager.java:273)
                                                                at com.taobao.weex.bridge.WXBridgeManager$4.run(WXBridgeManager.java:820)
                                                                at com.taobao.weex.common.WXThread$SafeRunnable.run(WXThread.java:234)
                                                                at android.os.Handler.handleCallback(Handler.java:739)
                                                                at android.os.Handler.dispatchMessage(Handler.java:95)
                                                                at android.os.Looper.loop(Looper.java:148)
                                                                at android.os.HandlerThread.run(HandlerThread.java:61)
12-28 20:10:53.069 19353-19374/com.ahai.weex_demo02 E/weex: [WXBridgeManager] invokeCreateInstance: framework.js uninitialized.
-keep class com.taobao.weex.WXDebugTool{*;}
-keep class com.taobao.weex.devtools.common.LogUtil{*;}
-keep public class * extends com.taobao.weex.ui.component.WXComponent{*;}
-keepclassmembers class ** {
  @com.taobao.weex.ui.component.WXComponentProp public *;
}
-keep class com.taobao.weex.bridge.**{*;}
-keep class com.taobao.weex.dom.**{*;}
-keep class com.taobao.weex.adapter.**{*;}
-keep class com.taobao.weex.common.**{*;}
-keep class * implements com.taobao.weex.IWXObject{*;}
-keep class com.taobao.weex.ui.**{*;}
-keep class com.taobao.weex.ui.component.**{*;}
-keep class com.taobao.weex.utils.**{
    public <fields>;
    public <methods>;
    }
-keep class com.taobao.weex.view.**{*;}
-keep class com.taobao.weex.module.**{*;}
WXSample地址
https://github.com/xkli/WXSample.git
新版中文网站及文档已经上线,请访问 https://weex-project.io/cn/ , 此处后续不再维护,谢谢理解。
子组件可以使用this.$dispatch([String type], [Object detail]) 方法传递消息给父组件。
第一个参数定义消息类型,第二个参数为消息对象。如果父组件中的任何子组件使用$on([String type], [Function callback])注册监听事件,则回调执行第一个参数,参数中的 detail属性是消息数据。
案例:
<we-element name="foo">
  <template>
    <div>
      <image src="{{imageUrl}}" onclick="test"></image>
      <text>{{title}}</text>
    </div>
  </template>
  <script>
    module.exports = {
      data: {
        title: '',
        imageUrl: ''
      },
      methods: {
        test: function () {
          this.$dispatch('notify', {a: 1})
        }
      }
    }
  </script>
</we-element>

<template>
  <foo title="..." image-url="..."></foo>
</template>

<script>
  module.exports = {
    created: function () {
      this.$on('notify', function(e) {
        //  when <foo> image tag  be clicked ,the function will be executing.
        // e.detail is  `{a: 1}`
      })
    }
  }
</script>父组件可以使用 this.$([String id]) 来获取子组件的上下文。你可以使用上下文对象访问子组件的信息。
<we-element name="foo">
  <template>
    <div>
      <image src="{{imageUrl}}"></image>
      <text>{{title}}</text>
    </div>
  </template>
  <script>
    module.exports = {
      data: {
        title: '',
        imageUrl: ''
      },
      methods: {
        setTitle: function (t) {
          this.title = t
        }
      }
    }
  </script>
</we-element>

<template>
  <div>
    <text onclick="test">click to update foo</text>
    <foo id="fooEl" title="..." image-url="..."></foo>
  </div>
</template>

<script>
  module.exports = {
    methods: {
      test: function (e) {
        var foo = this.$('fooEl')
        foo.setTitle('...')
        foo.imageUrl = '...'
      }
    }
  }
</script>父组件可以使用this.$broadcast([String type], [Object detail]) 广播消息给所有子组件。
案例:
<we-element name="bar">
  <template>
    <div>
      <image src="{{imageUrl}}"></image>
    </div>
  </template>
  <script>
    module.exports = {
      data: {
        imageUrl: ''
      },
      created: function() {
        var self = this
        this.$on('changeImage', function(e) {
          self.imageUrl = e.detail.imageUrl
        })
      }
    }
  </script>
</we-element>

<we-element name="foo">
  <template>
    <div>
      <bar></bar>
      <text>{{title}}</text>
    </div>
  </template>
  <script>
    module.exports = {
      data: {
        title: ''
      },
      created: function() {
        var self = this
        this.$on('changeTitle', function(e) {
          self.title = e.detail.title
        })
      }
    }
  </script>
</we-element>

<template>
  <div>
    <text onclick="test">click to update foo</text>
    <foo></foo>
    <foo></foo>
  </div>
</template>

<script>
  module.exports = {
    methods: {
      test: function (e) {
        this.$broadcast('changeTitle', {
          title: '...'
        })
        this.$broadcast('changeImage', {
          imageUrl: '...'
        })
      }
    }
  }
</script>兄弟组件间通过公共的父组件作为桥梁来传递消息。
案例:
<we-element name="foo">
  <template>...</template>
  <script>
    module.exports = {
      methods: {
        callbar: function () {
          this.$dispatch('callbar', {a: 1})
        }
      }
    }
  </script>
</we-element>

<we-element name="bar">
  <template>...</template>
  <script>
    module.exports = {
      created: function() {
        this.$on('callbar', function(e) {
          // e.detail.a
        })
      }
    }
  </script>
</we-element>

<template>
  <div>
    <foo></foo>
    <bar></bar>
  </div>
</template>

<script>
  module.exports = {
    created: function () {
      var self = this
      this.$on('callbar', function(e) {
        self.$broadcast('callbar', e.detail)
      })
    }
  }
</script>
最后,你将学习怎么给Weex页面写 配置 & 数据
新版中文网站及文档已经上线,请访问 https://weex-project.io/cn/ , 此处后续不再维护,谢谢理解。
原文链接
在组合模板中,这个元素作为填充内容替代元素使用,它自身会被填充内容替代。
别名: <slot>
<we-element name="item">
  <template>
    <div>
      <content></content>
    </div>
  </template>
</we-element>

<template>
  <div>
    <item>
      <text>Content Text</text>
    </item>
  </div>
</template>新版中文网站及文档已经上线,请访问 https://weex-project.io/cn/ , 此处后续不再维护,谢谢理解。
Weex前端语义支持通过两种特殊属性(if和repeat)的设置来确定组件的显示状态,这会使得整个页面布局显得更加灵活。
if通过设置if属性值,可以控制当前组件节点的显示状态。如果设为true,则会将当前节点置于DOM中渲染,反之则会从DOM中移除。
    <template>
    <container>
        <text onclick="toggle">Toggle</text>
        <image src="..." if="{{shown}}"></image>
    </container>
    </template>

    <script>
        module.exports = {
        data: {
            shown: true
        },
        methods: {
        toggle: function () {
            this.shown = !this.shown
        }
        }
    }
</script>repeatrepeat属性用于控制具有相同样式或属性的组件节点做重复渲染。它绑定的数据类型必须为数组,其中每个数组项的属性会分别绑定到需要重复渲染的各子组件上。
    <template>
    <container>
        <container repeat="{{list}}" class="{{gender}}">
            <image src="{{avatar}}"></image>
            <text>{{nickname}}</text>
        </container>
    </container>
    </template>

    <style>
    .male {...}
    .female {...}
    </style>

    <script>
    module.exports = {
        data: {
            list: [
            {gender: 'male', nickname: 'Li Lei', avatar: '...'},
            {gender: 'female', nickname: 'Han Meimei', avatar: '...'},
         ...
        ]
     }
    }
</script>
此外,weex同样支持不在repeat数组中的数据绑定到重复渲染的组件节点上。
    <template>
    <container>
        <container repeat="{{list}}" class="{{gender}}">
        <image src="{{avatar}}"></image>
        <text>{{nickname}} - {{group}}</text>
        </container>
    </container>
    </template>

    <style>
    .male {...}
    .female {...}
    </style>

    <script>
    module.exports = {
        data: {
            group: '...',
             list: [
                {gender: 'male', nickname: 'Li Lei', avatar: '...'},
                {gender: 'female', nickname: 'Han Meimei', avatar: '...'},
                 ...
            ]
        }
    }
</script>$index 获取当前节点所绑定的数据在repeat数组中的索引值.例如:
    <div repeat="{{list}}">
        <text>No. {{$index + 1}}</text>
<div>例如:
    <div repeat="{{v in list}}">
        <text>No. {{$index + 1}}, {{v.nickname}}
        </text>
    </div>```

```html

    <div repeat="{{(k, v) in list}}">
      <text>No. {{k + 1}}, {{v.nickname}}</text>
</div>track-by 追踪特殊的属性通常情况下,当更新repeat数组时,所有数组元素关联的组件节点都会被重新渲染。如果其中部分节点的数据在更新前后未发生变更,那么最好是让这些节点保持原样,仅更新数据有变化的节点,weex提供了track-by属性能帮您轻松搞定。
注意: track-by属性的设置不支持数据绑定的方式
例如:
    <template>
    <container>
        <container repeat="{{list}}" track-by="nickname" class="{{gender}}">
            <image src="{{avatar}}"></image>
            <text>{{nickname}} - {{group}}</text>
        </container>
    </container>
    </template>
如前所述,当更新repeat数组时,如果检测到属性nickname的值前后一致,那么它所绑定的子节点将不被重新渲染。
对于if和repeat的使用,可以简化处理,即if="show"和if="{{show}}"所表达的前端语义相同。
    <template>
    <container>
        <text if="shown">Hello</text>
        <text if="{{shown}}">Hello</text>
    </container>
    </template>

    <script>
        module.exports = {
        data: function () {return {shown: true}}
    }
    </script>
很显然,这两个text文本会被同时显示出来。
本文档已迁移至 https://weex-project.io/cn/references/advanced/extend-to-android.html , 此处不再维护,谢谢。
Weex 提供了扩展机制,可以根据自己的业务进行定制自己的功能。
主要分为两类扩展:
-keep public class * extends com.taobao.weex.common.WXModule{*;}WXSDKEngine.registerModule("myModule", MyModule.class); 否则会报类似错误:ReportException :undefined:9: TypeError: Object #<Object> has no method 'printLog'示例如下:
public class MyModule extends WXModule {

  @WXModuleAnno(runOnUIThread = true)
  public void printLog(String msg) {
    Toast.makeText(mWXSDKInstance.getContext(),msg,Toast.LENGTH_SHORT).show();
  }
}
JS 调用如下:
<template>
  <div>
    <text onclick="click">点击我测试</text>
  </div>
</template>

<script>
  module.exports = {
    methods: {
      click: function() {
        require('@weex-module/myModule').printLog("我是一个测试!");
      }
    }
  }
</script>
-keep public class * extends com.taobao.weex.ui.component.WXComponent{*;}WXSDKEngine.registerComponent("richtext",RichText.class);示例如下:
public class RichText extends WXComponent {

  public RichText(WXSDKInstance instance, WXDomObject dom, WXVContainer parent, boolean isLazy) {
    super(instance, dom, parent, isLazy);
  }

  @Override
  protected void initView() {
    mHost=new TextView(mContext);
    ((TextView)mHost).setMovementMethod(LinkMovementMethod.getInstance());
  }

  @WXComponentProp(name = "tel")
  public void setTelLink(String tel){
    SpannableString spannable=new SpannableString(tel);
    spannable.setSpan(new URLSpan("tel:"+tel),0,tel.length(), Spanned.SPAN_EXCLUSIVE_EXCLUSIVE);
    ((TextView)mHost).setText(spannable);
  }
}
JS 调用如下:
<template>
  <div>
    <richText tel="12305" style="width:200;height:100">12305</text>
  </div>
</template>
图片下载:
需要时集成接口IWXImgLoaderAdapter,实现setImage 方法。
示例如下:
public class ImageAdapter implements IWXImgLoaderAdapter {

  public ImageAdapter() {
  }

  @Override
  public void setImage(final String url, final ImageView view,
                       WXImageQuality quality, WXImageStrategy strategy) {

    WXSDKManager.getInstance().postOnUiThread(new Runnable() {

      @Override
      public void run() {
        if(view==null||view.getLayoutParams()==null){
          return;
        }
        if (TextUtils.isEmpty(url)) {
          view.setImageBitmap(null);
          return;
        }
        String temp = url;
        if (url.startsWith("//")) {
          temp = "http:" + url;
        }
        if (view.getLayoutParams().width <= 0 || view.getLayoutParams().height <= 0) {
          return;
        }
        Picasso.with(WXEnvironment.getApplication())
            .load(temp)
            .into(view);
      }
    },0);
  }
}
注:工程要添加依赖 compile 'com.squareup.picasso:picasso:2.5.2'
本文档已迁移至 http://weex.apache.org/cn/guide/extend-ios.html , 此处不再维护,谢谢。
swift 扩展 module
Weex SDK 只提供渲染,而不是其他的能力,如果你需要 像网络,图片,URL跳转这些特性,需要自己动手实现他们
例如,如果你想实现一个url地址跳转函数,你可以按照如下步骤实现一个 Module
自定义module的步骤
自定义的module类 必须实现 WXModuleProtocol
必须添加宏WX_EXPORT_METHOD, 它可以被weex识别,它的参数是 JavaScript调用 module指定方法的参数
添加@synthesized weexInstance,每个moudle对象被绑定到一个指定的实例上
Module 方法会在UI线程中被调用,所以不要做太多耗时的任务在这里,如果要在其他线程执行整个module 方法,需要实现WXModuleProtocol中- (NSThread *)targetExecuteThread的方法,这样,分发到这个module的任务会在指定的线程中运行
Weex 的参数可以是 String 或者Map
Module 支持返回值给 JavaScript中的回调,回调的类型是WXModuleCallback,回调的参数可以是String或者Map
@implementation WXEventModule
@synthesize weexInstance;
   WX_EXPORT_METHOD(@selector(openURL:callback))
- (void)openURL:(NSString *)url callback:(WXModuleCallback)callback
{
    NSString *newURL = url;
    if ([url hasPrefix:@"//"]) {
        newURL = [NSString stringWithFormat:@"http:%@", url];
    } else if (![url hasPrefix:@"http"]) {
       newURL = [NSURL URLWithString:url relativeToURL:weexInstance.scriptURL].absoluteString;
    }

    UIViewController *controller = [[WXDemoViewController alloc] init];
    ((WXDemoViewController *)controller).url = [NSURL URLWithString:newURL];

    [[weexInstance.viewController navigationController] pushViewController:controller animated:YES];
    callback(@{@"result":@"success"});
}

@end
Register the module
通过调用 WXSDKEngine 中的 registerModule:withClass方法来注册自己的module
WXSDKEngine.h
/**
*  @abstract Registers a module for a given name
*  @param name The module name to register
*  @param clazz  The module class to register
**/
+ (void)registerModule:(NSString *)name withClass:(Class)clazz;
[WXSDKEngine registerModule:@"event" withClass:[WXEventModule class]];
使用自己的module
这里的 require 里面的event 就是在 上一步调用registerModule: 注册module 时候的name
  var eventModule = require('@weex-module/event');
  eventModule.openURL('url',function(ret) {
      nativeLog(ret);
  });
Weex SDK没有 图片下载,navigation 操作的能力,请大家自己实现这些 protocol
WXImgLoaderProtocol
weexSDK 没有图片下载的能力,需要实现 WXImgLoaderProtocol,参考下面的例子
WXImageLoaderProtocol.h
@protocol WXImgLoaderProtocol <WXModuleProtocol>
/**
 * @abstract Creates a image download handler with a given URL
 * @param imageUrl The URL of the image to download
 * @param imageFrame  The frame of the image you want to set
 * @param options : The options to be used for this download
 * @param completedBlock : A block called once the download is completed.
   image : the image which has been download to local.
   error : the error which has happened in download.
   finished : a Boolean value indicating whether download action has finished.
*/
-(id<WXImageOperationProtocol>)downloadImageWithURL:(NSString *)url imageFrame:(CGRect)imageFrame userInfo:(NSDictionary *)options completed:(void(^)(UIImage *image,  NSError *error, BOOL finished))completedBlock;
@end
实现上述协议
@implementation WXImgLoaderDefaultImpl
#pragma mark -
#pragma mark WXImgLoaderProtocol

- (id<WXImageOperationProtocol>)downloadImageWithURL:(NSString *)url imageFrame:(CGRect)imageFrame userInfo:(NSDictionary *)userInfo completed:(void(^)(UIImage *image,  NSError *error, BOOL finished))completedBlock
{
    if ([url hasPrefix:@"//"]) {
        url = [@"http:" stringByAppendingString:url];
    }
    return (id<WXImageOperationProtocol>)[[SDWebImageManager sharedManager] downloadImageWithURL:[NSURL URLWithString:url] options:0 progress:^(NSInteger receivedSize, NSInteger expectedSize) {
    } completed:^(UIImage *image, NSError *error, SDImageCacheType cacheType, BOOL finished, NSURL *imageURL) {
    if (completedBlock) {
        completedBlock(image, error, finished);
    }
    }];
}
@end
handler注册
你可以通过WXSDKEngine 中的 registerHandler:withProtocol注册handler
WXSDKEngine.h
/**
* @abstract Registers a handler for a given handler instance and specific protocol
* @param handler The handler instance to register
* @param protocol The protocol to confirm
*/
+ (void)registerHandler:(id)handler withProtocol:(Protocol *)protocol;

[WXSDKEngine registerHandler:[WXImgLoaderDefaultImpl new] withProtocol:@protocol(WXImgLoaderProtocol)]
Component 扩展
虽然WeexSDK中有很多的native的Component,但这有可能并不能满足你的需求。在之前你可能已经写了一些很酷炫native的组件,想包装一下,导入到Weex中,因此我们提供了让开发者实现自己的native Component
下面将以WeexSDK 中已经存在的 Component:image为例子,介绍一下如何构建一个native Component.
假设你已经了解IOS开发
注册 Component
注册一个component比较简单,调用 WXSDKEngine 中的 registerComponent:withClass:方法,传入组件的标签名称,还有对应的class
然后你可以创建一个 WXImageComponent 表示image组件的实现 在.we 文件中,只需要写
添加属性
现在我们要做一些让image component更加强大的事情。既然作为一个图片的component,那它应该要有源,给他加上一个 src的属性,同时给它加上一个resize的属性(可以配置的有contain/cover/stretch)
    @interface WXImageComponent ()

    @property (nonatomic, strong) NSString *imageSrc;
    @property (nonatomic, assign) UIViewContentMode resizeMode;

    @end
component中所有的style,attribute,events都会被传递到 Component的初始化方法中,所以,你可以在初始化方法中存储你感兴趣的一些属性值
    @implementation WXImageComponent

    - (instancetype)initWithRef:(NSString *)ref type:(NSString *)type styles:(NSDictionary *)styles attributes:(NSDictionary *)attributes events:(NSArray *)events weexInstance:(WXSDKInstance *)weexInstance
    {
        if (self = [super initWithRef:ref type:type styles:styles attributes:attributes events:events weexInstance:weexInstance]) {
            _imageSrc = [WXConvert NSString:attributes[@"src"]];
            _resizeMode = [WXConvert UIViewContentMode:attributes[@"resize"]];
    }

        return self;
    }

    @end
attribute中拿到的值的类型都是id,我们可以用转换方法把它转换到任何值。Weex SDK提供了一些基础的转换方法,可以参考 WXConvert类,或者你可以添加自己的转换函数
| 方法 | 描述 |
|---|---|
| initWithRef:type:... | 用给定的属性初始化一个component. |
| layoutDidFinish | 在component完成布局时候会调用. |
| loadView | 创建component管理的view. |
| viewWillLoad | 在component的view加载之前会调用. |
| viewDidLoad | 在component的view加载完之后调用. |
| viewWillUnload | 在component的view被释放之前调用. |
| viewDidUnload | 在component的view被释放之后调用. |
| updateStyles: | 在component的style更新时候调用. |
| updateAttributes: | 在component的attribute更新时候调用. |
| addEvent: | 给component添加event的时候调用. |
| removeEvent: | 在event移除的时候调用. |
在image component的例子里面,如果我们需要我们自己的image view 的话,可以复写 loadView这个方法.
- (UIView *)loadView
{
    return [[WXImageView alloc] init];
}
现在我们使用 WXImageView 渲染 image component。
作为一个image component,我们需要拿到服务器图片,而且把它设置进image view 里. 这个操作可以在 viewDidLoad 方法中做,这个方法是在view已经被创建而且加载了时候weex SDK会调用到,而且viewDidLoad这个方法是你做额外初始化工作比如改变content mode(也就是设置resize) 的最好时间.
- (void)viewDidLoad
{
    UIImageView *imageView = (UIImageView *)self.view;
    imageView.contentMode = _resizeMode;
    imageView.userInteractionEnabled = YES;
    imageView.clipsToBounds = YES;
    imageView.exclusiveTouch = YES;

    // Do your image fetching and updating logic
}
如果可以改变image的src,也可以hook updateAttributes:方法来做属性更新操作,当updateAttributes:或者 updateStyles:被调用的时候, component的view 已经加载完成
- (void)updateAttributes:(NSDictionary *)attributes
{
    if (attributes[@"src"]) {
        _imageSrc = [WXConvert NSString:attributes[@"src"]];
        // Do your image updating logic
    }

    if (attributes[@"resize"]) {
        _resizeMode = [WXConvert UIViewContentMode:attributes[@"resize"]];
        self.view.contentMode = _resizeMode;
    }
}
或许你需要考虑更多的生命周期方法去Hook,当布局完成时候,像layoutDidFinish,如果你想了解更多,可以参考一下WXComponent.h 声明的方法
现在你可以用在任何 .we文件里面使用 <image>,而且可以加上 image的属性
<image style="your-custom-style" src="image-remote-source" resize="contain/cover/stretch"></image>
如题...不要写在Issues里面
新版中文网站及文档已经上线,请访问 https://weex-project.io/cn/ , 此处后续不再维护,谢谢理解。
0.4
Weex使用_mustache_的语法({{...}})来对<template>中的模板和<script>里的数据进行绑定. 一旦数据额模板绑定了, 数据上的修改会实时的在模板内容中生效.
<template>
  <container>
    <text style="font-size: {{size}}">{{title}}</text>
  </container>
</template>

<script>
  module.exports = {
    data: {
      size: 48,
      title: 'Alibaba Weex Team'
    }
  }
</script>上面的代码会把title和size的数值绑定到模板内容上.
我们也可以通过.符号来绑定数据结构中的字段. 看一下下面的代码片段:
<template>
  <container>
    <text style="font-size: {{title.size}}">{{title.value}}</text>
  </container>
</template>

<script>
  module.exports = {
    data: {
      title: {
        size: 48,
        value: 'Alibaba Weex Team'
      }
    }
  }
</script>进行数据绑定时, Weex支持一些简单的javascript表达式,例如:
<template>
  <container style="flex-direction: row;">
    <text>{{firstName + ' ' + lastName}}</text>
  </container>
</template>

<script>
  module.exports = {
    data: {
      firstName: 'John',
      lastName: 'Smith'
    }
  }
</script>
这些表达式会在当前的上下文中进行演算.
NOTE: 每个绑定只能包含单个表达式
0.5
in-template表达式相比于简单的操作符方便多了. 但如果需要在模板里实现更多的逻辑判断,你可以使用'computed property'.
例如:
<template>
  <container style="flex-direction: row;">
    <text>{{fullName}}</text>
    <text onclick="changeName"></text>
  </container>
</template>

<script>
  module.exports = {
    data: {
      firstName: 'John',
      lastName: 'Smith'
    },
    computed: {
      fullName: {
        get: function() {
          return this.firstName + ' ' + this.lastName
        },

        set: function(v) {
          var s = v.split(' ')
          this.firstName = s[0]
          this.lastName = s[1]
        }
      }
    },
    methods: {
      changeName: function() {
        this.fullName = 'Terry King'
      }
    }
  }
</script>
我们在这段代码里定义了一个computed property fullName. 它所提供的函数能作为gettter函数实现连接字符串firstName和lastName.
除此以外当由点击出发了changeName后, setter函数会被调用,并且this.firstName和this.lastName会对应的更新.
NOTE: data 和 methods 不能有重复的字段. 因为在执行的上下文中 -- this, 能同时指向这两者.
style 或 class组件的样式能够通过style属性进行绑定:
<template>
  <text style="font-size: {{size}}; color: {{color}}; ...">...</text>
</template>样式也能够通过class属性实现绑定,多个classname通过空格分隔:
<template>
  <container>
    <text class="{{size}}"></text>
    <text class="title {{status}}"></text>
  </container>
</template>在上面的代码中如果{{size}} 和 {{status}} 是空值, 就只有class="title" 会被渲染.
on...以on...开头的就是用于指定事件处理器的属性, 属性名中'on'之后的部分就是事件的类型, 属性的值就是对应进行事件处理的函数名. 不需要添加mustache语法中的大括号或者函数调用时的圆括号.
<template>
  <text onclick="toggle">Toggle</text>
</template>

<script>
  module.exports = {
    methods: {
      toggle: function () {
        // todo
      }
    }
  }
</script>
if & repeatif 属性能够通过true/false值控制组建是否显示.
<template>
  <container style="flex-direction: column;">
    <text onclick="toggle">Toggle</text>
    <image src="..." if="{{shown}}"></image>
  </container>
</template>

<script>
  module.exports = {
    data: {
      shown: true
    },
    methods: {
      toggle: function () {
        this.shown = !this.shown
      }
    }
  }
</script>Weex通过repeat属性来生成列表.
NOTE: 当你修改 data 中的数组时,在写法上会受到一定的限制,具体如下
直接通过 index 修改数组的某个项目 (如 vm.items[0] = {};) 是不会触发视图自动更新的。我们在数组的原型上提供了一个额外的方法:$set(index, item).
// 和 `example1.items[0] = ...` 作用相同,但会自动触发视图更新
example1.items.$set(0, { childMsg: 'Changed!'})
直接通过修改 length 来改变数组长度 (如 vm.items.length = 0) 也是不会触发视图自动更新的。我们推荐您直接赋值一个新的空数组把旧的替换掉。
// 和 `example2.items.length = 0` 作用相同,但会自动触发视图更新
example2.items = []
staticstatic 属性可以取消数据绑定机制,从而数据更新不会再同步到 UI 界面。
<template>
  <div static>
    <text>{{ word }}</text>
  </div>
</template>

<script>
  module.exports = {
    ready: function() {
      this.word = 'Data changes'
    },
    data: {
      word: 'Hello, static'
    }
  }
</script>
如上所示,添加 static 关键字,渲染结果会是 Hello, static,相当于渲染一个静态的节点,ready 函数中对数据 word 的改变不会被监听,从而 text 值不会改变。
static 属性设计的目的是为了降低长列表、纯静态页面的内存开销。小心的使用它,因为它可能会中断你的页面逻辑。
下一篇: style和class.
新版中文网站及文档已经上线,请访问 https://weex-project.io/cn/ , 此处后续不再维护,谢谢理解。
weex中,可以通过在特定的节点上设置 id 属性,以此来唯一标识该节点。然后可以用 this.$el(id)来找到该节点,以scrollToElement() 为例,如下:
<template>
  <container>
    <text id="top">Top</text>
    <container style="height: 10000; background-color: #999999;">
    </container>
    <text onclick="back2Top">Back to Top</text>
  </container>
</template>
<script>
  var dom = require('@weex-module/dom');
  module.exports = {
    methods: {
      back2Top: function () {
        var top = this.$el('top')
        dom.scrollToElement(top, { offset: 10 })
      }
    }
  }
</script>
id 也可以在 repeat语法中使用,更多详见 展示逻辑控制,但是要确保循环的节点需要用不同的id,如下:
  <template>
    <container>
      <image id="{{imgId}}" src="{{imgUrl}}" onclick="getImageId" repeat="{{images}}"></image>
    </container>
  </template>
  <script>
  module.exports = {
    data: {
      images: [
        {imgId: 1, imgUrl: '...'},
        {imgId: 2, imgUrl: '...'},
        {imgId: 3, imgUrl: '...'},
        ...
      ]
    },
    methods: {
      getImageId: function(e) {
        // get e.target.id
      }
    }
  }
  </script>
另外,我们可以通过this.$vm(id) 方法可以访问子组件的上下文,用法见 组件封装。
下一篇: 组件间如何通信
新版中文网站及文档已经上线,请访问 https://weex-project.io/cn/ , 此处后续不再维护,谢谢理解。
weex-toolkit
我们强烈建议你使用weex-toolkit在浏览器中预览weex代码。这个工具基于NodeJS,所以你需要先安装Node。请从https://nodejs.org/en/download/stable/网站下载安装最新稳定版本的Node。
接下来你就可以通过npm安装weex-toolkit
npm install -g weex-toolkit
通过在终端中输入weex检查是否可以运行,通常你应该看到如下的帮助文字:
Options:
  --qr     display QR code for native runtime,
  -o,--output  transform weex we file to JS Bundle, output path (single JS bundle file or dir)
  -s,--server  start a http file server, weex .we file will be transforme to JS bundle on the server , specify local root path using the option
  ......
  --help  Show help
假如一切运行正常,终端导航到你想预览的xxx.we所在目录,输入命令:
weex xxx.we
浏览器窗口将会自动打开显示你想预览的页面:
本文档已迁移至 https://weex-project.io/cn/references/common-event.html , 此处不再维护,谢谢。
如果某个组件绑定了 click 事件,那么该事件会在用户点击时触发。
注解: input组件 和 switch组件目前并不支持 click 事件,请使用 change 或 input 事件代替。
事件对象
type: click;target: 触发事件的目标组件;timestamp: 事件触发的时间戳。如果一个 appear 事件被绑定到某个滚动区内的组件上,当组件可见时该事件触发。
事件对象
type: appear;target: 触发事件的目标组件;timestamp: 事件触发的时间戳;direction: 屏幕滚动时的滚动方向,up 或 down。如果一个 disappear 事件被绑定到某个滚动区内的组件上,该事件将在组件滚动出视口,并从你的视线中消失时触发。
事件对象
type: disappear;target: 触发事件的目标组件;timestamp: 事件触发的时间戳;direction: 屏幕滚动时的滚动方向,up 或 down。新版中文网站及文档已经上线,请访问 https://weex-project.io/cn/ , 此处后续不再维护,谢谢理解。
你可以在另外的<script>中写一些 配置和数据的实例,添加到 top-level weex 组件中。
降级到H5 渲染方式。未来还将支持更多的扩展。top-level组件数据。这些都使weex文件更具扩展和可配置,让其更容易的在其他工具和服务中工作,比如CMS系统。
<!-- definition of sub components -->
<element name="sub-component-a">...</element>
<element name="sub-component-b">...</element>
<element name="sub-component-c">...</element>

<!-- definition of top-level component -->
<template>...</template>
<style>...</style>
<script>
  module.exports = {
    data: function () {return {x: 1, y: 2}}
  }
</script>

<!-- instance config and data -->
<script type="config">
  downgrade: {
    ios: {
      os: '9', // all of 9.x.x
      app: '~5.3.2',
      framework: '^1.3', // all of 1.3.x
      deviceModel: ['AAAA', 'BBBB']
    },
    android: {
      os: '*', // all of version
      app: '^5',
      framework: '',
      deviceModel: ''
    }
  }
</script>
<script type="data">
  {y: 200}
</script>请注意,这两个附加<script>都是 optional 并且有type="config|data" 属性,当它是一个Weex实例的top-level组件才有效。
这是所有关于Weex语法。更多阅读,请查看:
本文档已迁移至 https://weex-project.io/cn/references/text-style.html , 此处不再维护,谢谢。
原文连接
文档类组件共享一些共同特性, 这类组件目前包括text and input.
color: <colors> 前景颜色.font-size: <length> 文字大小.font-style: <enum> normal | italic. 字体类别,默认为 normal.font-weight: <enum> normal | bold. 字体粗细程度,默认为 normal.text-decoration: <enum> none | underline | line-through. 字体装饰,默认值为 none.text-align: <enum> left | center | right. 对齐方式,默认值为 left.font-family:<string> 字体家族, 这个设置 不保证 在不同平台,设备间的一致性. 如所选设置在平台上不可用,将会降级到平台默认字体家族.text-overflow:<string> clip | ellipsis. 内容超长时的省略样式color属性支持多种颜色表达方法: rgb, rgba, #fff, #ffffff, 或颜色名.
例子:
.my-class { color: red; }
.my-class { color: #f00; }
.my-class { color: #ff0000; }
.my-class { color: rgb(255, 0, 0); }
.my-class { color: rgba(255, 0, 0, 0.5); }
px, px 能被省略.rgb(255, 0, 0)), rgba (rgba(255, 0, 0, 0.5)), 十六进制 (#ff0000), 短十六进制 (#f00), 颜色名字 (red).本文档已迁移至 https://weex-project.io/cn/references/components/slider.html ,此处不再维护,谢谢。
轮播组件用于在一个网页中展示多个图片。初始设置是3秒内在2个图片做切换。
weex 所有的组件都支持轮播,特定的indicator组件只能是slider的子组件。
auto-play:<布尔值> true | false.该值决定网页渲染完成之后是否自动播放。初始值的是关。其他属性请查阅基本属性
基础样式:请查阅基本样式
position相关样式opacity,background-color等.change:当轮播索引改变时的钩子。事件对象包含index属性,他显示正在展示的图片的索引序号。基本事件:查阅基本事件
<template>
  <div>
    <slider auto-play="true" onchange="change" style="...">
      <image repeat="{{imageList}}" src="{{src}}" style="..."></image>
      <indicator></indicator>
    </slider>
  </div>
</template>

<script>
  module.exports = {
    data: {
      imageList: [{src: '...'}, {src: '...'}, ...]
    },
    methods: {
      change: function (e) {
        // e.index
      }
    }
  }
</script>
新版中文网站及文档已经上线,请访问 https://weex-project.io/cn/ , 此处后续不再维护,谢谢理解。
0.4
CSS样式可以理解为一系列的键值对, 其中的每一对描述了一个特定的样式, 例如组件的宽或者高.
width: 400; height: 50; ...
键值对的形式是 prop-name: prop-value;. 键名是prop-name, 键值是 prop-value. 一般情况下,键名按照连接符的方式进行命名, 键值可以是数字(默认的单位是px);键和值由:分隔,每对键值之间由;分隔.
在Weex页面上样式有两种形式:
<template>中标签的style属性<style> 中样式表在style属性中编写样式, 例如:
<template>
  <container style="width: 400; height: 50;">
    ...
  </container>
</template>
这段代码的意思是<container>组件的宽和高分别为400像素和50像素.
<style> 标签例如:
<style>
  .wrapper {width: 600;}
  .title {width: 400; height: 50;}
  .highlight {color: #ff0000;}
</style>
样式表包含了多个样式规则, 每条规则有一个对应的类, 以及由{...}包括的多条样式. 例如:
.title {width: 400; height: 50;}
以上为一条样式规则.
<style> 标签的选择器会去匹配 <template> 标签中的class属性, 多个属性值之间由空格分隔. 例如:
<template>
  <container class="wrapper">
    <text class="title">...</text>
    <text class="title highlight">...</text>
  </container>
</template>
<style>
  .wrapper {width: 600;}
  .title {width: 400; height: 50;}
  .highlight {color: #ff0000;}
</style>
这段代码的含义是container组件的宽度是600px, 两个title文本的尺寸为400px高50px宽, 其中第二个文本是红色.
px在样式中可以忽略不写, 直接使用对应的数值.更多详情请查看 通用样式.color和font-size等属性.font-size, color等样式.文档 数据绑定 有style 和 class属性相关的内容, 相关的内容可以查看该文档. 例如:
<template>
  <container>
    <text style="font-size: {{fontSize}};">Alibaba</text>
    <text class="large {{textClass}}">Weex Team</text>
  </container>
</template>
<style>
  .large {font-size: 32;}
  .highlight {color: #ff0000;}
</style>
<script>
  module.exports = {
    data: {
      fontSize: 32,
      textClass: 'highlight'
    }
  }
</script>
下一篇:事件.
新版中文网站及文档已经上线,请访问 https://weex-project.io/cn/ , 此处后续不再维护,谢谢理解。
我们强烈推荐你使用weex-toolkit在你的浏览器预览weex代码。这个工具是以node.js为基础的,所以你需要先安装Node。请从这里 https://nodejs.org/en/download/stable/下载稳定版的Node。然后你可以通过npm安装weex-toolkit
npm install -g weex-toolkit
在命令行通过weex命令检查toolkit是否正常工作,通常你会看到下面的帮助信息
Options:
  --qr     display QR code for native runtime,
  -o,--output  transform weex we file to JS Bundle, output path (single JS bundle file or dir)
  -s,--server  start a http file server, weex .we file will be transforme to JS bundle on the server , specify local root path using the option
  ......
  --help  Show help
如果顺利的话,进入到你想预览的xxx.we文件的路径,输入命令
weex xxx.we
浏览器窗口会自动打开你想要预览的页面:
新版中文网站及文档已经上线,请访问 https://weex-project.io/cn/ , 此处后续不再维护,谢谢理解。
appendappend属性没有做数据绑定的工作。它不会改变最终的渲染效果。但是此属性确定是以一整棵树或子节点的方式添加。
append 有两个关键属性,tree 和 node,使用方法如下:
<template>
  <container>
    <container id="world" append="tree">
      <text>Hello World!</text>
    </container>
    <container id="weex" append="node">
      <text>Hello Weex!</text>
    </container>
  </container>
</template>
在上面的代码中,id为world的元素将等待其所有子元素渲染完成,才完全全部渲染。然而id为weex的元素只完成自身的渲染就会被呈现在页面上,其子元素渲染完成一个展示一个。
渲染结果显而易见,后者渲染方式会使第一次绘画的速度比前者快些,但是总体的渲染时间可能比 append="tree" 长些。
默认情况下,元素的呈现为 node 模式,只要元素是 tree的渲染方式,其子元素都将以 tree模式渲染。
下一节我们将介绍复合组件。
本文档已迁移至 https://weex-project.io/cn/references/advanced/extend-to-html5.html , 此处不再维护,谢谢。
0.4
Weex是一个高可扩展性的跨平台动态化开发方案,你可以在现有组件基础上定制自己需要的三端组件。你可以为Weex API模块添加新的方法,或者创建新的API模块和新的加载器。按照以下几个步骤扩展你的组件,API或者加载器。
首先要明确的是,组件和API模块是基于weex的扩展,但是独立于weex,组件的定义本身是不需要依赖于weex的,这样有助于组件的分散化管理,去除中心化依赖。
其次,当你扩展一个组件,你需要同时扩展三端的组件(android, ios和web端),毕竟weex是一个重视三端一致体验的跨平台移动框架。你可以一个端一个端的扩展,也可以召唤其他端上的开发者来共同完成你在其他端上的组件(你总是可以在社区找到对某个功能有共同需求的开发者)。这里有一些在android端和ios端做扩展的文档可以参考。
你应该将你的扩展发布到weex开发者可以方便找到和使用的渠道,比如npm. 我们推荐你将你开发的组件发布到npm供其他weex开发者使用。
最重要的是,你的组件的命名需要遵守weex组件命名规范:以weex-开头作为组件的前缀,并且以-<platform>做为结尾后缀,除非你发布的包是三端的实现都包含在内的。这里有个<weex-hello-web>的例子作为参考,这里注册了一个简单的自定义的组件。
步骤:
Weex.Component这个类, 并选择性的重写其中的一些方法.init方法,并在其中使用Weex.registerComponent注册你的组件.这里用一个例子展示如何扩展一个新的组件
看这个组件扩展的代码(web端上的组件):
const attr = {
  // ...
}
const style = {
  // ...
}
const event = {
  // ...
}
// 每个扩展组件都需要实现一个init方法,Weex会通过这方法进行安装和注册.
function init (Weex) {
  const Component = Weex.Component
  const extend = Weex.utils.extend

  // 组件的构造函数
  function Hello (data) {
    Component.call(this, data)
  }

  // prototype继承
  Hello.prototype = Object.create(Component.prototype)
  extend(Hello.prototype, proto)

  // 配置属性、样式以及事件
  extend(Hello.prototype, { attr })
  extend(Hello.prototype, {
    style: extend(Object.create(Component.prototype.style), style)
  })
  extend(Hello.prototype, { event })

  Weex.registerComponent('weex-hello', Hello)
}

// 暴露init方法接口.
export default { init }上述代码摘引自weex-hello-web/src/index.js
这个demo重写了基类Component中的create方法。你也可以选择重写Component中的一些其他方法来定制组件的行为。典型的方法包括:
create: 创建组件的节点,在方法体中return这个节点.createChildren 创建子节点.insertBefore 在某个子节点之前插入一个新的子节点.appendChild 在子节点列表的最后加上一个节点.removeChild 移除一个子节点.进阶:更多关于组件定制和扩展的细节和代码展示,可以参考weex主仓库的代码,这里的组件基本上都是通过上述方式进行定义的。
重要的一点,注册组件的关键方法是Weex.registerComponent,如示例里的weex-hello组件的注册:
Weex.registerComponent('weex-hello', Hello)上述代码引自weex-hello-web/src/index.js
在某个需要使用该组件的weex项目中使用Weex.install方法安装该组件:
// import the original weex-html5.
import weex from 'weex-html5'
import hello from 'weex-hello-web'
// install the component.
weex.install(hello)上述代码引自weex_extend_demo/src/main.js
在你的.we文件中直接使用这个组件:
<template>
  <div>
    <weex-hello class="hello" style="txt-color:#fff;bg-color:green"
      value="WEEX" onclick="handleClick">
    </weex-hello>
  </div>
</template>上述代码引自weex_extend_demo/demo/index.we
你可以扩展新的API模块,或者为某个已有的模块添加新的API. 比如,你可以添加一个API模块叫做user,在里面添加一些用户登录登出处理的API,比如login, logout等等。你可以通过require('@weex-module/moduleName)[methodName](arg1, arg2, ...) (Module APIs)的方式调用你的API.
步骤:
init方法,并在这个方法里面使用Weex.registerAPIModules 注册你的API module.这里用一个例子展示如何扩展一个新的API模块
创建一个文件user.js,在其中定义登录登出login/logout方法.
const user = {
  // 定义用户登录方法.
  login (callbackId) {
    login.then(res => {
      this.sender.performCallback(callbackId, res)
    }).catch(err => {
      this.sender.performCallback(callbackId, err)
    })
  },

  // 定义用户登出方法.
  logout (callbackId) {
    logout.then(res => {
      this.sender.performCallback(callbackId, res)
    }).catch(err => {
      this.sender.performCallback(callbackId, err)
    })
  }
}

// 定义user模块的元 (meta) 信息.
const meta = {
  user: [{
    name: 'login',
    args: ['function']
  }, {
    name: 'logout',
    args: ['function']
  }]
}

export default {
  init (Weex) {
    // 注册这个模块,最后一个参数是模块的元信息.
    Weex.registerApiModule('user', user, meta)
  }
}
这个简单的user helper模块就实现好了,可以发布到npm上,我们可以给这个模块取个名字,比如说weex-user-helper。
在你的新的weex项目里安装这个模块:
import Weex from 'weex-html5'
import user from 'weex-user-helper'

Weex.install(user)
安装了这个模块,你就可以在dsl代码里引用这个模块干点事情了:
<template>
  <div>
    <div class="btn" onclick="handleClick">
      <text>LOGIN</text>
    </div>
  </div>
</template>

<script>
  var userHelper = require('@weex-module/user')
  module.exports = {
    methods: {
      handleClick: function () {
        userHelper.login(function () {
          // ... do sth. in callback.
        })
      }
    }
  }
</script>Loader仅用于weex-html5 (web端)加载dsl打包出来的bundle代码,native平台有其他的加载机制
已有的加载器包括xhr, jsonp和source. 你可以使用weex.registerLoader注册一个新的加载器。例如,你有一个获取weex bundle的服务myServe.getWeexBundle, 通过这个服务可以加载weex bundle,为此你可以定义一个加载器:
function loadByMyServe(pageId, callback) {
  myServe.getWeexBundle(pageId).then(function (bundle) {
    callback(bundle)
  }).catch(function(err) {
    callback(err)
  })
}

// 暴露init方法用于Weex安装此加载器.
export default {
  init (Weex) {
    Weex.registerLoader('myserve', loadByMyServe)
  }
}
在你的weex-html5项目的启动文件里安装并使用这个加载器:
import Weex from 'weex-html5'

// 或者import from './myserve.js',不管是import一个npm模块还是import一个文件.
import loader from 'myLoader'

Weex.install(loader)

// 在init方法里使用这个加载器加载bundle文件.
(function () {
  function getUrlParam (key) {
    const reg = new RegExp('[?|&]' + key + '=([^&]+)')
    const match = location.search.match(reg)
    return match && match[1]
  }
  const page = getUrlParam('page') || 'examples/build/index.js'
  Weex.init({
    appId: location.href,
    loader: 'myserve',  // 使用刚才定义的loader类型
    source: page,
    rootId: 'weex'
  })
})();以上是weex带来的扩展性里比较主要的一部分,更多实现细节可以在weex项目代码库以及weex的开源社区里找到。
作为一个简化的、过渡的操作流程,大家可以参考:
前置依赖(操作一次)
git clone https://github.com/alibaba/weex.git (申请权限)npm install,如果安装太慢或出错,可以使用 cnpm
常规操作
./startexamples/demo123.we./start本文档已迁移至 https://weex-project.io/cn/references/advanced/extend-to-html5.html , 此处不再维护,谢谢。
定义组件是通过一组选项来描述一个组件。这组选项总是被赋值给 <script> 标签中的 module.exports 。
module.exports = {
  // a set of options here
}module.exports = {
data: function () {
return {x: 1, y: 2}
},
methods: {
doThis: function () {...},
doThat: function () {...}
},
...
}data 选项是一个函数,它返回这个视图模型可监听的数据对象。而 methods 是一个映射,其中包含所有视图模型的方法。
每个 data 或 method 属性将被代理到视图模型实例中。所以,你能通过 this.x 读写数据,或者通过 this.doThis() 调用方法。
一个完整的例子:
<template>
  <div style="width: {{w}}; height: {{h}}; background-color: red;" onclick="update"></div>
</template>
<script>
  module.exports = {
    data: function () {
      return {w: 750, h: 200}
    },
    methods: {
      update: function (e) {
        this.h += 200
      }
    }
  }
</script>module.exports = {
data: ...,
methods: {
foo: function () {
...
this.$emit('customtype1', data)
}
},
events: {
customtype1: function (e) {
console.log(e.type, e.detail)
}
},
...
}events 选项允许你在视图模型被创建时注册自定义事件。然后,它会监听这些类型的事件,并通过函数类型的值处理它们。
Weex 会把一个事件对象作为第一个参数传递给其绑定的事件,这个事件对象在 e.detail 中包含事件数据。
module.exports = {
  data: ...,
  methods: ...,
  init: function () {
    console.log('ViewModel constructor begins')
  },
  created: function () {
    console.log('Data observation finished')
  },
  ready: function () {
    console.log('Virtual DOM finished')
  },
  ...
}
Weex 视图模型现在支持生命周期内的钩子函数,这些钩子函数能被写为组件选项:
init: 在视图模型的构造函数开始调用时激活;created: 当视图模型监听默认数据,但还未编译模板时激活;ready: 当视图模型监听默认数据并且编译模板生成虚拟DOM后被激活。注意:当 methods、events 或生命周期方法作为参数传递给别的函数时,务必确认函数执行时的上下文符合您的预期,例如:
module.exports = {
  data: function () {
    return {x: 1, y: 2}
  },
  ready: function () {
    // `undefined`
    // 因为上下文发生了变化
    this.foo(this.bar)
    // `1`
    // 正确绑定上下文之后可以得到预期的值
    this.foo(this.bar.bind(this))
  },
  methods: {
    foo: function (fn) {
      return fn()
    },
    bar: function () {
      return this.x
    }
  }
}本文档已迁移至 https://weex-project.io/cn/references/advanced/extend-to-android.html , 此处不再维护,谢谢。
Weex SDK 支持模块扩展,Weex SDK 只提供渲染的功能,而不是有其他的功能,比如网络,图片和URL重定向。如果你需要其他功能,你需要自己去实现它。
例子: 如果你想实现一个地址跳跃的功能 你可以按照以下步骤去实现一个模块
参照下面的例子
    import android.content.Intent;
    import android.net.Uri;
     ……………………

    public class WXEventModule extends WXModule{

    private static final String WEEX_CATEGORY="com.taobao.android.intent.category.WEEX";

    @WXModuleAnno
    public void openURL(String url){
        if (TextUtils.isEmpty(url)) {
            return;
        }
        StringBuilder builder=new StringBuilder("http:");
        builder.append(url);
        Uri uri = Uri.parse(builder.toString());
        Intent intent = new Intent(Intent.ACTION_VIEW, uri);
        intent.addCategory(WEEX_CATEGORY);
        mWXSDKInstance.getContext().startActivity(intent);
       }
}/**
* Register module. This is a wrapper method for
* {@link WXModuleManager#registerModule(String, Class)}.
* The module register here only needto
* be singleton in {@link WXSDKInstance} level.
* @param moduleName module name
* @param moduleClass module to be registered.
* @return true for registration success, false for otherwise.
* @see {@link WXModuleManager#registerModule(String, Class, boolean)}
*/
WXSDKEngine.registerModule("event", WXEventModule.class);参照下面的例子
    package com.taobao.weextest;
    ………………

    public class MyViewComponent extends WXComponent{
    public MyViewComponent(WXSDKInstance instance, WXDomObject dom,
                       WXVContainer parent, String instanceId, boolean isLazy)
     {
     public MyViewComponent(WXSDKInstance instance, WXDomObject dom,
       WXVContainer parent, String instanceId, boolean isLazy) {
      super(instance, dom, parent, instanceId, isLazy);
     }


     @Override
     protected void initView() {
        mHost = new TextView(mContext);
     }
     @WXComponentProp(name=WXDomPropConstant.WX_ATTR_VALUE)
     public void setMyViewValue(String value) {
        ((TextView)mHost).setText(value);
     }
    }
  /**
   * Register component. The registration is singleton in {@link WXSDKEngine} level
   * @param type name of component. Same as type filed in the JS.
   * @param clazz the class of the {@link WXComponent} to be registered.
   * @param appendTree true for appendTree flag
   * @return true for registration success, false for otherwise.
   * @throws WXException Throws exception if type conflicts.
   */
WXSDKEngine.registerComponent("MyView", MyViewComponent.class);package com.alibaba.weex.extend;
import android.app.Activity;
import android.text.TextUtils;
import android.widget.ImageView;
import com.squareup.picasso.Picasso;
import com.taobao.weex.WXEnvironment;
import com.taobao.weex.adapter.IWXImgLoaderAdapter;
import com.taobao.weex.common.WXImageStrategy;
import com.taobao.weex.dom.WXImageQuality;
public class ImageAdapter implements IWXImgLoaderAdapter {
private Activity mContext;
public ImageAdapter(Activity activity) {
mContext = activity;
}
@Override
public void setImage(final String url, final ImageView view,
WXImageQuality quality, WXImageStrategy strategy) {
mContext.runOnUiThread(new Runnable() {
@Override
public void run() {
if (TextUtils.isEmpty(url)) {
view.setImageBitmap(null);
return;
}
String temp = url;
if (url.startsWith("//")){
temp = "http:" + url;
}
if (view.getLayoutParams().width<=0 || view.getLayoutParams().height<=0) {
return;
}
Picasso.with(WXEnvironment.getApplication())
.load(temp)
.resize(view.getLayoutParams().width,
view.getLayoutParams().height).into(view);
}
});
}
}新版中文网站及文档已经上线,请访问 https://weex-project.io/cn/ , 此处后续不再维护,谢谢理解。
weex 允许对<template> 中的元素绑定事件处理器。属性名称是以on...为前缀加事件类型 和处理函数名。例如:onclick="handler"
<template>
  <image onclick="handler" ...></image>
</template>

<script>
  module.exports = {
    methods: {
      handler: function (e) {
        // TODO
      }
    }
  }
</script>
当用户点击图片时, <script> 中定义的handler 函数将被执行。
除了使用方法名外,你也可以自定义入参。
e.g.
<template>
  <image onclick="handler('arg1', $event)" ...></image>
</template>

<script>
  module.exports = {
    methods: {
      handler: function (arg1, e) {
        // TODO
      }
    }
  }
</script>当一个事件函数被调用,它会收到的第一个参数就是事件对象。每个事件对象包含一下属性。
type: 事件名称, 如: clicktarget: 目标元素timestamp: 事件触发的时间戳接下来,请看 显示逻辑控制器.
本文档已迁移至 https://weex-project.io/cn/references/color-names.html , 此处不再维护,谢谢。
原文连接
| 颜色名 | 十六进制RGB值 |
|---|---|
| black(黑) | #000000 |
| silver(银) | #C0C0C0 |
| gray(灰) | #808080 |
| white(白) | #FFFFFF |
| maroon(褐紫红) | #800000 |
| red(红) | #FF0000 |
| purple(紫) | #800080 |
| fuchsia(晚樱) | #FF00FF |
| green(绿) | #008000 |
| lime(石灰) | #00FF00 |
| olive(橄榄) | #808000 |
| yellow(黄) | #FFFF00 |
| navy(海军蓝) | #80 |
| blue(蓝) | #0000FF |
| teal(水鸭) | #008080 |
| aqua(水蓝) | #00FFFF |
| 颜色名 | 十六进制RGB值 |
|---|---|
| aliceblue | #F0F8FF |
| antiquewhite | #FAEBD7 |
| aqua | #00FFFF |
| aquamarine | #7FFFD4 |
| azure | #F0FFFF |
| beige | #F5F5DC |
| bisque | #FFE4C4 |
| black | #000000 |
| blanchedalmond | #FFEBCD |
| blue | #0000FF |
| blueviolet | #8A2BE2 |
| brown | #A52A2A |
| burlywood | #DEB887 |
| cadetblue | #5F9EA0 |
| chartreuse | #7FFF00 |
| chocolate | #D2691E |
| coral | #FF7F50 |
| cornflowerblue | #6495ED |
| cornsilk | #FFF8DC |
| crimson | #DC143C |
| cyan | #00FFFF |
| darkblue | #00008B |
| darkcyan | #008B8B |
| darkgoldenrod | #B8860B |
| darkgray | #A9A9A9 |
| darkgreen | #006400 |
| darkgrey | #A9A9A9 |
| darkkhaki | #BDB76B |
| darkmagenta | #8B008B |
| darkolivegreen | #556B2F |
| darkorange | #FF8C00 |
| darkorchid | #9932CC |
| darkred | #8B0000 |
| darksalmon | #E9967A |
| darkseagreen | #8FBC8F |
| darkslateblue | #483D8B |
| darkslategray | #2F4F4F |
| darkslategrey | #2F4F4F |
| darkturquoise | #00CED1 |
| darkviolet | #9400D3 |
| deeppink | #FF1493 |
| deepskyblue | #00BFFF |
| dimgray | #696969 |
| dimgrey | #696969 |
| dodgerblue | #1E90FF |
| firebrick | #B22222 |
| floralwhite | #FFFAF0 |
| forestgreen | #228B22 |
| fuchsia | #FF00FF |
| gainsboro | #DCDCDC |
| ghostwhite | #F8F8FF |
| gold | #FFD700 |
| goldenrod | #DAA520 |
| gray | #808080 |
| green | #008000 |
| greenyellow | #ADFF2F |
| grey | #808080 |
| honeydew | #F0FFF0 |
| hotpink | #FF69B4 |
| indianred | #CD5C5C |
| indigo | #4B0082 |
| ivory | #FFFFF0 |
| khaki | #F0E68C |
| lavender | #E6E6FA |
| lavenderblush | #FFF0F5 |
| lawngreen | #7CFC00 |
| lemonchiffon | #FFFACD |
| lightblue | #ADD8E6 |
| lightcoral | #F08080 |
| lightcyan | #E0FFFF |
| lightgoldenrodyellow | #FAFAD2 |
| lightgray | #D3D3D3 |
| lightgreen | #90EE90 |
| lightgrey | #D3D3D3 |
| lightpink | #FFB6C1 |
| lightsalmon | #FFA07A |
| lightseagreen | #20B2AA |
| lightskyblue | #87CEFA |
| lightslategray | #778899 |
| lightslategrey | #778899 |
| lightsteelblue | #B0C4DE |
| lightyellow | #FFFFE0 |
| lime | #00FF00 |
| limegreen | #32CD32 |
| linen | #FAF0E6 |
| magenta | #FF00FF |
| maroon | #800000 |
| mediumaquamarine | #66CDAA |
| mediumblue | #0000CD |
| mediumorchid | #BA55D3 |
| mediumpurple | #9370DB |
| mediumseagreen | #3CB371 |
| mediumslateblue | #7B68EE |
| mediumspringgreen | #00FA9A |
| mediumturquoise | #48D1CC |
| mediumvioletred | #C71585 |
| midnightblue | #191970 |
| mintcream | #F5FFFA |
| mistyrose | #FFE4E1 |
| moccasin | #FFE4B5 |
| navajowhite | #FFDEAD |
| navy | #80 |
| oldlace | #FDF5E6 |
| olive | #808000 |
| olivedrab | #6B8E23 |
| orange | #FFA500 |
| orangered | #FF4500 |
| orchid | #DA70D6 |
| palegoldenrod | #EEE8AA |
| palegreen | #98FB98 |
| paleturquoise | #AFEEEE |
| palevioletred | #DB7093 |
| papayawhip | #FFEFD5 |
| peachpuff | #FFDAB9 |
| peru | #CD853F |
| pink | #FFC0CB |
| plum | #DDA0DD |
| powderblue | #B0E0E6 |
| purple | #800080 |
| red | #FF0000 |
| rosybrown | #BC8F8F |
| royalblue | #4169E1 |
| saddlebrown | #8B4513 |
| salmon | #FA8072 |
| sandybrown | #F4A460 |
| seagreen | #2E8B57 |
| seashell | #FFF5EE |
| sienna | #A0522D |
| silver | #C0C0C0 |
| skyblue | #87CEEB |
| slateblue | #6A5ACD |
| slategray | #708090 |
| slategrey | #708090 |
| snow | #FFFAFA |
| springgreen | #00FF7F |
| steelblue | #4682B4 |
| tan | #D2B48C |
| teal | #008080 |
| thistle | #D8BFD8 |
| tomato | #FF6347 |
| turquoise | #40E0D0 |
| violet | #EE82EE |
| wheat | #F5DEB3 |
| white | #FFFFFF |
| whitesmoke | #F5F5F5 |
| yellow | #FFFF00 |
| yellowgreen | #9ACD32 |
新版中文网站及文档已经上线,请访问 https://weex-project.io/cn/ , 此处后续不再维护,谢谢理解。
除了其默认的意义,<script>标签支持在页面的顶级组件中通过 type 属性定义两种配置。
type="data": 配置初始化数据,这里定义的数据会覆盖定义在<script>中的数据;type="config": 定义配置项。<script type="data">
/* (可选) 定义初始化数据 */
</script>
<script type="config">
/* (可选) 定义配置项 */
</script>有时,很难在默认的<script>标签中维护巨大的数据结构。所以 Weex 允许我们通过 <script type="data"> 标签定义初始化数据。在这里定义的数据将完全取代默认的 <script> 标签中定义的数据。
例如:
<script type="data">
  module.exports = {
      title: 'Alibaba',
      date: new Date().toLocaleString()
  }
</script>Weex 也允许我们通过 <script type="config"> 定义一些配置项,目前,仅只支持配置 downgrade。
downgrade.osVersiondowngrade.appVersiondowngrade.weexVersiondowngrade.deviceModelWeex 的 JS Framework 是一个 MVVM,即 Model-View-ViewModel 框架。他会自动监听数据的变化,并通过 {{字段名}} 的语法把数据和视图中所展示的内容自动绑定起来。当数据被改写的时候,视图会自动根据数据的变化而发生相应的变化。
比如下面这个例子,<text> 的内容被绑定在了 notes 数据字段上:
<template>
  <div>
    <text>{{notes}}</text>
  </div>
<template>

<script>
  module.exports = {
    data: {
      notes: 'Hello'
    }
  }
</script>
Weex 的 JS Framework 会首先对 data 里的数据进行监听,这样未来的数据变化都能够被监听到。然后我们会编译整个 <template> 标签里的内容。当我们找到 <text> 标签里的 {{notes}} 时,JS Framework 会跟踪 data.notes 的变化并在其发生变化时触发一个句柄,将 <text> 的内容设置为 data.notes 最新的值。这样的话开发者就不必手动关心数据和视图之间的数据同步问题了。
在这个基础上我们还设计了一些特殊的语法:
<foo if="..."> 代表一个条件监听,当其值为 true 时,<foo> 元素将会被创建和载入,反之则不会被创建或被移除掉。<foo repeat="..."> 代表一个列表监听,第一次加载的时候 <foo> 元素会被按照数组里的数据逐条 clone 并赋值。而当有列表项增加、移动或移除时,视图层也会自动触发相应的改变,并且智能优化至最小变更策略<foo if="..." repeat="..."> 两个特殊语法共用时,将会优先展开 repeat 然后逐条判断 if。相比于一些 virtual-DOM 的 diff 计算机制,我们会直接对数据进行 diff,而且只会 diff 由于用户操作或数据操作发生改变的那部分数据和视图,这是一种更小范围的计算方式。尤其在追求轻量快速的移动端界面上,这种更新机制更加显得具有优势。
本文档已迁移至 https://weex-project.io/cn/references/components/scroller.html ,此处不再维护,谢谢。
scroller是一个竖直的,可以容纳多个排成一列的子组件的滚动器。 如果子组件的总高度高于其本身,那么所有的子组件都可滚动。
注意: 可以当作根元素或者嵌套元素使用。此组件的滚动方向是列的形式(原文: The scroll direction of this component is column),不可更改。
这类组件支持任意类型的weex组件作为其自组件。
show-scrollbar: true | false. 这个属性决定滚动条是否现实,默认是truescroll-direction: 定义子组件的滚动方向, horizontal 或者 vertical。共公样式: 查阅 公共样式
公共事件: 查阅 公共事件
<template>
  <scroller>
    <div repeat="{{list}}">
      <text>{{name}}: ${{price}}</text>
    </div>
  </scroller>
</template>

<script>
  module.exports = {
    data: {
      list: [
        {name: '...', price: 100},
        {name: '...', price: 500},
        {name: '...', price: 1.5},
        ...
      ]
    }
  }
</script>本文档已迁移至 https://weex-project.io/cn/guide/intro/how-it-works.html , 此处不再维护,谢谢。
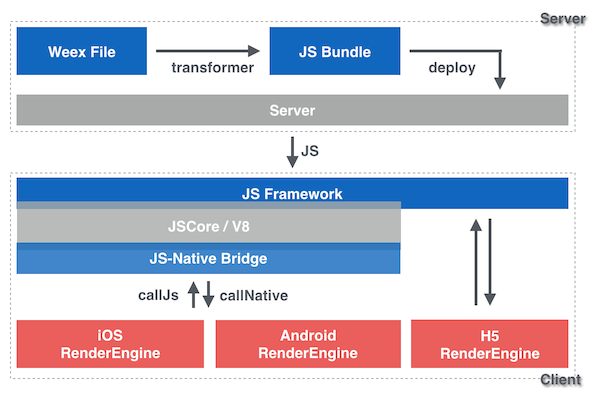
Weex是跨平台,可扩展的动态化技术. 你能通过在Weex源码中写<template>, <style> 和 <script>标签,然后把这些标签转换为JS Bundle用于部署, 在服务端以这些JS Bundle响应请求. 当客户端接收到JS Bundle时,它能用被客户端中的JS引擎用于管理Native渲染;API调用和用户交互.
Weex we 文件 --------------前端(we源码)
↓ (转换) ------------------前端(构建过程)
JS Bundle -----------------前端(JS Bundle代码)
↓ (部署) ------------------服务器
在服务器上的JS bundle  ----服务器
↓ (编译) ------------------ 客户端(JS引擎)
虚拟 DOM 树 --------------- 客户端(Weex JS Framework)
↓ (渲染) ------------------ 客户端(渲染引擎)
Native视图 ---------------  客户端(渲染引擎)
在上面的工作流中,我们提到:
转换器转换Weex源码为JS Bundle. 整体工作可以分为三个部分:
<template> 为类JSON的树状数据结构, 转换数据绑定为返回数据的函数原型.例如. For example: <foo a="{% raw %}{{x}}{% endraw %}" b="1" /> 将转换为 {type: "foo", attr: {a: function () {return this.x}, b: 1}}.<style> 为类JSON的树状数据结构. 例如: .classname {name: value;} 将转换为 {classname: {name: value}}.<script> 中的内容结合. 上面的三个部分将结合成一个JavaScript AMD 模块.一个完整的例子:
<template>
  <foo a="{{x}}" b="1" class="bar"></foo>
</template>
<style>
  .bar {width: 200; height: 200}
</style>
<script>
  module.exports = {
    data: function () {
      return {x: 100}
    }
  }
</script>
将转换为:
define('@weex-component/main', function () {
  module.exports = {
    data: function () {
      return {x: 100}
    }
  }
  module.template = {
    type: "foo",
    attr: {
      a: function () {return this.x},
      b: 1,
      classname: ['bar']
    }
  }
  module.style = {
    bar: {width: 200, height: 200}
  }
}
bootstrap('@weex-component/main'))
除此之外,转换器还会做一些额外的事情: 合并Bundle ,添加引导函数,配置外部数据等等,更详细的,请参阅Synatax章节.
当前大部分Weex工具最终输出的JS Bundle格式都经过了Webpack的二次处理,所以你实际使用工具输出的JS Bundle会和上面的有所区别.
JS Framework在初始化阶段被原生JavaScript引擎运行. 它提供被每个JS Bundle调用的 define() 和 bootstrap() 函数. 一旦JS Bundle从服务器下载后,这些函数就会执行. define() 函数以注册模块;bootstrap()会编译主要的模块为虚拟DOM,并发送渲染指令给Native .
JS 和 Native 的沟通主要通过两个关键方法进行:
callNative 是一个由native代码实现的函数, 它被JS代码调用并向native发送指令,例如 rendering, networking, authorizing和其他客户端侧的 toast 等API.callJS 是一个由JS实现的函数, 它用于Native向JS发送指令. 目前这些指令由用户交互和Native的回调函数组成.Native 渲染引擎提供客户端组件和模块.
Component(组件) 在屏幕内可见,有特定行为. 能被配置不同的属性和样式,能响应用户交互. 常见的组件有: <div>, <text>, <image>.
Module(模块) 是一组能被JS Framework调用的API. 其中的一些能以异步的方式调用JS Framework, 例如: 发送HTTP请求.
在Weex实例运行期间,Native渲染引擎将接收各种各样不同模块的API调用。这些调用创建或更新组件外观,运行如toast的Native API.当用户交互或模块回调时,callJS()会由JS Framework调用. 这样的循环往复将从Weex实例初始化到销毁一直持续. 如下面的架构图所示, HTML5渲染引擎提供和Native渲染引擎几乎一致的功能。
Weex架构图
[JS Framework]
↓ callNative
模块 APIs
  渲染 -> 模块显示
  其他功能
[Native 渲染引擎]
[Native 渲染引擎]
模块 APIs 回调
用户交互
↓ callJS
[JS Framework]
Weex 渲染流程
在Weex HTML5环境下 CSS 布局 and 更新视窗 由浏览器引擎(例如webkit)实现.
1 . 运行如下命令,遇到错误:
E:\workplace\Android\weex>weex tech_list.we
info Tue Jun 21 2016 11:48:53 GMT+0800 (**标准时间)WebSocket  is listening on port 8082
info Tue Jun 21 2016 11:48:53 GMT+0800 (**标准时间)http  is listening on port 8081
events.js:160
      throw er; // Unhandled 'error' event
      ^

Error: listen EADDRINUSE 0.0.0.0:8082
    at Object.exports._errnoException (util.js:1007:11)
    at exports._exceptionWithHostPort (util.js:1030:20)
    at Server._listen2 (net.js:1253:14)
    at listen (net.js:1289:10)
    at net.js:1399:9
    at _combinedTickCallback (internal/process/next_tick.js:77:11)
    at process._tickCallback (internal/process/next_tick.js:98:9)
2 . weex版本
E:\workplace\Android\weex>weex --version
info 0.1.1
3 . tech_list.we的内容:
<template>
  <div class="container" >
    <div class="cell">
       <image class="thumb" src="http://t.cn/RGE3AJt"></image>
       <text class="title">JavaScript</text>
    </div>
  </div>
</template>

<style>
  .cell{margin-top:10 ; margin-left:10 ; flex-direction: row; }
  .thumb {width: 200; height: 200; }
  .title {text-align: center ; flex: 1; color: grey; font-size: 50; }
</style>
本文档已迁移至 https://weex-project.io/cn/references/components/image.html ,此处不再维护,谢谢。
image 标签用于渲染一个特定的图片,并且它不能包含任何子组件。可以用img 作简写。
注意: width和height需要指定,否则会不工作。
简写:
这个组件不支持子组件。
src:<字符串>属性 图片原始链接resize: <字符串> 组件的拉伸属性。默认值是stretch,如果此属性不指定,该值可能是cover,contain , 值行为和W3C标准一致。其他属性请查阅基本属性
width : <长度>属性 组件的宽度,需指定。height: <长度>属性 组件的高度,需指定。基本样式: 查看基本样式
position 相关属性opacity,background-color 等。基本事件:查阅基本事件
<div>
  <image src="..." ></image>
  <text>...</text>
</div>
简写:
<div>
  <img src="..." ></img>
  <text>...</text>
</div>
新版中文网站及文档已经上线,请访问 https://weex-project.io/cn/ , 此处后续不再维护,谢谢理解。
https://github.com/alibaba/weex/

Weex-Toolkit生成.we的二维码
前段时间进行了weex页面尝试, 页面滚动加载渲染得非常流畅, 让H5页面拥有了native般的体验。
如此之利器,让人非常想探一究竟,因此最近进行了js-framwork源码学习(weex开源地址:https://github.com/alibaba/weex),希望能进一步了解其dom渲染机制。
weex代码结构如下,重点关注其js-framework实现。
    ├── weex-dev
      ├── android
      ├── ios
      ├── bin
      ├── doc
      ├── examples
      ├── src
      │  ├── components
      │  ├── h5-render
      │  ├── js-framework
      │  ├── README.md
      ├── test
      ├── website
      ├── index.html
      ├── package.json
      ├── webpack.config.js
      ├── README.md
      └── ...
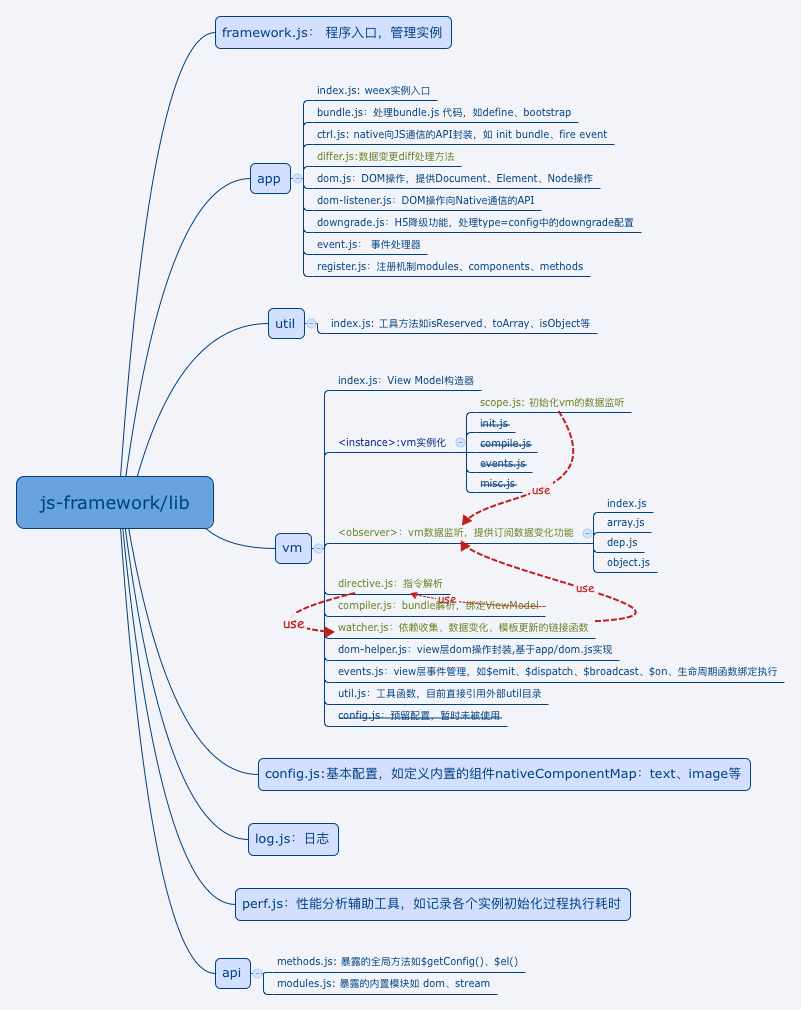
阅读js-framework代码,我整理了一份思维导图。
framework.js是Instance创建的入口,可以从这个文件开始自顶向下地阅读代码,了解其工作原理。可以重点理解它的DOM结构,初始化过程,数据更新过程,下面我也将从这几个方面进行描述。
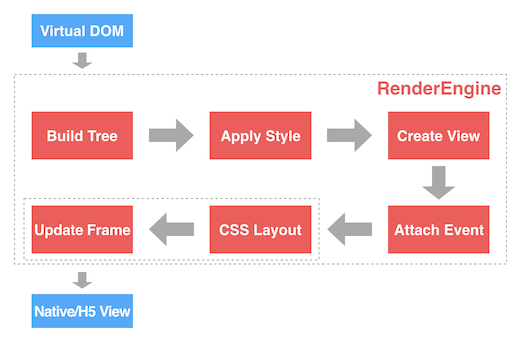
Weex的DOM结构由Document、Element、Comment三类组成。Element创建普通节点,Comment用于创建frag block节点。每个节点都有一个唯一的ref值,可以很方便地在文档中被查询到,同时记录其父节点parentRef,通过这种’双向链表‘的操作可以方便进行节点拼接和获取。文档树节点Document记录整个DOM的结构,同时在Document上绑定EventManager事件处理器和Listener监听操作处理器。EventManager记录每个绑定了事件的节点和它对应的事件处理函数,提供事件的添加、删除和触发。Listener提供了dom操作转化为callNative的能力,通过将每一个操作转化为对应类型的actions,如createBody、addElement,并将每一个actions记录updates数组。
Weex复用了 Vue.js 的数据监听和依赖收集的代码实现。通过observer、directive、watcher之间的协作,建立数据(Model)和视图(View)的关联关系:
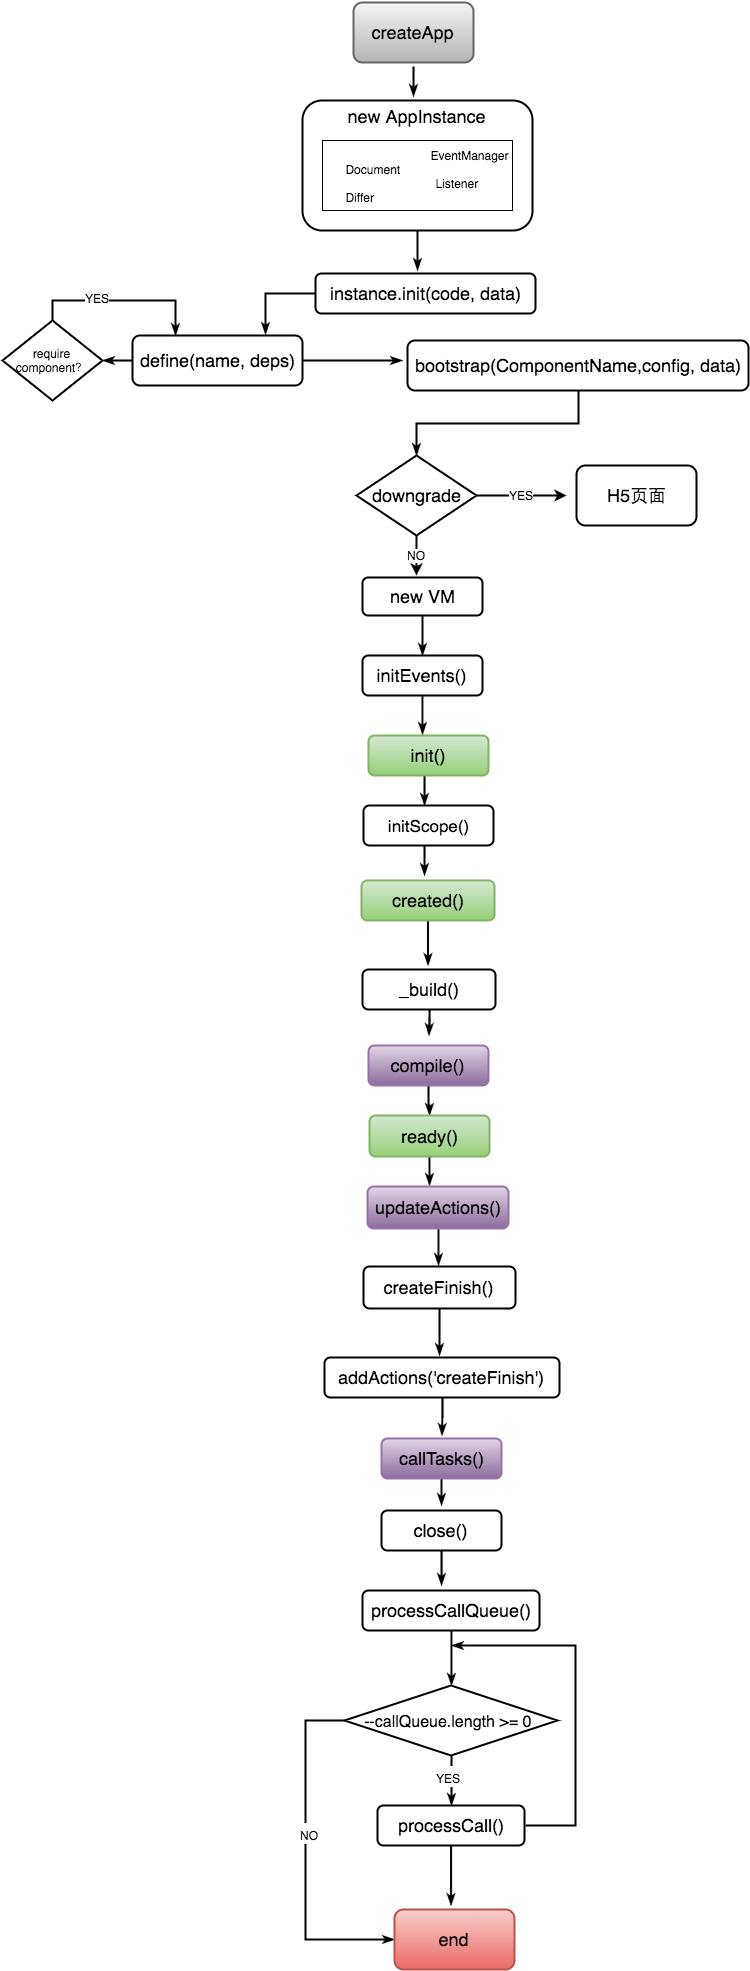
当我们在浏览器中输入我们的bundle地址,其解析渲染为HTML过程大致可以分解为createInstance->initInstace->run bundle->define->boostrap->create Vm->生命周期函数。可细化为下面这些步骤:
initInstance: 根据webpack打包后的js代码来定义实例。
define: 解析代码中的__weex_define__("@weex-component/bottom-bar")定义的component,包含依赖的子组件。并将component记录到customComponentMap[name] = exports数组中,维护组件与组件代码的对应关系。由于会依赖子组件,因此会被多次调用。

bootstrap:解析代码中的__weex_bootstrap__("@weex-component/30d1c553f95b5f87afb6a1cff70a7bbd")执行当前页面,提取customComponentMap中记录的组件代码进行初始化。只会执行一次。
downgrade: 检测页面降级配置进行页面降级。
initEvents: 绑定events和lifecycle(init、create、ready)执行的钩子。
initScope: 执行initData()、initComputed、initMethods。初始化data、computed属性和methods,并进行data的observer监听。
build: 根据预留选项opt.replace进行编译,目前该选项还未被实质使用。编译完成后执行ready的钩子命令,执行ready。
compile: 编译视图。
updateActions: 检测是否有数据更新需要执行。
createFinish: 表明dom结构创建完成,想callQueue队列中添加一个'createFinish'的actions。
processCallQueue: 依次执行队列中的actions,进行节点渲染到页面的过程,为了性能考虑,通过requestAnimationFrame进行分帧渲染。

通过初始化过程我们可以得到init -> 数据监听 -> created -> 视图生成 -> ready,为了避免重复的视图操作,可在init进行数据的获取,created阶段进行数据的赋值和修改。
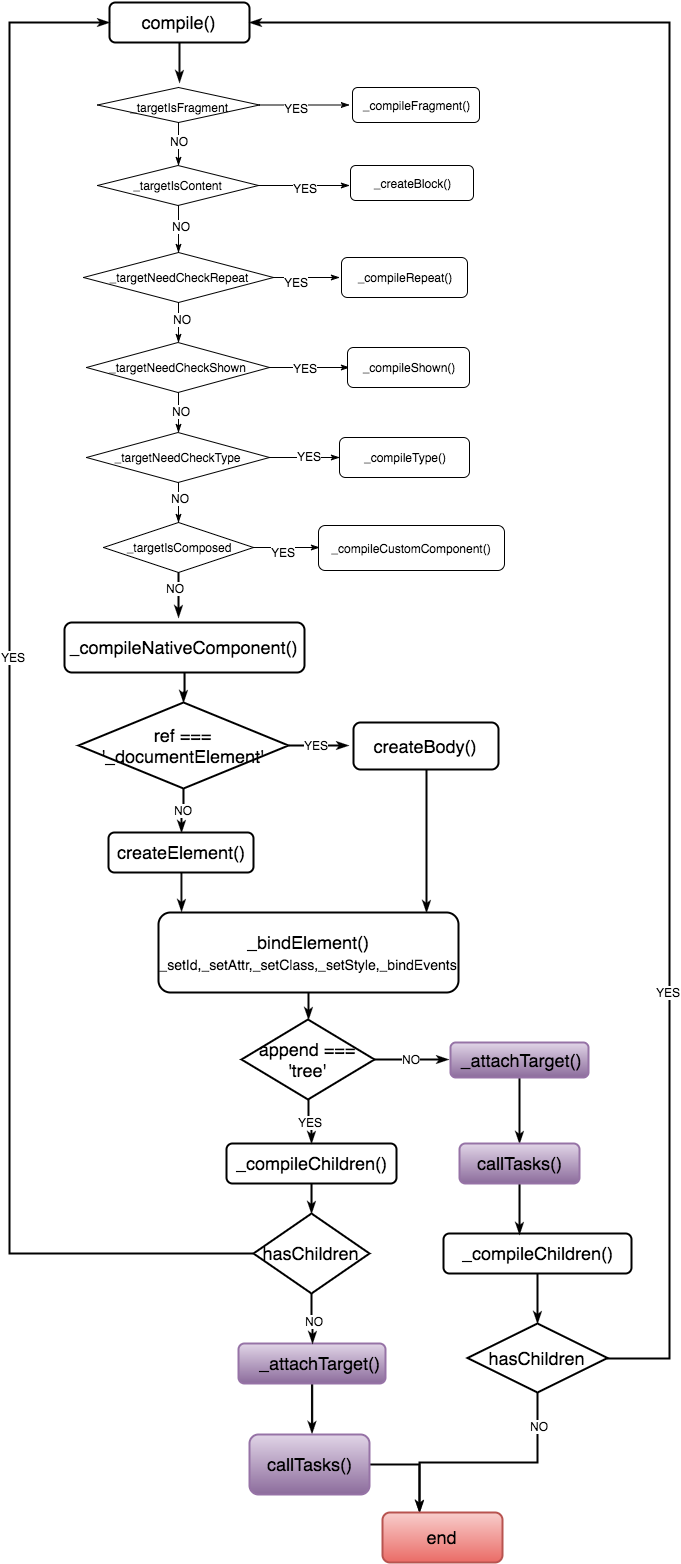
首先根据tagert的type类型选择不同的编译方式:数组类型、content类型(占位,可参考special-element)、repeat元素、if元素、function类型元素、子组件元素、内置定义的元素。内置元素类型可在config.js中查看,目前是text、image、container、slider、cell。以内置元素的编译为例,进行body和element节点的编译。在编译的时候会解析节点的attr、class、style、events指令,并进行监听。
从上图可知,weex提供了两种append方式:tree、node。
| 1个文本节点 | 第1次 | 第2次 | 第3次 | 第4次 | 第5次 | 平均 |
|---|---|---|---|---|---|---|
| tree | 8ms | 10ms | 12ms | 9ms | 10ms | 9.8ms |
| node | 10ms | 9ms | 9ms | 9ms | 9ms | 9.2ms |
| 20个文本节点 | 第1次 | 第2次 | 第3次 | 第4次 | 第5次 | 平均 |
|---|---|---|---|---|---|---|
| tree | 17ms | 18ms | 18ms | 16ms | 18ms | 17.4ms |
| node | 18ms | 17ms | 21ms | 17ms | 18ms | 18.2ms |
| 50个文本节点 | 第1次 | 第2次 | 第3次 | 第4次 | 第5次 | 平均 |
|---|---|---|---|---|---|---|
| tree | 32ms | 28ms | 26ms | 27ms | 27ms | 28ms |
| node | 30ms | 29ms | 34ms | 33ms | 31ms | 31.4ms |
| 100个文本节点 | 第1次 | 第2次 | 第3次 | 第4次 | 第5次 | 平均 |
|---|---|---|---|---|---|---|
| tree | 44ms | 41ms | 37ms | 37ms | 44ms | 40.6ms |
| node | 46ms | 44ms | 41ms | 44ms | 43ms | 43.6ms |
attachTarget: 进行节点渲染的时候,将每个append动作细化为具体的actions,置入callQueue队列中。
updateActions: 检测是否有diff,如果有,则执行diff中记录的task
callTasks: 调用callNative,根据执行状态判断是否执行callQueue列表中的人物或者置入callQueue队列中。
执行click事件,其中修改了data数据值,执行顺序如下:
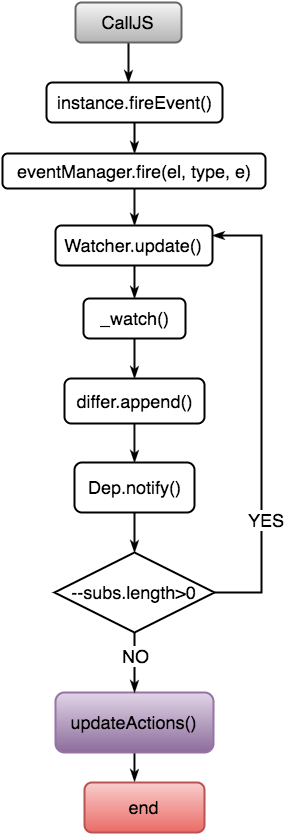 CallJS响应事件、接受事件,通过eventManager获得事件目标响应函数并fire执行,通过Watcher监听数据修改,如果数据前后不等则将修改更新操作记入diff中,同时通知订阅它的依赖继续收集更新操作。最终执行updateActions完成数据更新操作。 # 总结通过上文分析,可以认为:
以上是个人拙见,本文中描述不正确的地方欢迎指正~
Weex 的最棒的一个部分是 Native Runtime。你的 .we 文件可以使用 weex-toolkit CLI 在浏览器中预览 Web 效果,也可以通过 Weex Playground App 这样一个单独的应用来预览原生效果。不仅如此,Weex playground App 还内置了大量的 Demo 和展示案例,这样你就可以更加容易地体验到 Weex 在 Native 层面的效果了。
Playground App 的 Android 版可以在这里下载。iOS 版可在 AppStore 下载。
截图:
上图就是 Weex Playground App 的主界面,点击列表中的每一项即可进入某个 Demo 或者展示案例。用 Weex toolkit CLI 生成二维码,用 Weex Playground App 扫描二维码(点击右上角图标即可开始扫描)可以预览你的文件。
请参阅 Weex 快速上手教程。
新版中文网站及文档已经上线,请访问 https://weex-project.io/cn/ , 此处后续不再维护,谢谢理解。
经常我们会发现很多可复用的 weex 文件,这时候可以封装成 weex 组件。我们可以直接创建一个名为foo.we的文件,<foo>就是组件名。
<!-- foo.we -->
<template>
  <container style="flex-direction: row;">
    <image src="{{image}}"></image>
    <text>{{title}}</text>
  </container>
</template>
<script>
  module.exports = {
    data: {
      title: null,
      image: null
    }
  }
</script>
foo.we 的也包含 <template>,<style> 和 <script>,定义好了后,直接用<foo>标签即可, 注意这里bar.we和foo.we是在同目录下哦,如下:
<!-- bar.we -->
<template>
  <foo title="..." image="..."></foo>
</template>
封装好的组件也支持嵌套,如下:
<!-- somepath/foo.we -->
<template>
  <container style="flex-direction: row;">
    <image src="{{image}}"></image>
    <text>{{title}}</text>
  </container>
</template>
<script>
  module.exports = {
    data: {
      // 这几个 key 必须明确写好,不论是上层数据传递下来还是内部修改数据才会被正常监听
      title: null,
      image: null
    }
  }
</script>
<!-- somepath/foo.list.we -->
<template>
  <container>
    <text>{{description}}</text>
    <foo repeat="{{list}}" title="{{text}}" image="{{img}}"></foo>
  </container>
</template>
<script>
  module.exports = {
    data: {
      description: '',
      // 因为上层组件会通过 list 向下传递数据,所以这里需要把字段明确写好
      list: []
    }
  }
</script>
<!-- somepath/main.we -->
<template>
  <foo-list list="{{list}}"></foo-list>
</template>
<script>
  module.exports = {
    data: {
      list: [
        {text: '...', img: '...'},
        {text: '...', img: '...'},
        {text: '...', img: '...'},
        ...
      ]
    }
  }
</script>
main.we嵌套了<foo-list>, <foo-list>嵌套了<foo>。
<style>id 属性,可以通过this.$vm(id)来访问子组件的上下文,并可以通过this.$el(id)来找节点。更多详见【如何找节点】data 选项中明确写明的 key 才会被数据监听,不论是基于上层数据传递下来的场景还是内部修改数据的时候下一篇:如何找节点
新版中文网站及文档已经上线,请访问 https://weex-project.io/cn/ , 此处后续不再维护,谢谢理解。
所有的 weex 标签都有以下的基本属性。
id="logo"
id="item-{{index}}"
id 是一个 weex 标签在 <template> 下的唯一标识符。你可以使用 id 属性来引用对应的 weex 标签。
style="width: 200; height: 200"
style="padding: {{x}}; margin: 0"
为 weex 标签增加内联样式。
class="button"
class="button {{btnStatus}}"
为 weex 标签增加类别。
repeat="{{items}}"
以 {{items}} 作为循环项,迭代地生成当前的 weex 标签。
if="{{opened}}"
{{opened}} 返回一个 boolean 值。若为 true,则显示当前标签;否则不显示。
append="tree/node"
append 属性的可选值为 tree 或 node。不同的值会走不同的渲染过程。
onclick="gotoDetail"
onappear="loadMore"
为当前 weex 标签注册事件处理函数。
weex 遵循 HTML attribute 命名规范,所以 不要在属性中使用驼峰风格(CamelCase),使用 - 连接符的 羊肉串风格(kebab-case)才是正确的打开方式。
本文档已迁移至 https://weex-project.io/cn/references/common-style.html , 此处不再维护,谢谢。
所有 weex 标签都有以下基本样式规则。
weex 盒模型基于 CSS 盒模型,每个 weex 元素都可视作一个盒子。我们一般在讨论设计或布局时,会提到「盒模型」这个概念。
元素实际的内容(content)、内边距(paddings)、边框(borders)、外边距(margins),形成一层层的盒子包裹起来,这就是盒模型大体上的含义。
注意:目前在 <image> 和 <text> 组件上尚无法只定义一个或几个角的 border-radius。比如你无法在这两个组件上使用 border-top-left-radius。
weex 盒模型的 box-sizing 默认为 border-box,即盒子的宽高包含内容、内边距和边框的宽度,不包含外边距的宽度。
示例:
<template>
  <div>
    <image src="..." style="width: 400; height: 200; margin-left: 20;"></image>
  </div>
</template>weex 布局模型基于 CSS 的 Flexbox。以便所有页面元素的排版能够一致可预测,同时页面布局能适应各种设备或者屏幕尺寸。
Flexbox 包含 flex 容器和 flex 成员项。如果一个 weex 元素可以容纳其他元素,那么它就成为 flex 容器。需要注意的是,flexbox 的老版规范相较新版有些出入,比如是否能支持 wrapping。这些都描述在 W3C 的工作草案中了,你需要注意下新老版本之间的不同。另外,老版本只在安卓 4.4 版以下得到支持。
在 weex 中,Flexbox 是默认且唯一的样式模型,所以你不需要手动为元素添加 display: flex; 属性。
flex-direction: row | columncolumn,即从左到右、从上到下。justify-content: flex-start | flex-end | center | space-betweenflex-start 是默认值,即左对齐,所有的 flex 成员项都排列在容器的前部;flex-end 则意味着右对齐,成员项排列在容器的后部;center 即中间对齐,成员项排列在容器中间、两边留白;space-between 表示两端对齐,空白均匀地填充到 flex 成员项之间。
align-items: stretch | flex-start | center | flex-endstretch 是默认值,即拉伸高度至 flex 容器的大小;flex-start 则是上对齐,所有的成员项排列在容器顶部;flex-end 是下对齐,所有的成员项排列在容器底部;center 是中间对齐,所有成员项都垂直地居中显示。
flex: 1,那么它们就有相等的宽度(水平排列)或者相等的高度(垂直排列)。如果一共有两个成员项,其中一个 flex: 1,另一个 flex: 2,那么第一个将占据 1/3 的空间,另一个占据 2/3。如果所有 flex 成员项都不设置 flex 属性,它们将根据容器的 justify-content 属性来决定如何排列。一组平分了容器的图片。
<template>
  <div style="width: 300; height: 100;">
    <image src="..." style="flex: 1;"></image>
    <image src="..." style="flex: 1;"></image>
    <image src="..." style="flex: 1;"></image>
  </div>
</template>
一张固定宽度的图片加上一段流动布局的文本。
<template>
  <div style="width: 300; height: 100;">
    <image src="..." style="width: 100; height: 100;"></image>
    <text style="flex: 1;">...</text>
  </div>
</template>
复杂的混合布局。
<template>
  <div style="width: 100;">
    <image src="..." style="width: 100; height: 100;"></image>
    <div style="flex-direction: row;">
      <text style="flex: 2; font-size: 32;">title</text>
      <text style="flex: 1; font-size: 16;">$100</text>
    </div>
  </div>
</template>
一段文本左对齐,其他内容右对齐。
<template>
<div style="flex-direction: row; justify-content: space-between;">
   <text>WEEX</text>
   <text>2016-05-08</text>
</div>
</template>我们可以使用以下属性来定位一个 weex 元素。
position: relative | absolute | fixed | stickyrelative 是默认值,指的是相对定位;absolute 是绝对定位,以元素的容器作为参考系;fixed 保证元素在页面窗口中的对应位置显示;sticky 指的是仅当元素滚动到页面之外时,元素会固定在页面窗口的顶部。top: <number>bottom: <number>left: <number>right: <number><template>
<div style="flex-direction: column;">
<div style="height: 3000;">
<image src="..." style="top: 50; left: 50; ..."></image>
</div>
<div style="height: 3000;">
<image src="..." style="position: sticky; ..."></image>
</div>
<div style="height: 3000;">
<image src="..." style="position: absolute; top: 50; left: 50; ..."></image>
</div>
</div>
</template>opacity: <number>background-color: <colors>transparent。px 作为单位,px 也可以省略。rgb(255, 0, 0));RGBA(rgba(255, 0, 0, 0.5));十六进制(#ff0000);精简写法的十六进制(#f00);色值关键字(red)。注意: 色值的关键字列表。
你可以按照以下步骤来规划 weex 页面的样式。
0.4
子组件能通过 this.$dispatch([String type], [Object detail]) 方法向父组件传送数据。第一个参数代表数据类型(个人理解应该是叫通信事件名更好理解) , 第二个参数则是数据对象。如果子组件的某个父组件通过$on([String type], [Function callback])方法注册了一个相同名字的属性监听,那么callback函数将得到一个参数对象,并且参数对象的detail属性值为子组件传递出来的数据对象。
eg:
<we-element name="foo">
  <template>
    <div>
      <image src="{{imageUrl}}" onclick="test"></image>
      <text>{{title}}</text>
    </div>
  </template>
  <script>
    module.exports = {
      data: {
        title: '',
        imageUrl: ''
      },
      methods: {
        test: function () {
          this.$dispatch('notify', {a: 1})
        }
      }
    }
  </script>
</we-element>

<template>
  <foo title="..." image-url="..."></foo>
</template>

<script>
  module.exports = {
    created: function () {
      this.$on('notify', function(e) {
        //  当图片元素<foo>被点击时,触发回调函数
        // e.detail 值为  `{a: 1}`
      })
    }
  }
</script>
父组件能通过this.$([String id]) 获取子组件的上下文,你能通过这个上下文对象修改子组件相关信息。
eg:
<we-element name="foo">
  <template>
    <div>
      <image src="{{imageUrl}}"></image>
      <text>{{title}}</text>
    </div>
  </template>
  <script>
    module.exports = {
      data: {
        title: '',
        imageUrl: ''
      },
      methods: {
        setTitle: function (t) {
          this.title = t
        }
      }
    }
  </script>
</we-element>

<template>
  <div>
    <text onclick="test">click to update foo</text>
    <foo id="fooEl" title="..." image-url="..."></foo>
  </div>
</template>

<script>
  module.exports = {
    methods: {
      test: function (e) {
        var foo = this.$('fooEl')
        foo.setTitle('...')
        foo.imageUrl = '...'
      }
    }
  }
</script>
父组件能通过this.$broadcast([String type], [Object detail]) 方法像所有的子组件分发消息。
<we-element name="bar">
  <template>
    <div>
      <image src="{{imageUrl}}"></image>
    </div>
  </template>
  <script>
    module.exports = {
      data: {
        imageUrl: ''
      },
      created: function() {
        var self = this
        this.$on('changeImage', function(e) {
          self.imageUrl = e.detail.imageUrl
        })
      }
    }
  </script>
</we-element>

<we-element name="foo">
  <template>
    <div>
      <bar></bar>
      <text>{{title}}</text>
    </div>
  </template>
  <script>
    module.exports = {
      data: {
        title: ''
      },
      created: function() {
        var self = this
        this.$on('changeTitle', function(e) {
          self.title = e.detail.title
        })
      }
    }
  </script>
</we-element>

<template>
  <div>
    <text onclick="test">click to update foo</text>
    <foo></foo>
    <foo></foo>
  </div>
</template>

<script>
  module.exports = {
    methods: {
      test: function (e) {
        this.$broadcast('changeTitle', {
          title: '...'
        })
        this.$broadcast('changeImage', {
          imageUrl: '...'
        })
      }
    }
  }
</script>
兄弟组件能通过父组件作为桥梁进行通信。
<we-element name="foo">
  <template>...</template>
  <script>
    module.exports = {
      methods: {
        callbar: function () {
          this.$dispatch('callbar', {a: 1})
        }
      }
    }
  </script>
</we-element>

<we-element name="bar">
  <template>...</template>
  <script>
    module.exports = {
      created: function() {
        this.$on('callbar', function(e) {
          // e.detail.a
        })
      }
    }
  </script>
</we-element>

<template>
  <div>
    <foo></foo>
    <bar></bar>
  </div>
</template>

<script>
  module.exports = {
    created: function () {
      var self = this
      this.$on('callbar', function(e) {
        self.$broadcast('callbar', e.detail)
      })
    }
  }
</script>
| 功能 | [email protected] | [email protected] |
|---|---|---|
require('*.js') js 文件 |
✓ | ✓ |
require('*') npm 包 |
✓ | ✓ |
require('*.we') 自定义组件 |
✓1 | ✓ |
| 自动依赖同目录同名自定义组件 | ✓ | ✓ |
<element name="*"> 标签 |
✓ | ✓2 |
在 *.we 文件里 require('@weex-module/xxx') |
✓ | ✓ |
在 *.js 文件里 require('@weex-module/xxx') |
✗3 | ✗3 |
角标解释:
(1) v0.2.1 及以上版本支持
(2) v0.1.5 及以上版本支持
(3) 可以使用一个临时黑魔法达到相同的目的:
// 在 js 文件里原本无法找到 Weex native module 对象
// 这段代码只供临时使用
// 用来找到 Weex native module 对象
var modal
__weex_define__('@weex-temp/x', function (__weex_require__) {
  modal = __weex_require__('@weex-module/modal')
})

// 可以在任意位置调用该 native module APIs
modal.toast({message: 'hello'})本文档已迁移至 https://weex-project.io/cn/guide/integrate-to-your-app.html , 此处不再维护,谢谢。
导入Weex iOS SDK 到你已有的项目, 如果没有,可以参考新建项目
在继续下面内容之前,确保你已有的项目目录有名称为Podfile文件,如果没有,创建一个,用文本编辑器打开
集成framework
WeexSDK 在cocoaPods 上最新版本 可以在这获取
在 Podfile文件中添加如下内容
```
  source '[email protected]:CocoaPods/Specs.git'
  #或者使用 source 'https://github.com/CocoaPods/Specs.git'
     target 'YourTarget' do
         platform :ios, '7.0'
         pod 'WeexSDK', '0.9.5'   ## 建议使用WeexSDK新版本
     end
  ```
源码集成
ios/sdk目录到你已有项目目录(此处以拷贝到你已有项目的根目录为例子)Podfile文件中添加 source '[email protected]:CocoaPods/Specs.git'
# 或者使用 source 'https://github.com/CocoaPods/Specs.git'
target 'YourTarget' do
platform :ios, '7.0'
pod 'WeexSDK', :path=>'./sdk/'
end
打开命令行,切换到你已有项目Podfile这个文件存在的目录,执行 pod install,没有出现任何错误就已经完成环境配置
初始化 Weex 环境
在AppDelegate.m 文件中做初始化操作,一般会在 didFinishLaunchingWithOptions方法中如下添加
//business configuration
[WXAppConfiguration setAppGroup:@"AliApp"];
[WXAppConfiguration setAppName:@"WeexDemo"];
[WXAppConfiguration setAppVersion:@"1.0.0"];

//init sdk enviroment
[WXSDKEngine initSDKEnviroment];

//register custom module and component,optional
[WXSDKEngine registerComponent:@"MyView" withClass:[MyViewComponent class]];
[WXSDKEngine registerModule:@"event" withClass:[WXEventModule class]];

//register the implementation of protocol, optional
[WXSDKEngine registerHandler:[WXNavigationDefaultImpl new] withProtocol:@protocol(WXNavigationProtocol)];

//set the log level
[WXLog setLogLevel: WXLogLevelAll];
渲染 weex Instance
Weex 支持整体页面渲染和部分渲染两种模式,你需要做的事情是用指定的URL渲染weex的view,然后添加到它的父容器上,父容器一般都是viewController
#import <WeexSDK/WXSDKInstance.h>
- (void)viewDidLoad
{
    [super viewDidLoad];

    _instance = [[WXSDKInstance alloc] init];
    _instance.viewController = self;
    _instance.frame = self.view.frame;

    __weak typeof(self) weakSelf = self;
    _instance.onCreate = ^(UIView *view) {
        [weakSelf.weexView removeFromSuperview];
        [weakSelf.view addSubview:weakSelf.weexView];
    };

    _instance.onFailed = ^(NSError *error) {
        //process failure
    };

    _instance.renderFinish = ^ (UIView *view) {
        //process renderFinish
    };
    [_instance renderWithURL:self.url options:@{@"bundleUrl":[self.url absoluteString]} data:nil];
}
WXSDKInstance 是很重要的一个类,提供了基础的方法和一些回调,如 renderWithURL,onCreate,onFailed等,可以参见 WXSDKInstance.h的声明
3. 销毁Weex Instance
在 viewController的 dealloc 阶段 销毁掉weex instance, 释放内存,避免造成内存泄露
- (void)dealloc
{
    [_instance destroyInstance];
}
可以通过源码编译出Weex SDK,可以在新的feature 或者bugfix 分支,尝试最新的feature
参考此处直接导入weexSDK
引用代码: var test = require('./common.we'); test.methods.test();
common.we中的代码:
请问该怎么修改,我用weex test.we 编译,如何查看我使用的是那个版本的weex-toolkit,本机已安装[email protected]
本文档已迁移至 https://weex-project.io/cn/references/components/input.html ,此处不再维护,谢谢。
input 标签用于创造一个从用户那边获取数据的交互动作。渲染一个特定的图片,并且它不能包含任何子组件。input组件的效果变化依赖于变量类型的属性设置,比如text,password,url,email,tel等。
注意: width和height需要指定,否则会不工作。
注释:input不支持普通的点击事件click.请使用监听input或change事件代替。
这个组件不支持子组件。
type:<字符串>属性,控制组件显示的类型。如果没有特定,默认值是text。可以设置的值有:text,password,tel,email,url等,和w3c标准一致。value:<字符串>属性,控制组件的值。disabled:<布尔值>属性,用于使得组件不可用。实际使用中,click事件在有disabled属性值在的情况下不会执行。autofocus:<布尔值>属性,让你可以设置当页面加载时,input是否自动获取焦点。其他属性请查阅基本属性
placeholder-color : 占位符的颜色,默认是#999999。文本样式: 请查阅文本样式
color样式。font-size样式。font-style样式。font-weight样式。text-align样式。基础样式请查阅组件的基础样式
position 相关属性opacity,background-color 等。input:该元素改变的值change:改变事件是当组件提交的值已经改变的时候用户中断结果。经常跟在事件之后。focus:组件获取焦点。blur:组件失去焦点。基本事件:查阅基本事件
appear / disappear 事件。查阅基本事件注意:input不支持基础事件click.请用监听事件input或者change事件代替。
input和change事件:
value:组件事件发出的值。focus和blur事件:
<div>
  <input
    type="url"
    autofocus="true"
    placeholder="..."
    value="http://alibaba.github.io/weex/"
    style="placeholder-color: #666666;">
  </input>
</div>
1.为什么不遵循w3c标准,生成出来的html结果都是div+span,毫无语义化
2.如何使用字体图标,而不是图片
3.很多css的选择器无法使用,调样式的难度大大提高了
4.用绝对定位或固定定位时,如何让div居中,left,top,bottom,right这些的值用不了百分比
本文中的链接多指向目前“内测”阶段的Weex Github仓库
如访问时页面显示"404", 请移步至  http://alibaba.github.io/weex/  提交内测申请
Weex于 2016年4月21日在北京QCon大会上宣布开源并同时上线开源站点 已近一月。对于技术同学来说,”开源”一词肯定经常听闻,不少同学还是知名或低调的开源项目的参与者或创建者。 但这次“Weex开源”第一次让我们一个技术团队集体参与到开源项目中来, 其中经历,心得和收获我想无论是对于参与其中的同学,兄弟技术团队乃至业界都是有价值的。 希望本次和其后的记录能给大家带来帮助.
看多了不少“晒代码后撂下不管”式的开源项目 , 也观摩了很多代码质量,开发过程,社区活跃情况皆优的开源项目。同时,Weex又已经在内部开发了近一年时间,并已运用于多个关键阿里产品里。 出于对“开源”和公司“数据安全”的敬畏, 我们决定采用以下三步走的策略来推进开源过程.
我们目前处于第二阶段 , 对Weex感兴趣的同学请访问 http://alibaba.github.io/weex/ 提交你的个人邮箱和Github ID, Weex项目组期待与你在Github相会。
开源首月,截至至2016/05/12, 一共有3414位用户向我们提交了内测申请, 我们分11批邀请了其中信息较为完整 (有工作/组织信息,有GithubID ,GithubID有活跃记录) 的1962位用户成为我们的Github “Collaborator”, 月内,这些最早的Weex外部种子用户一共给我们提交了130项Github Issue 。某种程度上,这些Issue可以看做业界对Weex的第一印象,项目组同学们对此非常重视,在每一项Issue下面热情的为提出Issue的同学答疑解惑, 目前已有92项Issue得到了解决。
Github Issue 除了作为“技术支持”的渠道, 同时也是借助社区力量帮助Weex完善的平台。
通过这些Issue,有同学指出我们文档中的typo ; 有同学给我们提了组件完善建议;有同学甚至研究了我们的底层渲染策略后给出了可行的改进建议; 有同学通过Issue宣传自己的Weex技术交流QQ群 ; 当然,也有这样让列表气氛欢乐起来,最后不得不锁帖的Issue。
在自身的改进之外,作为一款UI框架,我们最期待用户能通过Weex做出新的,超出我们预计的App或Demo , 首月内,我们看到了内测参与同学的回应 , 虽然略显简单,但Weex项目组同学非常珍视,因为这令我们想起了改变世界的Web最初的时候,质朴中蕴含着无限的可能.
可视化直观呈现开发过程数据是Github吸引开发者的一大特性, 通过下面的图表可以直观的看出在Weex开源首月,一共有25位同学在Weex Github仓库进行了401次提交和98次分枝间的Pull Request.
具体的变更记录可以在这里查看, 为了保证工程质量,同时让新开发者参与Weex项目更容易,我们参考了多个开源项目后制定了关于 Commit Log 和 Branch Name的格式规范. 每个内测期受邀的用户,都会在代码库赋权通知邮件中被强调在开始参与Weex前需要学习并遵守这些规范。
本月之内的工作多是完善,改进和优化。 内置组件中新增了移动应用中常见的Navigation Bar和Tab Bar , List组件也添加了很多同学期待已久的"pull to refresh"特性。WeexDSL语法也有所增强, 马上同学们就能使用起 require/ inline event / require / compute等让你写we时更趁手一些的新语法。
完整的Change Log, 我们会在随后两天内和Weex 0.5版一起在Github上发布.
Weex的代码组织结构在开源前发生了一次较大的变化, 在Github提交前,我们把内部的10多个仓库中的内容合并到一个主仓库中. 这样做的好处是可以方便外部用户更快上手同时汇聚社区关注. 但为项目组也带来了不小的工程负担, 原来可以在不同仓库中分而治之的Android ,iOS, Javascript团队现在需要在一个仓库中协作. 每个部分都有独立的构建过程,同时又需要协调一致.
我们初步的解决思路是让不同的功能团队在不同的分枝中进行开发,功能完成后再合并到主分枝。
虽然在同一个库中,Weex不同部分依赖形式各不相同,有基于代码的依赖,有基于构建产出的依赖。 为了修复问题,某个分枝会产生紧急变更,独立构建版本提供给Weex用户. 面对这样的情况, 我们最初较为简单的分枝策略经历几次迭代就显现出局限性了,功能分枝合并时都每每遇到各种问题.
为了应对这种情况,我们把分枝策略进行了升级。 最新的策略如下图所示
master
 ↑
dev         <--- PR(hotfix/typo)
 ↑ PR
daily       <--- CI
 ↑ merge/PR
{domain}    <--- PR(feature/bugfix)
 ↑ merge/PR
{domain}-feature-{date}
我们希望通过多层次的分枝结合CI , 能应付后续更复杂的代码管理情景.
Weex目前只开源了Android部分, 我们知道对于想尝试基于Weex跨终端开发的同学这是仓促不周的,当前,Weex 开源团队正在全力准备. 预计到6月底iOS渲染器就会和HTML5渲染器,功能更丰富的命令行工具一起“准备好行头"来到Github和大家相见.
后续,我们会根据大家在Github Issue 列表里的讨论,把一些有共性的问题汇总,通过文档或Blog做答。也欢迎大家尝试把自己的Weex使用体验,对Weex的所思所想记录成文投递给我们, 让这里的文章更加丰富,让其他用户学到新知识, 让Weex开源社区成为一个更好的地方.
新版中文网站及文档已经上线,请访问 https://weex-project.io/cn/ , 此处后续不再维护,谢谢理解。
你可以在组件的方法中通过 this (Vm)上下文访问这些 API。
例子:
<script>
module.exports = {
    methods: {
        somemethod: function() {
            this.$vm('someId');
        }
    }
}
</script>不建议使用,请使用 $vm 代替。
返回对应 id 的元素对象的引用。
id (string): 唯一标识符。返回对应 id 的 vm 对象引用。
id (String): 唯一标识符。vm (Vm): 一个 Vm 对象引用。获取当前全局环境变量和配置信息。
config (object): 配置对象;bundleUrl (string): bundle 的 url;debug (boolean): 是否是调试模式;env (object): 环境对象;
weexVersion (string): Weex sdk 版本;appName (string): 应用名字;appVersion (string): 应用版本;platform (string): 平台信息,是 iOS、Android 还是 Web;osVersion (string): 系统版本;deviceModel (string): 设备型号 (仅原生应用);deviceWidth (number): 设备宽度,默认为 750;deviceHeight (number): 设备高度。不建议使用,请使用 require('@weex-module/module')[method](...args) 代替。查看更多信息:modules。
新版中文网站及文档已经上线,请访问 https://weex-project.io/cn/ , 此处后续不再维护,谢谢理解。
Weex页面页面由<template>,<style>,<script>三个部分构成。
<template>: 必须的, 使用类HTML的语法描述页面结构,内容由多个标签组成,不同的标签代表不同的组件。<style>: 可选的, 使用类CSS的语法描述页面的具体展现形式。<script>: 可选的 , 使用JavaScript描述页面中的数据和页面的行为,Weex中的数据定义也在<script>中进行。<template>
<!-- (required) the structure of page -->
</template>
<style>
/* (optional) stylesheet */
</style>
<script>
/* (optional) the definition of data, methods and life-circle */
</script><template> 中的标签组织类似如下代码:
<template>
  <container>
    <image style="width: 200; height: 200;" src="http://gtms02.alicdn.com/tps/i2/TB1QHKjMXXXXXadXVXX20ySQVXX-512-512.png"></image>
    <text>Alibaba Weex Team</text>
  </container>
</template>
container 标签是一个根节点,其下包含描述图片的 image标签和描述一段文字的 text 标签。
和HTML中类似,不同标签代表的元素/组件有各自的属性,其中一些组件还能有子组件.
根节点: 每个 template 标签中的最顶层标签,我们称为根节点。下面是目前我们支持的三种不同的根节点:
<container>: 普通根节点<scroller>: 滚动器根节点,适用于需要全页滚动的场景<list>: 列表根节点,适用于其中包含重复的子元素的列表场景目前Weex仅支持以上三种根节点
<style>你能把Weex中的样式语法理解为CSS的一个子集,两者有一些细微的区别
第一种写法是,你能在标签上,直接通过内联style属性编写样式. 第二种写法,通过标签中的class属性与style标签中定义的样式建立对应关系,让style标签中定义的样式作用于特定标签之上.
以下是例子:
<template>
  <container>
    <text style="font-size: 64;">Alibaba</text>
    <text class="large">Weex Team</text>
  </container>
</template>

<style>
  .large {font-size: 64;}
</style>上面的两个text组件都被设置了同样的字体大小,但分别用了两种不同的方式.
weex 遵循 HTML属性 命名规范 , 所以属性命名时 请不要使用陀峰格式(CamelCase) , 采用以“-”分割的long-name形式.
<script><script>中的代码遵循 JavaScript(ES5)语法. 描述页面中的数据和页面的行为。 下面是一个例子:
<template>
  <container>
    <text>The time is {{datetime}}</text>
    <text>{{title}}</text>
    <text>{{getTitle()}}</text>
  </container>
</template>

<script>
  module.exports = {
    data: {
      title: 'Alibaba',
      datetime: null
    },
    methods: {
      getTitle: function () {
        return 'Weex Team'
      }
    },
    created: function() {
      this.datetime = new Date().toLocaleString()
    }
  }
</script>上面<script>标签中定义了被赋值给 module.exports 的对象.其作用是让三个<text>标签显示当前时间,'Alibaba' 和 'Weex Team'. <script>中的data存储可以用于在<template>标签中进行数据绑定的数据, 当这些数据变更时,被进行了数据绑定的标签也会自动更新. 这些数据在<script>中的各个方法内可以通过this.x读写.
A declarative, efficient, and flexible JavaScript library for building user interfaces.
🖖 Vue.js is a progressive, incrementally-adoptable JavaScript framework for building UI on the web.
TypeScript is a superset of JavaScript that compiles to clean JavaScript output.
An Open Source Machine Learning Framework for Everyone
The Web framework for perfectionists with deadlines.
A PHP framework for web artisans
Bring data to life with SVG, Canvas and HTML. 📊📈🎉
JavaScript (JS) is a lightweight interpreted programming language with first-class functions.
Some thing interesting about web. New door for the world.
A server is a program made to process requests and deliver data to clients.
Machine learning is a way of modeling and interpreting data that allows a piece of software to respond intelligently.
Some thing interesting about visualization, use data art
Some thing interesting about game, make everyone happy.
We are working to build community through open source technology. NB: members must have two-factor auth.
Open source projects and samples from Microsoft.
Google ❤️ Open Source for everyone.
Alibaba Open Source for everyone
Data-Driven Documents codes.
China tencent open source team.