Here you should put a small summary of what is in this repo, why it is important, and explain a little on how the problem was solved.
If there are any versions of this readme in another languages, please link here. Exemple:
English | Portuguese
In this section, you will explain what is necessary and recommended to already have installed in order to use the program. Example:
Windows (Installer)
-
Install the python using the installer:
In order to install python, you will need to run the installer located on the python official website
In this section, you should start with the installation of the project itself. To maintain the repository well organized, you can also create various subsections breaking the installation process into smaller pieces to help in better understanding of the process.
If any part of the installation can be considered complex, adding images and GIFS can also help, especially when it is needed to find a button on an interface or to click on various settings in a menu following a specific order.
Example:
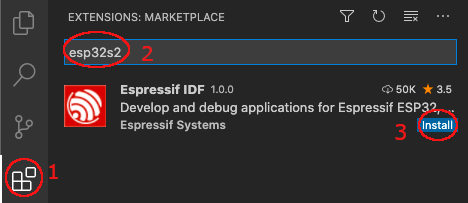
In the image above, you can easily understand which steps you should take and their order, but it is a good practice to explain the content in the image to make sure it will be understood correctly.
Cloning the repository
First things first, it is needed to clone the repository, which can be done by the following command:
git clone (repository url)Creating a build directory
Now, before you run the CMAKE, it is necessary to create a folder named build and then move to that folder. This can be done by using the following command:
mkdir build && cd buildCompiling the program
cmake ..In some parts of the installation, in which common mistakes can happen, it is recommended to use a warning explaining how things can go wrong and common mistakes that can be made. Example:
Warning: Be careful not to run the MAKEFILE while at superuser, it could break your OS.
Another recommendation is to put a simple compiling table with the parameters you can use to compile the program, for example:
| Command | Function |
|---|---|
| make clean | Delete the files created by the last compilation in the build folder |
| make | Compiles the program with the g++ compiler, the result is in the build folder |
| make run | Compiles and then executes the program in the build folder |
Before the installation, it is good to have a section to explain how to use the program in the way it was intended to be used, so explain which parameters it can receive, common inputs and their expected outputs, etc. If necessary, you can also create a Configuration section to better explain how to configure the program. Depending on the program, it is possible to create another section just to explain what are the package formats used and examples of messages with them being sent.
Example:
Firewall
-
Firewall
- Turn on Firewall?
- This helps protect your Mac from being attacked over the internet.
- Turn on logging?
- If there IS an infection, logs are useful for determining the source.
- Turn on stealth mode?
- Your Mac will not respond to ICMP ping requests or connection attempts from closed TCP and UDP networks.
-
General System Protection
- Enable Gatekeeper?
- Defend against malware by enforcing code signing and verifying downloaded applications before allowing them to run.
- Prevent automatic software whitelisting?
- Both built-in and downloaded software will require user approval for whitelisting.
- Disable Captive Portal Assistant and force login through browser on untrusted networks?
- Captive Portal Assistant could be triggered and direct you to a malicious site WITHOUT any user interaction.
- Enable Gatekeeper?
- Turn on Firewall?
Health message format
Every ten seconds, the gateway sends a health message to the broker. Through this message, it's possible to monitor certain aspects of the device's operation.
{
  "t": time_t,                        ///< Message timestamp
  "rssi": int8_t,                     ///< WiFi rssi
  "ssid": string,                     ///< WiFi ssid
  "ip": string,                       ///< Device IP
  "bsc": hdr_bsc_err_t,               ///< Ble Scanner Err Code
  "performance": float,               ///< Device Performance (Packets Received/Lost Ratio)
  "boot": uint16_t,                   ///< Boot count after last power up
  "reason": esp_reset_reason_t,       ///< Last reset reason
  "memory": uint16_t,                 ///< Free memory heap
  "lifetime": uint64_t                ///< Lifetime after last power up in minutes
}
The value of the "bsc" key can represent the following errors:
typedef enum hdr_bsc_err
{
    BSC_ERROR_NOERROR = 48,           ///< No error
    BSC_ERROR_UNEXPECTED_CMD = 49,    ///< Unexpected cmd received by nrf
    BSC_ERROR_UNKNOWN_CMD = 50,        ///< Unknown cmd received by nrf
    BSC_ERROR_RQMBUSY = 51,           ///< RQM is busy
    BSC_ERROR_UARTCOMM = 52,          ///< UART Communication error
    BSC_ERROR_UARTUFIFO = 53,         ///< UART FIFO overflow
    BSC_ERROR_ADVLOST = 54,           ///< ADV is lost
    BSC_ERROR_UNKNOWN_SEQ = 55,        ///< Unknown data sequence received by nrf
    BSC_ERROR_CNNT_TIMEOUT = 56,        ///< Connection timeout <DEPRECATED>
    BSC_ERROR_CNNT_OVERFLOW = 57,     ///< Connection overflow <DEPRECATED>
    BSC_ERROR_STARTUP = 58            ///< Error at Ble Scanner Startup
} hdr_bsc_err_t;
The value of the "reason" key can represent the following errors:
typedef enum {
    ESP_RST_UNKNOWN,    ///< Reset reason cannot be determined
    ESP_RST_POWERON,    ///< Reset due to power-on event
    ESP_RST_EXT,        ///< Reset by an external pin (not applicable for ESP32)
    ESP_RST_SW,         ///< Software reset via esp_restart
    ESP_RST_PANIC,      ///< Software reset due to exception/panic
    ESP_RST_INT_WDT,    ///< Reset (

software or hardware) due to interrupt watchdog
    ESP_RST_TASK_WDT,   ///< Reset due to task watchdog
    ESP_RST_WDT,        ///< Reset due to other watchdogs
    ESP_RST_DEEPSLEEP,  ///< Reset after exiting deep sleep mode
    ESP_RST_BROWNOUT,   ///< Brownout reset (software or hardware)
    ESP_RST_SDIO,       ///< Reset over SDIO
} esp_reset_reason_t;
Message example:
{
  "t": 1654689408,
  "rssi": -55,
  "ssid": "CABO CANAVERAL",
  "ip": "192.168.1.13",
  "bsc": 48,
  "performance": 99.16,
  "boot": 0,
  "reason": 1,
  "memory": 75272,
  "lifetime": 30
}
If the program can also communicate with any API, you can also create a section and put the information into it, with examples of a request and response from the API. Example:
Gateway API
It's possible to communicate with the device using the Gateway API that can be reached by a local HTTP client or an MQTT client connected to the same device broker.
To use this API on MQTT, publish requests to B2D/$companyId/$mac/$deviceId and subscribe
to C2B/$companyId/$mac/$deviceId/ackGtw to receive device responses.
POST /v1/hg/queue
{
    "id": 0,
    "timeout": 5000,
    "disabled": false,
    "ip": {
        "enabled": false,
        "ip": "",
        "netmask": "",
        "gw": "",
        "dns": ""
    }
}HTTP 200 OK
{
	"err": 0,
	"msg": "ESP_OK(0x0)"
}
