xiedacon / blog Goto Github PK
View Code? Open in Web Editor NEWmy blog
Home Page: http://www.xiedacon.com/
my blog
Home Page: http://www.xiedacon.com/


Given an array of integers A with even length, return true if and only if it is possible to reorder it such that A[2 * i + 1] = 2 * A[2 * i] for every 0 <= i < len(A) / 2.
Example 1:
Input: [3,1,3,6]
Output: false
Example 2:
Input: [2,1,2,6]
Output: false
Example 3:
Input: [4,-2,2,-4]
Output: true
Explanation: We can take two groups, [-2,-4] and [2,4] to form [-2,-4,2,4] or [2,4,-2,-4].
Example 4:
Input: [1,2,4,16,8,4]
Output: false
Note:
0 <= A.length <= 30000
A.length is even
-100000 <= A[i] <= 100000
Solution:
/**
 * @param {number[]} A
 * @return {boolean}
 */
const canReorderDoubled = function(A) {
  const res = [];
  const both = [];
  const map = {};

  for (let i = 0; i < A.length; i++) {
    map[A[i]] = (map[A[i]] || 0) + 1;
  }

  for (let i = 0; i < A.length; i++) {
    const a = A[i];
    if (map[a] && map[a / 2] && map[a * 2]) {
      both.push(a);
    } else if (map[a] && map[a / 2]) {
      map[a / 2]--;
      map[a]--;

      res.push(a / 2, a);
    } else if (map[a] && map[a * 2]) {
      map[a * 2]--;
      map[a]--;

      res.push(a, a * 2);
    }
  }

  for (let i = 0; i < both.length; i++) {
    const a = both[i];
    if (map[a] && map[a / 2]) {
      map[a / 2]--;
      map[a]--;

      res.push(a / 2, a);
    } else if (map[a] && map[a * 2]) {
      map[a * 2]--;
      map[a]--;

      res.push(a, a * 2);
    }
  }

  return res.length === A.length;
};
/**
* @param {number[]} A
* @return {boolean}
*/
const canReorderDoubled = function(A) {
const map = {};
for (let i = 0; i < A.length; i++) {
const val = Math.abs(A[i]);
map[val] = (map[val] || 0) + 1;
}
for (const i in map) {
const j = i * 2;
if (i == '0') {
if (map[i] % 2 !== 0) return false;
map[i] = 0;
} else if (map[i] && map[j]) {
map[j] -= map[i];
map[i] = 0;
}
}
for (const i in map) if (map[i]) return false;
return true;
};网上介绍原型链的优质文章已经有很多了,比如说:
作为补充,就让我们换个角度,从实现来分析一下吧
ps: 本文假设你对原型链已经有所了解。如不了解,建议先看上面两篇文章
创建一个函数时,会创建两个对象:函数本身和它的原型对象
所以我们可以先画个这样的关系图:
ps: 圆形代表函数,矩形代表对象
通过函数创建的对象,其原型是函数的原型对象
再修改下关系图:
函数的原型对象的原型是 Object 的原型对象
再修改下关系图:
js的内置函数对象也满足这个规律
再修改下关系图:
Function 的原型对象是一个函数
再修改下关系图:
所有函数的原型都相同,都为 Function 的原型对象
再修改下关系图:
Object 的原型对象的原型是 null 意为不应该存在
最后得到如下关系图:
Object instanceof Function // true
Function instanceof Object // true
首先需要确定的是,instanceof 运算符相当于如下代码:
// L instanceof R
function instance_of(L, R) {
 var O = R.prototype; // 取函数 R 的原型对象
 L = L.__proto__;     // 取对象 L 的原型
 while (true) {       // 遍历原型链
   if (L === null)
     return false;
   if (O === L)       // 函数 R 的原型对象在对象 L 的原型链上
     return true;
   L = L.__proto__;
 }
}
对于 Object instanceof Function 来说,就相当于 Object.__proto__ === Function.prototype
因为所有函数的原型都是 Function 的原型对象,所以是 true
对于 Function instanceof Object 来说,就相当于 Function.__proto__ === Object.prototype
因为 Object 的原型对象处于原型链的顶部,所以 Object.prototype 一定在 Function 的原型链上,为 true
Function.__proto__ === Function.prototype对于这个,可以先把上面的关系图变形一下:
可以看出:
Function.prototypeObject.prototype 位于原型链的顶部,在所有对象的原型链上根据 1 和 2,就可以得出 Function.__proto__ === Function.prototype
至于 Function.prototype 为什么是函数,可以先看看下面这个例子:
可以看出,Array.prototype 是 Array 类型,Map.prototype 是 Map 类型,Set.prototsype 是 Set 类型
所以,为了保持一致性,Function.prototype 也应该是 Function 类型
参考:
在 Node.js 中,对于大文件一般是以 Buffer 形式存储,相比于字符串,Buffer 可以免去 decode / encode 过程,节省 CPU 成本
说到 Buffer 就不得不提到 Buffer 的 8k 池,那么,下面就让我们来看看 8k 池是如何实现的吧
在 Node.js v8.4.0 中,可以通过以下方法来获取一个 Buffer 实例:
new Buffer() ( 不推荐 )Buffer.from()Buffer.alloc()Buffer.allocUnsafe()Buffer.allocUnsafeSlow()从命名上来看,Buffer.allocUnsafe() 和 Buffer.allocUnsafeSlow() 都是不安全的,有泄漏内存中敏感信息的危险
unsafe 的问题放到后面说,先看看如何获取一个 Buffer 实例
从图中可以看出,只有 allocate() 和 fromString() 两个函数直接与8k池相关
// lib/buffer.js

function allocate(size) {
  if (size <= 0) {
    return new FastBuffer();
  }
  if (size < (Buffer.poolSize >>> 1)) { // < 4k
    if (size > (poolSize - poolOffset)) // 大于剩余容量
      createPool();
    var b = new FastBuffer(allocPool, poolOffset, size);
    poolOffset += size;
    alignPool();
    return b;
  } else { // > 4k
    return createUnsafeBuffer(size);
  }
}

function fromString(string, encoding) {
  // ...
  if (length >= (Buffer.poolSize >>> 1)) // > 4k
    return binding.createFromString(string, encoding);

  if (length > (poolSize - poolOffset)) // 大于剩余容量
    createPool();
  var b = new FastBuffer(allocPool, poolOffset, length);
  const actual = b.write(string, encoding);
  if (actual !== length) { // byteLength() 可能会估计错误,尽管可能性很小
    b = new FastBuffer(allocPool, poolOffset, actual);
  }
  poolOffset += actual;
  alignPool();
  return b;
}
allocate() 和 fromString() 都是分为大于 4k 和小于 4k 两种情况来处理
小于 4k 时,先检查8k池的剩余容量,如果大于剩余容量则直接创建一个新的8k池,然后修正 poolOffset,最后调用 alignPool()
// lib/buffer.js

Buffer.poolSize = 8 * 1024;
var poolSize, poolOffset, allocPool;

function createUnsafeArrayBuffer(size) {
  // ...
  return new ArrayBuffer(size);
  // ...
}

function createPool() {
  poolSize = Buffer.poolSize; // 8k
  allocPool = createUnsafeArrayBuffer(poolSize);
  poolOffset = 0;
}
createPool();

function alignPool() {
  if (poolOffset & 0x7) { // 进行校准,只能为 8 的倍数
    poolOffset |= 0x7; // xxx111
    poolOffset++; // xx(x+1)000
  }
}
通过调用 alignPool() 来校准 poolOffset,poolOffset 只能为 8 的倍数,换句话说,每次至少使用 8 个字节内存
8k池容量不够时,调用 createPool(),创建一个新的8k池
createPool() 内部调用 createUnsafeArrayBuffer() 来获取一个对应大小的 ArrayBuffer 实例
关于 ArrayBuffer,这里引用 MDN 的介绍:
The ArrayBuffer object is used to represent a generic, fixed-length raw binary data buffer
因为 ArrayBuffer 是 raw binary data,所以它是不安全的,存在泄漏内存中敏感信息的危险
从图中我们知道,一共有 4 种方法来获得一个 Buffer 实例,它们之中,有的是 unsafe 的,有的不是
new Buffer()依赖Buffer.from()和Buffer.alloc()不算一种
下面让我们来看看为什么有的是 unsafe 的
// lib/buffer.js

// safe
Buffer.from = function(value, encodingOrOffset, length) {
  if (typeof value === 'string')
    return fromString(value, encodingOrOffset); // safe

  if (isAnyArrayBuffer(value))
    return fromArrayBuffer(value, encodingOrOffset, length); // safe

  var b = fromObject(value); // safe
  // ...
};

function fromString(string, encoding) {
  // ...
  var b = new FastBuffer(allocPool, poolOffset, length);
  const actual = b.write(string, encoding);
  // ...
}

function fromArrayBuffer(obj, byteOffset, length) {
  // ...
  return new FastBuffer(obj, byteOffset, length);
}

function fromObject(obj) {
  if (isUint8Array(obj)) {
    const b = allocate(obj.length);
    // ...
    binding.copy(obj, b, 0, 0, obj.length);
  }

  if (obj != null) {
    // ...
      return fromArrayLike(obj);
    // ...
  }
}

function fromArrayLike(obj) {
  // ...
  const b = allocate(length);
  for (var i = 0; i < length; i++)
    b[i] = obj[i];
  return b;
}

// unsafe
Buffer.allocUnsafe = function(size) {
  return allocate(size);
};

// unsafe
Buffer.allocUnsafeSlow = function(size) {
  return createUnsafeBuffer(size);
};

function createUnsafeBuffer(size) {
  return new FastBuffer(createUnsafeArrayBuffer(size));
}

// safe
Buffer.alloc = function(size, fill, encoding) {
  assertSize(size);
  if (size > 0 && fill !== undefined) {
    // ...
    return createUnsafeBuffer(size).fill(fill, encoding);
  }
  return new FastBuffer(size);
};
可以看出:
Buffer.from() 和 Buffer.alloc(): 取到原始 buffer 后,对原始数据进行了替换,所以它们是 safe 的Buffer.allocUnsafe() 和 Buffer.allocUnsafeSlow(): 直接使用原始 buffer,所以它们是 unsafe 的new Buffer(): 依赖 Buffer.from() 和 Buffer.alloc()Buffer.from()
binding.createFromString()createUnsafeBuffer()Buffer.alloc(): 需要 fill buffer,用给定字符填充,否则用 0 填充Buffer.allocUnsafe(): 小于 4k 使用8k池,大于 4k 调用 createUnsafeBuffer()Buffer.allocUnsafeSlow(): 调用 createUnsafeBuffer()参考:
Given two sequences pushed and popped with distinct values, return true if and only if this could have been the result of a sequence of push and pop operations on an initially empty stack.
Example 1:
Input: pushed = [1,2,3,4,5], popped = [4,5,3,2,1]
Output: true
Explanation: We might do the following sequence:
push(1), push(2), push(3), push(4), pop() -> 4,
push(5), pop() -> 5, pop() -> 3, pop() -> 2, pop() -> 1
Example 2:
Input: pushed = [1,2,3,4,5], popped = [4,3,5,1,2]
Output: false
Explanation: 1 cannot be popped before 2.
Note:
0 <= pushed.length == popped.length <= 1000
0 <= pushed[i], popped[i] < 1000
pushed is a permutation of popped.
pushed and popped have distinct values.
Solution:
/**
 * @param {number[]} pushed
 * @param {number[]} popped
 * @return {boolean}
 */
let validateStackSequences = function(pushed, popped) {
  const arr = [];

  for (const i of pushed) {
    arr.push(i);

    while (
      arr.length > 0 &&
          arr[arr.length - 1] === popped[0]
    ) {
      arr.pop();
      popped.shift();
    }
  }

  return popped.length === 0;
};在 Node.js 中,起一个 HTTP Server 非常简单,只需要如下代码即可:
const http = require('http')

http.createServer((req, res) => {
  res.end('Hello World\n')
}).listen(3000)
$ curl localhost:3000
Hello World
对,就这么简单。因为 Node.js 已经把具体实现细节给封装起来了,我们只需要调用 http 模块提供的方法即可
那么,一个请求是如何处理,然后响应的呢?让我们来看看源码
首先,让我们理一理思路
             _______
            |       | <== res
request ==> |   ?   |
            |_______| ==> req
               /\
               ||
        http.createServer()
http.createServer() 生成一个 http.Server 对象 ( 黑盒 ) 来处理请求http.IncomingMessage ) 和 res ( http.ServerResponse ),然后交由用户函数处理res.end() 来结束处理,响应请求综上,我们的切入点有:
让我们先来看看 http.createServer()
// lib/http.js

function createServer(requestListener) {
  return new Server(requestListener);
}

// lib/_http_server.js

function Server(requestListener) {
  if (!(this instanceof Server)) return new Server(requestListener);
  net.Server.call(this, { allowHalfOpen: true });

  if (requestListener) {
    this.on('request', requestListener);
  }

  this.on('connection', connectionListener);

  // ...
}
http.createServer() 函数返回一个 http.Server 实例
该实例监听了 request 和 connection 两个事件
request 事件:绑定 requestListener() 函数,req 和 res 准备好时触发connection 事件:绑定 connectionListener() 函数,连接时触发用户函数是 requestListener(),因此,我们需要知道 request 事件何时触发
// lib/_http_server.js

function connectionListener(socket) {
  // ...

  // 从 parsers 中取一个 parser
  var parser = parsers.alloc();
  parser.reinitialize(HTTPParser.REQUEST);
  parser.socket = socket;
  socket.parser = parser;

  // ...

  state.onData = socketOnData.bind(undefined, this, socket, parser, state);

  // ...

  socket.on('data', state.onData);

  // ...
}

function socketOnData(server, socket, parser, state, d) {
  // ...
  var ret = parser.execute(d);
  // ...
}
当连接建立时,触发 connnection 事件,执行 connectionListener()
这里的 socket 正是连接的 socket 对象,给 socket 绑定 data 事件用来处理数据,处理数据用到的 parser 是从 parsers 中取出来的
data 事件触发时,执行 socketOnData(),最后调用 parser.execute() 来解析 HTTP 报文
值得一提的是 parsers 由一个叫做 FreeList ( wiki ) 的数据结构实现,其主要目的是复用 parser
// lib/internal/freelist.js

class FreeList {
  constructor(name, max, ctor) {
    this.name = name;
    this.ctor = ctor;
    this.max = max;
    this.list = [];
  }

  alloc() {
    return this.list.length ? this.list.pop() :
                              this.ctor.apply(this, arguments);
  }

  free(obj) {
    if (this.list.length < this.max) {
      this.list.push(obj);
      return true;
    }
    return false;
  }
}

module.exports = FreeList;
通过调用 parsers.alloc() 和 parsers.free(parser) 来获取释放 parser ( http 模块中 max 为 1000 )
既然,HTTP 报文是由 parser 来解析的,那么,就让我们来看看 parser 是如何创建的吧
// lib/_http_common.js

const binding = process.binding('http_parser');
const HTTPParser = binding.HTTPParser;

// ...

var parsers = new FreeList('parsers', 1000, function() {
  var parser = new HTTPParser(HTTPParser.REQUEST);

  parser._headers = [];
  parser._url = '';
  parser._consumed = false;

  parser.socket = null;
  parser.incoming = null;
  parser.outgoing = null;

  parser[kOnHeaders] = parserOnHeaders;
  parser[kOnHeadersComplete] = parserOnHeadersComplete;
  parser[kOnBody] = parserOnBody;
  parser[kOnMessageComplete] = parserOnMessageComplete;
  parser[kOnExecute] = null;

  return parser;
});

function parserOnHeadersComplete(versionMajor, versionMinor, headers, method, url, statusCode, statusMessage, upgrade, shouldKeepAlive) {
  // ...

  if (!upgrade) {
    skipBody = parser.onIncoming(parser.incoming, shouldKeepAlive);
  }

  // ...
}

// lib/_http_server.js

function connectionListener(socket) {
  // ...
  parser.onIncoming = parserOnIncoming.bind(undefined, this, socket, state);
  // ...
}
parser 是由 http_parser 这个库实现。不难看出,这里的 parser 也是基于事件的
在解析过程中,所经历的事件:
当请求头解析完毕时,对于非 upgrade 请求,可以直接执行 parser.onIncoming(),进行响应
// lib/_http_server.js

// 生成 response,并触发 request 事件
function parserOnIncoming(server, socket, state, req, keepAlive) {
  state.incoming.push(req);

  // ...

  var res = new ServerResponse(req);

  // ...

  if (socket._httpMessage) {
    state.outgoing.push(res);
  } else {
    res.assignSocket(socket);
  }

  // ...

  res.on('finish', resOnFinish.bind(undefined, req, res, socket, state, server));

  // ...

    server.emit('request', req, res);

  // ...
}

function resOnFinish(req, res, socket, state, server) {
  // ...

  state.incoming.shift();

  // ...

  res.detachSocket(socket);

  // ...
    var m = state.outgoing.shift();
    if (m) {
      m.assignSocket(socket);
    }
  }
}
可以看出,在源码中,对每一个 socket,维护了 state.incoming 和 state.outgoing 两个队列,分别用于存储 req 和 res
当 finish 事件触发时,将 req 和 res 从队列中移除
执行 parserOnIncoming() 时,最后会触发 request 事件,来调用用户函数
就拿最开始的例子来说:
const http = require('http')

http.createServer((req, res) => {
  res.end('Hello World\n')
}).listen(3000)
通过调用 res.end('Hello World\n') 来告诉 res,处理完成,可以响应并结束请求
ServerResponse 继承自 OutgoingMessage,res.end() 正是 OutgoingMessage.prototype.end()
// lib/_http_outgoing.js

OutgoingMessage.prototype.end = function end(chunk, encoding, callback) {
  // ...
  if (chunk) {
    // ...
    write_(this, chunk, encoding, null, true);
  } else if (!this._header) {
    this._contentLength = 0;
    // 生成响应头
    this._implicitHeader();
  }

  // ...
  // 触发 finish 事件
  var finish = onFinish.bind(undefined, this);

  var ret;
  if (this._hasBody && this.chunkedEncoding) {
    // trailer 头相关
    ret = this._send('0\r\n' + this._trailer + '\r\n', 'latin1', finish);
  } else {
    // 保证一定会触发 finish 事件
    ret = this._send('', 'latin1', finish);
  }

  this.finished = true;

  // ...
};

function write_(msg, chunk, encoding, callback, fromEnd) {
  // ...

  if (!msg._header) {
    msg._implicitHeader();
  }

  // ...

  var len, ret;
  if (msg.chunkedEncoding) { // 响应大文件时,分块传输
    if (typeof chunk === 'string')
      len = Buffer.byteLength(chunk, encoding);
    else
      len = chunk.length;

    msg._send(len.toString(16), 'latin1', null);
    msg._send(crlf_buf, null, null);
    msg._send(chunk, encoding, null);
    ret = msg._send(crlf_buf, null, callback);
  } else {
    ret = msg._send(chunk, encoding, callback);
  }

  // ...
}
执行函数时,如果给了 chunk,就先 write_(chunk),写入 chunk。再 _send('', 'latin1', finish) 绑定 finish 函数。待写入完成后,触发 finish 事件,结束响应
在写入 chunk 之前,必须确保 headers 已经生成,如果没有则调用 _implicitHeader() 隐式生成 headers
// lib/_http_server.js

ServerResponse.prototype._implicitHeader = function _implicitHeader() {
  this.writeHead(this.statusCode);
};

ServerResponse.prototype.writeHead = writeHead;
function writeHead(statusCode, reason, obj) {
  // ...
  // 将 obj 和 this[outHeadersKey] 中的所有 header 放到 headers 中
  // ...

  var statusLine = 'HTTP/1.1 ' + statusCode + ' ' + this.statusMessage + CRLF;

  this._storeHeader(statusLine, headers);
}

// lib/_http_outgoing.js

OutgoingMessage.prototype._storeHeader = _storeHeader;
function _storeHeader(firstLine, headers) {
  // > GET /index.html HTTP/1.1\r\n
  // < HTTP/1.1 200 OK\r\n

  // ...
  // 校验 header 并生成 HTTP 报文头
  // ...

  this._header = state.header + CRLF;
  this._headerSent = false;

  // ...
}
headers 生成后,保存在 this._header 中,此时,响应报文头部已经完成,只需要在响应体之前写入 socket 即可
write_() 函数,内部也是调用 _send() 函数写入数据
// lib/_http_outgoing.js

OutgoingMessage.prototype._send = function _send(data, encoding, callback) {
  if (!this._headerSent) { // 将 headers 添加到 data 前面
    if (typeof data === 'string' &&
        (encoding === 'utf8' || encoding === 'latin1' || !encoding)) {
      data = this._header + data;
    } else {
      var header = this._header;
      if (this.output.length === 0) {
        this.output = [header];
        this.outputEncodings = ['latin1'];
        this.outputCallbacks = [null];
      } else {
        this.output.unshift(header);
        this.outputEncodings.unshift('latin1');
        this.outputCallbacks.unshift(null);
      }
      this.outputSize += header.length;
      this._onPendingData(header.length);
    }
    this._headerSent = true;
  }
  return this._writeRaw(data, encoding, callback);
};

OutgoingMessage.prototype._writeRaw = _writeRaw;
function _writeRaw(data, encoding, callback) {
  const conn = this.connection;

  // ...

  if (conn && conn._httpMessage === this && conn.writable && !conn.destroyed) {
    if (this.output.length) { // output 中有缓存,先写入缓存
      this._flushOutput(conn);
    } else if (!data.length) { // 没有则异步执行回调
      if (typeof callback === 'function') {
        nextTick(this.socket[async_id_symbol], callback);
      }
      return true;
    }
    // 直接写入 socket
    return conn.write(data, encoding, callback);
  }
  // 加入 output 缓存
  this.output.push(data);
  this.outputEncodings.push(encoding);
  this.outputCallbacks.push(callback);
  this.outputSize += data.length;
  this._onPendingData(data.length);
  return false;
}
对于 res.end() 来说,直接在 nextTick() 中触发 finish 事件,结束响应
到这里,我们已经走完了一个请求从接收到响应的过程
除此之外,在 http 模块中,还考虑了许多的实现细节,非常值得一看
参考:
工作是属于公司的,而职业生涯却是属于你自己的
不要努力成为一个成功的人,而要努力成为一个有价值的人
教育就是当一个人把在学校所学全部忘光之后剩下的东西
外行静坐等待灵感,其他人则唤起激情努力工作
金钱只是一种工具。它会带你去往任何你想去的地方,但不会取代你成为司机
人的身体就是人的灵魂的最好写照
如果你不征服自己,你就会被自己征服
We have a list of points on the plane. Find the K closest points to the origin (0, 0).
(Here, the distance between two points on a plane is the Euclidean distance.)
You may return the answer in any order. The answer is guaranteed to be unique (except for the order that it is in.)
Example 1:
Input: points = [[1,3],[-2,2]], K = 1
Output: [[-2,2]]
Explanation:
The distance between (1, 3) and the origin is sqrt(10).
The distance between (-2, 2) and the origin is sqrt(8).
Since sqrt(8) < sqrt(10), (-2, 2) is closer to the origin.
We only want the closest K = 1 points from the origin, so the answer is just [[-2,2]].
Example 2:
Input: points = [[3,3],[5,-1],[-2,4]], K = 2
Output: [[3,3],[-2,4]]
(The answer [[-2,4],[3,3]] would also be accepted.)
Note:
1 <= K <= points.length <= 10000
-10000 < points[i][0] < 10000
-10000 < points[i][1] < 10000
Solution:
/**
 * @param {number[][]} points
 * @param {number} K
 * @return {number[][]}
 */
var kClosest = function(points, K) {
    return points.map(([i, j]) => ([i, j, i * i + j * j]))
        .sort(function([i1, j1, n1], [i2, j2, n2]) {
            if (n1 > n2) return 1
            else if (n1 < n2) return -1
            else return 0
        })
        .slice(0, K)
        .map(([i, j]) => ([i, j]))
};
/**
* @param {number[][]} points
* @param {number} K
* @return {number[][]}
*/
var kClosest = function(points, K) {
return points.sort(
([i1, j1], [i2, j2]) => i1 * i1 + j1 * j1 - i2 * i2 - j2 * j2
).slice(0, K)
};对于一个 stream 模块来说,最基本的就是读和写。读由 Readable 负责,写则是由 Writable 负责。Readable 的实现上篇文章已经介绍过了,这篇介绍 Writable 的实现
在开始之前,先看看 Writable 的构造函数
// lib/_stream_readable.js

function Writable(options) {
  // 只能在 Writable 或 Duplex 的上下文中执行
  if (!(realHasInstance.call(Writable, this)) &&
      !(this instanceof Stream.Duplex)) {
    return new Writable(options);
  }

  // Wrirable 的状态集
  this._writableState = new WritableState(options, this);

  // legacy
  this.writable = true;

  if (options) {
    if (typeof options.write === 'function')
      this._write = options.write;

    if (typeof options.writev === 'function')
      this._writev = options.writev;

    if (typeof options.destroy === 'function')
      this._destroy = options.destroy;

    if (typeof options.final === 'function')
      this._final = options.final;
  }

  Stream.call(this);
}

function WritableState(options, stream) {
  options = options || {};

  // object 模式标识
  this.objectMode = !!options.objectMode;

  if (stream instanceof Stream.Duplex)
    this.objectMode = this.objectMode || !!options.writableObjectMode;

  var hwm = options.highWaterMark;
  var defaultHwm = this.objectMode ? 16 : 16 * 1024;
  this.highWaterMark = (hwm || hwm === 0) ? hwm : defaultHwm;

  // highWaterMark 高水位标识
  // 此时,write() 返回 false
  // 默认 16k
  this.highWaterMark = Math.floor(this.highWaterMark);

  this.finalCalled = false;
  // drain 事件标识
  this.needDrain = false;
  // 刚调用 end() 时的状态标识
  this.ending = false;
  // end() 调用完成后的状态标识
  this.ended = false;
  this.finished = false;
  this.destroyed = false;

  var noDecode = options.decodeStrings === false;
  // 数据写入前,是否应该将 string 解析为 buffer
  this.decodeStrings = !noDecode;
  this.defaultEncoding = options.defaultEncoding || 'utf8';

  // 缓存中的数据长度
  // 不是真正的 buffer 长度,而是正在等待写入的数据长度
  this.length = 0;
  // writing 标识
  this.writing = false;
  // cork 标识
  this.corked = 0;
  // 标识是否有异步回调
  this.sync = true;
  // 标识正在写入缓存中的内容
  this.bufferProcessing = false;
  // _write() 和 _writev() 函数的回调
  this.onwrite = onwrite.bind(undefined, stream);
  // 调用 write(chunk, cb) 时的回调函数
  this.writecb = null;
  // 需写入的单个 chunk 块长度
  this.writelen = 0;

  // Writable 的缓冲池实现也是一个链表,其每个节点的结构如下:
  // {
  //   chunk,
  //   encoding,
  //   isBuf,
  //   callback,
  //   next
  // }

  // 缓冲池头节点
  this.bufferedRequest = null;
  // 缓冲池尾节点
  this.lastBufferedRequest = null;
  // 缓冲池的大小
  this.bufferedRequestCount = 0;

  // 还需要执行的 callback 数量,必须在 finish 事件发生之前降为 0
  this.pendingcb = 0;
  this.prefinished = false;
  this.errorEmitted = false;

  // cork 的回调函数,最多只能有两个函数对象
  var corkReq = { next: null, entry: null, finish: undefined };
  corkReq.finish = onCorkedFinish.bind(undefined, corkReq, this);
  this.corkedRequestsFree = corkReq;
}
Writable 与 Readable 类似,也使用一个对象 ( WritableState ) 对状态和属性进行集中管理
在 Writable 的构造函数参数中,options.write 函数是必须的,options.writev 则是用于批量写入数据,可以选择实现
Writable 的缓冲池也是由链表实现,但与 Readable 不同的是,Writable 的缓冲池实现更简单,其节点结构如下:
{
  chunk,    // 数据块,可能是 object / string / buffer
  encoding, // 数据块编码
  isBuf,    // buffer 标识
  callback, // write(chunk, cb) 的回调函数
  next      // 下一个写入任务
}
除此之外,WritableState 还使用 bufferedRequest、lastBufferedRequest、bufferedRequestCount 属性分别记录缓冲池的头、尾节点和节点数量
在 Duplex 的源码中有这么一段注释
// a duplex stream is just a stream that is both readable and writable.
// Since JS doesn't have multiple prototypal inheritance, this class
// prototypally inherits from Readable, and then parasitically from
// Writable.
意思是: Duplex 流既是 Readable 流又是 Writable 流,但是由于 JS 中的继承是基于原型的,没有多继承。所以 Duplex 是继承自 Readable,寄生自 Writable
寄生自 Writable 体现在两个方面:
duplex instanceof Writable 为 true// lib/_stream_writable.js
var realHasInstance;
if (typeof Symbol === 'function' && Symbol.hasInstance) {
realHasInstance = Function.prototype[Symbol.hasInstance];
Object.defineProperty(Writable, Symbol.hasInstance, {
value: function(object) {
if (realHasInstance.call(this, object))
return true;
return object && object._writableState instanceof WritableState;
}
});
} else {
realHasInstance = function(object) {
return object instanceof this;
};
}
function Writable(options) {
if (!(realHasInstance.call(Writable, this)) &&
!(this instanceof Stream.Duplex)) {
return new Writable(options);
}
// ...
}可以看出,通过修改 Writable 的 Symbol.hasInstance 使得 duplex/writable instanceof Writable 为 true。Writable 的构造函数也只能在 writable 或 duplex 的上下文中调用,使 duplex 具有 Writable 的属性
// lib/_stream_duplex.js

util.inherits(Duplex, Readable);

var keys = Object.keys(Writable.prototype);
// 获取 Writable 的所有方法
for (var v = 0; v < keys.length; v++) {
  var method = keys[v];
  if (!Duplex.prototype[method])
    Duplex.prototype[method] = Writable.prototype[method];
}

function Duplex(options) {
  if (!(this instanceof Duplex))
    return new Duplex(options);

  Readable.call(this, options);
  Writable.call(this, options);
  // ...
}
遍历 Writable 原型上的方法,并添加到 Duplex 的原型上,使 duplex 具有 Writable 的方法
Writable 的写过程比 Readable 的读过程简单得多,不用考虑异步操作,直接写入即可
// lib/_stream_writable.js

Writable.prototype.write = function(chunk, encoding, cb) {
  var state = this._writableState;
  var ret = false;
  // 判断是否是 buffer
  var isBuf = Stream._isUint8Array(chunk) && !state.objectMode;
  // ...
  if (state.ended)
    // Writable 结束后继续写入数据会报错
    // 触发 error 事件
    writeAfterEnd(this, cb);
  else if (isBuf || validChunk(this, state, chunk, cb)) {
    // 对 chunk 进行校验
    // 不能为 null
    // undefined 和非字符串只在 objectMode 下接受
    state.pendingcb++;
    ret = writeOrBuffer(this, state, isBuf, chunk, encoding, cb);
  }

  return ret;
};
write() 函数对传入数据进行初步处理与校验后交由 writeOrBuffer() 函数继续处理
// lib/_stream_writable.js

function writeOrBuffer(stream, state, isBuf, chunk, encoding, cb) {
  if (!isBuf) {
    // 非 buffer 的情况有: string 或 object
    // 为 object,代表是 objectMode,直接返回即可
    // 为 string,则需解码成 buffer
    var newChunk = decodeChunk(state, chunk, encoding);
    if (chunk !== newChunk) {
      isBuf = true;
      encoding = 'buffer';
      chunk = newChunk;
    }
  }
  var len = state.objectMode ? 1 : chunk.length;

  state.length += len;

  var ret = state.length < state.highWaterMark;
  if (!ret) state.needDrain = true;

  if (state.writing || state.corked) {
    // 正在写或处于 cork 状态
    // 将数据块添加到缓冲池链表为尾部
    var last = state.lastBufferedRequest;
    state.lastBufferedRequest = {
      chunk,
      encoding,
      isBuf,
      callback: cb,
      next: null
    };
    if (last) {
      last.next = state.lastBufferedRequest;
    } else {
      state.bufferedRequest = state.lastBufferedRequest;
    }
    state.bufferedRequestCount += 1;
  } else {
    // 写入数据
    doWrite(stream, state, false, len, chunk, encoding, cb);
  }

  return ret;
}
writeOrBuffer() 函数对 chunk 进行处理后,根据 Writable 自身状态决定应何时写入数据
如果正在写入或处于 cork 状态,就将数据存储到缓冲池链表尾部,等待以后处理。否则,直接调用 doWrite() 写入数据
当缓存达到 highWaterMark 时,writeOrBuffer() 返回 false,表示不应该再写入数据
// lib/_stream_writable.js

function doWrite(stream, state, writev, len, chunk, encoding, cb) {
  state.writelen = len; // 写入的数据块长度
  state.writecb = cb; // 写入操作的回调函数
  state.writing = true;
  state.sync = true; // 同步状态标识
  if (writev) // 一次写入多个数据块
    stream._writev(chunk, state.onwrite);
  else // 一次写入单个数据块
    stream._write(chunk, encoding, state.onwrite);
  state.sync = false;
}
在 doWrite() 函数中,根据 writev 参数决定该执行 _write() 还是 _writev()
_write() 函数用于写入单个数据块,_writev() 函数用于写入多个数据块
_write() / _writev() 中的回调函数不是传入的 cb 而是 state.onwrite,其定义如下:
this.onwrite = onwrite.bind(undefined, stream);可知,写入完成后,执行 onwrite(stream, err)
// lib/_stream_writable.js

function onwrite(stream, er) {
  var state = stream._writableState;
  var sync = state.sync;
  var cb = state.writecb;

  // 更新 state
  onwriteStateUpdate(state);

  if (er) // 发生错误
    onwriteError(stream, state, sync, er, cb);
  else {
    var finished = needFinish(state);

    if (!finished &&
        !state.corked &&
        !state.bufferProcessing &&
        state.bufferedRequest) {
      // 清空缓冲池
      // 有 _writev() 函数时,执行 _writev() 一次写入多个数据块
      // 没有,则循环执行 _write() 写入单个数据块
      clearBuffer(stream, state);
    }

    if (sync) { // 代表写入操作是同步的,需要在 process.nextTick() 中执行 callback
      process.nextTick(afterWrite, stream, state, finished, cb);
    } else { // 代表写入操作是异步的,直接执行 callback 即可
      afterWrite(stream, state, finished, cb);
    }
  }
}
当写入过程中有错误发生时,会执行 onwriteError(),继而调用 cb(err) 并触发 error 事件
如果写入过程正确执行,则先查看还有多少数据块正在等待写入,有多个,就执行 clearBuffer() 清空缓存,然后执行 afterWrite()
// lib/_stream_writable.js

function afterWrite(stream, state, finished, cb) {
  if (!finished)
    onwriteDrain(stream, state);
  state.pendingcb--;
  // 执行回调函数
  cb();
  // 检查是否应该结束 Writable
  finishMaybe(stream, state);
}当有大量小数据块需要写入时,如果一个个写入,会导致效率低下。Writable 提供了 cork() 和 uncork() 两个方法用于大量小数据块写入的情况
先将写操作柱塞住,等到缓存达到一定量后,再解除柱塞,然后一次性将存储的数据块写入,这个操作需要 _writev() 支持
// lib/_stream_writable.js

Writable.prototype.cork = function() {
  var state = this._writableState;

  // 增加柱塞的次数
  state.corked++;
};
由于 cork() 函数可能会被多次调用,所以 state.corked 需要记录 cork() 调用的次数,是个 number
// lib/_stream_writable.js

Writable.prototype.uncork = function() {
  var state = this._writableState;

  if (state.corked) {
    // 减少柱塞的次数
    state.corked--;

    if (!state.writing &&
        !state.corked &&
        !state.finished &&
        !state.bufferProcessing &&
        state.bufferedRequest)
      // 清空缓冲池
      clearBuffer(this, state);
  }
};
当 state.corked === 0 时,才能表示柱塞已经全部解除完毕,可以执行 clearBuffer() 来处理缓存中的数据
// lib/_stream_writable.js

function clearBuffer(stream, state) {
  // 正在清空 buffer 的标识
  state.bufferProcessing = true;
  // 缓存的头节点
  var entry = state.bufferedRequest;

  if (stream._writev && entry && entry.next) {
    // _writev() 函数存在,且有一个以上数据块,就使用 _writev() 写入数据,效率更高
    var l = state.bufferedRequestCount;
    var buffer = new Array(l);
    var holder = state.corkedRequestsFree;
    holder.entry = entry;

    var count = 0;
    var allBuffers = true;
    // 取得所有数据块
    while (entry) {
      buffer[count] = entry;
      if (!entry.isBuf)
        allBuffers = false;
      entry = entry.next;
      count += 1;
    }
    buffer.allBuffers = allBuffers;

    // 写入数据
    doWrite(stream, state, true, state.length, buffer, '', holder.finish);

    state.pendingcb++;
    state.lastBufferedRequest = null;
    // 保证最多只有两个实例
    if (holder.next) {
      state.corkedRequestsFree = holder.next;
      holder.next = null;
    } else {
      var corkReq = { next: null, entry: null, finish: undefined };
      corkReq.finish = onCorkedFinish.bind(undefined, corkReq, state);
      state.corkedRequestsFree = corkReq;
    }
  } else {
    // 一个个的写入
    while (entry) {
      var chunk = entry.chunk;
      var encoding = entry.encoding;
      var cb = entry.callback;
      var len = state.objectMode ? 1 : chunk.length;

      doWrite(stream, state, false, len, chunk, encoding, cb);
      entry = entry.next;
      // 如果写操作不是同步执行的,就意味着需要等待此次写入完成,再继续写入
      if (state.writing) {
        break;
      }
    }

    if (entry === null)
      state.lastBufferedRequest = null;
  }

  state.bufferedRequestCount = 0;
  // 修正缓存的头节点
  state.bufferedRequest = entry;
  state.bufferProcessing = false;
}
执行 clearBuffer() 时,根据是否有 _writev() 函数和待写入数据块数量,决定使用 _writev() 还是 _write() 写入数据
_writev(): 会先将所有数据块包装成数组,然后写入。写入完成后,回调 corkReq.finish_write(): 只需要将数据块一个个写入即可在使用 _writev() 的情况下,写入完成后回调 corkReq.finish 也就是 onCorkedFinish() 函数
// lib/_stream_writable.js

function onCorkedFinish(corkReq, state, err) {
  var entry = corkReq.entry;
  corkReq.entry = null;
  // 依次执行回调函数
  while (entry) {
    var cb = entry.callback;
    state.pendingcb--;
    cb(err);
    entry = entry.next;
  }
  // 保证最多只有两个实例
  if (state.corkedRequestsFree) {
    state.corkedRequestsFree.next = corkReq;
  } else {
    state.corkedRequestsFree = corkReq;
  }
}
根据缓冲池链表的顺序,依次执行写操作的回调函数
每次调用 stream.write(chunk, cb),Writable 都会根据自身状态,决定是将 chunk 加到缓冲池,还是直接写入
当需要写入大量小数据块时,推荐先使用 cork() 将写操作柱塞住,待调用完毕后,再调用 uncork() 解除柱塞,然后一次性写入所有缓存数据
参考:
在编写 Node.js 应用的过程中,我们或多或少的都写过类似 const xxx = require('xxx') 的代码,其作用是引入模块。不知大家有没有想过,这段代码是如何确定我们要引入的模块?又是以怎样的上下文来执行模块代码的呢?
让我们来翻开 Node.js 源码,先找到 lib/module.js 中的 Module.prototype.require() 函数
// lib/module.js

Module.prototype.require = function(path) {
  assert(path, 'missing path');
  assert(typeof path === 'string', 'path must be a string');
  return Module._load(path, this, /* isMain */ false);
};

// Check the cache for the requested file.
// 1. If a module already exists in the cache: return its exports object.
// 2. If the module is native: call `NativeModule.require()` with the
//    filename and return the result.
// 3. Otherwise, create a new module for the file and save it to the cache.
//    Then have it load  the file contents before returning its exports
//    object.
Module._load = function(request, parent, isMain) {
  if (parent) {
    debug('Module._load REQUEST %s parent: %s', request, parent.id);
  }

  var filename = Module._resolveFilename(request, parent, isMain);

  var cachedModule = Module._cache[filename];
  if (cachedModule) {
    return cachedModule.exports;
  }

  if (NativeModule.nonInternalExists(filename)) {
    debug('load native module %s', request);
    return NativeModule.require(filename);
  }

  var module = new Module(filename, parent);

  if (isMain) {
    process.mainModule = module;
    module.id = '.';
  }

  Module._cache[filename] = module;

  tryModuleLoad(module, filename);

  return module.exports;
};
Module.prototype.require() 对传入的 path 简单断言后调用 Module._load() 来导入模块
Module._load() 的执行思路如下:
Module._resolveFilename()cachedModule.exportstryModuleLoad()因此,Module.prototype.require() 的源码可以分为两大块: 查找模块和加载模块
查找模块的关键在于定位模块的具体路径,这个功能由 Module._resolveFilename() 函数实现
// lib/module.js

Module._resolveFilename = function(request, parent, isMain) {
  if (NativeModule.nonInternalExists(request)) {
    return request;
  }

  // 可能存在要加载模块的目录
  var paths = Module._resolveLookupPaths(request, parent, true);

  // 具体的模块路径
  var filename = Module._findPath(request, paths, isMain);
  if (!filename) {
    var err = new Error(`Cannot find module '${request}'`);
    err.code = 'MODULE_NOT_FOUND';
    throw err;
  }
  return filename;
};
Module._resolveFilename() 函数先调用 Module._resolveLookupPaths() 计算出模块可能存在的目录,然后调用 Module._findPath() 得到模块路径
通过调用 Module._resolveLookupPaths() 函数可以计算出模块可能存在的目录,在调用时存在三种情况:
require('xxx'): 需要递归查询路径上的 node_modules 目录和全局 node_modules 目录Module.runMain() 或 --eval 参数: 返回执行命令行的目录// lib/module.js
Module._resolveLookupPaths = function(request, parent, newReturn) {
if (NativeModule.nonInternalExists(request)) {
debug('looking for %j in []', request);
return (newReturn ? null : [request, []]);
}
// 类似 require('xxx')
if (request.length < 2 ||
request.charCodeAt(0) !== 46 || // 非 . 开头
(request.charCodeAt(1) !== 46 // 非 .. 开头
&& request.charCodeAt(1) !== 47)) { // 非 / 开头
var paths = modulePaths;
if (parent) {
if (!parent.paths)
paths = parent.paths = [];
else
paths = parent.paths.concat(paths);
}
// Maintain backwards compat with certain broken uses of require('.')
// by putting the module's directory in front of the lookup paths.
if (request === '.') {
if (parent && parent.filename) {
paths.unshift(path.dirname(parent.filename));
} else {
paths.unshift(path.resolve(request));
}
}
debug('looking for %j in %j', request, paths);
return (newReturn ? (paths.length > 0 ? paths : null) : [request, paths]);
}
// 执行 Module.runMain() 进入,此时 request 是绝对路径
// with --eval, parent.id is not set and parent.filename is null
if (!parent || !parent.id || !parent.filename) {
// make require('./path/to/foo') work - normally the path is taken
// from realpath(__filename) but with eval there is no filename
var mainPaths = ['.'].concat(Module._nodeModulePaths('.'), modulePaths);
debug('looking for %j in %j', request, mainPaths);
return (newReturn ? mainPaths : [request, mainPaths]);
}
// ...
var parentDir = [path.dirname(parent.filename)];
debug('looking for %j in %j', id, parentDir);
return (newReturn ? parentDir : [id, parentDir]);
};使用 Module._resolveLookupPaths() 函数找到模块可能存在的目录后,调用 Module._findPath() 函数,递归查找模块
Module._findPath() 函数在查找模块时,存在以下几种情况:
require 的是文件 ==> .js / .json / .noderequire 的文件夹 ==> 找 index.js / index.json / index.noderequire 的包 ==> 找 package.json// lib/module.js
Module._findPath = function(request, paths, isMain) {
if (path.isAbsolute(request)) {
paths = [''];
} else if (!paths || paths.length === 0) {
return false;
}
// 计算 cacheKey
// 对于同一模块,每个目录的 cacheKey 不同
var cacheKey = request + '\x00' +
(paths.length === 1 ? paths[0] : paths.join('\x00'));
var entry = Module._pathCache[cacheKey];
// 有缓存就走缓存
if (entry)
return entry;
var exts;
var trailingSlash = request.length > 0 &&
request.charCodeAt(request.length - 1) === 47; // /
// For each path
for (var i = 0; i < paths.length; i++) {
const curPath = paths[i];
// 不存在就跳过
if (curPath && stat(curPath) < 1) continue;
var basePath = path.resolve(curPath, request);
var filename;
var rc = stat(basePath);
if (!trailingSlash) {
if (rc === 0) { // 文件
if (preserveSymlinks && !isMain) {
filename = path.resolve(basePath);
} else {
filename = toRealPath(basePath);
}
} else if (rc === 1) { // 目录或 package
if (exts === undefined)
exts = Object.keys(Module._extensions);
// 如果是目录,则 filename 为 false
filename = tryPackage(basePath, exts, isMain);
}
// 对应是文件但未给出文件后缀的情况
if (!filename) {
// try it with each of the extensions
if (exts === undefined)
exts = Object.keys(Module._extensions);
filename = tryExtensions(basePath, exts, isMain);
}
}
if (!filename && rc === 1) { // 目录或 package
if (exts === undefined)
exts = Object.keys(Module._extensions);
// 如果是目录,则 filename 为 false
filename = tryPackage(basePath, exts, isMain);
}
if (!filename && rc === 1) { // 目录
// try it with each of the extensions at "index"
if (exts === undefined)
exts = Object.keys(Module._extensions);
filename = tryExtensions(path.resolve(basePath, 'index'), exts, isMain);
}
if (filename) {
// Warn once if '.' resolved outside the module dir
if (request === '.' && i > 0) {
if (!warned) {
warned = true;
process.emitWarning(
'warning: require(\'.\') resolved outside the package ' +
'directory. This functionality is deprecated and will be removed ' +
'soon.',
'DeprecationWarning', 'DEP0019');
}
}
Module._pathCache[cacheKey] = filename;
return filename;
}
}
return false;
};上面的 for 循环内有许多重复代码,可以优化为:
  var exts = Object.keys(Module._extensions);
  var trailingSlash = request.length > 0 &&
                      request.charCodeAt(request.length - 1) === 47; // /

  for (var i = 0; i < paths.length; i++) {
    const curPath = paths[i];
    // 不存在就跳过
    if (curPath && stat(curPath) < 1) continue;
    var basePath = path.resolve(curPath, request);
    var filename;

    var rc = stat(basePath);
    if (!trailingSlash && rc !== 1) {  // 文件或啥也没有
      if (rc === 0) {  // 文件
        if (preserveSymlinks && !isMain) {
          filename = path.resolve(basePath);
        } else {
          filename = toRealPath(basePath);
        }
      } else {  // 对应是文件但未给出文件后缀的情况
        filename = tryExtensions(basePath, exts, isMain);
      }
    }

    if(!filename && rc === 1){  // 目录或 package
      filename = tryPackage(basePath, exts, isMain);

      // 如果是目录,则 filename 为 false
      if (!filename) {
        // try it with each of the extensions at "index"
        filename = tryExtensions(path.resolve(basePath, 'index'), exts, isMain);
      }
    }

    if (filename) {
      // Warn once if '.' resolved outside the module dir
      if (request === '.' && i > 0) {
        if (!warned) {
          warned = true;
          process.emitWarning(
            'warning: require(\'.\') resolved outside the package ' +
            'directory. This functionality is deprecated and will be removed ' +
            'soon.',
            'DeprecationWarning', 'DEP0019');
        }
      }

      Module._pathCache[cacheKey] = filename;
      return filename;
    }
  }
Module._findPath() 函数内部依赖下面几个方法:
// lib/module.js

function tryPackage(requestPath, exts, isMain) {
  // 读取目录下的 package.json 并返回 package.main,没有则返回 false
  var pkg = readPackage(requestPath);

  if (!pkg) return false;

  var filename = path.resolve(requestPath, pkg);
  return tryFile(filename, isMain) || // package.main 有后缀
         tryExtensions(filename, exts, isMain) || // package.main 没有后缀
         tryExtensions(path.resolve(filename, 'index'), exts, isMain); // package.main 不存在则默认加载 index.js / index.json / index.node
}

function readPackage(requestPath) {
  const entry = packageMainCache[requestPath];
  if (entry)
    return entry;

  const jsonPath = path.resolve(requestPath, 'package.json');
  const json = internalModuleReadFile(path._makeLong(jsonPath));

  // 没有 package.json,说明不是一个包
  if (json === undefined) {
    return false;
  }

  try {
    var pkg = packageMainCache[requestPath] = JSON.parse(json).main;
  } catch (e) {
    e.path = jsonPath;
    e.message = 'Error parsing ' + jsonPath + ': ' + e.message;
    throw e;
  }
  return pkg;
}

// given a path check a the file exists with any of the set extensions
function tryExtensions(p, exts, isMain) {
  for (var i = 0; i < exts.length; i++) {
    const filename = tryFile(p + exts[i], isMain);

    if (filename) {
      return filename;
    }
  }
  return false;
}

// check if the file exists and is not a directory
// if using --preserve-symlinks and isMain is false,
// keep symlinks intact, otherwise resolve to the
// absolute realpath.
function tryFile(requestPath, isMain) {
  const rc = stat(requestPath);
  if (preserveSymlinks && !isMain) {
    return rc === 0 && path.resolve(requestPath);
  }
  return rc === 0 && toRealPath(requestPath);
}

function toRealPath(requestPath) {
  return fs.realpathSync(requestPath, {
    [internalFS.realpathCacheKey]: realpathCache
  });
}
通过以上步骤,我们找到了对应的模块文件,下面开始加载模块
通过 Module._resolveFilename() 函数找到具体的模块文件路径后,就可以开始加载模块了
Module._load() 调用 tryModuleLoad() 函数来加载模块。tryModuleLoad() 则将 module.load() 函数( 真正加载模块的函数 )包裹在一个 try-finally 块中
// lib/module.js

function tryModuleLoad(module, filename) {
  var threw = true;
  try {
    module.load(filename);
    threw = false;
  } finally {
    if (threw) {
      delete Module._cache[filename];
    }
  }
}对于 Module.prototype.load() 函数来说,模块文件有三种类型:
.js: 读取文件然后调用 module._compile() 编译执行,这是默认情况.json: 作为 json 文件读取.node: 直接执行编译后的二进制文件// lib/module.js
// Given a file name, pass it to the proper extension handler.
Module.prototype.load = function(filename) {
debug('load %j for module %j', filename, this.id);
assert(!this.loaded);
this.filename = filename;
// 全局 node_modules 和文件路径上所有的 node_modules
this.paths = Module._nodeModulePaths(path.dirname(filename));
// 通过文件扩展名确定加载方式,默认采用 .js 的方式加载
var extension = path.extname(filename) || '.js';
if (!Module._extensions[extension]) extension = '.js';
Module._extensions[extension](this, filename);
this.loaded = true;
};
// Native extension for .js
Module._extensions['.js'] = function(module, filename) {
var content = fs.readFileSync(filename, 'utf8');
module._compile(internalModule.stripBOM(content), filename);
};
// Native extension for .json
Module._extensions['.json'] = function(module, filename) {
var content = fs.readFileSync(filename, 'utf8');
try {
module.exports = JSON.parse(internalModule.stripBOM(content));
} catch (err) {
err.message = filename + ': ' + err.message;
throw err;
}
};
//Native extension for .node
Module._extensions['.node'] = function(module, filename) {
return process.dlopen(module, path._makeLong(filename));
};
// Run the file contents in the correct scope or sandbox. Expose
// the correct helper variables (require, module, exports) to
// the file.
// Returns exception, if any.
Module.prototype._compile = function(content, filename) {
content = internalModule.stripShebang(content);
// 使用下面这个结构包裹
// (function (exports, require, module, __filename, __dirname) {
// ...
// });
var wrapper = Module.wrap(content);
// 在沙箱内生成函数对象
var compiledWrapper = vm.runInThisContext(wrapper, {
filename: filename,
lineOffset: 0,
displayErrors: true
});
// ...
var dirname = path.dirname(filename);
var require = internalModule.makeRequireFunction(this);
var depth = internalModule.requireDepth;
if (depth === 0) stat.cache = new Map();
var result;
if (inspectorWrapper) {
result = inspectorWrapper(compiledWrapper, this.exports, this.exports,
require, this, filename, dirname);
} else {
result = compiledWrapper.call(this.exports, this.exports, require, this,
filename, dirname);
}
if (depth === 0) stat.cache = null;
return result;
};从上面的代码可以看出,执行模块时,模块中的 require,不是 module.js 中的 require,而是由 internalModule.makeRequireFunction() 生成的一个新的函数对象,其隐藏了 module 的实现细节,方便使用
// lib/internal/module.js

// Invoke with makeRequireFunction(module) where |module| is the Module object
// to use as the context for the require() function.
function makeRequireFunction(mod) {
  const Module = mod.constructor;

  function require(path) {
    try {
      exports.requireDepth += 1;
      return mod.require(path);
    } finally {
      exports.requireDepth -= 1;
    }
  }

  function resolve(request) {
    return Module._resolveFilename(request, mod);
  }

  require.resolve = resolve;

  require.main = process.mainModule;

  // Enable support to add extra extension types.
  require.extensions = Module._extensions;

  require.cache = Module._cache;

  return require;
}
各个模块文件中 require 的区别:
module.js / fs.js 等 ): 对应 NativeModule.require 函数,仅供 node 内部使用internalModule.makeRequireFunction() 函数的执行结果,底层依赖 Module.prototype.require(),遵循 CommonJS 规范当执行 const xxx = require('xxx') 这段代码时
'xxx' 和模块所在目录得出被 require 的模块可能存在的目录 - Module._resolveLookupPaths'xxx' 和 1 的结果得出被 require 的模块的文件路径 - Module._findPathmodule.exports 导出参考:
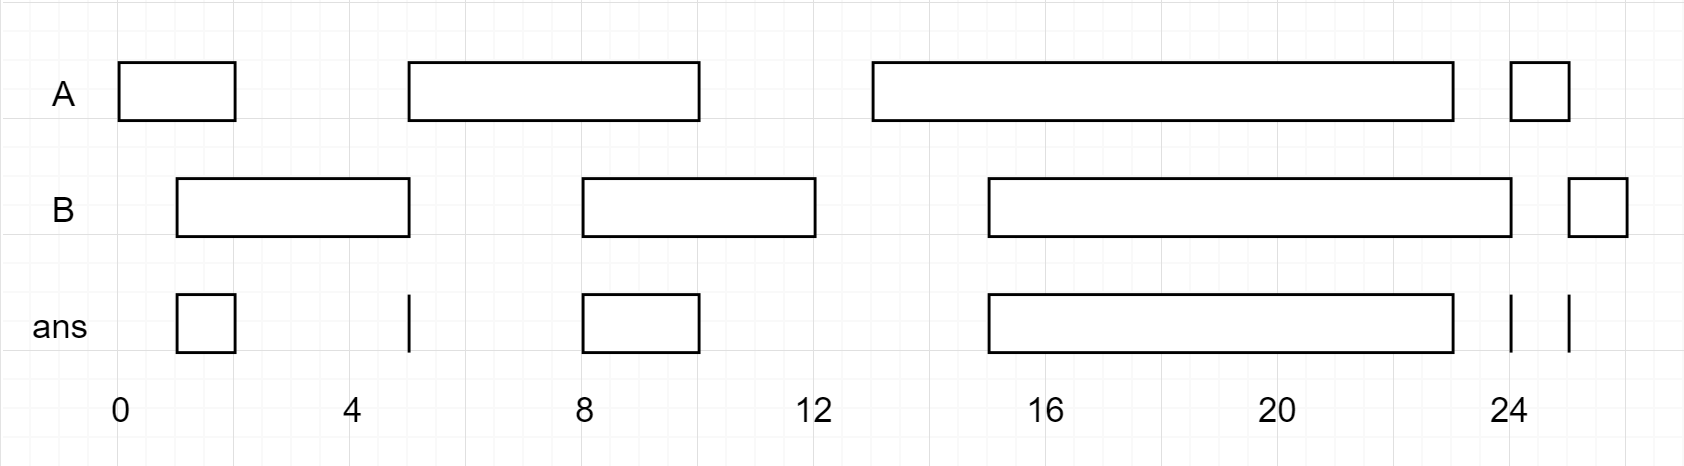
Given two lists of closed intervals, each list of intervals is pairwise disjoint and in sorted order.
Return the intersection of these two interval lists.
(Formally, a closed interval [a, b] (with a <= b) denotes the set of real numbers x with a <= x <= b. The intersection of two closed intervals is a set of real numbers that is either empty, or can be represented as a closed interval. For example, the intersection of [1, 3] and [2, 4] is [2, 3].)
Example 1:
Input: A = [[0,2],[5,10],[13,23],[24,25]], B = [[1,5],[8,12],[15,24],[25,26]]
Output: [[1,2],[5,5],[8,10],[15,23],[24,24],[25,25]]
Reminder: The inputs and the desired output are lists of Interval objects, and not arrays or lists.
Note:
0 <= A.length < 1000
0 <= B.length < 1000
0 <= A[i].start, A[i].end, B[i].start, B[i].end < 10^9
Solution:
/**
 * Definition for an interval.
 * function Interval(start, end) {
 *     this.start = start;
 *     this.end = end;
 * }
 */
/**
 * @param {Interval[]} A
 * @param {Interval[]} B
 * @return {Interval[]}
 */
var intervalIntersection = function(A, B) {
    let res = []

    let i = 0
    let j = 0
    while (i < A.length && j < B.length) {
        let x = A[i].start
        let y = A[i].end
        let x1 = B[j].start
        let y1 = B[j].end

        if (y >= x1 && x <= y1) {
            res.push({ start: Math.max(x, x1), end: Math.min(y, y1) })
        }

        y < y1 ? i++ : j++
    }

    return res
};We are given that the string "abc" is valid.
From any valid string V, we may split V into two pieces X and Y such that X + Y (X concatenated with Y) is equal to V. (X or Y may be empty.) Then, X + "abc" + Y is also valid.
If for example S = "abc", then examples of valid strings are: "abc", "aabcbc", "abcabc", "abcabcababcc". Examples of invalid strings are: "abccba", "ab", "cababc", "bac".
Return true if and only if the given string S is valid.
Example 1:
Input: "aabcbc"
Output: true
Explanation:
We start with the valid string "abc".
Then we can insert another "abc" between "a" and "bc", resulting in "a" + "abc" + "bc" which is "aabcbc".
Example 2:
Input: "abcabcababcc"
Output: true
Explanation:
"abcabcabc" is valid after consecutive insertings of "abc".
Then we can insert "abc" before the last letter, resulting in "abcabcab" + "abc" + "c" which is "abcabcababcc".
Example 3:
Input: "abccba"
Output: false
Example 4:
Input: "cababc"
Output: false
Note:
1 <= S.length <= 20000
S[i] is 'a', 'b', or 'c'
Solution:
标准思路,一次拿一个,如果符合则最后递归值为空字符串
/**
 * @param {string} S
 * @return {boolean}
 */
var isValid = function(S) {
  if (S.length === 0) return true

  for (let i = 0; i < S.length; i++) {
    if (S.substring(i, i + 3) === 'abc') return isValid(S.slice(0, i) + S.slice(i + 3))
  }

  return false
};
API 解法,既然是由 abc 组成,那么死循环将所有 abc 去除即可
/**
 * @param {string} S
 * @return {boolean}
 */
var isValid = function(S) {
  let n = S.length
  while(true) {
    if (S === '' || S === 'abc') return true
    S = S.replace(/abc/g, '')
    if (S.length === n) return false
    n = S.length
  }
};想要了解 Readable 的实现,最好的方法是顺着 Readable 的 Birth-Death 走一遍
在了解 Readable 的 Birth-Death 之前,先看看 Readable 的构造函数
// lib/_stream_readable.js

function Readable(options) {
  if (!(this instanceof Readable))
    return new Readable(options);

  // Readable 流的状态集
  this._readableState = new ReadableState(options, this);

  // legacy
  this.readable = true;

  if (options) {
    if (typeof options.read === 'function')
      // 真实数据来源,Readable.prototyoe._read() 函数会抛出异常,因此必须有options.read
      this._read = options.read;

    if (typeof options.destroy === 'function')
      this._destroy = options.destroy;
  }

  Stream.call(this);
}

function ReadableState(options, stream) {
  options = options || {};

  // object 模式标识
  this.objectMode = !!options.objectMode;

  if (stream instanceof Stream.Duplex)
    this.objectMode = this.objectMode || !!options.readableObjectMode;

  var hwm = options.highWaterMark;
  var defaultHwm = this.objectMode ? 16 : 16 * 1024;
  this.highWaterMark = (hwm || hwm === 0) ? hwm : defaultHwm;

  // highWaterMark 高水位标识
  // 内部缓存高于 highWaterMark 时,会停止调用 _read() 获取数据
  // 默认 16k
  this.highWaterMark = Math.floor(this.highWaterMark);

  // Readable 流内部缓冲池,是一个 buffer 链表
  // 之所以不用数组实现,是因为链表增删头尾元素更快
  this.buffer = new BufferList();
  // 缓存大小
  this.length = 0;
  // pipe 的流
  this.pipes = null;
  this.pipesCount = 0;
  // flow 模式标识
  this.flowing = null;
  // Readable 状态标识,为 true 表示数据源已读取完毕
  // 此时 Readable 中可能还有数据,不能再向缓冲池中 push() 数据
  this.ended = false;
  // Readable 状态标识,为 true 表示 end 事件已触发
  // 此时 Readable 中数据已读取完毕,不能再向缓冲池中 push() 或 unshift() 数据
  this.endEmitted = false;
  // Readable 状态标识,为 true 表示正在调用 _read() 读取数据
  this.reading = false;
  this.sync = true;
  // 标识需要触发 readable 事件
  this.needReadable = false;
  // 标识已触发 readable 事件
  this.emittedReadable = false;
  this.readableListening = false;
  this.resumeScheduled = false;
  this.destroyed = false;
  this.defaultEncoding = options.defaultEncoding || 'utf8';
  this.awaitDrain = 0;
  this.readingMore = false;

  // 解码器
  this.decoder = null;
  this.encoding = null;
  if (options.encoding) {
    if (!StringDecoder)
      StringDecoder = require('string_decoder').StringDecoder;
    this.decoder = new StringDecoder(options.encoding);
    this.encoding = options.encoding;
  }
}
在 Readable 的构造函数中,可通过 options 传入参数,其中 options.read 函数是必需的
readable._readableState 中保存了 Readable 的各种状态与属性
在这里将 Readable 的 Birth-Death 分为五个状态:
表中为
this._readableSate的属性
start: 初始状态,Readable 刚刚被创建,还未调用 readable.read()
| length | reading | ended | endEmitted |
|---|---|---|---|
| 0 | false | false | false |
reading: 代表正在从数据源中读取数据,此时缓存大小 this._readableSate.length 小于 highWaterMark,应读取数据使缓存达到 highWaterMark
| length | reading | ended | endEmitted |
|---|---|---|---|
| < highWaterMark | true | false | false |
read: Readable 从数据源读取数据后的相对稳定状态
| length | reading | ended | endEmitted |
|---|---|---|---|
| >= highWaterMark | false | false | false |
ended: 数据已经全部读取完成( push(null) ),此时 push(chunk) 会报 stream.push() after EOF 错误
| length | reading | ended | endEmitted |
|---|---|---|---|
| >= 0 | false | true | false |
endEmitted: end 事件触发完成,此时 unshift(chunk) 会报 stream.unshift() after end event 错误
| length | reading | ended | endEmitted |
|---|---|---|---|
| 0 | false | true | true |
它们之间的关系如下:
         1           4         5
  start ==> reading ==> ended ==> endEmitted
             || /\
           2 \/ || 3
             read
start 状态变为 reading 状态,发生在第一次调用 read() 时
// lib/_stream_readable.js

Readable.prototype.read = function(n) {
  debug('read', n);
  n = parseInt(n, 10);
  var state = this._readableState;
  var nOrig = n;

  if (n !== 0)
    state.emittedReadable = false;

  // 调用 read(0)时,如果缓存大于 highWaterMark 则直接触发 readable 事件
  if (n === 0 &&
      state.needReadable &&
      (state.length >= state.highWaterMark || state.ended)) {
    debug('read: emitReadable', state.length, state.ended);
    if (state.length === 0 && state.ended)
      endReadable(this);
    else
      emitReadable(this);
    return null;
  }

  // 计算可读数据量
  // n = NaN ==> 读取全部
  // n <= state.length ==> 读取 n
  // n > state.length ==> 读取 0,并使 Readable 从数据源读取数据
  //
  // n > state.highWaterMark ==> 重新计算 highWaterMark,大小是大于 n 的最小 2^x
  n = howMuchToRead(n, state);

  // 当 Readable 已经读完时,调用 endReadable() ,结束 Readable
  if (n === 0 && state.ended) {
    if (state.length === 0)
      endReadable(this);
    return null;
  }

  // 判断是否应该从数据源读取数据
  // BEGIN
  var doRead = state.needReadable;
  debug('need readable', doRead);

  if (state.length === 0 || state.length - n < state.highWaterMark) {
    doRead = true;
    debug('length less than watermark', doRead);
  }
  // END

  if (state.ended || state.reading) {
    // 对于 ended 或 reading 状态的 Readable 是不需要读取数据的
    doRead = false;
    debug('reading or ended', doRead);
  } else if (doRead) {
    // 读取数据
    debug('do read');
    state.reading = true;
    state.sync = true;

    if (state.length === 0)
      state.needReadable = true;
    // 从数据源读取数据,可能是异步,也可能是同步
    this._read(state.highWaterMark);
    state.sync = false;
    // 因为 _read() 函数可能是异步的,也可能是同步的
    // 在同步情况下,需要重新确认可读长度
    if (!state.reading)
      n = howMuchToRead(nOrig, state);
  }

  // 获取数据
  var ret;
  if (n > 0) ret = fromList(n, state); // 从缓冲池中读取数据
  else ret = null;

  if (ret === null) {
    state.needReadable = true;
    n = 0;
  } else {
    state.length -= n;
  }

  // ...

  if (ret !== null)
    this.emit('data', ret);

  return ret;
};

// 必须实现的方法
Readable.prototype._read = function(n) {
  this.emit('error', new Error('_read() is not implemented'));
};

// 计算可读长度
function howMuchToRead(n, state) {
  if (n <= 0 || (state.length === 0 && state.ended))
    return 0;
  if (state.objectMode)
    return 1;
  if (n !== n) { // NaN
    if (state.flowing && state.length)
      return state.buffer.head.data.length;
    else
      return state.length;
  }

  if (n > state.highWaterMark)
    // 当需要数据大于 highWaterMark 时,调整 highWaterMark 大小到大于 n 的最小 2^x
    state.highWaterMark = computeNewHighWaterMark(n);
  if (n <= state.length)
    return n;
  // 缓冲池中数据不够
  if (!state.ended) {
    state.needReadable = true;
    return 0;
  }
  return state.length;
}
调用 read() 后,如果缓冲池中数据不够或读取后低于 highWaterMark,则调用 _read() 来读取更多的数据,否则直接返回读取的数据
当期望数据量大于 highWaterMark 时,重新计算 highWaterMark,大小是大于期望数据量的最小 2^x
调用 _read() 后,会异步或同步地将调用 push(chunk),将数据放入缓冲池,并使 Readable 从 reading 状态变为 read 状态
// lib/_stream_readable.js

Readable.prototype.push = function(chunk, encoding) {
  var state = this._readableState;
  var skipChunkCheck;

  if (!state.objectMode) {
    if (typeof chunk === 'string') {
      encoding = encoding || state.defaultEncoding;
      // 如果指定编码与 Readable 编码不同,则将 chunk 使用指定编码解码为 Buffer
      if (encoding !== state.encoding) {
        chunk = Buffer.from(chunk, encoding);
        encoding = '';
      }
      // string 不需要检查
      skipChunkCheck = true;
    }
  } else {
    // object mode 的 Readable 也不需要检查
    skipChunkCheck = true;
  }

  return readableAddChunk(this, chunk, encoding, false, skipChunkCheck);
};

function readableAddChunk(stream, chunk, encoding, addToFront, skipChunkCheck) {
  var state = stream._readableState;
  if (chunk === null) { // 结束信号
    state.reading = false;
    onEofChunk(stream, state);
  } else {
    var er;
    if (!skipChunkCheck) // 检查 chunk 格式
      er = chunkInvalid(state, chunk);
    if (er) {
      stream.emit('error', er);
    } else if (state.objectMode || chunk && chunk.length > 0) {
      if (typeof chunk !== 'string' &&
          Object.getPrototypeOf(chunk) !== Buffer.prototype &&
          !state.objectMode) {
        chunk = Stream._uint8ArrayToBuffer(chunk);
      }

      if (addToFront) { // unshift() 的 hook
        if (state.endEmitted)
          stream.emit('error', new Error('stream.unshift() after end event'));
        else
          addChunk(stream, state, chunk, true); // 将数据添加到缓冲池中
      } else if (state.ended) {
        stream.emit('error', new Error('stream.push() after EOF'));
      } else {
        state.reading = false;
        if (state.decoder && !encoding) {
          chunk = state.decoder.write(chunk);
          if (state.objectMode || chunk.length !== 0)
            addChunk(stream, state, chunk, false); // 将数据添加到缓冲池中
          else
            maybeReadMore(stream, state); // 会在 addChunk() 函数内部调用
        } else {
          addChunk(stream, state, chunk, false); // 将数据添加到缓冲池中
        }
      }
    } else if (!addToFront) {
      state.reading = false;
    }
  }

  return needMoreData(state);
  // return !state.ended &&  数据源还有数据
  //          (state.needReadable ||  需要更多数据
  //           state.length < state.highWaterMark ||  缓存小于 highWaterMark
  //           state.length === 0)
}

function addChunk(stream, state, chunk, addToFront) {
  if (state.flowing && state.length === 0 && !state.sync) {
    // 对于异步 flow 模式的 Readable,直接触发 data 事件,并继续读取数据,无需将数据写入缓冲区
    stream.emit('data', chunk);
    stream.read(0);
  } else {
     // 对于同步 flow 模式或 pause 模式的 Readable,则直接将数据写入缓冲区

     // 需要注意:flow 模式下,Readable 与 Writable 之间的沟通依靠的是 data/drain 事件
     // 因此对于同步 flow 模式的 Readable 还需要经过 Readable.prototype.read 函数内的 this.emit('data', ret) 才能将数据流向 Writable
    state.length += state.objectMode ? 1 : chunk.length;
    if (addToFront)
      state.buffer.unshift(chunk);
    else
      state.buffer.push(chunk);

    if (state.needReadable)
      emitReadable(stream);
  }

  // 在允许的情况下,读取数据直到 highWaterMark
  maybeReadMore(stream, state);
}
调用 push(chunk) 时,会将 chunk 放入缓冲池内,并改变 Readable 的状态。如果 Readable 处于 ended 状态,会报 stream.push() after EOF 错误
如果缓存小于 highWaterMark,返回 true,意味着需要写入更多的数据
从 read 到 reading 状态,意味着需要读取更多的数据,即缓存小于 highWaterMark
缓存与 highWaterMark 的关系可以根据 push(chunk) 的返回值来判断,但是需要使用者手动处理。因此,为了方便使用,addChunk() 函数会自动调用 maybeReadMore() 来异步读取数据。这样,即使单次 _read() 无法达到 highWaterMark,也可以通过多次异步读取,使数据流动起来
// lib/_stream_readable.js

function maybeReadMore(stream, state) {
  if (!state.readingMore) {
    state.readingMore = true;
    process.nextTick(maybeReadMore_, stream, state);
  }
}

function maybeReadMore_(stream, state) {
  var len = state.length;
  while (!state.reading && !state.flowing && !state.ended &&
         state.length < state.highWaterMark) {
    debug('maybeReadMore read 0');
    stream.read(0);
    if (len === state.length) // 取不到数据就放弃
      break;
    else
      len = state.length;
  }
  state.readingMore = false;
}
在 maybeReadMore() 函数内,通过异步读取数据,直到 highWaterMark
那么为什么是异步读取数据呢?
因为,在 _read() 函数内,可能不止一次调用 push(chunk)
如果是同步,push(chunk) 后,因为没有达到 highWaterMark,会继续调用 read(0),发生第二次 _read()。第二次 _read() 也可能导致第三次 _read() ,直到 highWaterMark
待整个调用完毕后,缓冲池内会有 highWaterMark * n( _read() 内调用 push(chunk) 次数 )的数据,而这与 highWaterMark 的设计是不符的
如果是异步,则可以等 _read() 执行完毕后,在 process.nextTick() 内再次调用 _read() 读取数据,不会发生上面的问题
当数据源读取完毕时,需要调用 push(null) 来通知 Rreadable 数据源已经读取完毕。push(null) 函数内部会调用 onEofChunk()
// lib/_stream_readable.js

function onEofChunk(stream, state) {
  if (state.ended) return;
  if (state.decoder) {
    var chunk = state.decoder.end();
    if (chunk && chunk.length) {
      state.buffer.push(chunk);
      state.length += state.objectMode ? 1 : chunk.length;
    }
  }
  state.ended = true;

  // 触发 readable 事件,通知监听者来处理剩余数据
  emitReadable(stream);
}
onEofChunk() 函数将 readable 标记为 ended 状态后,禁止再向缓冲池内 push 数据。此时,缓冲池内可能还有数据
ended 状态的 Readable 内可能还有数据。因此,当数据全部被读取后,需要调用 endReadable() 来结束 Readable
// lib/_stream_readable.js

function endReadable(stream) {
  var state = stream._readableState;

  // state.length 一定是 0
  if (state.length > 0)
    throw new Error('"endReadable()" called on non-empty stream');

  if (!state.endEmitted) {
    state.ended = true;
    process.nextTick(endReadableNT, state, stream);
  }
}

function endReadableNT(state, stream) {
  // 防止中间调用 unshift(chunk),向缓冲池中放入数据
  if (!state.endEmitted && state.length === 0) {
    state.endEmitted = true;
    stream.readable = false;
    stream.emit('end');
  }
}
调用 endReadable() 时,缓冲池一定为空。整个调用完成后,触发 end 事件,Readable 将不能再读取或写入( push() / unshift() )数据
到这里,已经走完了 Readable 的整个 Birth-Death 过程
整个过程就如下面这个图:
         1           4         5
  start ==> reading ==> ended ==> endEmitted
             || /\
           2 \/ || 3
             read

1. read()
2. push(chunk)
3. maybeReadMore() ==> read(0)
4. push(null)
5. endReadable()
根据这个图还有代码,在脑袋里面,把 Readable 的模型运行一遍,就能了解它的实现了
参考:
On a N x N grid of cells, each cell (x, y) with 0 <= x < N and 0 <= y < N has a lamp.
Initially, some number of lamps are on. lamps[i] tells us the location of the i-th lamp that is on. Each lamp that is on illuminates every square on its x-axis, y-axis, and both diagonals (similar to a Queen in chess).
For the i-th query queries[i] = (x, y), the answer to the query is 1 if the cell (x, y) is illuminated, else 0.
After each query (x, y) [in the order given by queries], we turn off any lamps that are at cell (x, y) or are adjacent 8-directionally (ie., share a corner or edge with cell (x, y).)
Return an array of answers. Each value answer[i] should be equal to the answer of the i-th query queries[i].
Example 1:
Input: N = 5, lamps = [[0,0],[4,4]], queries = [[1,1],[1,0]]
Output: [1,0]
Explanation:
Before performing the first query we have both lamps [0,0] and [4,4] on.
The grid representing which cells are lit looks like this, where [0,0] is the top left corner, and [4,4] is the bottom right corner:
1 1 1 1 1
1 1 0 0 1
1 0 1 0 1
1 0 0 1 1
1 1 1 1 1
Then the query at [1, 1] returns 1 because the cell is lit.  After this query, the lamp at [0, 0] turns off, and the grid now looks like this:
1 0 0 0 1
0 1 0 0 1
0 0 1 0 1
0 0 0 1 1
1 1 1 1 1
Before performing the second query we have only the lamp [4,4] on.  Now the query at [1,0] returns 0, because the cell is no longer lit.
Note:
1 <= N <= 10^9
0 <= lamps.length <= 20000
0 <= queries.length <= 20000
lamps[i].length == queries[i].length == 2
Solution:
既然是求 (x, y) 处是 0 还是 1,那就先确定 (x, y) 再倒推此处应该是 0 还是 1
/**
 * @param {number} N
 * @param {number[][]} lamps
 * @param {number[][]} queries
 * @return {number[]}
 */
var gridIllumination = function(N, lamps, queries) {
    let result = []

    let lampMap = {}
    let rowMap = {}
    let colMap = {}
    let slashMap = {}
    let backSlashMap = {}
    for (let [x, y] of lamps) {
        let k = `${x}${y}`

        if (!lampMap[k]) {
            lampMap[k] = 1
            rowMap[x] = (rowMap[x] || 0) + 1
            colMap[y] = (colMap[y] || 0) + 1
            slashMap[x + y] = (slashMap[x + y] || 0) + 1
            backSlashMap[N - x + y] = (backSlashMap[N - x + y] || 0) + 1
        }
    }

    function clearLamp(x, y) {
        let k = `${x}${y}`
        if (lampMap[k]) {
            rowMap[x]--
            colMap[y]--
            slashMap[x + y]--
            backSlashMap[N - x + y]--
            lampMap[k] = 0
        }
    }

    for (let i = 0; i < queries.length; i++) {
        let x = queries[i][0]
        let y = queries[i][1]
        let k = `${x}${y}`

        if (rowMap[x] || colMap[y] || slashMap[x + y] || backSlashMap[N - x + y]) {
            result[i] = 1

            if (lampMap[k]) {
                clearLamp(x, y)
            } else {
                clearLamp(x - 1, y - 1)
                clearLamp(x - 1, y)
                clearLamp(x - 1, y + 1)
                clearLamp(x, y - 1)
                clearLamp(x, y + 1)
                clearLamp(x + 1, y - 1)
                clearLamp(x + 1, y)
                clearLamp(x + 1, y + 1)
            }
        } else {
            result[i] = 0
        }
    }

    return result
};In a deck of cards, every card has a unique integer. You can order the deck in any order you want.
Initially, all the cards start face down (unrevealed) in one deck.
Now, you do the following steps repeatedly, until all cards are revealed:
Return an ordering of the deck that would reveal the cards in increasing order.
The first entry in the answer is considered to be the top of the deck.
Example 1:
Input: [17,13,11,2,3,5,7]
Output: [2,13,3,11,5,17,7]
Explanation:
We get the deck in the order [17,13,11,2,3,5,7] (this order doesn't matter), and reorder it.
After reordering, the deck starts as [2,13,3,11,5,17,7], where 2 is the top of the deck.
We reveal 2, and move 13 to the bottom.  The deck is now [3,11,5,17,7,13].
We reveal 3, and move 11 to the bottom.  The deck is now [5,17,7,13,11].
We reveal 5, and move 17 to the bottom.  The deck is now [7,13,11,17].
We reveal 7, and move 13 to the bottom.  The deck is now [11,17,13].
We reveal 11, and move 17 to the bottom.  The deck is now [13,17].
We reveal 13, and move 17 to the bottom.  The deck is now [17].
We reveal 17.
Since all the cards revealed are in increasing order, the answer is correct.
Note:
1 <= A.length <= 1000
1 <= A[i] <= 10^6
A[i] != A[j] for all i != j
Solution:
仔细观察给出的示例,倒序
/**
 * @param {number[]} deck
 * @return {number[]}
 */
const deckRevealedIncreasing = function(deck) {
  deck.sort((i, j) => j - i);

  const res = [ deck.shift() ];
  for (const i of deck) {
    res.unshift(i, res.pop());
  }

  return res;
};Given a set of points in the xy-plane, determine the minimum area of a rectangle formed from these points, with sides parallel to the x and y axes.
If there isn't any rectangle, return 0.
Example 1:
Input: [[1,1],[1,3],[3,1],[3,3],[2,2]]
Output: 4
Example 2:
Input: [[1,1],[1,3],[3,1],[3,3],[4,1],[4,3]]
Output: 2
Note:
1 <= points.length <= 500
0 <= points[i][0] <= 40000
0 <= points[i][1] <= 40000
All points are distinct.
Solution:
/**
 * @param {number[][]} points
 * @return {number}
 */
const minAreaRect = function(points) {
  let min = Number.MAX_SAFE_INTEGER;

  for (let i = 0; i < points.length - 1; i++) {
    const [ x, y ] = points[i];
    for (let j = i + 1; j < points.length; j++) {
      const [ x1, y1 ] = points[j];
      const rect = Math.abs((x - x1) * (y - y1));
      if (rect >= min || rect === 0) continue;

      let validate = 0;

      for (const [ x2, y2 ] of points) {
        if (x2 === x && y2 === y1) validate++;
        if (x2 === x1 && y2 === y) validate++;
      }

      if (validate === 2) min = rect;
    }
  }

  return min === Number.MAX_SAFE_INTEGER ? 0 : min;
};ZooKeeper ( 简称 zk ) 是一个开源的分布式协调服务,其常用做分布式服务的注册中心
本文要讲的是 Node.js 的 zk sdk -- node-zookeeper-client
在这之前,先了解一下 zk 相关的基本知识
ZooKeeper Transaction Id,用于保证 zk 分布式一致性[总长度, header, payload]先从使用示例开始
/**
 * xiedacon created at 2019-06-14 10:07:46
 *
 * Copyright (c) 2019 Souche.com, all rights reserved.
 */
'use strict';

const ZK = require('node-zookeeper-client');
const util = require('util');

const client = ZK.createClient('127.0.0.1:2181');

client.getChildren = util.promisify(client.getChildren);

(async () => {
  console.log('Result:', await client.getChildren('/xxx'));
})().catch((err) => {
  console.log(err);
});

client.connect();
上面的代码总共分成 3 步:
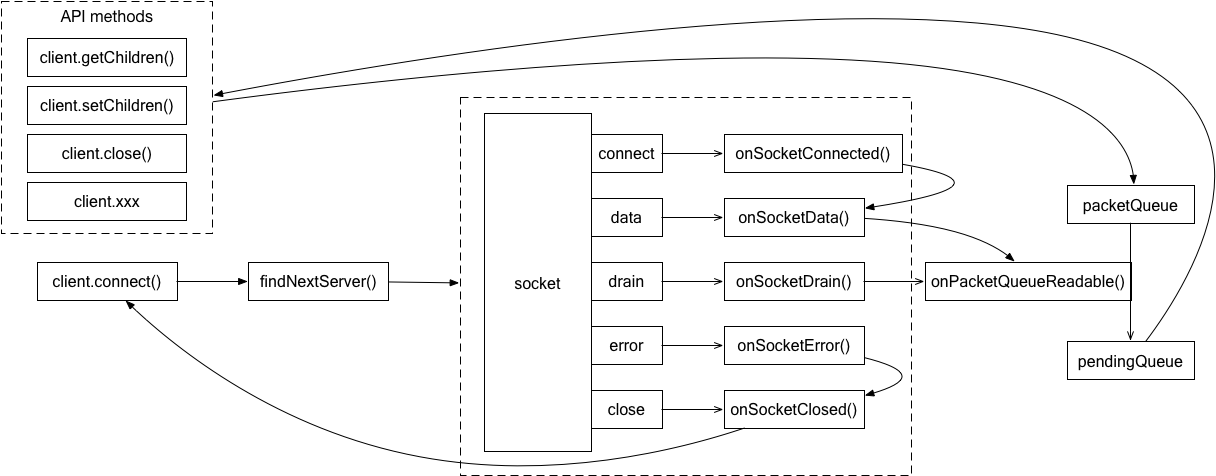
ZK.createClient('127.0.0.1:2181'),创建 zk 客户端实例client.connect(),与 zk 服务端建立连接client.getChildren('/xxx'),获取 /xxx 节点下的所有子节点zk 客户端可大致分为三块:
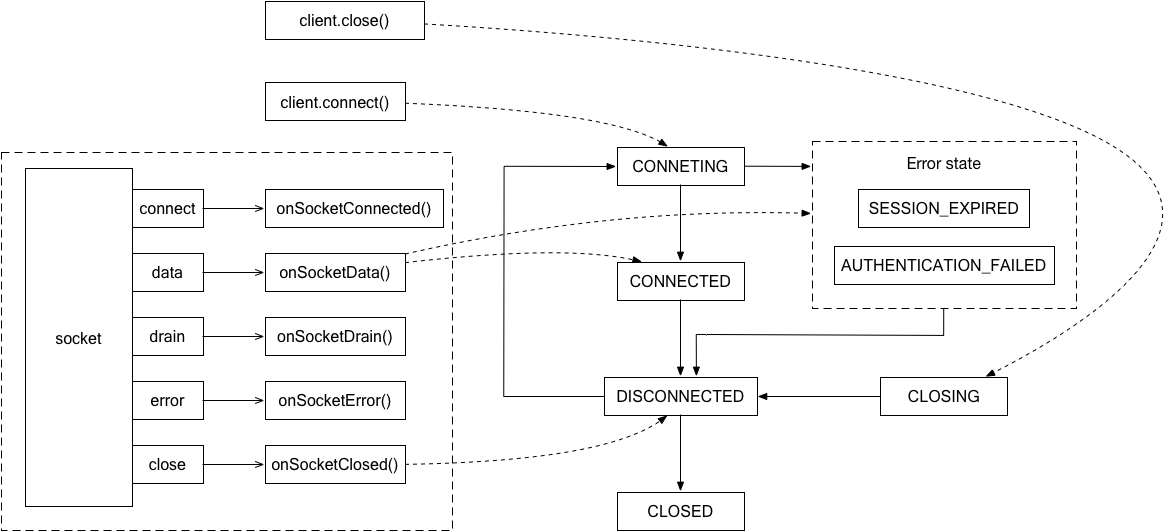
index.jslib/connectionManager.jslib/watcherManager.jsclient.connect(),connect 方法内调用 connectionManager.connect(),将 connectionManager 状态置为 CONNECTINGfindNextServer() 获取一个 zk 服务器地址connect、data、drain、close、error 事件onSocketConnected 方法error、close 事件,并执行 onSocketError、onSocketClosed 方法onSocketData 方法,此时 connectionManager 状态为 CONNECTINGconnectResponse.timeOut <= 0 意味着当前 client 的 session 过期:将 connectionManager 状态置为 SESSION_EXPIRED,稍后 zk 服务器将自动关闭 socket,即触发 5drain,发送阻塞 request,使数据流动起来PS:其实并没有触发 socket drain 的代码,而是调用的 onPacketQueueReadable 方法,但它们的效果一样
client.getChildren('/xxx')connectionManager.queue ,将 request 放入 packetQueue 中,同时触发 socket drainonPacketQueueReadable 方法中,对于非 Auth、Ping 等的外部 request,设置 xiddata 事件,此时 connectionManager 状态为 CONECTEDclient.getChildren 的回调方法PS:其实并没有触发 socket drain 的代码,而是触发 packetQueue 的 readable 事件,但它们的效果一样
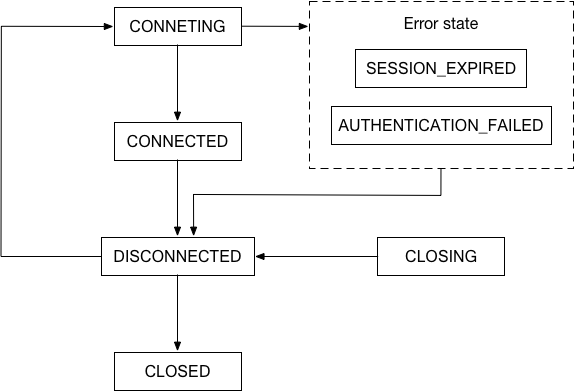
各方法与状态机的关系如下:
node-zookeeper-client 本身提供断线重连的能力
对于长期断线 ( 30s 以上 ),连接重新建立后,当前客户端的 session 已经过期,connectionManager 将进入 SESSION_EXPIRED 状态,此时调用 queue 方法会抛出 SESSION_EXPIRED 错误
这一问题在 zookeeper 文档 中也有提到:
It means that the client was partitioned off from the ZooKeeper service for more the the session timeout and ZooKeeper decided that the client died.
当客户端收到 SESSION_EXPIRED 错误时,那意味着当前客户端已经从 ZooKeeper 服务中断开,即 sesssion 过期,ZooKeeper 判定当前客户端应当关闭。
If the client is only reading state from ZooKeeper, recovery means just reconnecting. In more complex applications, recovery means recreating ephemeral nodes, vying for leadership roles, and reconstructing published state.
如果客户端以只读方式连接的 ZooKeeper,那么只需要重新连接就好了。但在更复杂的情况下,重连就意味着重新创建临时节点,参与 leader 竞争,重建已发布的状态。
因此 node-zookeeper-client 的做法也合情合理,当 session 过期时直接禁止发送,由调用程序决定是否重连,重连后需要做什么操作
但在大多数情况下,node-zookeeper-client 只会作为一个简单的客户端连接 zookeeper 服务,不会参与 zk 选举,因此,它最多需要做的事情也只是恢复临时节点
目前的方案是 session 过期自动重连,重连成功后将会进入 CONNECTED 状态并触发 connect 事件,在事件内重新注册临时节点
在 zk 集群中,不同服务节点之间通过 ZAB 协议,保证分布式一致性。zxid ( ZooKeeper Transaction Id ) 就是用于保证分布式一致性的标识符
zk 直接挂掉或者手动重启都将会导致集群 zxid 重置。当客户端重连时,由于客户端本身存储的 xzid 大于 zk 集群 xzid,此时,zk 集群将拒绝客户端连接。外部表现为 connectionManager 疯狂执行 connect 操作,所有调用阻塞,zk 日志输出 Refusing session request for client /192.168.0.1:33400 as it has seen zxid 0x300000012 our last zxid is 0x0 client must try another server
虽然 zk 集群判断出 zxid 有误,但直接断开连接的处理方式确实是有待考量。因为通过这种方式处理,客户端完全不知道发生了什么,只能通过重连来解决,然而重连又连接不上,这就形成了一个死循环
由于客户端无需在意 zk 集群版本,因此,可以在每次连接时,直接重置 zxid 即可
Node.js 版本 8.x
Node.js 进程启动时,首先执行 c / c++ 代码,然后 c / c++ 加载并执行 lib/internal/bootstrap_node.js 并给予一个 process 参数( 运行上下文 )
// lib/internal/bootstrap_node.js 概览

// Hello, and welcome to hacking node.js!
//
// This file is invoked by node::LoadEnvironment in src/node.cc, and is
// responsible for bootstrapping the node.js core. As special caution is given
// to the performance of the startup process, many dependencies are invoked
// lazily.

'use strict';

// 这里的 process 对象来自 c / c++,属于原始数据
(function(process) {
  // ...

  startup();
})
加载 lib/internal/bootstrap_node.js 后,直接执行 startup() 函数
// lib/internal/bootstrap_node.js

  function startup() {
    // 下面几行代码使 process 具有 EventEmitter 的特性,比如说 on,emit
    // BEGIN
    const EventEmitter = NativeModule.require('events');
    process._eventsCount = 0;

    const origProcProto = Object.getPrototypeOf(process);
    Object.setPrototypeOf(process, Object.create(EventEmitter.prototype, {
      constructor: Object.getOwnPropertyDescriptor(origProcProto, 'constructor')
    }));
    // 相当于 new EventEmitter() ,不过上下文是 process
    EventEmitter.call(process);
    // END

    // 一些初始化操作
    // BEGIN
    setupProcessObject();
    // do this good and early, since it handles errors.
    setupProcessFatal();
    setupProcessICUVersions();
    setupGlobalVariables();
    if (!process._noBrowserGlobals) {
      setupGlobalTimeouts();
      setupGlobalConsole();
    }
    // END

    // process 对象的初始化操作
    // BEGIN
    // 这里的 internal/process 模块用于初始化 process
    const _process = NativeModule.require('internal/process');
    _process.setup_hrtime();
    _process.setup_cpuUsage();
    _process.setupMemoryUsage();
    _process.setupConfig(NativeModule._source);
    NativeModule.require('internal/process/warning').setup();
    NativeModule.require('internal/process/next_tick').setup();
    NativeModule.require('internal/process/stdio').setup();
    _process.setupKillAndExit();
    _process.setupSignalHandlers();
    if (global.__coverage__)
      NativeModule.require('internal/process/write-coverage').setup();

    if (process.argv[1] !== '--debug-agent')
      _process.setupChannel();

    _process.setupRawDebug();

    NativeModule.require('internal/url');

    Object.defineProperty(process, 'argv0', {
      enumerable: true,
      configurable: false,
      value: process.argv[0]
    });
    process.argv[0] = process.execPath;
    // ...
    // END

    // 下面的 if-else 用来判断 node 的运行模式,我们只关注 node xx.js 的运行模式

    // if () {
    // ...
    } else {
      // 执行用户代码

      // cluster 模块的 hook
      if (process.argv[1] && process.env.NODE_UNIQUE_ID) {
        const cluster = NativeModule.require('cluster');
        cluster._setupWorker();

        // Make sure it's not accidentally inherited by child processes.
        delete process.env.NODE_UNIQUE_ID;
      }

      if (process._eval != null && !process._forceRepl) {
        // ...
      } else if (process.argv[1] && process.argv[1] !== '-') {
        // node app.js

        // make process.argv[1] into a full path
        const path = NativeModule.require('path');
        // 变为绝对路径
        process.argv[1] = path.resolve(process.argv[1]);

        const Module = NativeModule.require('module');

        // check if user passed `-c` or `--check` arguments to Node.
        if (process._syntax_check_only != null) {
          const fs = NativeModule.require('fs');
          // read the source
          const filename = Module._resolveFilename(process.argv[1]);
          var source = fs.readFileSync(filename, 'utf-8');
          checkScriptSyntax(source, filename);
          process.exit(0);
        }

        preloadModules();
        Module.runMain();
      } else {
        // REPL 或其他
      }
    }
  }
startup() 最后调用 Module.runMain() 函数来加载并执行用户代码。在执行 startup() 函数的过程中,多次用到了 NativeModule.require() 来加载模块
NativeModule.require() 是专门用来加载 Node.js 内置模块的
// lib/internal/bootstrap_node.js

  function NativeModule(id) {
    this.filename = `${id}.js`;
    this.id = id;
    this.exports = {};
    this.loaded = false;
    this.loading = false;
  }

  NativeModule._source = process.binding('natives');
  NativeModule._cache = {};

  NativeModule.require = function(id) {
    if (id === 'native_module') {
      return NativeModule;
    }

    const cached = NativeModule.getCached(id);
    if (cached && (cached.loaded || cached.loading)) {
      return cached.exports;
    }

    if (!NativeModule.exists(id)) {
      // Model the error off the internal/errors.js model, but
      // do not use that module given that it could actually be
      // the one causing the error if there's a bug in Node.js
      const err = new Error(`No such built-in module: ${id}`);
      err.code = 'ERR_UNKNOWN_BUILTIN_MODULE';
      err.name = 'Error [ERR_UNKNOWN_BUILTIN_MODULE]';
      throw err;
    }

    process.moduleLoadList.push(`NativeModule ${id}`);

    const nativeModule = new NativeModule(id);

    nativeModule.cache();
    nativeModule.compile();

    return nativeModule.exports;
  };

  NativeModule.getCached = function(id) {
    return NativeModule._cache[id];
  };

  NativeModule.exists = function(id) {
    return NativeModule._source.hasOwnProperty(id);
  };

  // ...

  NativeModule.wrap = function(script) {
    return NativeModule.wrapper[0] + script + NativeModule.wrapper[1];
  };

  NativeModule.wrapper = [
    '(function (exports, require, module, __filename, __dirname) { ',
    '\n});'
  ];

  NativeModule.prototype.compile = function() {
    var source = NativeModule.getSource(this.id);
    source = NativeModule.wrap(source);

    this.loading = true;

    try {
      const fn = runInThisContext(source, {
        filename: this.filename,
        lineOffset: 0,
        displayErrors: true
      });
      fn(this.exports, NativeModule.require, this, this.filename);

      this.loaded = true;
    } finally {
      this.loading = false;
    }
  };

  NativeModule.prototype.cache = function() {
    NativeModule._cache[this.id] = this;
  };
NativeModule 有几个重要的属性和方法:
id: NativeModule 的标识符,例如 events,internal/processfilename: NativeModule 对应源码文件exports: 默认值是 {}loaded / loading: NativeModule 状态_cache: 简单的模块缓存_source: 模块源码资源require(): 先查询缓存,缓存没有则新建 NativeModule 并编译,返回 exportswrap()/wrapper: wrapper 是对模块上下文的包裹,如下:
(function (exports, require, module, __filename, __dirname) {
  xxx
});compile(): 将模块源码用 wrapper 包裹后,使用 runInThisContext()(类似 eval())生成 js 函数,再执行之Node.js 启动完成后,调用 Module.runMain(),源码如下:
// bootstrap main module.
Module.runMain = function() {
  // Load the main module--the command line argument.
  Module._load(process.argv[1], null, true);
  // Handle any nextTicks added in the first tick of the program
  process._tickCallback();
};
Module._load() 加载并执行用户代码。至此 启动-js部分 已经全部完成,后续模块加载部分,见 Node.js源码解析-require背后
启动只是 Node.js 源码的一小部分,除此之外还有大量的内置模块和 c / c++ 源码
参考:
In an array A of 0s and 1s, how many non-empty subarrays have sum S?
Example 1:
Input: A = [1,0,1,0,1], S = 2
Output: 4
Explanation:
The 4 subarrays are bolded below:
[1,0,1,0,1]
[1,0,1,0,1]
[1,0,1,0,1]
[1,0,1,0,1]
Note:
A.length <= 30000
0 <= S <= A.length
A[i] is either 0 or 1.
Solution:
/**
 * @param {number[]} A
 * @param {number} S
 * @return {number}
 */
const numSubarraysWithSum = function(A, S) {
  let res = 0;
  let sum = 0;
  const arr = new Array(A.length + 1).fill(0);
  arr[0] = 1;

  for (const i of A) {
    sum += i;
    if (sum >= S) res += arr[sum - S];

    arr[sum]++;
  }

  return res;
};In an array A containing only 0s and 1s, a K-bit flip consists of choosing a (contiguous) subarray of length K and simultaneously changing every 0 in the subarray to 1, and every 1 in the subarray to 0.
Return the minimum number of K-bit flips required so that there is no 0 in the array. If it is not possible, return -1.
Example 1:
Input: A = [0,1,0], K = 1
Output: 2
Explanation: Flip A[0], then flip A[2].
Example 2:
Input: A = [1,1,0], K = 2
Output: -1
Explanation: No matter how we flip subarrays of size 2, we can't make the array become [1,1,1].
Example 3:
Input: A = [0,0,0,1,0,1,1,0], K = 3
Output: 3
Explanation:
Flip A[0],A[1],A[2]: A becomes [1,1,1,1,0,1,1,0]
Flip A[4],A[5],A[6]: A becomes [1,1,1,1,1,0,0,0]
Flip A[5],A[6],A[7]: A becomes [1,1,1,1,1,1,1,1]
Note:
1 <= A.length <= 30000
1 <= K <= A.length
Solution:
遇 0 就翻转
/**
 * @param {number[]} A
 * @param {number} K
 * @return {number}
 */
var minKBitFlips = function(A, K) {
    let n = 0

    for (let i = 0; i <= A.length - K; i++) {
        if (!A[i]) {
            n++

            for (let j = i; j < i + K; j++) {
                A[j] ^= 1
            }
        }
    }

    return A.every(a => a) ? n : -1
};
将解法 1 中的翻转数组变为翻转变量
/**
 * @param {number[]} A
 * @param {number} K
 * @return {number}
 */
var minKBitFlips = function(A, K) {
    let n = 0
    let flip = 0
    let arr = Array(A.length).fill(0)

    for (let i = 0; i < A.length; i++) {
        flip ^= arr[i]

        if (!(A[i] ^ flip)) {
            if (i + K > A.length) return -1

            n++
            arr[i + K] = 1
            flip ^= 1
        }
    }

    return n
};Given an array of integers A, a move consists of choosing any A[i], and incrementing it by 1.
Return the least number of moves to make every value in A unique.
Example 1:
Input: [1,2,2]
Output: 1
Explanation:  After 1 move, the array could be [1, 2, 3].
Example 2:
Input: [3,2,1,2,1,7]
Output: 6
Explanation:  After 6 moves, the array could be [3, 4, 1, 2, 5, 7].
It can be shown with 5 or less moves that it is impossible for the array to have all unique values.
Note:
0 <= A.length <= 40000
0 <= A[i] < 40000
Solution:
/**
 * @param {number[]} A
 * @return {number}
 */
const minIncrementForUnique = function(A) {
  A.sort((a, b) => a - b);

  let n = 0;
  for (let i = 0; i < A.length; i++) {
    const a = A[i];
    const b = A[i + 1];
    const inc = a - b + 1;

    if (a >= b) {
      n += inc;
      A[i + 1] += inc;
    }
  }

  return n;
};A subarray A[i], A[i+1], ..., A[j] of A is said to be turbulent if and only if:
That is, the subarray is turbulent if the comparison sign flips between each adjacent pair of elements in the subarray.
Return the length of a maximum size turbulent subarray of A.
Example 1:
Input: [9,4,2,10,7,8,8,1,9]
Output: 5
Explanation: (A[1] > A[2] < A[3] > A[4] < A[5])
Example 2:
Input: [4,8,12,16]
Output: 2
Example 3:
Input: [100]
Output: 1
Note:
1 <= A.length <= 40000
0 <= A[i] <= 10^9
Solution:
/**
 * @param {number[]} A
 * @return {number}
 */
var maxTurbulenceSize = function(A) {
    let max = 1

    for (let i = 0; i < A.length - max + 1; i++) {
        let n = 0

        for (let j = i + 1; j < A.length; j++) {
            if (A[j - 1] < A[j]) {
                if (n <= 0) {
                    n = 1
                    max = Math.max(max, j - i + 1)
                } else {
                    break
                }
            } else if (A[j - 1] > A[j]) {
                if (n >= 0) {
                    n = -1
                    max = Math.max(max, j - i + 1)
                } else {
                    break
                }
            } else {
                break
            }
        }
    }

    return max
};Create a timebased key-value store class TimeMap, that supports two operations.
Example 1:
Input: inputs = ["TimeMap","set","get","get","set","get","get"], inputs = [[],["foo","bar",1],["foo",1],["foo",3],["foo","bar2",4],["foo",4],["foo",5]]
Output: [null,null,"bar","bar",null,"bar2","bar2"]
Explanation:
TimeMap kv;
kv.set("foo", "bar", 1); // store the key "foo" and value "bar" along with timestamp = 1
kv.get("foo", 1);  // output "bar"
kv.get("foo", 3); // output "bar" since there is no value corresponding to foo at timestamp 3 and timestamp 2, then the only value is at timestamp 1 ie "bar"
kv.set("foo", "bar2", 4);
kv.get("foo", 4); // output "bar2"
kv.get("foo", 5); //output "bar2"
Example 2:
Input: inputs = ["TimeMap","set","set","get","get","get","get","get"], inputs = [[],["love","high",10],["love","low",20],["love",5],["love",10],["love",15],["love",20],["love",25]]
Output: [null,null,null,"","high","high","low","low"]
Note:
All key/value strings are lowercase.
All key/value strings have length in the range [1, 100]
The timestamps for all TimeMap.set operations are strictly increasing.
1 <= timestamp <= 10^7
TimeMap.set and TimeMap.get functions will be called a total of 120000 times (combined) per test case.
Solution:
/**
 * Initialize your data structure here.
 */
var TimeMap = function() {
    this.map = {}
};

/**
 * @param {string} key
 * @param {string} value
 * @param {number} timestamp
 * @return {void}
 */
TimeMap.prototype.set = function(key, value, timestamp) {
    let head = this.map[key] || { value: "", timestamp: Number.MIN_SAFE_INTEGER }
    let item = { value, timestamp }

    item.next = head
    this.map[key] = item
};

/**
 * @param {string} key
 * @param {number} timestamp
 * @return {string}
 */
TimeMap.prototype.get = function(key, timestamp) {
    let head = this.map[key]
    if (!head) return ""

    while (head) {
        if (head.timestamp <= timestamp) return head.value

        head = head.next
    }
};

/**
 * Your TimeMap object will be instantiated and called as such:
 * var obj = Object.create(TimeMap).createNew()
 * obj.set(key,value,timestamp)
 * var param_2 = obj.get(key,timestamp)
*/Given an array A of 0s and 1s, we may change up to K values from 0 to 1.
Return the length of the longest (contiguous) subarray that contains only 1s.
Example 1:
Input: A = [1,1,1,0,0,0,1,1,1,1,0], K = 2
Output: 6
Explanation:
[1,1,1,0,0,1,1,1,1,1,1]
Bolded numbers were flipped from 0 to 1.  The longest subarray is underlined.
Example 2:
Input: A = [0,0,1,1,0,0,1,1,1,0,1,1,0,0,0,1,1,1,1], K = 3
Output: 10
Explanation:
[0,0,1,1,1,1,1,1,1,1,1,1,0,0,0,1,1,1,1]
Bolded numbers were flipped from 0 to 1.  The longest subarray is underlined.
Note:
1 <= A.length <= 20000
0 <= K <= A.length
A[i] is 0 or 1
Solution:
动态规划求解即可
/**
 * @param {number[]} A
 * @param {number} K
 * @return {number}
 */
var longestOnes = function(A, K) {
    let n = 0
    let j = -1
    for (let i = 0; i < A.length; i++) {
        if (A[i] === 0 && K > 0) K--
        else if (A[i] === 0) {
            for (j++; j < i; j ++) {
                if (A[j] === 0) break
            }
        }

        n = Math.max(n, i - j)
    }

    return n
};Given an array A of integers, a ramp is a tuple (i, j) for which i < j and A[i] <= A[j]. The width of such a ramp is j - i.
Find the maximum width of a ramp in A. If one doesn't exist, return 0.
Example 1:
Input: [6,0,8,2,1,5]
Output: 4
Explanation:
The maximum width ramp is achieved at (i, j) = (1, 5): A[1] = 0 and A[5] = 5.
Example 2:
Input: [9,8,1,0,1,9,4,0,4,1]
Output: 7
Explanation:
The maximum width ramp is achieved at (i, j) = (2, 9): A[2] = 1 and A[9] = 1.
Note:
2 <= A.length <= 50000
0 <= A[i] <= 50000
Solution:
/**
 * @param {number[]} A
 * @return {number}
 */
var maxWidthRamp = function(A) {
    let max = 0

    for (let i = 0; i < A.length - max; i++) {
        for (let j = i + 1; j < A.length; j++) {
            if (A[i] <= A[j]) {
                max = Math.max(max, j - i)
            }
        }
    }

    return max
};从前面两篇文章,我们了解到。想要把 Readable 的数据写到 Writable,就必须先手动的将数据读入内存,然后写入 Writable。换句话说,每次传递数据时,都需要写如下的模板代码
readable.on('readable', (err) => {
  if(err) throw err

  writable.write(readable.read())
})
为了方便使用,Node.js 提供了 pipe() 方法,让我们可以优雅的传递数据
readable.pipe(writable)现在,就让我们来看看它是如何实现的吧
首先需要先调用 Readable 的 pipe() 方法
// lib/_stream_readable.js

Readable.prototype.pipe = function(dest, pipeOpts) {
  var src = this;
  var state = this._readableState;

  // 记录 Writable
  switch (state.pipesCount) {
    case 0:
      state.pipes = dest;
      break;
    case 1:
      state.pipes = [state.pipes, dest];
      break;
    default:
      state.pipes.push(dest);
      break;
  }
  state.pipesCount += 1;

  // ...

    src.once('end', endFn);

  dest.on('unpipe', onunpipe);

  // ...

  dest.on('drain', ondrain);

  // ...

  src.on('data', ondata);

  // ...

  // 保证 error 事件触发时,onerror 首先被执行
  prependListener(dest, 'error', onerror);

  // ...

  dest.once('close', onclose);

  // ...

  dest.once('finish', onfinish);

  // ...

  // 触发 Writable 的 pipe 事件
  dest.emit('pipe', src);

  // 将 Readable 改为 flow 模式
  if (!state.flowing) {
    debug('pipe resume');
    src.resume();
  }

  return dest;
};
执行 pipe() 函数时,首先将 Writable 记录到 state.pipes 中,然后绑定相关事件,最后如果 Readable 不是 flow 模式,就调用 resume() 将 Readable 改为 flow 模式
Readable 从数据源获取到数据后,触发 data 事件,执行 ondata()
ondata() 相关代码:
// lib/_stream_readable.js

  // 防止在 dest.write(chunk) 内调用 src.push(chunk) 造成 awaitDrain 重复增加,awaitDrain 不能清零,Readable 卡住的情况
  // 详情见 https://github.com/nodejs/node/issues/7278
  var increasedAwaitDrain = false;
  function ondata(chunk) {
    debug('ondata');
    increasedAwaitDrain = false;
    var ret = dest.write(chunk);
    if (false === ret && !increasedAwaitDrain) {
      // 防止在 dest.write() 内调用 src.unpipe(dest),导致 awaitDrain 不能清零,Readable 卡住的情况
      if (((state.pipesCount === 1 && state.pipes === dest) ||
           (state.pipesCount > 1 && state.pipes.indexOf(dest) !== -1)
          ) &&
          !cleanedUp) {
        debug('false write response, pause', src._readableState.awaitDrain);
        src._readableState.awaitDrain++;
        increasedAwaitDrain = true;
      }
      // 进入 pause 模式
      src.pause();
    }
  }
在 ondata(chunk) 函数内,通过 dest.write(chunk) 将数据写入 Writable
此时,在 _write() 内部可能会调用 src.push(chunk) 或使其 unpipe,这会导致 awaitDrain 多次增加,不能清零,Readable 卡住
当不能再向 Writable 写入数据时,Readable 会进入 pause 模式,直到所有的 drain 事件触发
触发 drain 事件,执行 ondrain()
// lib/_stream_readable.js

  var ondrain = pipeOnDrain(src);

  function pipeOnDrain(src) {
    return function() {
      var state = src._readableState;
      debug('pipeOnDrain', state.awaitDrain);
      if (state.awaitDrain)
        state.awaitDrain--;
      // awaitDrain === 0,且有 data 监听器
      if (state.awaitDrain === 0 && EE.listenerCount(src, 'data')) {
        state.flowing = true;
        flow(src);
      }
    };
  }
每个 drain 事件触发时,都会减少 awaitDrain,直到 awaitDrain 为 0。此时,调用 flow(src),使 Readable 进入 flow 模式
到这里,整个数据传递循环已经建立,数据会顺着循环源源不断的流入 Writable,直到所有数据写入完成
不管写入过程中是否出现错误,最后都会执行 unpipe()
// lib/_stream_readable.js

// ...

  function unpipe() {
    debug('unpipe');
    src.unpipe(dest);
  }

// ...

Readable.prototype.unpipe = function(dest) {
  var state = this._readableState;
  var unpipeInfo = { hasUnpiped: false };

  // 啥也没有
  if (state.pipesCount === 0)
    return this;

  // 只有一个
  if (state.pipesCount === 1) {
    if (dest && dest !== state.pipes)
      return this;
    // 没有指定就 unpipe 所有
    if (!dest)
      dest = state.pipes;

    state.pipes = null;
    state.pipesCount = 0;
    state.flowing = false;
    if (dest)
      dest.emit('unpipe', this, unpipeInfo);
    return this;
  }

  // 没有指定就 unpipe 所有
  if (!dest) {
    var dests = state.pipes;
    var len = state.pipesCount;
    state.pipes = null;
    state.pipesCount = 0;
    state.flowing = false;

    for (var i = 0; i < len; i++)
      dests[i].emit('unpipe', this, unpipeInfo);
    return this;
  }

  // 找到指定 Writable,并 unpipe
  var index = state.pipes.indexOf(dest);
  if (index === -1)
    return this;

  state.pipes.splice(index, 1);
  state.pipesCount -= 1;
  if (state.pipesCount === 1)
    state.pipes = state.pipes[0];

  dest.emit('unpipe', this, unpipeInfo);

  return this;
};
Readable.prototype.unpipe() 函数会根据 state.pipes 属性和 dest 参数,选择执行策略。最后会触发 dest 的 unpipe 事件
unpipe 事件触发后,调用 onunpipe(),清理相关数据
// lib/_stream_readable.js

  function onunpipe(readable, unpipeInfo) {
    debug('onunpipe');
    if (readable === src) {
      if (unpipeInfo && unpipeInfo.hasUnpiped === false) {
        unpipeInfo.hasUnpiped = true;
        // 清理相关数据
        cleanup();
      }
    }
}在整个 pipe 的过程中,Readable 是主动方 ( 负责整个 pipe 过程:包括数据传递、unpipe 与异常处理 ),Writable 是被动方 ( 只需要触发 drain 事件 )
总结一下 pipe 的过程:
readbable.pipe(writable),将 readable 与 writable 对接上readable.emit('data'),将数据写入 writablewritable.write(chunk) 返回 false,则进入 pause 模式,等待 drain 事件触发unpipe()unpipe() 调用 Readable.prototype.unpipe(),触发 dest 的 unpipe 事件,清理相关数据参考:
A declarative, efficient, and flexible JavaScript library for building user interfaces.
🖖 Vue.js is a progressive, incrementally-adoptable JavaScript framework for building UI on the web.
TypeScript is a superset of JavaScript that compiles to clean JavaScript output.
An Open Source Machine Learning Framework for Everyone
The Web framework for perfectionists with deadlines.
A PHP framework for web artisans
Bring data to life with SVG, Canvas and HTML. 📊📈🎉
JavaScript (JS) is a lightweight interpreted programming language with first-class functions.
Some thing interesting about web. New door for the world.
A server is a program made to process requests and deliver data to clients.
Machine learning is a way of modeling and interpreting data that allows a piece of software to respond intelligently.
Some thing interesting about visualization, use data art
Some thing interesting about game, make everyone happy.
We are working to build community through open source technology. NB: members must have two-factor auth.
Open source projects and samples from Microsoft.
Google ❤️ Open Source for everyone.
Alibaba Open Source for everyone
Data-Driven Documents codes.
China tencent open source team.