A very simple Ticket System based on WhatsApp messages.
Backend uses whatsapp-web.js to receive and send WhatsApp messages, create tickets from them and store all in a MySQL database.
Frontend is a full-featured multi-user chat app bootstrapped with react-create-app and Material UI, that comunicates with backend using REST API and Websockets. It allows you to interact with contacts, tickets, send and receive WhatsApp messages.
NOTE: I can't guarantee you will not be blocked by using this method, although it has worked for me. WhatsApp does not allow bots or unofficial clients on their platform, so this shouldn't be considered totally safe.
I'm a SysAdmin, and in my daily work, I do a lot of support through WhatsApp. Since WhatsApp Web doesn't allow multiple users, and 90% of our tickets comes from this channel, we created this to share same whatsapp account cross our team.
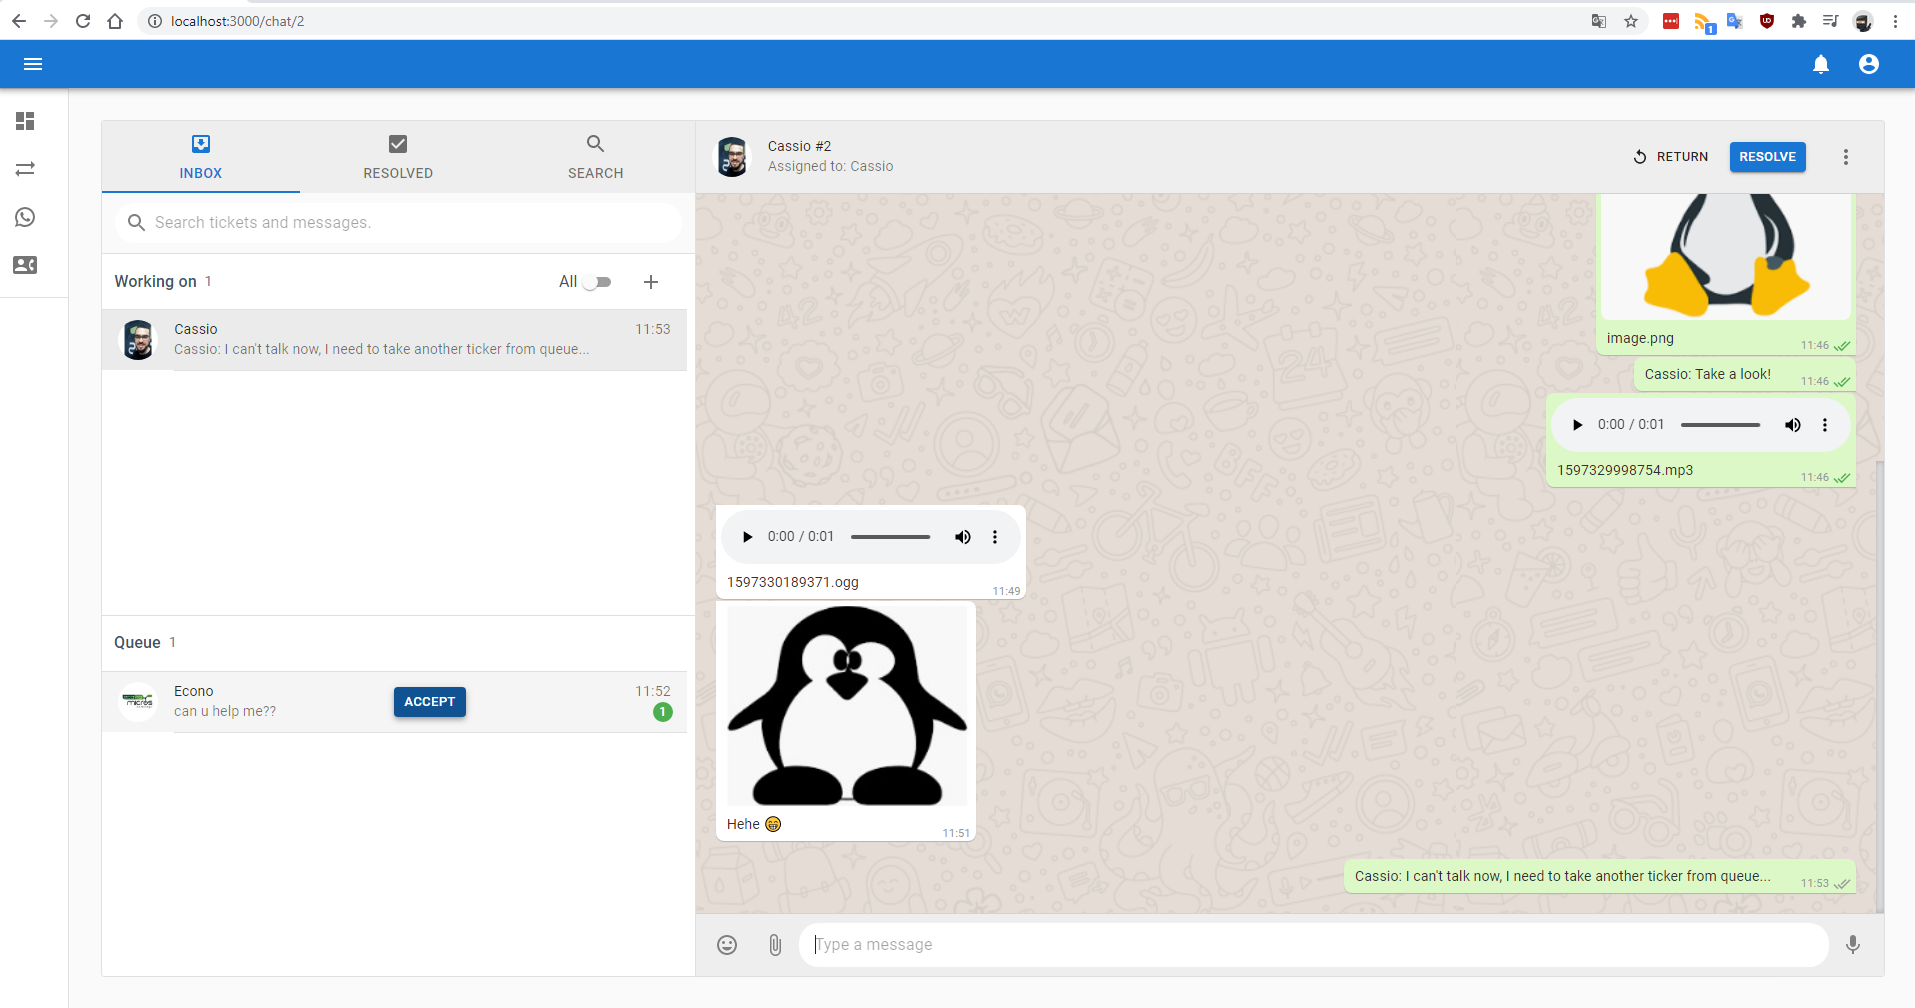
On every new message received in an associated WhatsApp, a new Ticket is created. Then, this ticket can be reached in a queue on Tickets page, where you can assign ticket to your yourself by aceppting it, respond ticket messagee and eventually resolve it.
Subsequent messages from same contact will be related to first open/pending ticket found.
If a contact sent a new message in less than 2 hours interval, and there is no ticket from this contact with pending/open status, the newest closed ticket will be reopen, instead of creating a new one.
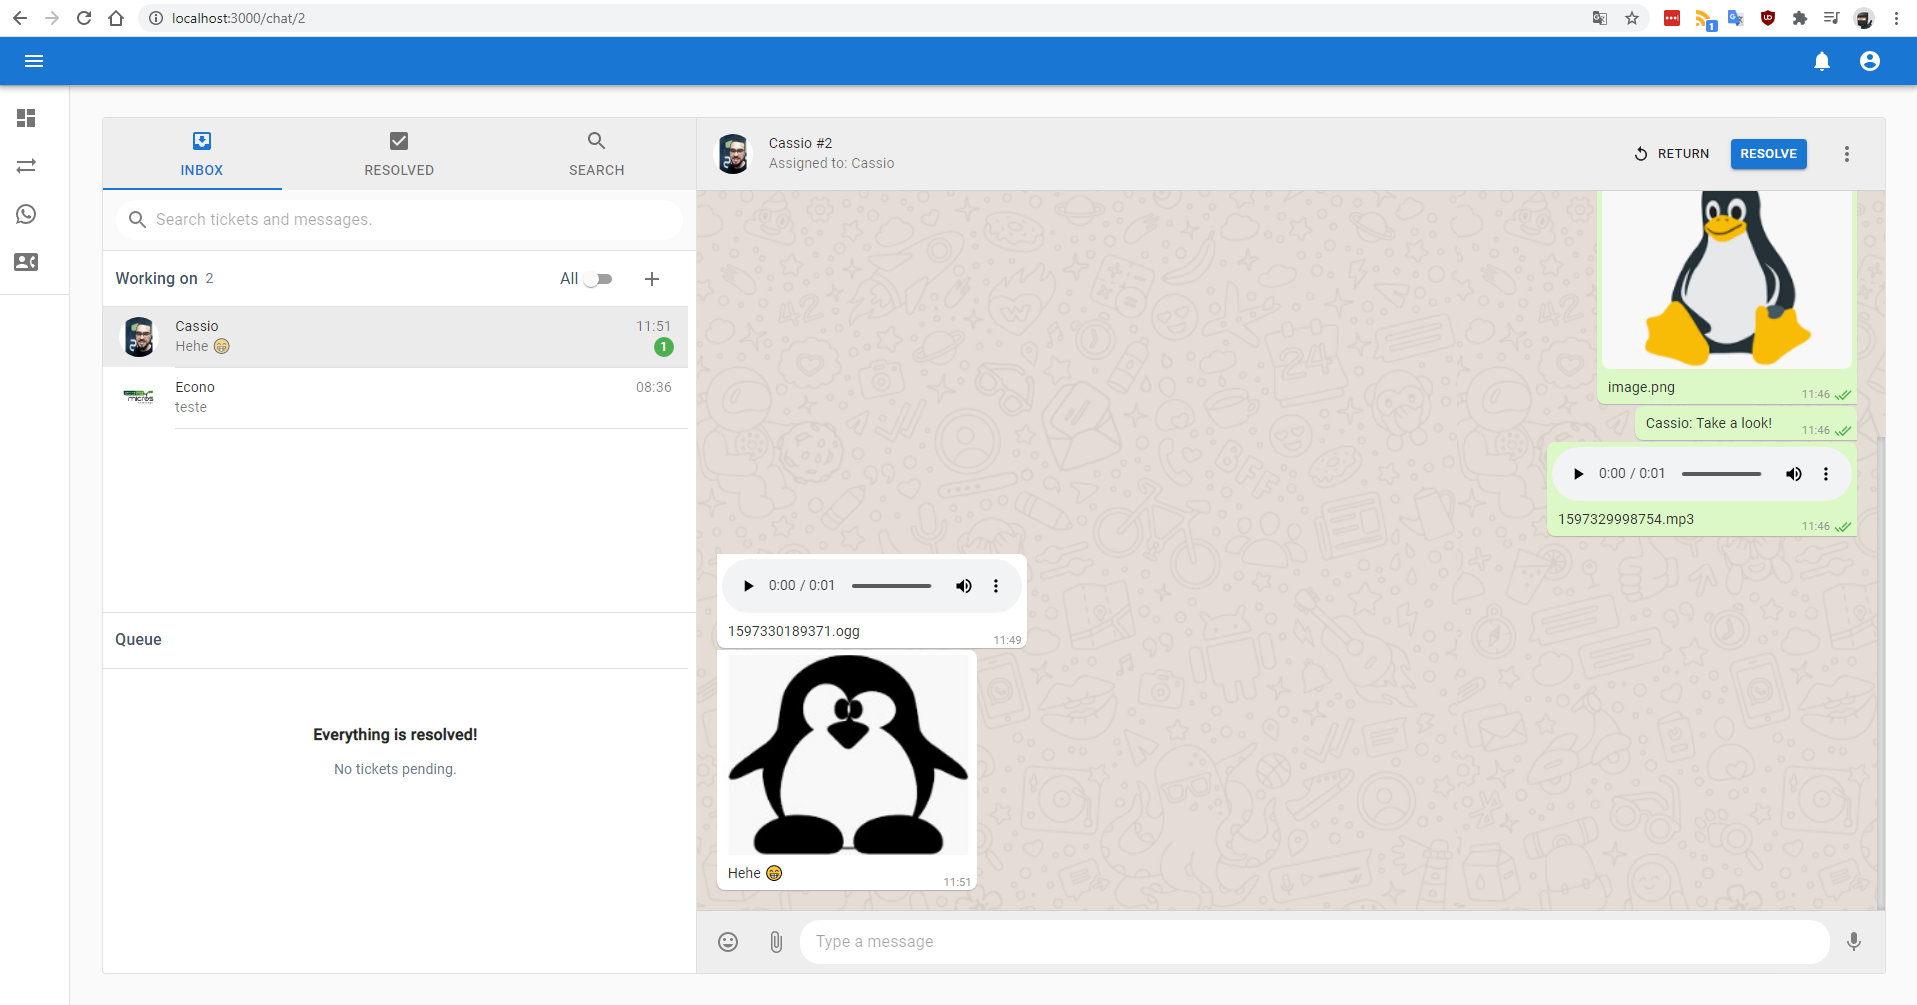
- Have multiple users chating in same WhatsApp Number ✅
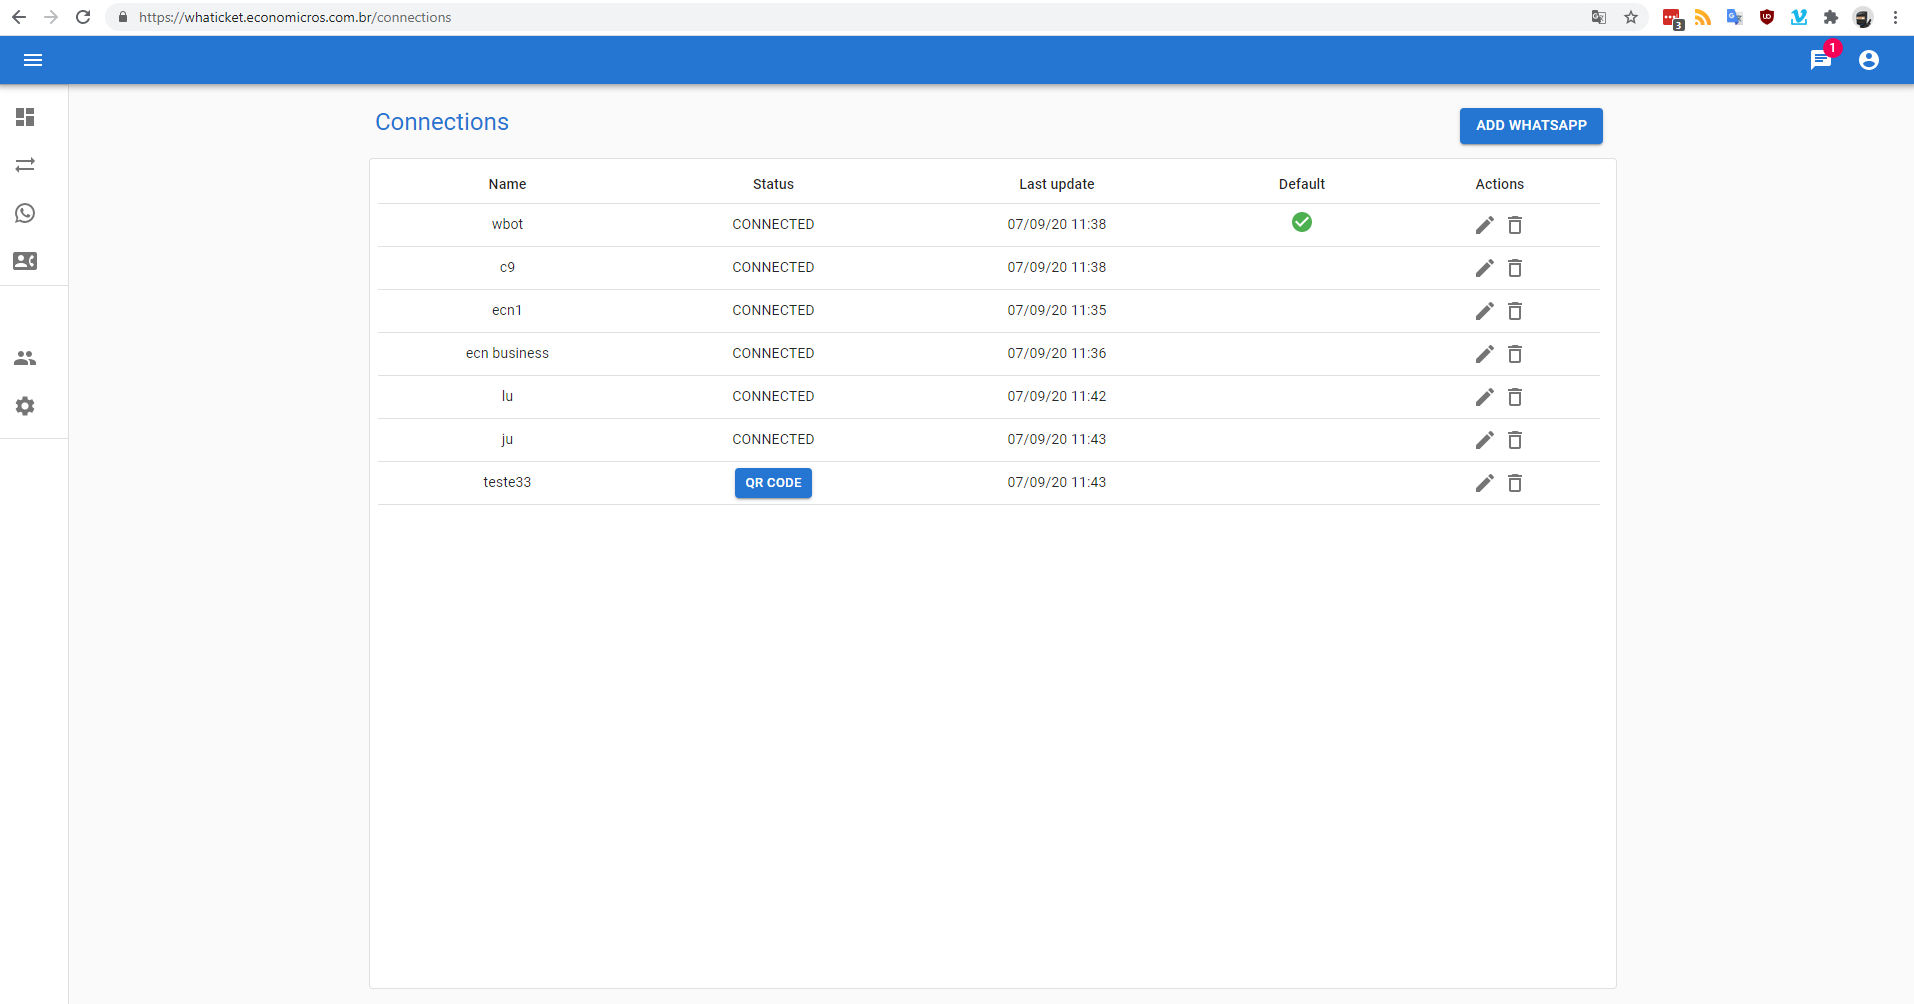
- Connect to multiple WhatsApp accounts and receive all messages in one place ✅ 🆕
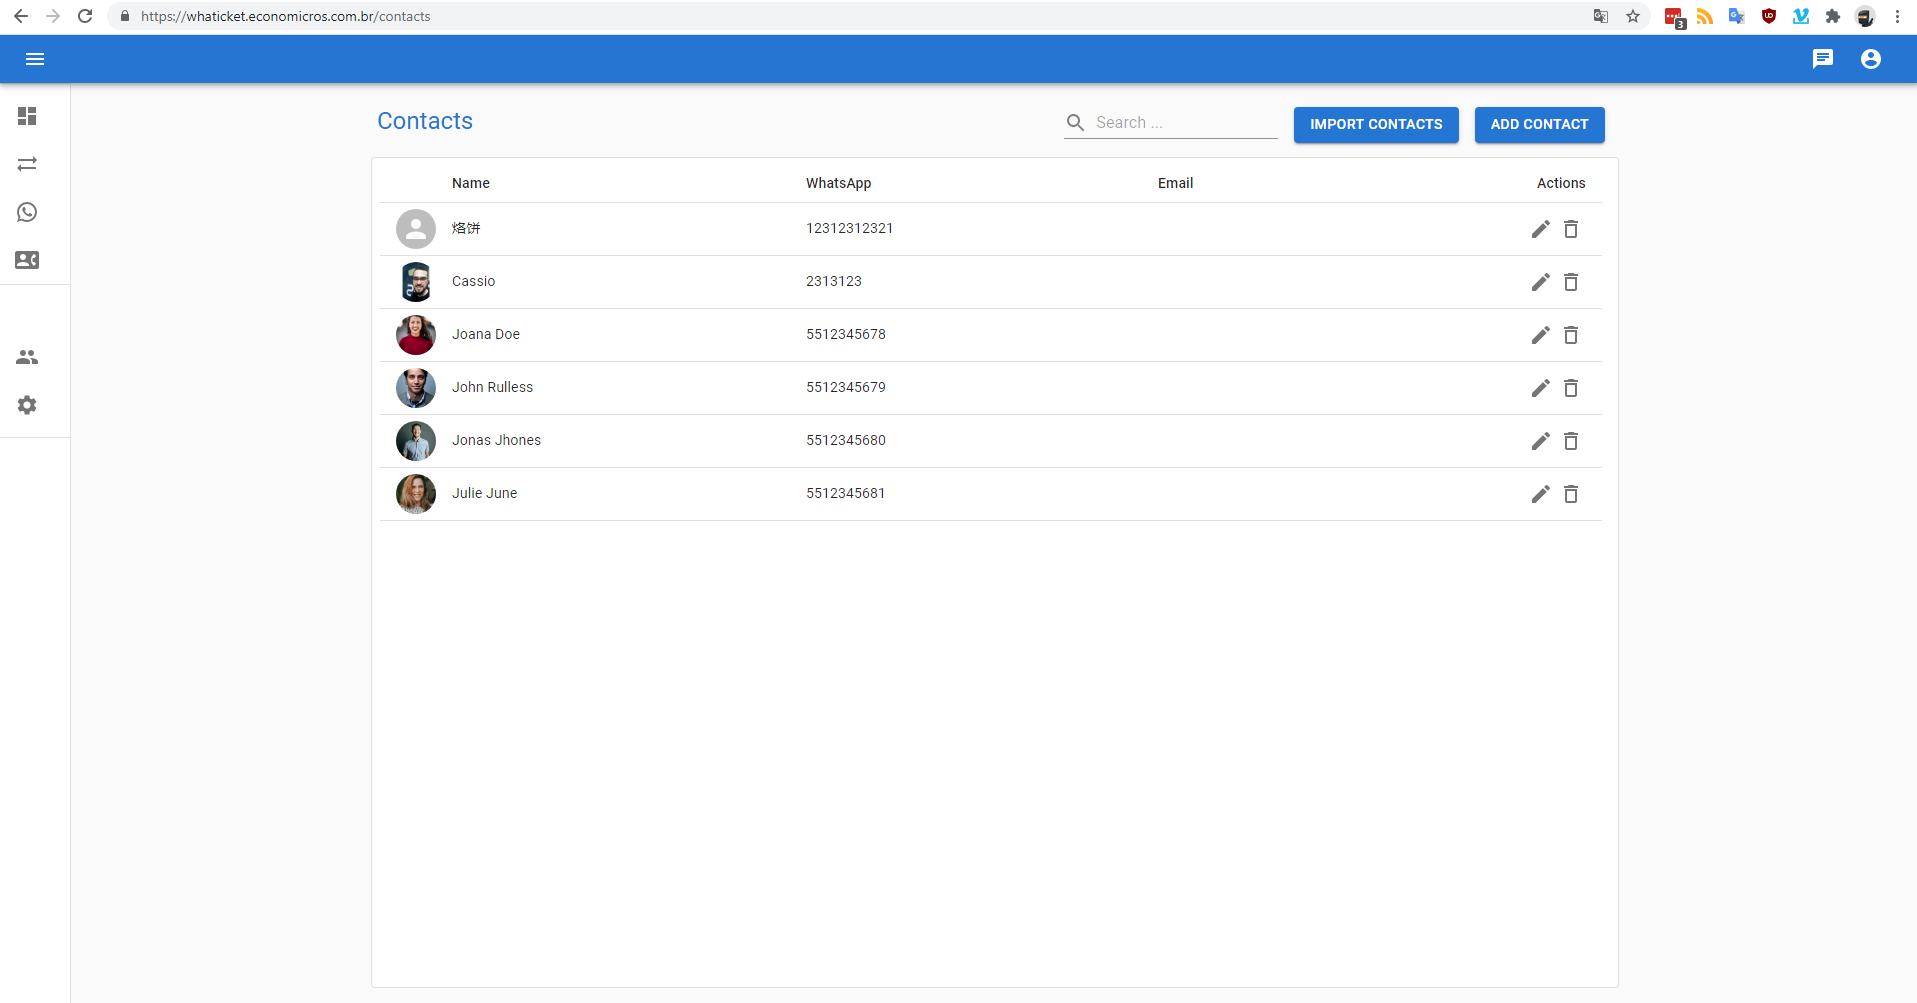
- Create and chat with new contacts without touching cellphone ✅
- Send and receive message ✅
- Send media (images/audio/documents) ✅
- Receive media (images/audio/video/documents) ✅
Note: It's not a good idea to sync your WhatsApp account is this demo enviroment, because all your received messages will be stored in database and will be accessible by everyone that access this URL and creates an account.
That said, theres not much to test without syncing an WhatsApp account, since adding contacts or tickets simple throws an error if app is not synced with WhatsApp.
Meanwhile, if you want to test it, remember to disconnect session and delete all tickets and contacts after your tests.
https://whaticket.economicros.com.br/login
email: [email protected]
password: demo123
It's online thanks to @ramphy, who provided a VPS to creation of these installation instructions.
Create Mysql Database using docker: Note: change MYSQL_DATABASE, MYSQL_PASSWORD, MYSQL_USER and MYSQL_ROOT_PASSWORD.
docker run --name whaticketdb -e MYSQL_ROOT_PASSWORD=strongpassword -e MYSQL_DATABASE=whaticket -e MYSQL_USER=whaticket -e MYSQL_PASSWORD=whaticket --restart always -p 3306:3306 -d mariadb:latest --character-set-server=utf8mb4 --collation-server=utf8mb4_binInstall puppeteer dependencies:
sudo apt-get install -y libgbm-dev wget unzip fontconfig locales gconf-service libasound2 libatk1.0-0 libc6 libcairo2 libcups2 libdbus-1-3 libexpat1 libfontconfig1 libgcc1 libgconf-2-4 libgdk-pixbuf2.0-0 libglib2.0-0 libgtk-3-0 libnspr4 libpango-1.0-0 libpangocairo-1.0-0 libstdc++6 libx11-6 libx11-xcb1 libxcb1 libxcomposite1 libxcursor1 libxdamage1 libxext6 libxfixes3 libxi6 libxrandr2 libxrender1 libxss1 libxtst6 ca-certificates fonts-liberation libappindicator1 libnss3 lsb-release xdg-utils- Clone this repo
- On backend folder:
- Copy .env.example to .env and fill it with database details.
- Install dependecies:
npm install(Only in the first time) - Create database tables:
npx sequelize db:migrate(Only in the first time) - Fill database with initial values:
npx sequelize db:seed:all - Start backend:
npm start
- In another terminal, on frontend folder:
- Copy .env.example to .env and fill it with backend URL (normally localhost:port)
- Install dependecies:
npm install(Only in the first time) - Start frontend:
npm start
- Go to http://your_server_ip:3000/signup
- Create an user and login with it.
- On the sidebard, go to Connections and create your first WhatsApp connection.
- Wait for QR CODE button to appear, click it and read qr code.
- Done. Every message received by your synced WhatsApp number will appear in Tickets List.
You'll need two subdomains forwarding to yours VPS ip to follow these instructions. We'll use myapp.mydomain.com to frontend and api.mydomain.com to backend in the following example. We'll also use an dedicated user with sudo privileges no deploy it (not root).
Update all system packages:
apt update && apt upgradeInstall node and confirm node command is available:
curl -sL https://deb.nodesource.com/setup_12.x | sudo -E bash -
sudo apt-get install -y nodejs
node -v
npm -v
Install docker and add you user to docker group:
sudo apt install apt-transport-https ca-certificates curl software-properties-common
curl -fsSL https://download.docker.com/linux/ubuntu/gpg | sudo apt-key add -
sudo add-apt-repository "deb [arch=amd64] https://download.docker.com/linux/ubuntu bionic stable"
sudo apt update
sudo apt install docker-ce
sudo systemctl status docker
sudo usermod -aG docker \${USER}
su - \${USER}
Create Mysql Database using docker: Note: change MYSQL_DATABASE, MYSQL_PASSWORD, MYSQL_USER and MYSQL_ROOT_PASSWORD.
docker run --name whaticketdb -e MYSQL_ROOT_PASSWORD=strongpassword -e MYSQL_DATABASE=whaticket -e MYSQL_USER=whaticket -e MYSQL_PASSWORD=whaticket --restart always -p 3306:3306 -d mariadb:latest --character-set-server=utf8mb4 --collation-server=utf8mb4_binClone this repository:
cd ~
git clone https://github.com/canove/whaticket whaticket
Create backend .env file and fill with details:
cp whaticket/backend/.env.example whaticket/backend/.env
nano whaticket/backend/.env
NODE_ENV=
BACKEND_URL=https://api.mydomain.com #USE HTTPS HERE, WE WILL ADD SSL LATTER
PROXY_PORT=443 #USE NGINX REVERSE PROXY PORT HERE, WE WILL CONFIGURE IT LATTER
PORT=8080
DB_HOST=localhost
DB_USER=
DB_PASS=
DB_NAME=Install puppeteer dependencies:
sudo apt-get install -y libgbm-dev wget unzip fontconfig locales gconf-service libasound2 libatk1.0-0 libc6 libcairo2 libcups2 libdbus-1-3 libexpat1 libfontconfig1 libgcc1 libgconf-2-4 libgdk-pixbuf2.0-0 libglib2.0-0 libgtk-3-0 libnspr4 libpango-1.0-0 libpangocairo-1.0-0 libstdc++6 libx11-6 libx11-xcb1 libxcb1 libxcomposite1 libxcursor1 libxdamage1 libxext6 libxfixes3 libxi6 libxrandr2 libxrender1 libxss1 libxtst6 ca-certificates fonts-liberation libappindicator1 libnss3 lsb-release xdg-utilsInstall backend dependencies, run migrations and seeds:
cd whaticket/backend
npm install
npx sequelize db:migrate
npx sequelize db:seed:all
Start it with npm start, you should see: Server started on port... on console. Hit CTRL + C to exit.
Install pm2 with sudo, and start backend with it:
sudo npm install -g pm2
pm2 start src/app.js --name whaticket-backend
Make pm2 auto start afeter reboot:
pm2 startup ubuntu -u `YOUR_USERNAME`Copy the last line outputed from previus command and run it, its something like:
sudo env PATH=\$PATH:/usr/bin pm2 startup ubuntu -u YOUR_USERNAME --hp /home/YOUR_USERNAMGo to frontend folder and install dependencies:
cd ../frontend
npm install
Edit .env file and fill it with your backend address, it should look like this:
REACT_APP_BACKEND_URL = https://api.mydomain.com/Build frontend app:
npm run buildStart frontend with pm2, and save pm2 process list to start automatically after reboot:
pm2 start server.js --name whaticket-frontend
pm2 save
To check if it's running, run pm2 list, it should look like:
deploy@ubuntu-whats:~$ pm2 list
┌─────┬─────────────────────────┬─────────────┬─────────┬─────────┬──────────┬────────┬──────┬───────────┬──────────┬──────────┬──────────┬──────────┐
│ id  │ name                    │ namespace   │ version │ mode    │ pid      │ uptime │ .    │ status    │ cpu      │ mem      │ user     │ watching │
├─────┼─────────────────────────┼─────────────┼─────────┼─────────┼──────────┼────────┼──────┼───────────┼──────────┼──────────┼──────────┼──────────┤
│ 1   │ whaticket-frontend      │ default     │ 0.1.0   │ fork    │ 179249   │ 12D    │ 0    │ online    │ 0.3%     │ 50.2mb   │ deploy   │ disabled │
│ 6   │ whaticket-backend       │ default     │ 1.0.0   │ fork    │ 179253   │ 12D    │ 15   │ online    │ 0.3%     │ 118.5mb  │ deploy   │ disabled │
└─────┴─────────────────────────┴─────────────┴─────────┴─────────┴──────────┴────────┴──────┴───────────┴──────────┴──────────┴──────────┴──────────┘
Install nginx:
sudo apt install nginxRemove nginx default site:
sudo rm /etc/nginx/sites-enabled/defaultCreate a new nginx site to frontend app:
sudo nano /etc/nginx/sites-available/whaticket-frontendEdit and fill it with this information, changing server_name to yours equivalent to myapp.mydomain.com:
server {
  server_name myapp.mydomain.com;

  location / {
    proxy_pass http://127.0.0.1:3333;
    proxy_http_version 1.1;
    proxy_set_header Upgrade $http_upgrade;
    proxy_set_header Connection 'upgrade';
    proxy_set_header Host $host;
    proxy_set_header X-Real-IP $remote_addr;
    proxy_set_header X-Forwarded-Proto $scheme;
    proxy_set_header X-Forwarded-For $proxy_add_x_forwarded_for;
    proxy_cache_bypass $http_upgrade;
  }
}
Create another one to backend api, changing server_name to yours equivalent to api.mydomain.com, and proxy_pass to your localhost backend node server URL:
sudo cp /etc/nginx/sites-available/whaticket-frontend /etc/nginx/sites-available/whaticket-backend
sudo nano /etc/nginx/sites-available/whaticket-backend
server {
server_name api.mydomain.com;
location / {
proxy_pass http://127.0.0.1:8080;
......
}Create a symbolic links to enalbe nginx sites:
sudo ln -s /etc/nginx/sites-available/whaticket-frontend /etc/nginx/sites-enabled
sudo ln -s /etc/nginx/sites-available/whaticket-backend /etc/nginx/sites-enabled
Test nginx configuration and restart server:
sudo nginx -t
sudo service nginx restart
Now, enable SSL (https) on your sites to use all app features like notifications and sending audio messages. A easy way to this is using Certbot:
Install certbor with snapd:
sudo snap install --classic certbotEnable SSL on nginx (Accept all information asked):
sudo certbot --nginxAny help and suggestions are welcome!
I just started leaning Javascript a few months ago and this is my first project. It may have security issues and many bugs. I recommend using it only on local network.
This project is not affiliated, associated, authorized, endorsed by, or in any way officially connected with WhatsApp or any of its subsidiaries or its affiliates. The official WhatsApp website can be found at https://whatsapp.com. "WhatsApp" as well as related names, marks, emblems and images are registered trademarks of their respective owners.