Spring-Boot 后端项目练习
熟悉Spring Boot常用组件,了解开发流程。
使用maven管理各种依赖,那么首先就需要先创建一个maven项目,并且将这个初创建的项目作为整个工程的最顶层目录。然后以此为基础,创建几个常用的模块,模块之间相互依赖。

(聚合工程 = 父工程 + 子工程(模块))
子工程之间是平级的模块,子模块如果要使用资源,必须构建依赖。
- 聚合工程里可以分为顶级项目(顶级工程、父工程)与子工程,这两者的关系其实就是父子继承的关系 子工程在maven里称之为模块(module),模块之间是平级,是可以相互依赖的。
- 子模块可以使用顶级工程里所有的资源(依赖),子模块之间如果要使用资源,必须构建依赖(构建关系)
- 一个顶级工程是可以由多个不同的子工程共同组合而成。
- 先创建maven的顶层结构
rookie-star。作为父级结构,设置他的pom文件,加上如下配置
<!--最外层顶层项目,使用的打包方式-->
<packaging>pom</packaging>
<!--指定项目编码方式,执行Java版本-->
<properties>
    <project.build.sourceEnconding>UTF-8</project.build.sourceEnconding>
    <project.reporting.outputEnconding>UTF-8</project.reporting.outputEnconding>
    <java.version>1.8</java.version>
</properties>- 分别创建
rookie-common,rookie-pojo,rookie-mapper,rookie-service,rookie-api几个模块,他们之间的相互依赖关系可以描述为
// 依次向后依赖
api -> service -> mapper -> pojo -> common
- 因此,在各自的对应
pom文件中需要引入依赖关系。举个栗子,如下为api模块的pom文件。
<dependency>
     <!--
         api -> service -> mapper -> pojo -> common
         依次向后依赖
     -->
     <groupId>com.rookie</groupId>
     <artifactId>rookie-service</artifactId>
     <version>1.0-SNAPSHOT</version>
</dependency>- 在父工程中的
maven管理中,使用install安装各个子模块

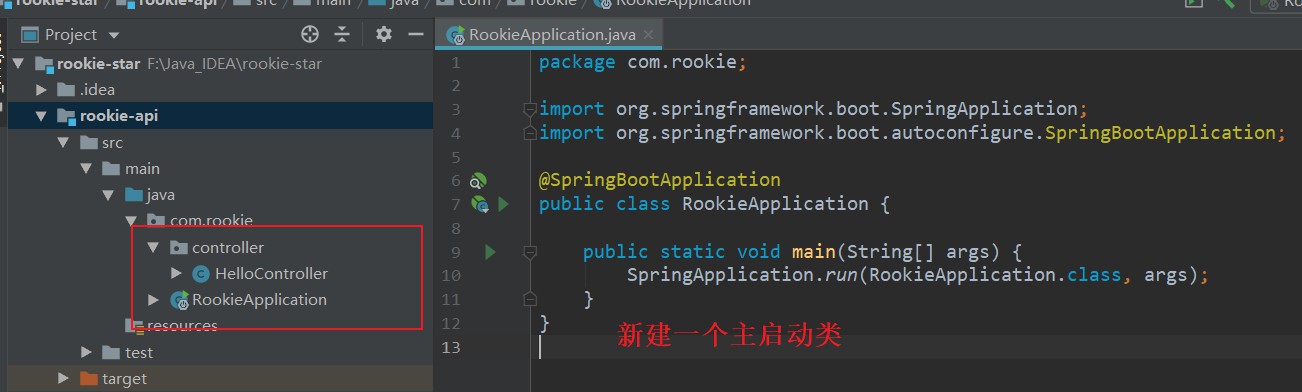
rookie-api中创建yml文件- 在rookie-api中新建一个主启动类
- 同理,新建一个
controller。
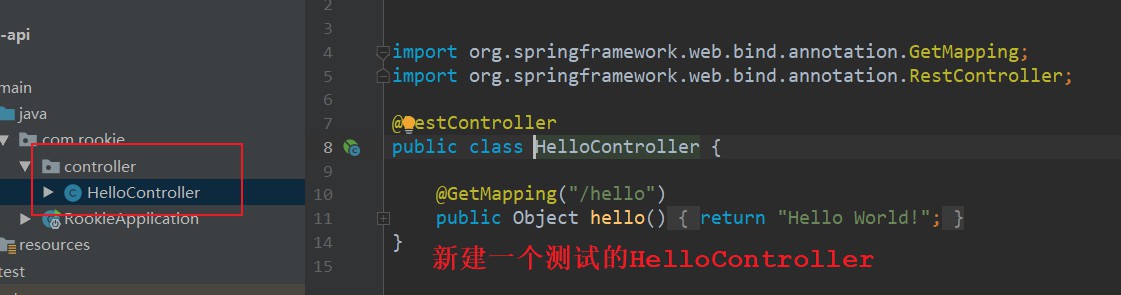
- 使用
maven父工程安装install一下。然后启动项目,在浏览器输入localhost:8080/hello就能够看到页面正常显示Hello World了。
- 父工程项目中引入
mysql和mybatis驱动
<!-- mysql驱动 -->
<dependency>
    <groupId>mysql</groupId>
    <artifactId>mysql-connector-java</artifactId>
    <version>5.1.41</version>
</dependency>
<!-- mybatis -->
<dependency>
    <groupId>org.mybatis.spring.boot</groupId>
    <artifactId>mybatis-spring-boot-starter</artifactId>
    <version>2.1.0</version>
</dependency>rookie-api中配置application.yml
spring:
#  profiles:
#    active: dev
  datasource:                                           # 数据源的相关配置
    type: com.zaxxer.hikari.HikariDataSource          # 数据源类型:HikariCP
    driver-class-name: com.mysql.jdbc.Driver          # mysql驱动
    url: jdbc:mysql://localhost:3306/rookie-star?useUnicode=true&characterEncoding=UTF-8&autoReconnect=true
    username: root
    password: root
    hikari:
      connection-timeout: 30000       # 等待连接池分配连接的最大时长(毫秒),超过这个时长还没可用的连接则发生SQLException, 默认:30秒
      minimum-idle: 5                 # 最小连接数
      maximum-pool-size: 20           # 最大连接数
      auto-commit: true               # 自动提交
      idle-timeout: 600000            # 连接超时的最大时长(毫秒),超时则被释放(retired),默认:10分钟
      pool-name: DateSourceHikariCP     # 连接池名字
      max-lifetime: 1800000           # 连接的生命时长(毫秒),超时而且没被使用则被释放(retired),默认:30分钟 1800000ms
      connection-test-query: SELECT 1
  servlet:
    multipart:
      max-file-size: 512000     # 文件上传大小限制为500kb
      max-request-size: 512000  # 请求大小限制为500kb

############################################################
#
# mybatis 配置
#
############################################################
mybatis:
  type-aliases-package: com.rookie.pojo          # 所有POJO类所在包路径,需要创建对应的文件夹
  mapper-locations: classpath:mapper/*.xml      # mapper映射文件,需要创建mapper文件夹
#  configuration:
#    log-impl: org.apache.ibatis.logging.stdout.StdOutImpl
使用逆向生成工具生成数据库mapper以及一些pojo
- 父工程中引入通用mapper逆向工具
<!--通用mapper逆向工具-->
<dependency>
    <groupId>tk.mybatis</groupId>
    <artifactId>mapper-spring-boot-starter</artifactId>
    <version>2.1.5</version>
</dependency>- 在yml中引入通用mapper配置
############################################################
#
# mybatis mapper配置
#
############################################################
mapper:
  mappers: com.rookie.my.mapper.MyMapper
  not-empty: false
identity: MYSQL- 引入MyMapper接口类
package com.rookie.my.mapper;

import tk.mybatis.mapper.common.Mapper;
import tk.mybatis.mapper.common.MySqlMapper;

/**
 * 继承自己的MyMapper
 */
public interface MyMapper<T> extends Mapper<T>, MySqlMapper<T> {
}- 使用逆向工具需要注意,重新生成的
xml文件是一种追加的方式,每次生成完了最好去检查一下
- 在启动类上加上如下注释
- 其中
@MapperScan(basePackages = "com.rookie.mapper")来自import tk.mybatis.spring.annotation.MapperScan;
@SpringBootApplication
// 使用通用mapper的这个包就是tk开头的这个,需要指明这些包是在哪里
// 扫描 mybatis 通用 mapper 所在的包
@MapperScan(basePackages = "com.rookie.mapper")
public class RookieApplication {
    public static void main(String[] args) {
        SpringApplication.run(RookieApplication.class, args);
    }
}- 在service模块中添加相应逻辑,使用mapper操作数据库。注意,在Service的实现类上面要添加注解表明这是一个Bean,
@Service - 在api模块中添加测试StuFooController,访问数据库中的stu表,查询数据。记得添加
@RestController注解
- 用户注册与登录
- Cookie 与 Session
- 集成 Swagger2 api
- 分类设计与实现
- 首页商品推荐
- 商品搜索与分页
- 商品详情与评论渲染
- 购物车与订单
- 微信与支付宝支付
- 首先创建一个
UserService接口,用来定义用户相关的方法
public interface UserService {
    // 用户注册的时候需要先去检查数据库中是否有这个用户存在了
    public boolean queryUsernameIsExist(String username);
    // UserBO 相当于是根据从前端取到的用户名称、密码构造一个新的用户
    public Users createUser(UserBO userBO);
}- 在
UserServiceImpl中实现接口中的两个方法- 其中查询是否存在的方法需要以
Propagation.SUPPORTS的事务传播级别 - 创建用户的事务传播级别为
Propagation.REQUIRED,创建失败需要回滚
- 其中查询是否存在的方法需要以
- 自定义响应数据结构
RookieJsonResult,前端接受此类数据(json object)后,可自行根据业务去实现相关功能 - 其中为了设置全局唯一的用户ID,引入了
org.n3r.idworder包 - 为了设置时间,也引入了
DateUtil类 - 为了加密用户的密码,我们引入了
MD5Utils - 引入性别枚举
- 前端到后端的参数使用
UserBO进行传递 - 使用
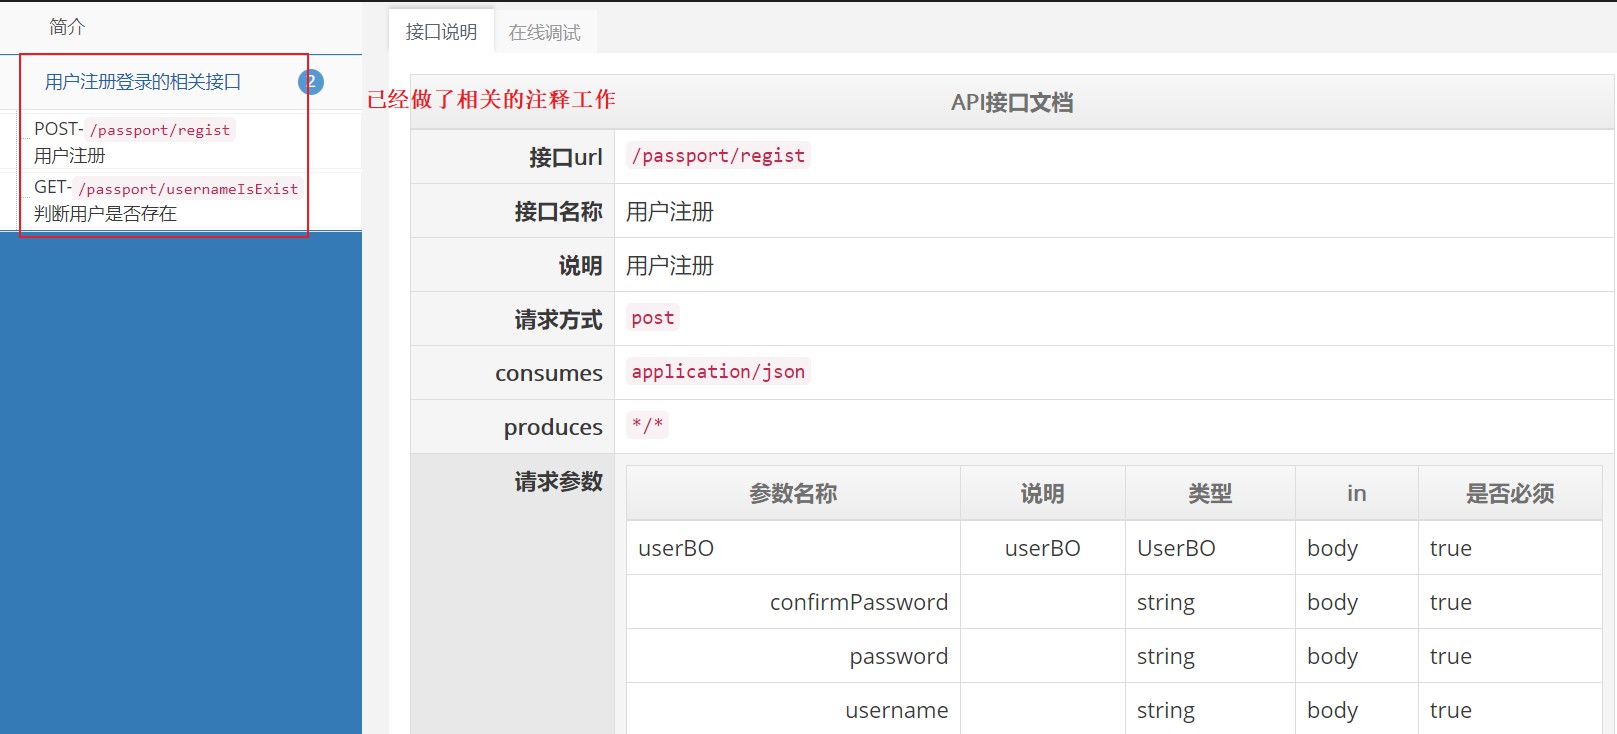
postman测试api层PassportController的功能是否正常
为了减少程序员撰写文档的时间,使用
Swagger2,只需要通过代码就能生成文档API提供给前端人员对接
<!-- swagger2 配置 -->
<dependency>
	<groupId>io.springfox</groupId>
	<artifactId>springfox-swagger2</artifactId>
	<version>2.4.0</version>
</dependency>
<dependency>
	<groupId>io.springfox</groupId>
	<artifactId>springfox-swagger-ui</artifactId>
	<version>2.4.0</version>
</dependency>
<dependency>
	<groupId>com.github.xiaoymin</groupId>
	<artifactId>swagger-bootstrap-ui</artifactId>
	<version>1.6</version>
</dependency>- 在
api模块创建config包,创建Swagger2.java对象,做相关配置 - 做好配置启动项目后,在网页中查看
http://localhost:8088/swagger-ui.html,就能看到一份文档了。http://localhost:8088/doc.html也可以 - 要想忽略某一个Controller,在他对应的类上方加上
@ApiIgnore即可 - 给Controller类加上接口注解,
@Api(value = "注册登录", tags = {"用户注册登录的相关接口"}) - 给类中某一个接口加上注解,
@ApiOperation(value = "判断用户是否存在", notes = "判断用户是否存在", httpMethod = "GET")httpMethod要与下方请求方法相互匹配
- 对上面的请求参数,我们也可以加上注释,在
UserBO类中。使用@ApiModel和@ApiModelProperty
@ApiModel(value = "用户对象BO", description = "从客户端,由用户传入的数据封装在此entity中")
public class UserBO {
    @ApiModelProperty(value = "用户名", name = "username", example = "Allen", required = true)
    private String username;
    @ApiModelProperty(value = "密码", name = "password", example = "123456", required = true)
    private String password;
    @ApiModelProperty(value = "确认密码", name = "confirmPassword", example = "123456", required = true)
private String confirmPassword;配置config目录下的CorsConfig文件,使得前后端联通
service层UserService中添加相应方法,然后到Controller中写一下用户login的controller- 登录后要隐藏掉用户的一些属性,使用
controller中的setNullProperty方法实现 - 引入
CookieUtils和JsonUtils工具类,在login和regist中设置cookie,实现用户信息在页面显示
<dependency>
    <groupId>org.springframework.boot</groupId>
    <artifactId>spring-boot-starter</artifactId>
    <exclusions>
        <!--排除这个日志jar包-->
        <exclusion>
            <groupId>org.springframework.boot</groupId>
            <artifactId>spring-boot-starter-logging</artifactId>
        </exclusion>
    </exclusions>
</dependency><dependency>
<groupId>org.slf4j</groupId>
<artifactId>slf4j-api</artifactId>
<version>1.7.21</version>
</dependency>
<dependency>
<groupId>org.slf4j</groupId>
<artifactId>slf4j-log4j12</artifactId>
<version>1.7.21</version>
</dependency>log4j.rootLogger=DEBUG,stdout,file
log4j.additivity.org.apache=true
log4j.appender.stdout=org.apache.log4j.ConsoleAppender
log4j.appender.stdout.threshold=INFO
log4j.appender.stdout.layout=org.apache.log4j.PatternLayout
log4j.appender.stdout.layout.ConversionPattern=%-5p %c{1}:%L - %m%n
log4j.appender.file=org.apache.log4j.DailyRollingFileAppender
log4j.appender.file.layout=org.apache.log4j.PatternLayout
log4j.appender.file.DatePattern='.'yyyy-MM-dd-HH-mm
log4j.appender.file.layout.ConversionPattern=%d{yyyy-MM-dd HH:mm:ss} %-5p %c{1}:%L - %m%n
log4j.appender.file.Threshold=INFO
log4j.appender.file.append=true
log4j.appender.file.File=/workspaces/logs/rookie-api/rookie.logfinal static Logger logger = LoggerFactory.getLogger(HelloController.class);- 先在 pom 中引入相应的依赖
<dependency>
    <groupId>org.springframework.boot</groupId>
    <artifactId>spring-boot-starter-aop</artifactId>
</dependency>- 在 api 层中加入 aspect 包,编写切面逻辑
/**
 * 切面表达式:
 * execution 代表所要执行的表达式主体
 * 第一处 * 代表方法返回类型 *代表所有类型
 * 第二处 包名代表aop监控的类所在的包
 * 第三处 .. 代表该包以及其子包下的所有类方法
 * 第四处 * 代表类名,*代表所有类
 * 第五处 *(..) *代表类中的方法名,(..)表示方法中的任何参数
 *
 */
@Around("execution(* com.rookie.service.impl..*.*(..))")
public Object recordTimeLog(ProceedingJoinPoint joinPoint) throws Throwable{
    ...
}使用到的接口就是 logout
@ApiOperation(value = "用户退出登录", notes = "用户退出登录", httpMethod = "POST")
@PostMapping("/logout")
public RookieJsonResult logout(@RequestParam String userId,
                               HttpServletRequest request,
                               HttpServletResponse response) {
    // 使用 Cookie 工具进行清除                 Cookie名字
    CookieUtils.deleteCookie(request, response, "user");
    // TODO 生成用户token,存入redis会话
    // TODO 同步购物车数据
    return RookieJsonResult.ok();
} 方便在开发测试的时候,及时通过打印出的 sql 语句来分析问题
# mybatis 的配置中添加
  configuration:
log-impl: org.apache.ibatis.logging.stdout.StdOutImpl在第一个方法,一定记得要返回 json 形式的对象给前端!!!!!!!
@ApiOperation(value = "获取首页轮播图列表", notes = "获取首页轮播图列表", httpMethod = "GET")
@GetMapping("/carousel")
// 返回值一定要使用 RookieJsonResult
public RookieJsonResult carousel() {

    List<Carousel> result = carouselService.queryAll(YesOrNo.YES.type);
    return RookieJsonResult.ok(result);
} 商品左侧分类导航栏,实现一种鼠标划过来才进行加载的方式
- 通用 mapper 无法实现复杂的查询,自己编写 SQL 查询语句,根据父分类 id 查询子分类列表
- 创建了新的自定义的 mapper 以及对应的 mapper.xml
ctrl alt o删除没有用到的包- 前后端在
ItemInfoVO中对应的名字要相互对应上,不然前端就拿不到这个数据
// 后端
public class ItemInfoVO {
    private Items item;
    private List<ItemsImg> itemImgList;
    private List<ItemsSpec> itemSpecList;
    private ItemsParam itemParams;
}
// 前端 item.html 659 行,几个值要对应起来
	var item = itemInfo.item;
	var itemImgListTemp = itemInfo.itemImgList;
	var itemSpecListTemp = itemInfo.itemSpecList;
this.itemParams = itemInfo.itemParams;- 引入分页插件依赖
<!--pagehelper -->
<dependency>
	<groupId>com.github.pagehelper</groupId>
	<artifactId>pagehelper-spring-boot-starter</artifactId>
	<version>1.2.12</version>
</dependency>- 配置 yml
# 分页插件配置
pagehelper:
  helperDialect: mysql
supportMethodsArguments: true- 使用分页插件,在查询前使用分页插件,原理:统一拦截 sql ,为其提供分页功能
// ItemServiceImpl中查询前使用的分页
/**
 * page: 第几页
 * pageSize: 每页显示条数
 */
PageHelper.startPage(page, pageSize);- 分页数据封装到
PagedGridResult.java传给前端
PageInfo<?> pageList = new PageInfo<>(list);
PagedGridResult grid = new PagedGridResult();
grid.setPage(page);
grid.setRows(list);
grid.setTotal(pageList.getPages());
grid.setRecords(pageList.getTotal());引入工具类 DesensitizationUtil.java
import sun.applet.Main;
/**
 * 通用脱敏工具类
 * 可用于:
 *      用户名
 *      手机号
 *      邮箱
 *      地址等
 */
public class DesensitizationUtil {

    private static final int SIZE = 6;
    private static final String SYMBOL = "*";

    public static void main(String[] args) {
        String name = commonDisplay("慕课网");
        String mobile = commonDisplay("13900000000");
        String mail = commonDisplay("[email protected]");
        String address = commonDisplay("北京大运河东路888号");

        System.out.println(name);
        System.out.println(mobile);
        System.out.println(mail);
        System.out.println(address);
    }

    /**
     * 通用脱敏方法
     * @param value
     * @return
     */
    public static String commonDisplay(String value) {
        if (null == value || "".equals(value)) {
            return value;
        }
        int len = value.length();
        int pamaone = len / 2;
        int pamatwo = pamaone - 1;
        int pamathree = len % 2;
        StringBuilder stringBuilder = new StringBuilder();
        if (len <= 2) {
            if (pamathree == 1) {
                return SYMBOL;
            }
            stringBuilder.append(SYMBOL);
            stringBuilder.append(value.charAt(len - 1));
        } else {
            if (pamatwo <= 0) {
                stringBuilder.append(value.substring(0, 1));
                stringBuilder.append(SYMBOL);
                stringBuilder.append(value.substring(len - 1, len));

            } else if (pamatwo >= SIZE / 2 && SIZE + 1 != len) {
                int pamafive = (len - SIZE) / 2;
                stringBuilder.append(value.substring(0, pamafive));
                for (int i = 0; i < SIZE; i++) {
                    stringBuilder.append(SYMBOL);
                }
                if ((pamathree == 0 && SIZE / 2 == 0) || (pamathree != 0 && SIZE % 2 != 0)) {
                    stringBuilder.append(value.substring(len - pamafive, len));
                } else {
                    stringBuilder.append(value.substring(len - (pamafive + 1), len));
                }
            } else {
                int pamafour = len - 2;
                stringBuilder.append(value.substring(0, 1));
                for (int i = 0; i < pamafour; i++) {
                    stringBuilder.append(SYMBOL);
                }
                stringBuilder.append(value.substring(len - 1, len));
            }
        }
        return stringBuilder.toString();
    }

}- 需要自定义相关的 sql
- 在搜索栏的搜索和在分类栏的搜索分开来进行,逻辑上是一样的
- 收货地址的新增、修改、删除、设置默认等
- 先从
AddressService层开始设计,然后实现AddressServiceImpl,再根据前端的接口,设计AddressController
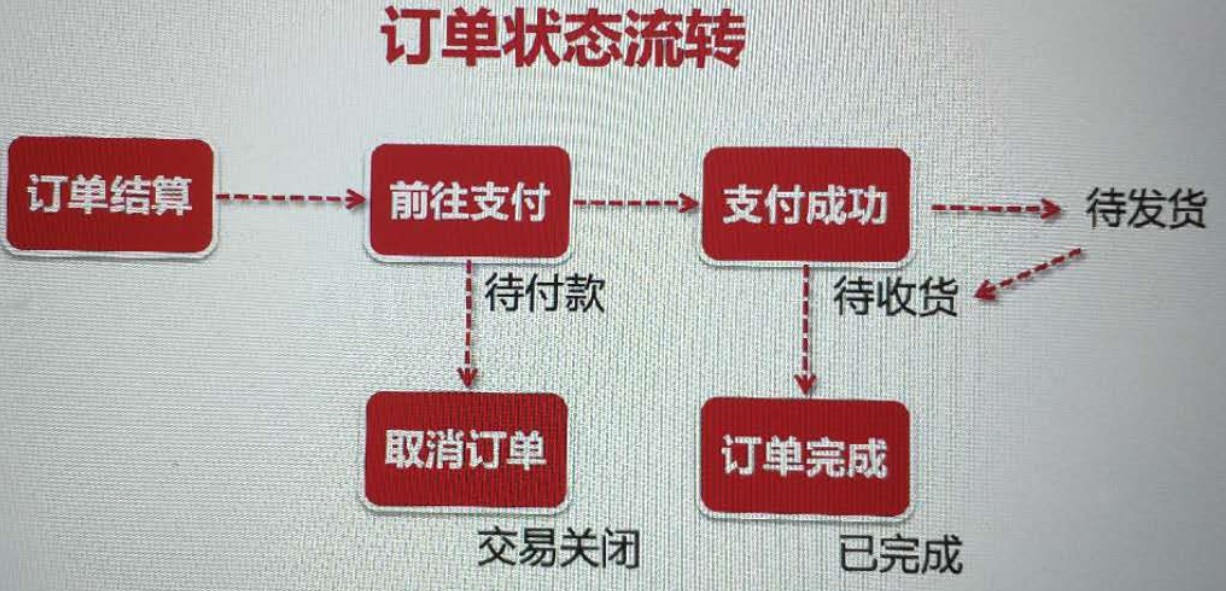
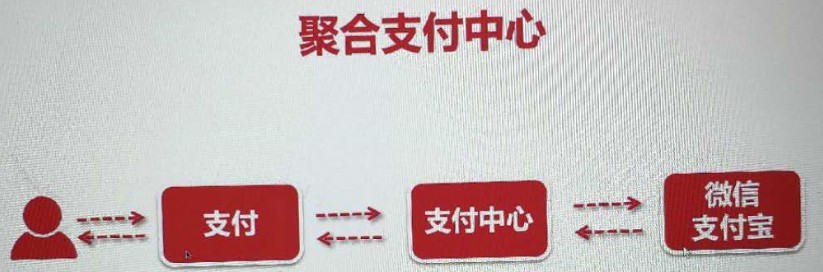
流程: 用户 ——> 选择商品——>加入购物车——>订单结算——>选择支付方式——>支付
- 创建订单过程中的减库存操作可能会造成超卖,先使用数据库乐观锁来实现,后期使用分布式锁(zookeeper redis)
- 账号和密码是在
github上面找的 - 需要同步更新到前端代码的
wxpay.html的189行
headers.add("imoocUserId", "6567325-1528023922");
headers.add("password", "342r-t450-gr4r-456y");-
要使用到内网穿透,以便使得本地的订单状态在支付之后能够和支付中心的一致
-
使用到的工具就是
natapp(注意这个工具开启之后,免费的可能公网地址会变,所以不得行的时候就去修改BaseController中的payReturnUrl) -
这一部分的重点在于
OrderServiceImpl.java中的createOrder()方法,其中包含了很多步骤 -
在
OrdersController中调用了创建订单的方法
- 同样需要在前端代码中修改
alipayTempTransit.html118 119 行的账号和密码,同上
-
@Scheduled(default = " ")中间的字符串在这个网站可以在线生成https://cron.qqe2.com/ -
启动类开启
@EnableScheduling // 开启定时任务 -
定时任务有弊端
/**
 * 使用定时任务关闭超期未支付订单,会存在的弊端:
 * 1. 会有时间差,程序不严谨
 *      10:39下单,11:00检查不足1小时,12:00检查,超过1小时多余21分钟
 * 2. 不支持集群
 *      单机没毛病,使用集群后,就会有多个定时任务
 *      解决方案:只使用一台计算机节点,单独用来运行所有的定时任务
 * 3. 会对数据库全表搜索,及其影响数据库性能:select * from order where orderStatus = 10;
 * 定时任务,仅仅只适用于小型轻量级项目,传统项目
 *
 * 后续会涉及到消息队列:MQ-> RabbitMQ, RocketMQ, Kafka, ZeroMQ...
 *      延时任务(队列)
 *      10:12分下单的,未付款(10)状态,11:12分检查,如果当前状态还是10,则直接关闭订单即可
*/- 用户个人信息维护
- 用户头像上传
- 用户收货地址
- 用户订单管理
- 用户评论模块
-
在 controller 层下面再新建一层用于存放用户中心相关,方便今后服务拆分等~
在
CenterUserServiceImpl中的queryUserInfo返回给前端的是用户的所有信息,我们需要将密码隐去
@Transactional(propagation = Propagation.SUPPORTS)
    @Override
    public Users queryUserInfo(String userId) {
        Users user = usersMapper.selectByPrimaryKey(userId);
        // 因为返回给前端的是用户全部信息,所以这里将密码隐去
        user.setPassword(null);
        return user;
}- 从前端传递到后端的用户中心的用户信息经由
CenterUserBO传递 - 在
CenterUserController进行更新操作后得到的用户信息需要做一些隐藏,即setNullProperty的操作
CenterUserBO
@ApiModel(value="用户对象", description="从客户端,由用户传入的数据封装在此entity中")
public class CenterUserBO {

    @ApiModelProperty(value="用户名", name="username", example="json", required = false)
    private String username;
    @ApiModelProperty(value="密码", name="password", example="123456", required = false)
    private String password;
    @ApiModelProperty(value="确认密码", name="confirmPassword", example="123456", required = false)
    private String confirmPassword;


    @NotBlank(message = "用户昵称不能为空")
    @Length(max = 12, message = "用户昵称不能超过12位")
    @ApiModelProperty(value="用户昵称", name="nickname", example="杰森", required = false)
    private String nickname;

    @Length(max = 12, message = "用户真实姓名不能超过12位")
    @ApiModelProperty(value="真实姓名", name="realname", example="杰森", required = false)
    private String realname;

    @Pattern(regexp = "^(((13[0-9]{1})|(15[0-9]{1})|(18[0-9]{1}))+\\d{8})$", message = "手机号格式不正确")
    @ApiModelProperty(value="手机号", name="mobile", example="13999999999", required = false)
    private String mobile;

    @Email
    @ApiModelProperty(value="邮箱地址", name="email", example="[email protected]", required = false)
    private String email;

    @Min(value = 0, message = "性别选择不正确")
    @Max(value = 2, message = "性别选择不正确")
    @ApiModelProperty(value="性别", name="sex", example="0:女 1:男 2:保密", required = false)
    private Integer sex;
    @ApiModelProperty(value="生日", name="birthday", example="1900-01-01", required = false)
    private Date birthday;
}- 对应的
Controller也要加上相应注解,@Valid,还有BindingResult
@PostMapping("update")
public RookieJsonResult update(
        @ApiParam(name = "userId", value = "用户 id", required = true)
        @RequestParam String userId,
        @RequestBody @Valid CenterUserBO centerUserBO,
        BindingResult result,
        HttpServletRequest request,
HttpServletResponse response) {}- 先定义一个上传后文件的保存地址,暂时保存在
F:\rookie-faces - 用户上传头像的位置,使用文件分隔符来分割。避免在不同操作系统下面的错误
- 使用配置文件来配置上述那个上传后的文件保存地址
resources目录下创建一个配置文件,file.imageUserFaceLocation=F:\\rookie-faces- 创建
FileUpload.java获得文件上传的位置,并在Controller中注入这个类之后就可以获得配置的文件保存位置了。
@Component
@ConfigurationProperties(prefix = "file")
@PropertySource("classpath:file-upload-dev.properties")
public class FileUpload {

    private String imageUserFaceLocation;

    public String getImageUserFaceLocation() {
        return imageUserFaceLocation;
    }

    public void setImageUserFaceLocation(String imageUserFaceLocation) {
        this.imageUserFaceLocation = imageUserFaceLocation;
    }
}WebMvcConfig.java
// 实现静态资源的映射
@Override
public void addResourceHandlers(ResourceHandlerRegistry registry) {
    registry.addResourceHandler("/**")
            .addResourceLocations("classpath:/META-INF/resources/")  // 映射swagger2
.addResourceLocations("file:F:\\rookie-faces\\"); // 映射本地静态资源- 测试的映射地址
http://localhost:8088/1908017YR51G1XWH/face-1908017YR51G1XWH.png
文件上传,一定要对文件格式进行验证!
- 由于浏览器可能存在缓存,所以在更新用户头像的时候,后端带上一个时间戳,让浏览器能够及时刷新新上传的头像。
CenterUserController.uploadFace()方法,可以好好研究一下这个地方- 为防止被恶意上传非图片文件,需要在后端对文件后缀进行判断
// CenterUserController.uploadFace() 中
//为防止后门,要判断一下上传的图片的格式
if (!suffix.equalsIgnoreCase("png") &&
        !suffix.equalsIgnoreCase("jpg") &&
        !suffix.equalsIgnoreCase("jpeg")) {
    return RookieJsonResult.errorMap("图片格式不正确");
}- 限制上传文件的大小
spring:
  servlet:
    multipart:
      max-file-size: 5120000 # 限制上传的文件大小为500 kb
      max-request-size: 512000 # 请求大小为500 kb
并捕获异常
@RestControllerAdvice
public class CustomExceptionHandler {

    // 上传问价超过 500 k, 捕获异常 MaxUploadSizeExceededException
    @ExceptionHandler(MaxUploadSizeExceededException.class)
    public RookieJsonResult handlerUploadFaceMax(MaxUploadSizeExceededException ex) {
        return RookieJsonResult.errorMsg("文件大小不能超过500kb,请压缩或降低质量后再上传!");
    }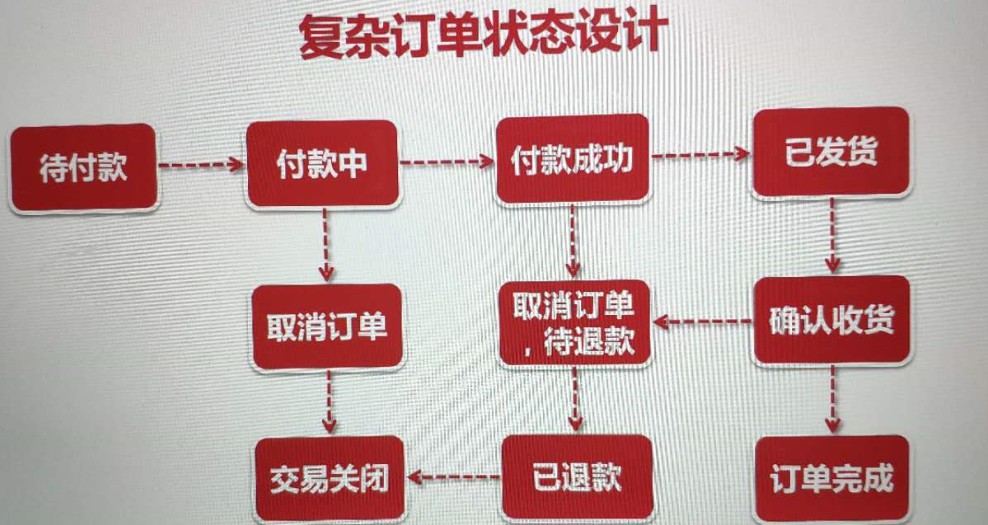
}订单与订单状态是一对一的,订单与订单商品是一对多的
自定义查询语句
SELECT
	od.id as orderId,
	od.created_time as createTime,
	od.pay_method as payMethod,
	od.real_pay_amount as realPayAmount,
	od.post_amount as postAmount,
	os.order_status as orderStatus,
	oi.item_id as itemId,
	oi.item_name as itemName,
	oi.item_img as itemImg,
	oi.item_spec_name as itemSpecName,
	oi.buy_counts as buyCounts,
	oi.price as price
FROM
	orders od
LEFT JOIN
	order_status os
on od.id = os.order_id
LEFT JOIN
	order_items oi
ON od.id = oi.order_id
WHERE
	od.user_id = '1908017YR51G1XWH'
AND
	od.is_delete = 0
ORDER BY
	od.updated_time ASC
重新修改 OrderMapperCustom.xml
写完一个模块发现所有模块提示 Result Maps collection does not contain value for 误,把报错模块检查一边全都没有问题,重新检查新建模块是发现问题
使用 mybatis 的 association 关联查询,程序设计应该是返回实体类,一时大意写成 resultMap,改回 resultType 所有问题解决

