zoeyyoung / blog Goto Github PK
View Code? Open in Web Editor NEW博客
博客


A Guide For Building A React Redux CRUD App
不错的总结,大概在创建一个功能模块的时候都要有这几个步骤,记录下几个问题
STEP 1 — Write Detailed Mocks For Each Page And Phases.
用到的软件:balsamiq-mockups
Mac 下可以用 brew cask 安装:brew cask install balsamiq-mockups
因为所有页面都采用AJAX请求来加载数据,因此都同时需要设计“Success(成功)”,"Loading(加载中)","Error(错误)"阶段的页面
STEP 2 — Divide Each Page Into Components
拆分组件通常比较简单
Redux Terms
PATTERN: Dealing With Async Actions
在处理异步请求时,通常具有如下的模式:
Initial State
{postsList:{posts:[], loading:false, error:null}}
Actions
1.“FETCH_OBJ”(for loading) 加载数据,设置加载中状态
{postsList:{posts:[], loading:true, error:null}}
2.“FETCH_OBJ_SUCCESS” 数据请求成功时分发
{postsList:{posts:[post1, post2], loading:false, error:null}}
3.“FETCH_OBJ_FAILURE” 数据请求失败时分发
{postsList:{posts:[], loading:false, error:{err: "Error Msg"}}}
4.“OBJ_RESET”(to cleanup dirty previous state)
{postsList:{posts:[], loading:false, error:null}}
只有一个小问题,就是如何区分是无数据,还是未加载?业务可能需要在无数据时显示特定的提示。追加一个数据是否为空的字段?扩展 loading 状态?
STEP 3 — List State and Actions For Each Component (AND For Each Phase)
列出所有可能改变组件展示的状态作为 States,并确定初始 state,确定可能的 Actions
这步通常大概一下就可以了
STEP 4 — Create Action Creators For Each Action
STEP 5 — Write Reducers For Each Action
这两步注意到一点,就是异步请求没有使用redux-thunk,在Container中分别使用了三个 Action Creator :
export function fetchPosts() {
  const request = axios({
    method: 'get',
    url: `${ROOT_URL}/posts`,
    headers: []
  });

  return {
    type: FETCH_POSTS,
    payload: request
  };
}

export function fetchPostsSuccess(posts) {
  return {
    type: FETCH_POSTS_SUCCESS,
    payload: posts
  };
}

export function fetchPostsFailure(error) {
  return {
    type: FETCH_POSTS_FAILURE,
    payload: error
  };
}
如果使用redux-thunk,就可以组合成下面的一个 ActionCreator :
export function fetchPosts() {
  return dispatch => {
    dispatch({
      type: FETCH_POSTS,
    });
    axios({
      method: 'get',
      url: `${ROOT_URL}/posts`,
      headers: []
    }).then(response => {
      if (!response.error) {
        return dispatch({
          type: FETCH_POSTS_SUCCESS,
          payload: response
        });
      }
      dispatch({
        type: FETCH_POSTS_FAILURE,
        payload: error
      });
    });
  };
}
Redux Term: “Presentational” and “Container” Components
STEP 6 — Implement Every Presentational Component
实现所有展示型组件
STEP 7 — Create Container Component For Some/All Presentational Component
创建容器组件
STEP 8 — Finally Bring Them All Together
之前把 containers 理解成 pages 应该是错误的,一个 page 通常是由多个 containers 组成的
由于这个错误理解,把一些本应该是 container 的东西放到了 components 中 😵
有一定经验后,现在大概步骤看起来都很简单,不过在不熟悉之前还是走了不少弯路的
React Native项目github地址: https://github.com/facebook/react-native
React Native项目官网文档: http://facebook.github.io/react-native/docs/getting-started.html
directory not found for option '-F/Applications/Xcode-beta.app/Contents/Developer/Platforms/iPhoneOS.platform/Developer/SDKs/iPhoneOS9.0.sdk/Developer/Library/Frameworks' "
http://stackoverflow.com/questions/30827022/xcode-7-library-search-path-warning/32620919
Tutorial里的fetch 是 Web API 的一部分
**a�ppKey修改??**AppDelegate.m文件
static registerComponent(appKey, () => Component);
�**闪屏界面修改?**LaunchScreen.xib文件
示例项目:
https://github.com/ColinEberhardt/ReactNative-PropertyFinder
describe块称为"测试套件"(test suite),表示一组相关的测试
it块称为"测试用例"(test case),表示一个单独的测试,是测试的最小单位
测试框架 Mocha 实例教程
两个命令:
$ lsof -i:27017
COMMAND   PID      USER   FD   TYPE             DEVICE SIZE/OFF NODE NAME
mongod  46211 zoeyyoung    5u  IPv4 0x4ffb85ab3aa06ad5      0t0  TCP *:27017 (LISTEN)
$ kill -9 46211
lsof - list open file
也可以用来找出某个文件被哪个进程使用
关于埋点组内有两种观点:
目前我还是倾向于第二种观点
https://www.zhihu.com/question/23078534
埋点从来就不是一个技术活,而是一个需要对市场分析,用户体验,客户需求都要有所了解的活。
Webpack 配置需要区分 dev 还是 pro;
线上环境需要更多性能上的优化;开发环境则要考虑热加载、自动刷新等;
| Config | DEV | PRO | |
|---|---|---|---|
| context | Default: process.cwd() | ||
| entry | o | o | |
| output | o | o | |
| output.filename | '[name].js' | o | o |
| output.path | o | o | |
| output.publicPath | |||
| output.chunkFilename | |||
| output.sourceMapFilename | |||
| output.devtoolModuleFilenameTemplate | |||
| output.devtoolFallbackModuleFilenameTemplate | |||
| output.devtoolLineToLine | |||
| output.hotUpdateChunkFilename | |||
| output.hotUpdateMainFilename | |||
| output.jsonpFunction | |||
| output.hotUpdateFunction | |||
| output.pathinfo | o | x | |
| output.library | |||
| output.libraryTarget | |||
| output.umdNamedDefine | |||
| output.sourcePrefix | |||
| output.crossOriginLoading | |||
| module | |||
| module.loaders | o | o | |
| module.preLoaders, module.postLoaders | |||
| module.noParse | |||
| automatically created contexts defaults module.xxxContextXxx | |||
| resolve | |||
| resolve.alias | |||
| resolve.root | |||
| resolve.modulesDirectories | |||
| resolve.fallback | |||
| resolve.extensions | Default: ["", ".webpack.js", ".web.js", ".js"] | ||
| resolve.packageMains | |||
| resolve.packageAlias | |||
| resolve.unsafeCache | |||
| resolveLoader | |||
| resolveLoader.moduleTemplates | |||
| externals | |||
| target | |||
| bail | |||
| profile | Capture timing information for each module | x | o |
| cache | enabled by default in watch mode | o | x |
| debug | o | x | |
| devtool | cheap-module-eval-source-map | o | x |
| devServer | o | x | |
| node | |||
| amd | |||
| loader | Custom values available in the loader context | ||
| recordsPath, recordsInputPath, recordsOutputPath | |||
| plugins | o | o |
| 做什么 | 用什么 | DEV | PRO |
|---|---|---|---|
| 定义全局变量 | webpack.DefinePlugin | o | o |
| 清理目录 | Clean Webpack Plugin | x | o |
| 拷贝目录/文件 | Copy Webpack Plugin | o | o |
| 生成单独的样式文件[非内联] | Extract Text Plugin For Webpack | o | o |
| 文件去重 | webpack.optimize.DedupePlugin | x | o |
| 打成多个包(通用库文件打包) | webpack.optimize.CommonsChunkPlugin | o | o |
| webpack.optimize.OccurrenceOrderPlugin | o | o | |
| 压缩文件 | webpack.optimize.UglifyJsPlugin | x | o |
| 生成HTML文件 | HtmlWebpackPlugin | o | o |
| webpack.HotModuleReplacementPlugin | o | x | |
| 加载完成后直接打开浏览器 | Open Browser Webpack Plugin | o | x |
�devtool: 'cheap-module-eval-source-map'
Build cross platform desktop apps with web technologies
中文文档翻译 https://github.com/electron/electron/tree/master/docs-translations/zh-CN
看起来很赞,也许目前项目的客户端也可以采用这个来开发
封装一个bilibili玩:https://github.com/ZoeyYoung/electron-bilibili
在Babel 5的时候,我们可以这样写
// foo.js
export default {
  foo: 'foo',
  bar: 'bar',
};

// bar.js Babel 5
import foobar, { foo, bar } from './foo';
console.log(foo); // 'foo'
console.log(bar); // 'bar'
console.log(foobar); // { foo: 'foo', bar: 'bar' }
但是到Babel 6的时候,foo、bar的值为undefined
之前一直不明白为啥Babel 6要改掉这种import default的方式,今天终于通过一个例子想通了
// foo.js
export const foo = 'foo-g'; // 1)
export default {
  foo: 'foo', // 2)
  bar: 'bar',
};

// bar.js Babel 5
import foobar, { foo, bar } from './foo';
console.log(foo); // 'foo-g'
console.log(bar); // undefined 这种时候bar就被隐藏了
console.log(foobar); // { foo: 'foo', bar: 'bar' }
import foobar from './foo'; 相当于 import { default as foobar } from './foo';
import foobar from './foo'; 相当于 import { default as foobar } from './foo';
那么写出import { bar, default as foobar } from './foo';感觉就有点怪怪的了
[注:如果使用oh-my-zsh,那么直接在插件列表里面添加sublime,就可以使用st来打开文件]
在命令行中查找文件时,经常会想直接查看文件内容、编辑文件或打开文件夹
如果用的是atom,直接就有快捷方式:
atom . 打开当前目录atom 文件名 打开文件Sublime Text 需要自己加这个快捷方式:
先确认环境变量PATH
> printenv | grep bin
PATH=/usr/bin:/bin:/usr/sbin:/sbin:/usr/local/bin
创建快捷方式
sudo rm /usr/local/bin/subl
sudo ln -s /Applications/Sublime\ Text.app/Contents/SharedSupport/bin/subl /usr/local/bin/subl
然后就可以在命令行中直接用S�ublime Text打开目录或文件了:smile:
subl . 打开当前目录subl 文件名 打开文件互联网公司素来以疯狂招聘、大把烧钱、华丽落败而广为人知
😂
这个有点意思,通常说的失败是成功之母,这里说的是成功过的人再次成功的概率大,失败并不是成功的先决条件。
只有在做一件事的过程中,才能掌握更多的相关信息,没有人能够未卜先知。千万不要在行动之前就作出重大的决定。
无计划地工作看上去挺悬,但是盲目遵循不切实际的计划,后果则更可怕。
这个主要讲的是只需要制定短期的计划,经常计划。
文档:http://docs.sonarqube.org/display/SONAR/Documentation
Get Started in Two Minutes http://docs.sonarqube.org/display/SONAR/Get+Started+in+Two+Minutes
Sonar是一个用于代码质量管理的开源平台,用于管理源代码的质量,可以从七个维度检测代码质量
通过插件形式,可以支持包括java,C#,C/C++,PL/SQL,Cobol,JavaScrip,Groovy等等二十几种编程语言的代码质量管理与检测
Developers' Seven Deadly Sins
通过sonar可以有效检测以上在程序开发过程中的七大问题
预置条件
下载地址:http://www.sonarqube.org/downloads/
下载SonarQube与SonarQube Runner
中文补丁包下载:http://docs.codehaus.org/display/SONAR/Chinese+Pack (有点旧)
进入数据库命令
# mysql -u root -p
mysql> CREATE DATABASE sonar CHARACTER SET utf8 COLLATE utf8_general_ci;
mysql> CREATE USER 'sonar' IDENTIFIED BY 'sonar';
mysql> GRANT ALL ON sonar.* TO 'sonar'@'%' IDENTIFIED BY 'sonar';
mysql> GRANT ALL ON sonar.* TO 'sonar'@'localhost' IDENTIFIED BY 'sonar';
mysql> FLUSH PRIVILEGES;将下载的sonarqube-5.2.zip包解压至_/etc/sonarqube_
将下载的sonar-runner-dist-2.4.zip包解压至_/etc/sonar-runner_
添加SONAR_HOME、SONAR_RUNNER_HOME环境变量,并将SONAR_RUNNER_HOME加入PATH
export SONAR_HOME=/etc/sonarqube
export SONAR_RUNNER_HOME=/etc/sonar-runner
export PATH=$PATH:$SONAR_HOME/bin/macosx-universal-64:$SONAR_RUNNER_HOME/bin
修改sonar配置文件
编辑_<install_directory>/conf/sonar.properties_文件,配置数据库设置,默认已经提供了各类数据库的支持
这里使用mysql,因此取消mysql模块的注释
#vi sonar.properties
sonar.jdbc.username:sonar
sonar.jdbc.password:sonar
sonar.jdbc.url:jdbc:mysql://localhost:3306/sonar?useUnicode=true&characterEncoding=utf8&rewriteBatchedStatements=true
# Optional properties
sonar.jdbc.driverClassName:com.mysql.jdbc.Driver
修改sonar-runner的配置文件
切换至sonar-runner的安装目录下,修改_sonar-runner.properties_
根据实际使用数据库情况取消相应注释
#Configure here general information about the environment, such as SonarQube DB details for example
#No information about specific project should appear here
#----- Default SonarQube server
sonar.host.url=http://localhost:9000
#----- PostgreSQL
#sonar.jdbc.url=jdbc:postgresql://localhost/sonar
#----- MySQL
sonar.jdbc.url=jdbc:mysql://localhost:3306/sonar?useUnicode=true&characterEncoding=utf8
#----- Oracle
#sonar.jdbc.url=jdbc:oracle:thin:@localhost/XE
#----- Microsoft SQLServer
#sonar.jdbc.url=jdbc:jtds:sqlserver://localhost/sonar;SelectMethod=Cursor
#----- Global database settings
sonar.jdbc.username=sonar
sonar.jdbc.password=sonar
#----- Default source code encoding
sonar.sourceEncoding=UTF-8
#----- Security (when 'sonar.forceAuthentication' is set to 'true')
sonar.login=admin
sonar.password=admin除了Oracle数据库外,其它数据库驱动都默认已经提供了,且这些已添加的驱动是sonar唯一支持的,因此不需要修改
如果是Oracle数据库,需要复制JDBC驱动至_<install_directory>/extensions/jdbc-driver/oracle_目录
(添加环境变量后可直接运行)
# sonar.sh start    启动服务
# sonar.sh stop    停止服务
# sonar.sh restart 重启服务
至此,sonar就安装好了
中文包安装
安装中文补丁包可以通过访问http:\localhost:9000,打开sonar后,进入更新中心安装
或者下载中文补丁包后,放到_SONARQUBE_HOME/extensions/plugins_目录,然后重启SonarQube服务
预置条件
已安装SonarQube Runner且环境变量已配置,即sonar-runner命令可在任意目录下执行
以android项目为例:
sonar.projectKey=android-sonarqube-runner
sonar.projectName=Simple Android project analyzed with the SonarQube Runner
sonar.projectVersion=1.0
sonar.sources=src
sonar.binaries=bin/classes
sonar.language=java
sonar.sourceEncoding=UTF-8
sonar.profile=Android Lint
注:要使用Android Lint
规则分析需要先访问http:\localhost:9000更新中心添加Android Lint插件,使其可以分析Android Lint规则
JavaScript
# Required metadata
sonar.projectKey=org.sonarqube:javascript-simple-sq-scanner
sonar.projectName=JavaScript :: Simple Project :: SonarQube Scanner
sonar.projectVersion=1.0
# Comma-separated paths to directories with sources (required)
sonar.sources=src
# Language
sonar.language=js
# Encoding of sources files
sonar.sourceEncoding=UTF-8
注:需要添加JavaScript Lint插件 http://docs.sonarqube.org/display/PLUG/JavaScript+Plugin
切换到项目源码根目录,执行命令# sonar-runner
分析成功后访问http:\localhost:9000即可查看分析结果
不同参数的意思:
http://docs.codehaus.org/display/SONAR/Analysis+Parameters
不同项目的源码分析示例下载:
https://github.com/SonarSource/sonar-examples
最后,当然了,得与IDE相关联,才能更方便地实时查看
以Eclipse为例,请见:http://docs.sonarqube.org/display/SONAR/SonarQube+in+Eclipse
结合intellij使用:https://github.com/sonar-intellij-plugin/sonar-intellij-plugin
附:
https://github.com/karma-runner/karma
真正要理解内容还有点多,慢慢来
(Redux作者录制,视频详解了 Todos 这个示例的由来,入门看这个很有帮助「如果能听懂英文」)
awesome-redux =》这里面的文章都能过一遍也就差不多了
Redux中文文档
redux
react-redux
redux-thunk
redux-logger
Provider 的作用:传递Store
connect()的作用:生成容器组件
import { connect } from 'react-redux';

const mapStateToProps = (state) => ({
  xxx: stateXXX
})
const mapDispatchToProps = (dispatch) => {
  return {
    xxx: (xxx) => {
      dispatch(actionCreatorXXX)
    }
  };
}
const ContainerComponent = connect(mapStateToProps, mapDispatchToProps)(Component);
中间件
http://camsong.github.io/redux-in-chinese/docs/advanced/Middleware.html
It provides a third-party extension point between dispatching an action, and the moment it reaches the reducer.
基本形式
store => next => action => {
  ...
  let result = next(action)
  ...
  return result
}在测试机(CentOS release 6.5)上跑单元测试的时候遇到这个问题
# npm test
...
START:
28 04 2016 05:44:47.156:INFO [karma]: Karma v0.13.22 server started at http://localhost:9876/
28 04 2016 05:44:47.169:INFO [launcher]: Starting browser Chrome
28 04 2016 05:44:47.171:ERROR [launcher]: No binary for Chrome browser on your platform.
  Please, set "CHROME_BIN" env variable.

Finished in 0 secs / 0 secs
...
即没有安装Chrome
查了一圈,主要是使用 xvfb 这个东西
最后使用了下面的 docker image:
https://hub.docker.com/r/markadams/chromium-xvfb-js/
主要起作用的脚本
https://github.com/mark-adams/docker-chromium-xvfb/blob/master/images%2Fbase%2Fxvfb-chromium
https://www.smashingmagazine.com/2012/04/a-new-front-end-methodology-bem/
a toolkit devised by Yandex: BEM
BEM stands for “Block”, “Element”, “Modifier”. It is a front-end methodology: a new way of thinking when developing Web interfaces.
BEM 代表 “块”,“元素”,“修饰符”,是一种前端方法论
下面是《黑客与画家》中比较喜欢的一篇
编程语言的一个重要特点:一个操作所需的代码越多,就越难避免bug,也越难发现它们。
应该使用哪一种语言?关于这个问题,现在有很多争论。部分原因是,如果你长期使用某种语言,你就会慢慢按照这种语言的思维模式进行思考。所以,后来当你遇到其它任何一种有重大差异的语言,即使那种语言本身并没有任何不对的地方,你也会觉得它极其难用。缺乏经验的程序员对于各种语言优缺点的判断经常被这种心态误导。
一些黑客只喜欢自己用的语言,反感其他所有的语言。另一些黑客则说所有的语言都一样。事实介于这两个极端之间。语言之间确实有差别,但是很难确定地说哪一种语言是最好的。这个领域依然还在快速发展。
对这点比较赞同是因为接触过的部分专门写前端的程序员,对于JS引入其它语言的特性有点小反感;
我到是希望各种语言的基础语法能够更加趋同一些,这样在切换使用语言的时候就不至于感到痛苦了;
有两种程度的面向对象编程:某些语言允许你以这种风格编程,另一些语言则强迫你一定要这样编程。
你应该使用允许你面向对象编程的语言。至于你最后到底用不用则是另外一个问题了。
关于这点JS还是比较自由的;
The pluggable linting utility for JavaScript and JSX. http://eslint.org
关键词:支持插件扩展、配置可继承、可自定义规则、支持React/JSX/ES6
可配置的错误等级 error level
因为配置可继承,因此比较方便的使用方式是采用比较流行的风格指南,然后根据团队需求配置
其中包含了react/jsx风格指南:https://github.com/airbnb/javascript/tree/master/react
对应的ESLint配置:https://github.com/airbnb/javascript/tree/master/packages/eslint-config-airbnb
安装说明:
Our default export contains all of our ESLint rules, including EcmaScript 6+ and React. It requires eslint and eslint-plugin-react.
npm install --save-dev eslint-config-airbnb eslint-plugin-react eslint- add "extends": "airbnb" to your .eslintrc
�npm install --save-dev babel-eslint
示例配置文件:.eslintrc(继承airbnb)
{
  "extends": "airbnb",
  "parser": "babel-eslint",
  "globals": {
    "__DEV__": true
  },
  "ecmaFeatures": {
    "experimentalObjectRestSpread": true
  },
  "rules": {
    "react/jsx-quotes": 0,
    "jsx-quotes": [2, "prefer-double"]
  }
}
添加_.eslintignore_文件:
node_modules/*
build/*
npm install -g eslint-config-airbnb eslint-plugin-react eslint babel-eslinteslint -f html src/** > eslint-report.html可用报告形式:http://eslint.org/docs/user-guide/formatters/
https://www.npmjs.com/package/eslint-stats
$ eslint --format node_modules/eslint-stats/byError.js src/**
可用报告:byError、byWarning、byErrorAndWarning、byErrorAndWarningStacked、byFolder
Atom https://github.com/AtomLinter/linter-eslint
Sublime Text 参考: http://jonathancreamer.com/setup-eslint-with-es6-in-sublime-text/
其它集成:http://eslint.org/docs/user-guide/integrations
https://github.com/dwyl/learn-pre-commit
使用pre-commit库
npm i -D pre-commit
在package.json中添加配置
{
  ...
  "scripts": {
    "eslint": "eslint -c ./MyApp/.eslintrc $(git diff --cached --name-only | grep -e \\MyApp/src/.*.js$)"
  },
  "pre-commit": [
    "eslint"
  ],
  ...
}
React.js 2016最佳实践 信息量很大,有时候是不是感觉组内各种调研,最后都是大差不差
会导致遇到这个坑的背景大概如下:
HEHE,所以排查了好久
If the User Agent limits the amount of data that can be queued to be sent using this API and the size of data causes that limit to be exceeded, this method returns false.
好抽象,没有说具体怎么限制的,限制多少 - -
https://nikcodes.com/2014/12/16/squeezing-the-most-into-the-new-w3c-beacon-api/
The specification allows the browser to refuse to send the beacon data (thus returning false) if it deems you’re trying to send too much. At this point, Chrome is the only browser that limits the amount of data that can be sent. Its limit is set at right around 64 KB (65,536 bytes exactly).
http://stackoverflow.com/questions/28989640/navigator-sendbeacon-data-size-limits
var url = 'http://jsfiddle.net?sendbeacon';
var n = 65536; // sendBeacon limit for Chrome v40 on Windows (2^16)

// this method courtesy of http://stackoverflow.com/questions/14343844/create-a-string-of-variable-length-filled-with-a-repeated-character
var data = new Array(n+1).join('X'); // generate string of length n

if(!navigator.sendBeacon(url, data)) {
   alert('data limit reached');
}
http://iherebydecree.com/archive/id/964
Finally, some browsers have a data limit of how much data, per page view, can be sent by the sendBeacon API. In my testing I have noticed that this only includes actual POST body data, so you can still send quite a lot on the query string if you want.
关于文件结构组织,不管是后端开发还是前端开发,大概都有两种倾向,一种是根据功能分[1],一种是根据业务实体分[2]
从去年9月份[2015]至今年2月份[2016],项目先从[1�]迁移至[2]又迁移回[1],也是瞒折腾的 😓
个人认为使用redux时第[1]种是比较合适的;必竟redux是单一store,如果采用实体分会导致没有用单一store的思路来思考,将action局限有只能更新部分state【这个问题和同事争论了很多次】
在使用第[2]种时经常遇到的问题就是不知道一块内容到底应该放到哪个位置,可能既属于这块业务又属于另一块业务,互有交叉,这种时候就比较纠结;采用第[1]种方式时就少了些纠结;
不过从目前的经验来看,不管用什么方法都不影响文件查找,善用编辑器查找就行;
最影响文件查找及debug的是之前一堆的_index.js_文件;这个问题有两种处理方式:
[目前使用的方式是大部分直接创建组件文件,部分index.js,事实上不利于未来样式的组件化,目前样式部分还是采用传统的方式把整个项目所有的样式都放在一个目录中,偶尔会出现样式的冲突]
�src
├── actions
├── a�dapts
├── assets
├── components
├── constants
├── containers
├── core
├── helpers
├── reducers
├── resource
├── server.js
├── store
├── styles  [X] => 个人倾向styles组件化
└── templates
�题外话
表单处理可以做得很简单,也可以做得很复杂;
简单的情况就是前端完全不做验证,把验证直接交给后台;其实目前都是通过ajax提交表单数据,并不存在页面刷新跳转,这样做除了可能会多发请求,其它并没有什么问题;
还是老观念,后台验证是必须的,前台验证是优化;必竟绕过前端验证去提交表单是比较容易的;
事实上,如果是正常的用户,通常不会有太多输入错误;而在前端添加验证代码会引入两个问题:1)多出许多验证逻辑代码,增加了复杂度;2)后端验证不全面,可能出现部分非前端提交的非法数据;
当然,如果能优化,又不会在业务中穿插许多验证逻辑代码,何乐尔不为呢
�目前的做法
function �save(data) {
  // 在提交到后台之前进行表单验证
  if (validateFail) {
    return {
      type: ActionType.SAVE_FAIL,
      message,
    };
  }
  return dispatch => {
    CallApi(data).then(res => {
      if (res.status === 0) {
        dispatch({
          type: ActionType.SAVE_SUCCESS,
        });
      } else {
        dispatch({
          type: ActionType.SAVE_FAIL,
          message: res.message,
        });
      }
    });
  };
}
一直计划学习一下redux-form是怎么干这件事情的
在1月31日的时候无意中发现系统的一个BUG
原因是旧项目代码写了一段非常SB的代码
�function �cloneDate(date) {
  var _date = new Date();
  _date.setFullYear(date.getFullYear());
  _date.setMonth(date.getMonth());
  _date.setDate(date.getDate();
  return _date;
}
在平常这段代码没什么问题,当月末的时候问题就来了,因为下个月的天数比这个月短,因此当把月份设置成2月,而�date还是31的时候,就会变成3月2日;
var date = new Date('2016-02-01');
var _date = new Date('2016-01-31');  // 当前日期
_date.setFullYear(date.getFullYear());
console.log(_date.toString()); // "Sun Jan 31 2016 08:00:00 GMT+0800 (CST)"
_date.setMonth(date.getMonth());
console.log(_date.toString()); // "Wed Mar 02 2016 08:00:00 GMT+0800 (CST)"
_date.setDate(date.getDate());
console.log(_date.toString()); // "Tue Mar 01 2016 08:00:00 GMT+0800 (CST)"
说SB的原因是压根不知道这个函数存在的意义~
https://github.com/dylang/npm-check
Check for outdated, incorrect, and unused dependencies.
项目开发一段时间后总是有一堆已经过期或有好几个版本更新的包,之前通常是一个个确认的,早该想到怎么可能没有这种工具呢,只要一个命令就能直观的知道哪些包没用了,哪些包可以更新,赞!
具体用法README里面已经写得很详细啦,甚至PR里面还有中文翻译
npm install karma-cli -g通常需要安装四种类型的插件
| 插件类型 | 使用的插件 | 备注 |
|---|---|---|
| frameworks | karma-mocha | 用于结合使用mocha和Karma,依赖 mocha 测试框架 |
| reporters | karma-mocha-reporter | |
| launchers | karma-chrome-launcher、karma-phantomjs-launcher | |
| preprocessors | karma-webpack、 karma-sourcemap-loader | 用于结合使用karma和webpack(用于预处理),依赖 webpack |
npm install karma mocha chai chai-enzyme karma-mocha karma-mocha-reporter karma-chrome-launcher webpack karma-webpack karma-sourcemap-loader karma-coverage babel-loader enzyme --save-dev
phantomjs-prebuilt?
两个文件:
配置文件参考 react-karma-babel-webpack-code-coverage
How to implement testing + code coverage on React with Karma, Babel, and Webpack
第一遍先了解了大概,需要再读一遍来理解细节
服务模型的变迁:同步-›复制进程-›多线程-›事件驱动
需要解决两个问题:
保证多个处理单元工作量公平的策略叫负载均衡
总结
每个进程只做一件事,并做好一件事,将复杂分解为简单,将简单组合成强大
在Node进程管理之外,还需要用监听进程数量或监听日志的方式确保整个系统的稳定性
之前看过第二版,有点久了所以印象不是很深刻,花了一个周末看了一遍第三版,主要的变动是引入了移动端部分的,接下去花点时间思考一下
其实通篇都在讲这个问题
关于链接和按钮,印象比较深是目前设计讲究简洁,因此许多可点的地方并不是很明显,必须把鼠标放上去,变成手形才知道 “哦,原来这里可以点”,那在平板上看的时候用户知不知道可点了?
作为开发人员如果不是自己开发的模块,可能都要试一试才知道是可点的
如果你不能做到让一个页面不言而喻,那么至少应该让它自我解释。
如果只有他们自己在进行设计,Web开发团队在可用性问题的决策方面并不是那么成功。很多团队一直在花大量宝贵的时间一次次地重复着同样的问题。
目前项目的需求由产品来提出,经常开发人员会对需求提出质疑,场景有点类似这章里面形容的
比较蛋疼的是作为开发人员没有接触过客户,不了解客户是怎么想的
职位情绪:每种职位的人的喜好都不一样,CEO、设计师、开发人员、业务拓展人员,这通常也是他们成为某种角色的原因
只有一种方式能决定谁是正确的:[可用性]测试
React Starter Kit https://github.com/kriasoft/react-starter-kit
React Style Guide
要点:
文件结构 Folder Structure
/src/components/Navigation/icon.svg
/src/components/Navigation/Navigation.css
/src/components/Navigation/Navigation.js
/src/components/Navigation/Navigation.test.js
/src/components/Navigation/Navigation.ru-RU.css
/src/components/Navigation/package.json
CSS类命名方式 CSS Class Names
组件名 Navigation
组件名--状态 Navigation--modifier
组件名-元素名 Navigation-item
组件名-元素名--状态 Navigation-item--modifier
React Components
npm install -g yo
npm install -g generator-react-fullstack
yo react-fullstack
疑问:
为什么要用两种Lint:eslint和jscs?有什么好处?
数据困境:缺乏数据,不能做出完整的决策;而有了大量的数据,仍然只能得到极少的深入分析见解。
第1章就提到了我目前遇到的困境,收集到了一堆的点击流数据,却只有极少的分析
因为收集的所有数据都只描述了“是什么”(What),而没有说明“为什么”(Why)
知道“发生什么”很重要,然而更重要的是知道“为什么”
Web Analytics 2.0定义为:
分析自身以及竞争对手的定量与定性的数据,为用户以及潜在用户不断改善网站体验,并将其转化为你所期望的结果(线上与线下的目标)。
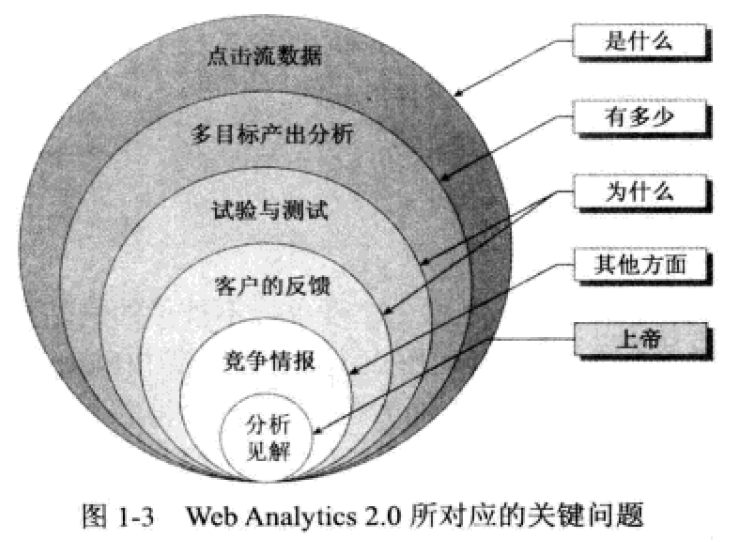
Web Analytics 2.0 多级策略与工具,强调**“多样性”**战略
| 策略 | 工具 | 备注 | |
|---|---|---|---|
| 点击流数据 | 是什么 | Google Analytics | |
| 多目标产出分析 | 有多少 | ||
| 试验与测试 | 为什么 | Google Website Optimizer 已经不存在了 | |
| 客户的反馈 | 为什么 | ||
| 竞争情报 | 其他方面 | Google Ad Planner => Google Display Planner | |
| 分析见解 |
一个网站要提供的产出有3个方面:
- 增加收入
- 降低成本
- 提高用户满意度与忠诚度
如果想获得管理者的重视,你必须关注多目标产出分析。
第一步:选择网站分析系统前需要回答的3个关键问题
- 问题1:需要报表,还是需要分析
- 问题2:我们的优势在IT方面、业务方面,还是两方面都有优势
- 问题3:我只需要解决点击流数据,还是需要整个Web Analytics 2.0
第二步:系统选定之前问供应商的10个问题
- 问题1:你们的工具/解决文案与 Yahoo ! 和 Google 的免费分析工具之间有什么区别
- 问题2:你们是否是 100% 的 ASP?是否提供本地安装版本的系统?你们计划提供本地安装版本吗?
- 问题3:你们使用什么样的数据捕获机制
- 问题4:你们能计算使用你们工具的总成本吗
- 问题5:你们能提供什么样的支持服务?哪些支持服务是免费的,哪些是付费的?免费服务是否是全天候的
- 问题6:你们的系统当中哪些功能允许对数据进行族群细分
- 问题7:有哪些方式可以将你们系统的数据导入到公司内部系统
- 问题8:你们的系统提供了哪些功能可以将其他来源的数据集成到系统
- 问题9:你们是否可以列举2~3个目前正在规划的新的系统功能,保证你们的系统未来3年领先于竞争对手;
- 问题10:最近两家客户与你们解除合同的原因是什么?他们中谁还在使用你们的系统?我们可以给这些客户打个电话吗
第三步:识别网站分析系统(如何有效地试用分析系统)
提到了一点,让实习生(或VP)试用,其实每次有新的实习生的时候,应该先让试用一下系统,提出一些建议,不了解业务的人经常能提出有意义的建议
校验数据(数据不可能完全吻合,但很有意思!):比较试运行中几个工具之间的数据,并让供应商来解释各工具之间数据存在差异的原因。
哈哈,这个比较重要,在项目中同时使用两套工具,然后发现了公司内部统计工具的BUG。:smile:
如果没有比较,可能会一直以为数据是正确的。
第四步:确定合作前的谈判——详细检查供应商提供的合同服务条款
网站分析指标不断演变,从原先的 hit 到 PV 到访问量。而现在,则是产出。
8 个关键网站指标
访问 (Visits) 与访客 (Visitors)
网页停留时间与网站停留时间
跳出率
退出率
退出率是指不管从哪个页面进入网站,而在这个页面退出的访问比率;
跳出率是指仅从这个页面进入网站,没有做任何事,就在这个页面退出网站的访问比率。
转化率
参与度
优秀指标的4个特性
Avinash 关于网站成功的3个教训
关键指标的战略性对策
第一,确定最关键因素,主要是用来通过关键指标提示问题所在。第二个对策,合理利用自定义报表,对于自定义报表的讨论与争论能让人对网站的表现更为了解。最后一条,要从宏观方面把握整个网站的表现,而不要过于纠缠细节的方面。
从宏观上理解网站
问题1:有多少访客来我们的网站?
问题2:访客是从哪儿来的?
问题3:你希望访客在网站上做什么?
问题4:访客实际上在网站上做了些什么?
参与了大半年的项目,经过了两次大的重构,终于有点走上轨道了,总结了半年下来提出的一些被忽视到需要执行的或还在沉睡中的意见:
拥抱变化,有预见性,能提前做准备,感觉这几点我做得还是比较好的;不好的地方还是表达力与影响力,不过影响力又有点微妙,当你职级较高的时候自然别人会听到你的声音,而你职级较低的时候,声音好像自动被过滤了;
使用brew安装
$ brew install nginx
==> Downloading https://homebrew.bintray.com/bottles/nginx-1.8.1.el_capitan.bo
...
==> Pouring nginx-1.8.1.el_capitan.bottle.tar.gz
Error: The `brew link` step did not complete successfully
The formula built, but is not symlinked into /usr/local
Could not symlink share/man/man8/nginx.8
/usr/local/share/man/man8 is not writable.

You can try again using:
  brew link nginx
==> Caveats
Docroot is: /usr/local/var/www

The default port has been set in /usr/local/etc/nginx/nginx.conf to 8080 so that
nginx can run without sudo.

nginx will load all files in /usr/local/etc/nginx/servers/.

To have launchd start nginx at login:
  ln -sfv /usr/local/opt/nginx/*.plist ~/Library/LaunchAgents
Then to load nginx now:
  launchctl load ~/Library/LaunchAgents/homebrew.mxcl.nginx.plist
Or, if you don't want/need launchctl, you can just run:
  nginx
==> Summary
🍺  /usr/local/Cellar/nginx/1.8.1: 7 files, 946.2K
根据Error信息,执行:
$ sudo chown -R `whoami` /usr/local
$ brew link nginx
Linking /usr/local/Cellar/nginx/1.8.1... 2 symlinks created
其它
brew install gcc
用于约束自己认真写 commit message, 通过一定的规约也能使 commit message 更加易读
https://commitizen.github.io/cz-cli/
http://www.ruanyifeng.com/blog/2016/01/commit_message_change_log.html
| 主版本号 | ChangeLog | 次版本号 | ChangeLog | 修订号 | ChangeLog |
|---|---|---|---|---|---|
| 0 | XXX | 0 | - | 0 | |
| 1 | XXX | 0 | - | 0 | |
| 1 | - | 1 | XXX | 0 | |
| 1 | - | 1 | - | 1 | XXX |
| 2 | XXX | 0 | 0 |
Koa 的一大设计理念是: 通过其他底层中间件层提供高级「语法糖」
http://es6.ruanyifeng.com/#docs/generator
http://javascript.ruanyifeng.com/nodejs/koa.html
对于直接返回Action对象的,没有其它预处理的Action Creator实在没什么好测的
关键测包含异步调用的
作为纯函数,测试起来也比较简单
如果用的R�eact其实就是React组件测试
P(rocess) M(anager) 2
Advanced, production process manager for Node.js
http://pm2.keymetrics.io/docs/usage/startup/ => 这部分没有实践
A declarative, efficient, and flexible JavaScript library for building user interfaces.
🖖 Vue.js is a progressive, incrementally-adoptable JavaScript framework for building UI on the web.
TypeScript is a superset of JavaScript that compiles to clean JavaScript output.
An Open Source Machine Learning Framework for Everyone
The Web framework for perfectionists with deadlines.
A PHP framework for web artisans
Bring data to life with SVG, Canvas and HTML. 📊📈🎉
JavaScript (JS) is a lightweight interpreted programming language with first-class functions.
Some thing interesting about web. New door for the world.
A server is a program made to process requests and deliver data to clients.
Machine learning is a way of modeling and interpreting data that allows a piece of software to respond intelligently.
Some thing interesting about visualization, use data art
Some thing interesting about game, make everyone happy.
We are working to build community through open source technology. NB: members must have two-factor auth.
Open source projects and samples from Microsoft.
Google ❤️ Open Source for everyone.
Alibaba Open Source for everyone
Data-Driven Documents codes.
China tencent open source team.
