Giter VIP home page Giter VIP logo

dianna's Introduction

build Documentation Status workflow scc badge CII Best Practices fair-software.eu DOI

Logo_ER10

Deep Insight And Neural Network Analysis

DIANNA is a Python package that brings explainable AI (XAI) to your research project. It wraps carefully selected XAI methods in a simple, uniform interface. It's built by, with and for (academic) researchers and research software engineers working on machine learning projects.

Why DIANNA?

DIANNA software is addressing needs of both (X)AI researchers and mostly the various domains scientists who are using or will use AI models for their research without being experts in (X)AI. DIANNA is future-proof: one of the very few XAI library supporting the Open Neural Network Exchange (ONNX) format.

After studying the vast XAI landscape we have made choices in the parts of the XAI Taxonomy on which methods, data modalities and problems types to focus. Our choices, based on the largest usage in scientific literature, are shown graphically in the XAI taxonomy below:

XAI_taxonomy

The key points of DIANNA:

  • Provides an easy-to-use interface for non (X)AI experts
  • Implements well-known XAI methods LIME, RISE and KernelSHAP, chosen by systematic and objective evaluation criteria
  • Supports the de-facto standard of neural network models - ONNX
  • Supports images, text, time series, and tabular data modalities, embeddings are currently being developed
  • Comes with simple intuitive image, text, time series, and tabular benchmarks, so can help you with your XAI research
  • Includes scientific use-cases tutorials
  • Easily extendable to other XAI methods

For more information on the unique strengths of DIANNA with comparison to other tools, please see the context landscape.

Installation

workflow pypi badge supported python versions

DIANNA can be installed from PyPI using pip on any of the supported Python versions (see badge):

python3 -m pip install dianna

To install the most recent development version directly from the GitHub repository run:

python3 -m pip install git+https://github.com/dianna-ai/dianna.git

If you get an error related to OpenMP when importing dianna, have a look at this issue for possible workarounds.

Pre-requisites only for Macbook Pro with M1 Pro chip users

  • To install TensorFlow you can follow this tutorial.
  • To install TensorFlow Addons you can follow these steps. For further reading see this issue. Note that this temporary solution works only for macOS versions >= 12.0. Note that this step may have changed already, see #245.
  • Before installing DIANNA, comment tensorflow requirement in setup.cfg file (tensorflow package for M1 is called tensorflow-macos).

Getting started

You need:

You get:

  • a relevance map overlayed over the data item

Template example for any data modality and explainer

  1. Provide your trained model and data item ( text, image, time series or tabular )
model_path = 'your_model.onnx'  # model trained on your data modality
data_item = <data_item> # data item for which the model's prediction needs to be explained 
  1. If the task is classification: which are the classes your model has been trained for?
labels = [class_a, class_b]   # example of binary classification labels

Which of these classes do you want an explanation for?

explained_class_index = labels.index(<explained_class>)  # explained_class can be any of the labels
  1. Run dianna with the explainer of your choice ( 'LIME', 'RISE' or 'KernalSHAP') and visualize the output:
explanation = dianna.<explanation_function>(model_path, data_item, explainer)
dianna.visualization.<visualization_function>(explanation[explained_class_index], data_item)

Text and image usage examples

Lets illustrate the template above with textual data. The data item of interest is a sentence being (a part of) a movie review and the model has been trained to classify reviews into positive and negative sentiment classes. We are intersted which words are contributing positively (red) and which - negatively (blue) towards the model's desicion to classify the review as positive and we would like to use the LIME explainer:

model_path = 'your_text_model.onnx'
# also define a model runner here (details in dedicated notebook)
review = 'The movie started great but the ending is boring and unoriginal.' 
labels = ["negative", "positive"] 
explained_class_index = labels.index("positive")  
explanation = dianna.explain_text(model_path, text, 'LIME')
dianna.visualization.highlight_text(explanation[explained_class_index], model_runner.tokenizer.tokenize(review))

image

Here is another illustration on how to use dianna to explain which parts of a bee image contributied positively (red) or negativey (blue) towards a classifying the image as a 'bee' using RISE. The Imagenet model has been trained to distinguish between 1000 classes (specified in labels). For images, which are data of higher dimention compared to text, there are also some specifics to consider:

model_path = 'your_image_model.onnx' 
image = PIL.Image.open('your_bee_image.jpeg') 
axis_labels = {2: 'channels'} 
explained_class_index = labels.index('bee') 
explanation = dianna.explain_image(model_path, image, 'RISE', axis_labels=axis_labels, labels=labels)
dianna.visualization.plot_image(explanation[explained_class_index], utils.img_to_array(image)/255., heatmap_cmap='bwr')
plt.show()

And why would Imagenet think the same image would be a garden spider?

explained_class_index = labels.index('garden_spider') # interested in the image being classified as a garden spider
explanation = dianna.explain_image(model_path, image, 'RISE', axis_labels=axis_labels, labels=labels)
dianna.visualization.plot_image(explanation[explained_class_index], utils.img_to_array(image)/255., heatmap_cmap='bwr')
plt.show()

Overview tutorial

There are full working examples on how to use the supported explainers and how to use dianna for all supported data modalities in our overview tutorial.

Demo movie (update planned):

Watch the video on YouTube

IMPORTANT: Sensitivity to hyperparameters

The explainers are sensitive to the choice of their hyperparameters! In this work, this sensitivity to hyperparameters is researched and useful conclusions are drawn. The default hyperparameters used in DIANNA for each explainer as well as the values for our tutorial examples are given in the Tutorials README.

Dashboard

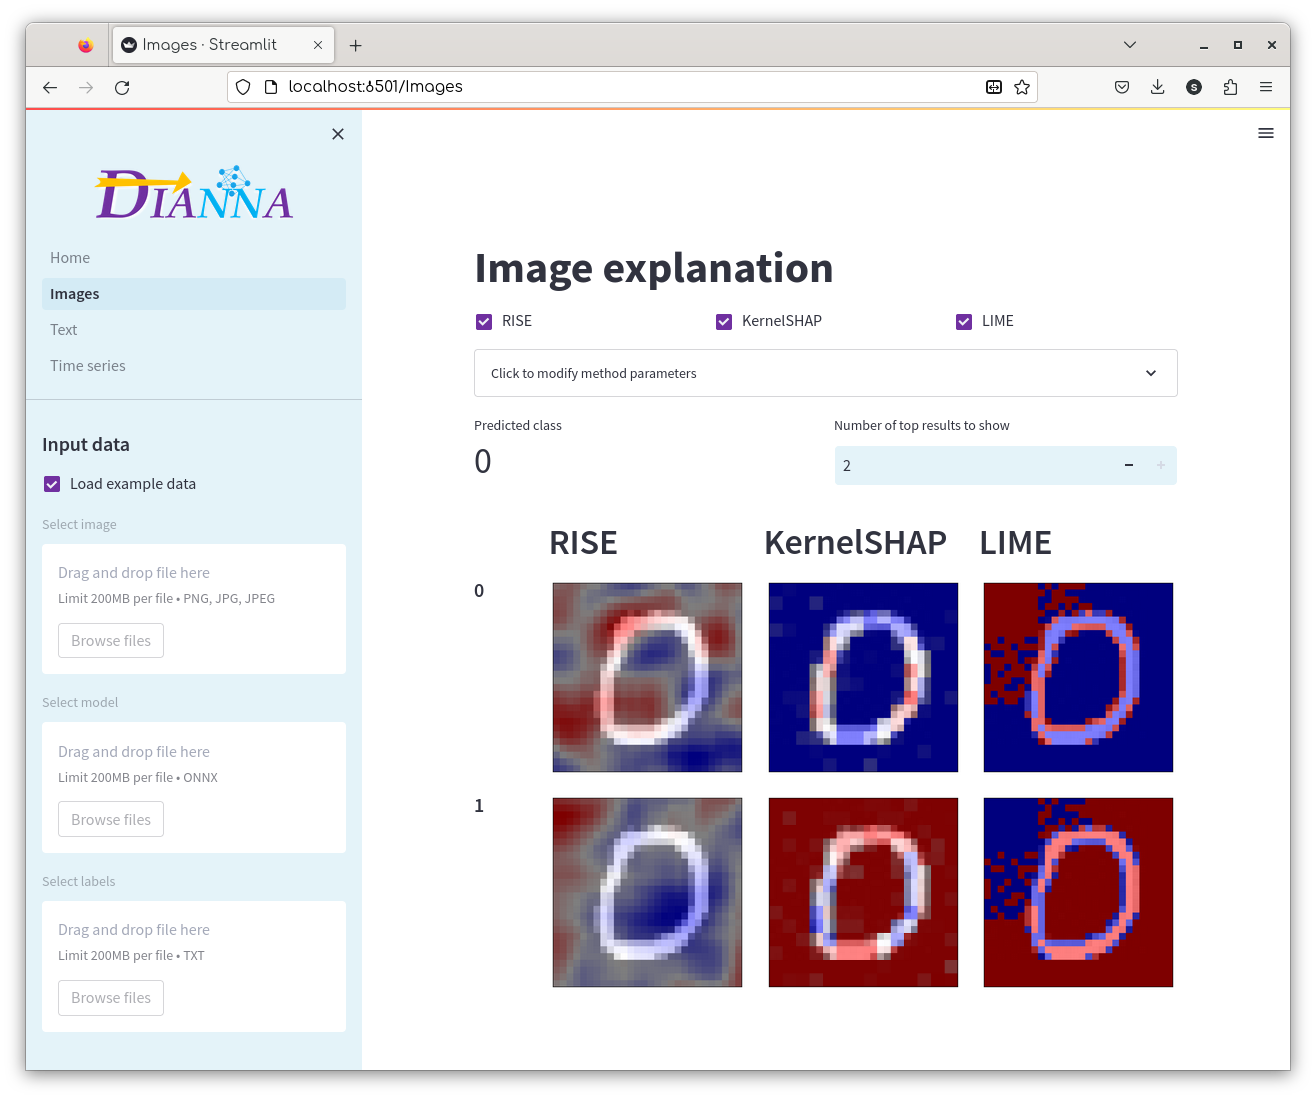
Explore the explanations of your trained model using the DIANNA dashboard (for now images, text and time series classification is supported). Click here for more information.

Dianna dashboard screenshot

Datasets

DIANNA comes with simple datasets. Their main goal is to provide intuitive insight into the working of the XAI methods. They can be used as benchmarks for evaluation and comparison of existing and new XAI methods.

Images

Dataset Description Examples Generation
Binary MNIST mnist_zero_and_one_half_size Greyscale images of the digits "1" and "0" - a 2-class subset from the famousMNIST dataset for handwritten digit classification. BinaryMNIST Binary MNIST dataset generation
Simple Geometric (circles and triangles) Simple Geometric Logo Images of circles and triangles for 2-class geometric shape classificaiton. The shapes of varying size and orientation and the background have varying uniform gray levels. SimpleGeometric Simple geometric shapes dataset generation
Simple Scientific (LeafSnap30) LeafSnap30 Logo Color images of tree leaves - a 30-class post-processed subset from the LeafSnap dataset for automatic identification of North American tree species. LeafSnap LeafSnap30 dataset generation

Text

Dataset Description Examples Generation
Stanford sentiment treebank nlp-logo_half_size Dataset for predicting the sentiment, positive or negative, of movie reviews. This movie was actually neither that funny, nor super witty. Sentiment treebank

Time series

Dataset Description Examples Generation
Coffee dataset Coffe Logo Food spectographs time series dataset for a two class problem to distinguish between Robusta and Arabica coffee beans. example image data source
Weather dataset Weather Logo The light version of the weather prediciton dataset, which contains daily observations (89 features) for 11 European locations through the years 2000 to 2010. example image data source

Tabular

Dataset Description Examples Generation
Pengiun dataset Penguins Logo Palmer Archipelago (Antarctica) penguin dataset is a great intro dataset for data exploration & visualization similar to the famous Iris dataset. example image data source
Weather dataset Weather Logo The light version of the weather prediciton dataset, which contains daily observations (89 features) for 11 European locations through the years 2000 to 2010. example image data source

ONNX models

We work with ONNX! ONNX is a great unified neural network standard which can be used to boost reproducible science. Using ONNX for your model also gives you a boost in performance! In case your models are still in another popular DNN (deep neural network) format, here are some simple recipes to convert them:

More converters with examples and tutorials can be found on the ONNX tutorial page.

And here are links to notebooks showing how we created our models on the benchmark datasets:

Images

Models Generation
Binary MNIST model Binary MNIST model generation
Simple Geometric model Simple geometric shapes model generation
Simple Scientific model LeafSnap30 model generation

Text

Models Generation
Movie reviews model Stanford sentiment treebank model generation

Time series

Models Generation
Coffee model Coffee model generation
Season prediction model Season prediction model generation
Fast Radio Burst classification model Fast Radio Burst classification model generation

Tabular

Models Generation
Penguin model (classification) Penguin model generation
Sunshine hours prediction model (regression) Sunshine hours prediction model generation

We envision the birth of the ONNX Scientific models zoo soon...

Tutorials

DIANNA supports different data modalities and XAI methods (explainers). We have evaluated many explainers using objective criteria (see the How to find your AI explainer blog-post). The table below contains links to the relevant XAI method's papers (for some explanatory videos on the methods, please see tutorials). The DIANNA tutorials cover each supported method and data modality on a least one dataset using the default or tuned hyperparameters. Our plans to expand DIANNA with more data modalities and explainers are given in the ROADMAP.

Data \ XAI RISE LIME KernelSHAP
Images โœ… โœ… โœ…
Text โœ… โœ…
Timeseries โœ… โœ…
Tabular planned โœ… โœ…
Embedding work in progress
Graphs* next steps ... ...

LRP and PatternAttribution also feature in the top 5 of our thoroughly evaluated explainers. Also GradCAM) has been recently found to be semantically continous! Contributing by adding these and more (new) post-hoc explainability methods on ONNX models is very welcome!

Scientific use-cases

Our goal is that the scientific community embrases XAI as a source for novel and unexplored perspectives on scientific problems. Here, we offer tutorials on specific scientific use-cases of uisng XAI:

Use-case (data) \ XAI RISE LIME KernelSHAP
Biology (Phytomorphology): Tree Leaves classification (images) โœ…
Astronomy: Fast Radio Burst detection (timeseries) โœ…
Geo-science (raster data) planned ... ...
Social sciences (text) work in progress ... ...
Climate planned ... ...

Reference documentation

For detailed information on using specific DIANNA functions, please visit the documentation page hosted at Readthedocs.

Contributing

If you want to contribute to the development of DIANNA, have a look at the contribution guidelines. See our developer documentation for information on developer installation, running tests, generating documentation, versioning and making a release.

How to cite us

DOI RSD

If you use this package for your scientific work, please consider citing directly the software as:

Ranguelova, E., Bos, P., Liu, Y., Meijer, C., Oostrum, L., Crocioni, G., Ootes, L., Chandramouli, P., Jansen, A., Smeets, S. (2023). dianna (*[VERSION YOU USED]*). Zenodo. https://zenodo.org/record/5592606

or the JOSS paper as:

Ranguelova et al., (2022). DIANNA: Deep Insight And Neural Network Analysis. Journal of Open Source Software, 7(80), 4493, https://doi.org/10.21105/joss.04493

See also the Zenodo page or the JOSS page for exporting the software citation to BibTteX and other formats.

Credits

This package was created with Cookiecutter and the NLeSC/python-template.

dianna's People

Contributors

abelsiqueira avatar apjansen avatar cpranav93 avatar cwmeijer avatar egpbos avatar elboyran avatar gcroci2 avatar geek-yang avatar jspaaks avatar laurasootes avatar loostrum avatar ocean1 avatar sarahalidoost avatar stefsmeets avatar willemspek avatar

Stargazers

 avatar  avatar  avatar  avatar  avatar  avatar  avatar  avatar  avatar  avatar  avatar  avatar  avatar  avatar  avatar  avatar  avatar  avatar  avatar  avatar  avatar  avatar  avatar  avatar  avatar  avatar  avatar  avatar  avatar  avatar  avatar  avatar  avatar  avatar  avatar  avatar  avatar  avatar  avatar  avatar  avatar  avatar  avatar  avatar

Watchers

 avatar  avatar  avatar  avatar  avatar

dianna's Issues

Next step: Sonarcloud integration

Continuous code quality can be handled by Sonarcloud. This repository is configured to use Sonarcloud to perform quality analysis and code coverage report on each push.

In order to configure Sonarcloud analysis GitHub Action workflow you must follow the steps below:

  1. go to Sonarcloud to create a new Sonarcloud project
  2. login with your GitHub account
  3. add Sonarcloud organization or reuse existing one
  4. set up a repository
  5. go to new code definition administration page and select Number of days option
  6. To be able to run the analysis:
    1. a token must be created at Sonarcloud account
    2. the created token must be added as SONAR_TOKEN to secrets on GitHub

Test/play with an implementation of LRP

At least on the leafs dataset:

  • copy a generated heatmap to this issue
  • lesson learnt from implementation
  • at least a few lines on the user experience

Focus on the question: Can we reuse (parts of) this implementation?

Keep track of data types

In some cases, the user may provide data with one data type, but the XAI methods produces model input with another data type. We should keep track of this, and convert the data back to the correct type before feeding it to the model.

Wrong shape in RISE test

test_rise_filename uses the MNIST model, but doesn't take into account that it needs a swap of the channels axis. (Model has it as 2nd axis, RISE wants it to be the last axis).
Now the heatmaps produced have a shape of (1, 28) instead of (28, 28). The test passes, because it does match the input shape and that is the only thing we test for.
The test could use the preprocessing_function option to reshape the data before running the test, and perhaps explicitly test if the shape matches the (y, x) shape of the input.

LIME explain_image design choice; forward kwargs to methods

LIME explain_image directly returns
mask = explanation.get_image_and_mask(label, positive_only=False, hide_rest=True, num_features=num_features)[1]
without giving the user the opportunity to change positive_only, hide_rest, or play with parameters such as min_weight.

What was the reasoning behind this choice of default parameters?
Would it be useful to give the user the opportunity to pass those values if needed?

The user will likely stumble upon the base LIME implementation documentation even when trying to use the DIANNA wrapper and that documentation demonstrates interesting flexibility in how to visualize the mask:
https://marcotcr.github.io/lime/tutorials/Tutorial%20-%20images.html

Make movie reviews model easier to run

Currently it needs quite a lof of code to run; most of that can be made part of the model itself.
This would allow for easy use of the model in tests as well

Implement tensor axis labeling for DIANNA completely

A few times, and again today from Matthieu, the issue came up that getting the tensor axes in the correct order is a huge annoyance and/or confuses users. The preprocessing function provides a way to fix it, but it is still difficult to wrap one's head around.

To make not only DIANNA but really all of tensor-based deep learning more convenient, it would help if we had a tensor type with annotated axes. Something that acts like

class AnnotatedAxesTensor:
    def __init__(self, data, axis_labels):
        ...

batch_size = 20
channels = 38
fidgets = 10
worbles = 204
sigwatts = 2

data = np.zeros((batch_size, channels, fidgets, worbles, sigwatts))

t = AnnotatedAxesTensor(data, ["batch", "channel", "fidget", "worble", "sigwatt"])

print(t.batch[0])

which would output the first batch. Models that use these tensors will be able to "transpose" / rotate axes in the underlying tensor automatically, which will make the user input side a lot easier. It can also give a warning when it does indeed need to reshape the underlying tensor, because this may impact performance, so the user may want to reshape beforehand, but now it will be easy, because the implementation warning can just say exactly how they should do the reshaping:

print("please reshape for optimal performance: t.rotate_axes["batch", "sigwatt", "worble" ...]")

I realize that this may be out of scope for the DIANNA project currently, but maybe this is something to look into in the future, if you think it would be useful.

feedback on usage

I have tried using dianna on a basic CLIP pipeline (https://github.com/openai/CLIP).

CLIP takes the output of preprocess(img) as input, where preprocess is model-specific (but provided) and img is a PIL.Image. Once in that format, I can simply do model.encode_image(input)

My goal was therefore to run something like:

    explainer = RISE()
    heatmaps = explainer.explain_image(run_model, x)

Where run_model would include a typical CLIP call (i.e., that function can be used independently from a CLIP+dianna pipeline). What I ended up having was:

    explainer = RISE(preprocess_function=lambda x:np.moveaxis(x, -1, 1))
    x = np.expand_dims(np.moveaxis(images[idx].numpy(), 0, -1), axis=0).astype('double')
    heatmaps = explainer.explain_image(run_model, x, batch_size=50)

Where images[idx] would have been the usual input to CLIP.

Is that the right way to proceed in this situation? Did I miss a simpler approach?

For reference, here is my run_model function:

def run_model(x, predict=False):
    image_input = torch.tensor(np.stack(x)).cuda()

    with torch.no_grad():
        image_features = model.encode_image(image_input).float()
        image_features /= image_features.norm(dim=-1, keepdim=True)

    text_probs = (100.0 * image_features @ text_features.T).softmax(dim=-1)
    top_probs, top_labels = text_probs.topk(5, dim=-1)
    if predict:
        return top_probs, top_labels
    return text_probs.cpu().detach().numpy()

and preprocess is a function similar to

Compose(
    Resize(size=224, interpolation=PIL.Image.BICUBIC)
    CenterCrop(size=(224, 224))
    <function _convert_image_to_rgb at 0x14c2c470e8b0>
    ToTensor()
    Normalize(mean=(0.48145466, 0.4578275, 0.40821073), std=(0.26862954, 0.26130258, 0.27577711))
)

Next step: Citation data

It is likely that your CITATION.cff currently doesn't pass validation. The error messages you get from the cffconvert GitHub Action are unfortunately a bit cryptic, but doing the following helps:

  • Check if the given-name and family-name keys need updating. If your family name has a name particle like von or van or de, use the name-particle key; if your name has a suffix like Sr or IV, use name-suffix. For details, refer to the schema description: https://github.com/citation-file-format/citation-file-format
  • Update the value of the orcid key. If you do not have an orcid yet, you can get one here https://orcid.org/.
  • Add more authors if needed
  • Update date-released using the YYYY-MM-DD format.
  • Update the doi key with the conceptDOI for your repository (see https://help.zenodo.org for more information on what a conceptDOI is). If your project doesn't have a DOI yet, you can use the string 10.0000/FIXME to pass validation.
  • Verify that the keywords array accurately describes your project.

Once you do all the steps above, the cffconvert workflow will tell you what content it expected to see in .zenodo.json. Copy-paste from the GitHub Action log into a new file .zenodo.json. Afterwards, the cffconvert GitHub Action should be green.

To help you keep the citation metadata up to date and synchronized, the cffconvert GitHub Action checks the following 6 aspects:

  1. Whether your repository includes a CITATION.cff file.

    By including this file, authors of the software can receive credit for the work they put in.

  2. Whether your CITATION.cff is valid YAML.

    Visit http://www.yamllint.com/ to see if the contents of your CITATION.cff are valid YAML.

  3. Whether your CITATION.cff adheres to the schema (as listed in the CITATION.cff file itself under key cff-version).

    The Citation File Format schema can be found here, along with an explanation of all the keys. You're advised to use the latest available schema version.

  4. Whether your repository includes a .zenodo.json file.

    With this file, you can control what metadata should be associated with any future releases of your software on Zenodo: things like the author names, along with their affiliations and their ORCIDs, the license under which the software has been released, as well as the name of your software and a short description. If your repository doesn't have a .zenodo.json file, Zenodo will take a somewhat crude guess to assign these metadata.

    The cffconvert GitHub action will tell you what it expects to find in .zenodo.json, just copy and paste it to a new file named .zenodo.json. The suggested text ignores CITATION.cff's version, commit, and date-released. cffconvert considers these keys suspect in the sense that they are often out of date, and there is little purpose to telling Zenodo about these properties: Zenodo already knows.

  5. Whether .zenodo.json is valid JSON.

    Currently unimplemented, but you can check for yourself on https://jsonlint.com/.

  6. Whether CITATION.cff and .zenodo.json contain equivalent data.

    This final check verifies that the two files are in sync. The check ignores CITATION.cff's version, commit, and date-released.

Make deeplift accept ONNX models

The deeplift code currently accepts models in pytorch format.
When #39 is done, this should be updated to accept onnx and do the conversion to pytorch internally.

Autotune p_keep parameter for RISE

We think that std of the probability of the predicted correct class on all masked instances of an image should be somewhere between 0.2 and 0.4. Under 0.1 we didn't see any good looking heatmaps. Between 0.1 and 0.2 we often saw some artifacts and strange blobs in the heatmaps. From 0.2 onwards we didn't see such randomish errors anymore. An std of 0.5 is possible in theory and will probably also be fine in terms of the resulting heatmap. Conclusion: at least std of 0.2.

Proposed algorithm:

  • use small number of masks for speed (let's say 50)
  • repeat:
    • try p_keep value and calculate std
  • take p_keep with high enough (highest?) std and use this for a computation with enough masks for quality (2000+?)

Next step: Linting

Your repository has a workflow which lints your code after every push and when creating a pull request.

Linter workflow may fail if description or keywords field in setup.cfg is empty. Please update these fields. To validate your changes run:

prospector

Enabling githook will automatically lint your code in every commit. You can enable it by running the command below.

git config --local core.hooksPath .githooks

failing build on 3.6 and 3.7 due to / in arguments list

I suggest to stop using this technique. Alternatively, we could stop supporting 3.6 and 3.7. I think we want to support these versions as we hope to build some tool that can be widely used. We might therefore not want to leave out people somehow bound to slightly older python versions.

Compare without tolerance in tests

I see in the method tests that comparisons are done with a pretty high tolerance, e.g. here:

assert np.allclose(heatmap, heatmap_expected, atol=.01)

This makes the comparison very lenient, which may cause us to miss changes and/or bugs.

Is it possible to change them to exactly equal tests?

autotune n_masks for rise

Output of rise can be added repeatedly so you don't have to know the final n_masks in advance.
We can keep adding masks until the output doesn't change much anymore.
Make sure other hyperparameters (p_keep and n_features) have already been optimized (see #24).

Dependencies list missing

When trying out the notebook at example_data/xai_method_study/LRP/LRP_mnist_binary.ipynb, two dependencies are missing: torch and captum. Probably, the same will go for some other notebooks. We should maybe add a requirements.txt at the top level for all dependencies, or add separate ones in each notebook directory with specific deps for those notebooks.

Next step: Read the Docs

Your Python package should have publicly available documentation, including API documentation for your users.
Read the Docs can host your user documentation for you.

To host the documentation of this repository please perform the following instructions:

  1. go to Read the Docs
  2. log in with your GitHub account
  3. find dianna-ai/dianna in list and press + button.
    • If repository is not listed,
      1. go to Read the Docs GitHub app
      2. make sure dianna-ai has been granted access.
      3. reload repository list on Read the Docs import page
  4. wait for the first build to be completed at https://readthedocs.org/projects/dianna/builds
  5. check that the link of the documentation badge in the README.md works

See README.dev.md# how to build documentation site locally.

Next step: Enable Zenodo integration

By enabling Zenodo integration, your package will automatically get a DOI which can be used to cite your package. After enabling Zenodo integration for your GitHub repository, Zenodo will create a snapshot and archive each release you make on GitHub. Moreover, Zenodo will create a new DOI for each GitHub release of your code.

To enable Zenodo integration:

  1. Go to http://zenodo.org and login with your GitHub account. When you are redirected to GitHub, Authorize application to give permission to Zenodo to access your account.
  2. Go to https://zenodo.org/account/settings/github/ and enable Zenodo integration of your repository by clicking on On toggle button.
  3. Your package will get a DOI only after you make a release. Create a new release as described in README.dev.md
  4. At this point you should have a DOI. To find out the DOI generated by Zenodo:
    1. Visit https://zenodo.org/deposit and click on your repository link
    2. You will find the latest DOI in the right column in Versions box in Cite all versions? section
    3. Copy the text of the link. For example 10.5281/zenodo.1310751
  5. Update the badge in your repository
    1. Edit README.md and replace the badge placeholder with the badge link you copied in previous step.
      The badge placeholder is shown below.

      [![DOI](https://zenodo.org/badge/DOI/<replace-with-created-DOI>.svg)](https://doi.org/<replace-with-created-DOI>)

For FAQ about Zenodo please visit https://help.zenodo.org/.

Badges & additional readme paragraphs

I would prefer a reorganization of badges on the readme. Thinking about this also made me realize a few things that are missing from the readme.

  • The code quality badges should be at the top, just below the title and possibly below a first short descriptive paragraph / tagline. These are: CII checklist, howfairis, Static analysis and coverage. We could also add the CI build badges to this line, but I think these would be better on a next line below the quality badges.
  • They should just be buttons, definitely no table, preferably also no descriptive labels.
  • There should just be a readme paragraph at the bottom for license/reusing; the license badge can go at the top of that paragraph.
  • The community registry badges should be moved to the top of the installation paragraph. Maybe the code repository one can be included there as well; otherwise imho it could be removed.
  • We need a How to cite paragraph; we can move the Zenodo DOI badge there as well.
  • Docs badge should go at the top of the documentation paragraph.

Recommend Projects

  • React photo React

    A declarative, efficient, and flexible JavaScript library for building user interfaces.

  • Vue.js photo Vue.js

    ๐Ÿ–– Vue.js is a progressive, incrementally-adoptable JavaScript framework for building UI on the web.

  • Typescript photo Typescript

    TypeScript is a superset of JavaScript that compiles to clean JavaScript output.

  • TensorFlow photo TensorFlow

    An Open Source Machine Learning Framework for Everyone

  • Django photo Django

    The Web framework for perfectionists with deadlines.

  • D3 photo D3

    Bring data to life with SVG, Canvas and HTML. ๐Ÿ“Š๐Ÿ“ˆ๐ŸŽ‰

Recommend Topics

  • javascript

    JavaScript (JS) is a lightweight interpreted programming language with first-class functions.

  • web

    Some thing interesting about web. New door for the world.

  • server

    A server is a program made to process requests and deliver data to clients.

  • Machine learning

    Machine learning is a way of modeling and interpreting data that allows a piece of software to respond intelligently.

  • Game

    Some thing interesting about game, make everyone happy.

Recommend Org

  • Facebook photo Facebook

    We are working to build community through open source technology. NB: members must have two-factor auth.

  • Microsoft photo Microsoft

    Open source projects and samples from Microsoft.

  • Google photo Google

    Google โค๏ธ Open Source for everyone.

  • D3 photo D3

    Data-Driven Documents codes.