Giter VIP home page Giter VIP logo

rordenlab / mricrogl Goto Github PK

View Code? Open in Web Editor NEW
185.0 9.0 32.0 58.31 MB

v1.2 GLSL volume rendering. Able to view NIfTI, DICOM, MGH, MHD, NRRD, AFNI format images.

Home Page: https://www.nitrc.org/plugins/mwiki/index.php/mricrogl:MainPage

License: Other

GLSL 3.80% Metal 3.83% Python 51.06% Pascal 37.83% Shell 0.03% Batchfile 0.01% C++ 0.12% C 3.29% Roff 0.01% Makefile 0.01%
volume-rendering dicom dicom-viewer visualization glsl mricrogl nifti opengl volume-renderings lazarus

mricrogl's Introduction

About

MRIcroGL is a cross-platform tool for viewing DICOM and NIfTI format images. It provides a drag-and-drop user interface as well as a scripting language. Please see the wiki page from more details. Note that the wiki page describes version 1.0 of the software, while this Github page is for the upcoming version 1.2. The changes are in general subtle, but the scripting has changed quite a bit.

Chest CT

Requirements

By default, MRIcroGL 1.2 is compiled to require OpenGL 2.1 (from 2006). It can also be compiled to require OpenGL 3.3 Core (released in 2009). Alternatively, macOS users can also compile the tool for the Metal. From the user perspective, there should be no difference between these choices. If your computer does not support OpenGL 2.1, you can try MRIcron. The code can be compiled for the macOS, Linux or Windows operating system. For macOS, both ARM-based Apple Silicon and Intel-based computers are natively supported.

Installation

You can get MRIcroGL using three methods:

  • Download from NITRC.
  • Download from Github.
  • Run the following command to get the latest version for Linux, Macintosh or Windows:
    • curl -fLO https://github.com/rordenlab/MRIcroGL/releases/latest/download/MRIcroGL_linux.zip
    • curl -fLO https://github.com/rordenlab/MRIcroGL/releases/latest/download/MRIcroGL_macOS.dmg
    • curl -fLO https://github.com/rordenlab/MRIcroGL/releases/latest/download/MRIcroGL_windows.zip

Once you have downloaded the software, extract the archive and run the executable. Visit the wiki for a full manual that includes troubleshooting.

MRI

Compiling with the Graphical Interface

It is generally recommended that download a pre-compiled executable (see previous section). However, you can compile your own copy from source code.

  • Download and install Lazarus 2.0.6 or later.
  • Get the MRIcroGL repository
  • Launch the graphical lazarus and choose the Project menu's Open Project item. Select the project you wish to open (e.g. MRIcroGL.lpi).
  • Use the Run command from the Run menu compile and run your project.

Compiling with the Command Line

It is generally recommended that download a pre-compiled executable (see earlier section). However, you can compile your own copy from source code. Download and install Lazarus 2.0.6 or later, at which point the lazbuild command should be available from the command line.

For Linux (QT5) or Windows (though see notes above), the compilation will look like this :

git clone https://github.com/rordenlab/MRIcroGL.git
lazbuild --build-ide= --add-package lazopenglcontext ./Python27-for-Lazarus/python4lazarus/python4lazarus_package.lpk
cd MRIcroGL
lazbuild  -B MRIcroGL.lpr

For MacOS, you will want to specify the modern Cocoa widgetset, rather than the legacy Cocoa widgetset:

git clone https://github.com/rordenlab/MRIcroGL.git
cd MRIcroGL
lazbuild  -B --ws=cocoa MRIcroGL.lpi

Project variations

MRIcroGL can be compiled for Linux, macOS and Windows. Compiler directives allow MRIcroGL to be tuned for various environments. Several projects are provided with different Compiler Options. For further control, one can edit the CompilerOptions fields of these projects for preferred builds. Here are the provided projects:

Name Python Metal LLVM cfGzip Notes
MRIcroGL.lpi Y N N Y default
MRIcroGL_Debian.lpi Y† N N N Debian only
MRIcroGL_Metal Y Y N Y macOS only
MRIcroGL_Metal_llvm.lpi Y Y Y Y macOS only
MRIcroGL_NoPython.lpi N N N Y minimal
MRIcroGL_Py4Laz.lpi Y* N N Y Python-for-Lazarus
MRIcroGL_llvm.lpi Y N Y Y macOS only
MRIcroGL_llvm_linux.lpi Y N Y Y linux only

Python:

  • Y: Scripting uses PythonBridge. Static linking for Unix, .dll for Windows.
  • N: Built without scripting functionality and menu.
  • Y*: cripting uses Python-for-Lazarus.
  • Y†: Scripting uses PythonBridge. Assumes libpython3.*.so in either /usr/local/lib or /usr/lib. For example, /usr/lib/python3.9/config-3.9-x86_64-linux-gnu/libpython3.9.so.

Metal:

  • N: OpenGL 2.1 used for visualization.
  • Y: Metal used for visualization (macOS only).

LLVM:

  • N: FreePascal compilation.
  • Y: FreePascal uses Clnag to create intermediate representation (IR) for LLVM. This can provide slightly faster performance, perticulary for the ARM architecture.

cfGzip:

  • N: Uses Compiles native Pascal code for handling GZip compression.
  • Y: Statically links accelerated cloudflare zlib which requires CPU instructions introduced in 2011.

Linux dependency

For the Linux (qt5) widgetset users will need to install libqt5pas. Hopefully this can be done with sudo apt install libqt5pas. However, you can also get a Linux libqt5pas 1.2.8 or later installer online. Head CT

Deploying MRIcroGL

The MRIcroGL executable has more functionality if it can access its Resources folder. This folder includes color lookup tables (lut folder), Python scripts (script), Material Capture (matcap), GPU Shaders (shader), default NIfTI images (standard), NIfTI atlases (atlas), as well as fonts and icons. Therefore, for full functionality, you want the executable to have access to this folder.

  • For MacOS, the Resources folder is placed inside the application package bundle. In other words, if your application is MRIcroGL.app, the software expects MRIcroGL.app/Resources.
  • For Windows, place the Resources folder in the same folder as MRIcroGL.exe.
  • For Linux, you can place the Resources folder in the same folder as the MRIcroGL executable. If this fails, it will look for the folder $MRICROGL_DIR where $MRICROGL_DIR is an environment variable. It will then look a folder in the following order (for the first pass, where the applications actual name is used MRIcroGL_QT, and for a second pass using MRIcroGL):
 /opt/MRIcroGL/Resources
 /opt/MRIcroGL
 /opt/MRIcroGL/Resources
 /opt/MRIcroGL
 /usr/local/MRIcroGL/Resources
 /usr/local/MRIcroGL
 /usr/local/MRIcroGL/Resources
 /usr/local/MRIcroGL
 /usr/local/share/MRIcroGL/Resources
 /usr/local/share/MRIcroGL
 /usr/local/share/MRIcroGL/Resources
 /usr/local/share/MRIcroGL

Linux GNOME users may also want to setup a desktop file with a name like MRIcroGL.desktop. A sample is provided in the Resources folder, but this will require minor editing since the Exec and Icon path must be absolute not relative.

Scripting and Command Line

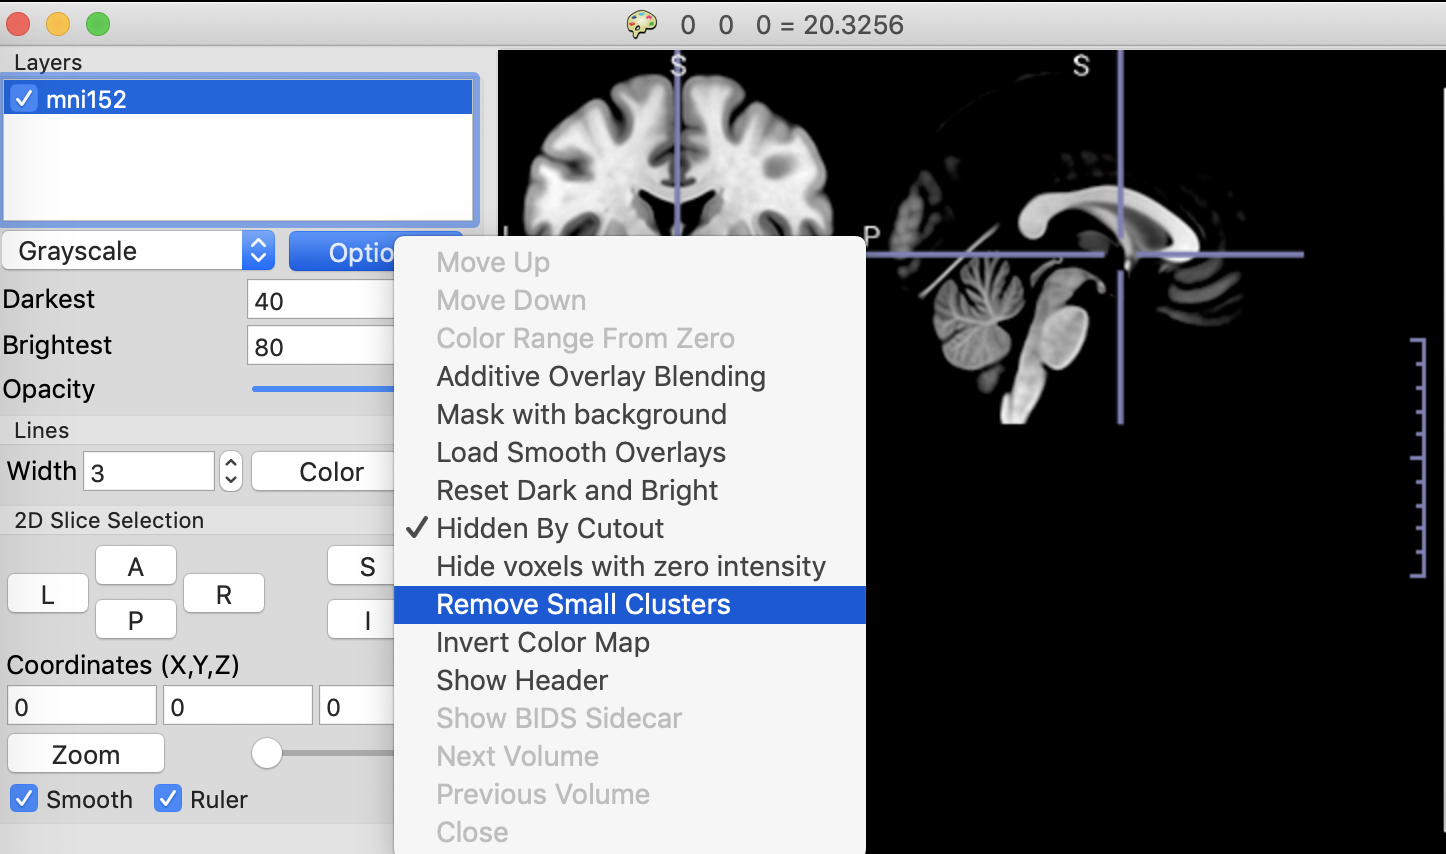
You can use all the functions of MRIcroGL using the graphical interface. You can also create Python scripts to get precise results our automate laborious tasks.

You can also control MRIcroGL from the command line.

  • Launch MRIcroGL and have it automatically run a Python script: mricrogl myscript.py. This method also allows you to control MRIcroGL from your preferred programming languages.
  • MacOS uses may find it useful to make an alias to MRIcroGL. This will allow you to simply run mricrogl from the command line instead of typing the full path. You can do this by running open -a TextWrangler ~/.bash_profile and then adding an alias, for example adding the line mricrogl='/Applications/MRIcroGL.app/Contents/MacOS/MRIcroGL' (assuming the application is in this folder).
  • Reset MRIcroGL to its defaults (forget user preferences): mricrogl -R.
  • You can choose the images to load from the command line: MRIcroGL -std -dr 2000 6000 motor -cm actc -dr 2 4. In this example, the FSL standard image is loaded as a background with a display range of 2000...6000, and the image 'motor' is loaded as an overlay with the 'actc' colormap and a display range of 2...4. Note that the options are a subset of those available for fsleyes.
    • You can provide an image name: 'motor', 'mni152.nii.gz', etc.
    • If you have FSL installed, you can choose one of the standard images: '-std', '-std1mm', '--standard', '--standard1mm'.
    • You can specify a color map. For example '-cm bone'.
    • You can specify a display range, for example '-dr 3 4'.
    • Note that you can load multiple images, and the color map and display range is applied to the most recently specified image.

Primate

Supported Image Formats

MRIcroGL uses NIfTI as its native format. However, you can drag-and-drop files of various formats and the software should automatically detect and load these images.

If your image format is not supported directly by MRIcroGL, you may want to see if it is supported by the Bio-Formats module of ImageJ/Fiji. If so, you can open the image with the module and save it as NIfTI or NRRD to read it with MRIcroGL.

Rendering Technique

MRIcroGL uses single-pass raycasting to generate volume renderings.

Alternatives

There are many terrific free tools for viewing medical imaging data. Since they are free, consider downloading a few and using the best tool for the task at hand. Below are a couple of my personal favorites.

  • MRIcron is similar and does not require OpenGL, but it is unable to generate interactive renderings.
  • DragonFly is not open source, but it does provide a non-commercial licenses are granted free-of-charge.
  • Drishti has powerful rendering abilities, though support for medical imaging formats is limited.
  • FSLeyes has many similar features, as well as rich support for FSL. Variants require either OpenGL 1.4 or OpenGL 2.1.
  • InVesalius provides useful segmentation tools.
  • Mango is a nice viewer.
  • Slicer 3D is daunting at first, but provides tremendous power and flexibility.
  • Seg3D has powerful segmentation routines.
  • For DICOM images (but not other formats), Horos is outstanding.

mricrogl's People

Contributors

neurolabusc avatar

Stargazers

 avatar  avatar  avatar  avatar  avatar  avatar  avatar  avatar  avatar  avatar  avatar  avatar  avatar  avatar  avatar  avatar  avatar  avatar  avatar  avatar  avatar  avatar  avatar  avatar  avatar  avatar  avatar  avatar  avatar  avatar  avatar  avatar  avatar  avatar  avatar  avatar  avatar  avatar  avatar  avatar  avatar  avatar  avatar  avatar  avatar  avatar  avatar  avatar  avatar  avatar  avatar  avatar  avatar  avatar  avatar  avatar  avatar  avatar  avatar  avatar  avatar  avatar  avatar  avatar  avatar  avatar  avatar  avatar  avatar  avatar  avatar  avatar  avatar  avatar  avatar  avatar  avatar  avatar  avatar  avatar  avatar  avatar  avatar  avatar  avatar  avatar  avatar  avatar  avatar  avatar  avatar  avatar  avatar  avatar  avatar  avatar  avatar  avatar  avatar  avatar

Watchers

 avatar  avatar  avatar  avatar  avatar  avatar  avatar  avatar  avatar

mricrogl's Issues

How to add packages to python for scripting

Hi, I'm a big fan of the scripting with python function and have been using it to auto-generate images. However, I noticed that python 3.7 embedded in the Linux release of MRIcroGL has a quite limited number of packages. json, for one, is not available but is extremely useful to read json files, which contain parameters I'd like MRIcroGL to use when running built-in functions.

What would be the correct way to add packages to the embedded python library? Or would it be possible to keep the libraries consistent across MRIcroGL on different OS (e.g., the windows version has json but Linux doesn't )?

macOS Python scripting

The latest release of MRIcroGL for macOS (v1.2.20211006) transitions from using the system Python 2.7 to a statically linked Python 3.7. This is in response to deprecation of Python 2.7 and Apple's requests that applications should not use the system Python. Some users have reported that scripting no longer works, though using previous versions works. Best guess is that this reflects people upgrading where the old installation set the PyLib preference to Python 2.7.

  1. Does installing the v1.2.20211007 dmg resolve this?
  2. Does using the -r argument from the terminal to reset the preferences resolve the issue? e.g. /Applications/MRIcroGL.app/Contents/MacOS/MRIcroGL -r

MRIcroGL handling complex (MRS) data

Dear Chris,

Would it be possible to include better handling for complex data types in MRIcroGL?

Recently someone reported that MRIcro couldn't load NIfTI-MRS formatted data (created by spec2nii), see spec2nii issue #23. From testing I believe that this arises from MRS data being complex. MRIcroGL reports 'unable to load "my_complex_data.nii.gz"', but will load the same file when the data is non-complex.

Your handling of a 4th time dimension means that (somewhat) meaningful viewing of MRS data can almost be handled. Would you consider loading and simply taking the absolute or real part of the data?

I've attached two very simple files that I tested with. These have 1x1x1x100 random real/complex float data, and in addition a header extension such as NIfTI-MRS uses.
n2_float_4dim_hdr.nii.gz
n2_cfloat_4dim_hdr.nii.gz

Get MNI coordinates of cluster of intensely bright voxels?

Dear MRIcroGL experts,

Summary:
I would like to obtain the MNI coordinates of the center of a cluster of particularly intensely bright voxels. I see that I can get the X,Y,Z coordinates of a cluster of particularly intensely bright voxels but would like to know how to get the MNI coordinates of that cluster. How can I do that?

More information:
I am working on a dataset of ~100 participants with lesions. I segmented and normalized my T1 images to MNI space, registered my native FLAIR images to my standardized T1 images so now the FLAIR images are also standardized, ran these images through the Lesion Segmentation Tool (LST) Lesion Growth Algorithm (LGA) pipeline (Schmidt et al., 2012), and obtained two output images: a version of the FLAIR and a lesion probability map. The lesion probability map is a binary map (each voxel is either white with an intensity of 1 indicating that voxel is a lesion or dark with an intensity of 0 indicating that voxel is not a lesion). Both files are .nii.

I open both of these images (the FLAIR as an image and the lesion probability map as an added overlay) into MRIcroGL. I then select the lesion probability map, click "options", "generate cluster table with options", and then set the threshold intensity to be 1 and the minimum cluster size to be 0. I obtain a table that tells me the volume and X,Y,Z coordinates of each lesion.

How do I get the MNI coordinates of each lesion?
(also, what exactly are the X,Y,Z coordinates? what space is that in?)

Note:
I read some posts that told me I can enter MNI coordinates and then view that brain location. I don't want to enter MNI coordinates, I want to be given MNI coordinates.

Any assistance you might be able to provide would be greatly appreciated. Additionally, please let me know if my question and/or explanation did not make sense.

Thank you so very much,
Emily Harriott
PhD student, Vanderbilt University

Python scripting broken with Python 3.9

As per the title. Using the latest pre-compiled Linux release, opening or trying to run any script (either through the GUI or the command-line options) makes this error pop out:

Error: could not find symbol "PyImport_Cleanup"
Python could not be properly initialized. We must quit.

And then MRIcroGL proceeds to fail abruptly with an access violation. This is probably because PyImport_Cleanup has been removed after Python 3.8. Just to double-check, I installed Python 3.8 (via pyenv), updated the PyLib in the MRIcroGL12.ini file, and scripting works as normal again.

PS: MRIcroGL is awesome, thanks a lot for a really nice piece of software!

metal version not retina

Hi @neurolabusc,

Just downloaded the latest release in this repo. The metal version appears to not be rendering the UI widgets in retina quality on mac OS 10.14.3. I tried the both the intel UHD graphics and the dedicated Radeon 560X. I imagine this is still experimental, so just thought I'd show what it's doing on my system.

screen shots attached.

metal

metal

not metal

not-metal

Background transparent in bitmaps preference resets

On macOS 10.15, the option for "Background transparent in bitmaps" always resets back to false on reopening MRIcroGL. In MRIcroGL.ini, there is no ScreenCaptureTransparentBackground field, and adding that field manually to the ini file has no effect (ScreenCaptureTransparentBackground=1 in the [BOOL] section).

Loading other parcellation atlas with "random rainbow" colorbar

Hi,

I am using the released version of MRIcroGL for windows, great software!

MRIcroGL can load some built-in parcellations, such as AAL, and it will automatically use the digitalized "random rainbow" colorbar for parcellation visualization.

Here, I want to use other non-built-in parcellation and to visualize the appearance of this parcellation. However, the "random rainbow" colorbar is not activated and I can not find the options for that. I wonder if there is any solution.

Thanks and best wishes,

Xiaoyu Chen

Debian installer

@ghisvail, @mih, and @yarikoptic:

I am wondering if you can give me feedback on my first attempt at a Debian package. This uses your advice from this issue and attempts to copy your prior work with the neurologist-debian micron package.

  • Experimental deb files are here, built using the script in the Debian folder of this repository.
  • I want to provide both a GTK2 and QT5 release. What is the expected naming scheme? Here I use mricrogl_gtk2 and mricrogl. I realize that GTK2 is EOL, but GTK3 is limited to Core OpenGL support and is unable to support multi-sampling. I think that the QT5 widgetset should be the default, but I do not think this will work on older Debian releases (e.g. Ubuntu 18.04).
  • Perhaps @dbannon can provide an update, but the QT5 version requires libqt5pas
    1.2.9, which I believe is newer than in Debian trunk. Previously, I have included release notes to use this version, but not sure how to capture that in a .deb file.
  • As suggested by @ghisvail, the Python scripting will use the system libpython, rather than statically embedding a copy of Python. I specify Python 3.7 and greater. However, since a user might have several versions of Python installed, I am not sure what the right approach for identifying the preferred Python version to use. At the moment, I use the highest version number, but in theory a future version of Python 3 could remove a feature that breaks my software.
  • My software will use dcm2niix if it is installed. If it is not installed, the Import/ConvertDICOMtoNIfTI menu item is not functional, but everything else works. If this is an option, should the Debian control file list dcm2niix in the Depends or not?

Any advice appreciated. This is my first attempt at supporting Debian and I would like to hear any wisdom you might have.

I appreciate any advice

colorbarcolor

Latest commit includes enhancement suggested by Brandon Gunasekera to change the colorbar color and translucency.

The new command colorbarcolor(R,G,B,A) allows you to set the color and transparency of the color bar. The text on the colorbar will be white if the specified colorbar luminance is dark, otherwise the text will be black.

Be aware that the command resetdefaults() always sets your colorbar to opaque black (as if the script included the command colorbarcolor(0,0,0,255)), so if you want to reset defaults and set a custom colorbar color, you need to consider the order of these two commands.

This example script sets a translucent red color bar:

import gl
gl.resetdefaults()
gl.loadimage('spm152')
gl.colorbarcolor(255,0,0,160)

The Color/Colobar menu allows the user to choose from four default options. The equivalent script commands are:

  • opaque white: gl.colorbarcolor(255,255,255,255)
  • translucent white: gl.colorbarcolor(255,255,255,168)
  • opaque black: gl.colorbarcolor(0,0,0,255)
  • translucent black: gl.colorbarcolor(0,0,0,168)

This function will be included in the next release. To test compile from code.

Slice numbers all over the place in mosaic on Ubuntu 20.04 LTS

Dear rordenlab,
the the mosaic function is really cool and I like it even better, that I can script it in python.
However, when I save the image (either using File > save Bitmap or using gl.savebmp) the slice numbers are all over the place, depending on the size of my window.

I am running MRIcroGL on a newly set up Ubuntu (20.04. LTS), placed it in /opt and created a mricorgl.desktop file (don't really think it makes a difference).

Best Vincent

MIP render

It looks like that MIP rendering results in a 3D image, and the image can be rotated or flipped from any angle. So if the MIP rendering results a 3D image, can we save that 3D image into Nifti format image? If not, why the MIP rendering looks like a 3D image?

Opening multiple windows

Hello!

I‘m using MRIcroGL on macOS 10.14.6. Is it the intended behavior, that opening multiple images side by side (multiple windows) is a bit complicated? If MRIcroGL is open, double clicking another file in the Finder doesn‘t open it in a new window, but instead uses the existing one. I have to manually open a new window from the menu (as there‘s no shortcut for it) and then open the file I want. If I forget this step, I have to manually reopen the one from before, again after opening a new window. Am I missing something?

Thanks!

Incompatibility of v1.2.20220720 with Ubuntu 18.04 circumstance

Thank you for continuous development of MRIcroGL.

I installed the latest version (v1.2.20220720) on both Ubuntu 18.04 and Ubuntu 20.04.

Though MRIcroGL runs without any problems on Ubuntu 20.04, it fails with Ubuntu 18.04 with the following error;

MRIcroGL: /lib/x86_64-linux-gnu/libm.so.6: version `GLIBC_2.29' not found (required by ./MRIcroGL)

(Both MRIcroGL and MRIcroGL_QT result in the same error.)

The shipped version of libc6 on Ubuntu 18.04 is 2.27 whereas the latest MRIcroGL requires 2.29.

I tried to find a solution, but it seems installing libc>=2.29 might cause several problems system-wide.

Any ideas on how to handle this?

Borg_Error for large t (4th dimension) nii.gz files in Windows

I have encountered a display/load error (Borg_Error) for large 4D nii.gz files in Windows.
Although I still cannot figure out the exact situations that lead to this error, I have seen the latest MRIcroGL (1.2.20220720) sometimes fails to load large t (4th dimension) nii.gz files and shows Borg_Error.

Some (marginal) info:

  • The older 1.2.20211006 version has no Borg_Error issues in the same environments.
  • If I converted them to uncompressed NIfTI files (*.nii), MRIcroGL displayed them without any issues.
  • Large t (4th dim) is not always critical. Not found Borg_Error for HCPpipeline preprocessed nii.gz files (4th dim > 1000)
  • (At the moment) I have not seen any issues in small t files (4th dim < 50).
  • No issues in 3D volumes (4th dim = 1).
  • Modality (function or diffusion) does not matter.

mricrogl_windows_1_2_20220720

To reproduce:
Dataset 1: Haxby 2001 subj2

# haxby2001/subj2/bold.nii.gz
from nilearn import datasets
nilearn.datasets.fetch_haxby()

Dataset 2: ABIDE
https://s3.amazonaws.com/fcp-indi/data/Projects/ABIDE_Initiative/Outputs/cpac/func_minimal/OHSU_0050147_func_minimal.nii.gz

My Environment 1:
MRIcroGL 1.2.20220720 x86-64 FPC
Author: Chris Rorden
License BSD 2-Clause
Windows: 10.0
Intel; OpenGL= 4.6.0 - Build 30.0.101.1122; Shader=4.60 - Build 30.0.101.1122
2.1 Max 3D texture: 2048
Current texture: 64x64x64 1mb

My Environment 2:
MRIcroGL 1.2.20220720 x86-64 FPC
Author: Chris Rorden
License BSD 2-Clause
Windows: 10.0
NVIDIA Corporation; OpenGL= 4.6.0 NVIDIA 512.15; Shader=4.60 - NVIDIA
2.1 Max 3D texture: 16384
Current texture: 64x64x64 1mb

Nifti Image loading fails if the file path contains /atlases/

Version 1.2.20190902+
Tested in both windows and linux release builds.

Attempting to open any nifti image I have lying around will fail (pixelated image and color scale locked to rainbow) if the directory path contains the string /atlases/
image

The /atlases/ string can occur anywhere in the file path, as far as I can tell, to trigger the bug. /home/user/atlases/foo.nii triggers it just the same as /home/user/foo/bar/atlases/foo.nii

Directories named atlases_ etc. are fine. It seems to be specific to /atlases/.

This issue did not occur on 1.1x builds.

Thank you! Please let me know if I can be of further help.

Affine transform show in renderer?

It seems affine transforms in NIfTI are not calculated into the MVP matrix in glvolume2.pas. How do I add that if needed for certain visualizations?

Consider this kind of layer to layer scan, with each layer's displacement not perpendicular to layer itself:
Untitled Diagram drawioUntitled Diagram1 drawio

add new option to not modulate alpha by voxel value?

MRIcroGL version: 1.2.20200707e Cocoa x86-64

@neurolabusc , some regions with low integer values in atlases rendered in 3D mode appear more transparent than high integer label regions.

For example, an atlas image with integer labels ranging from 1-140 (background == 0) will render regions with low values (1,2,3...) as more transparent.

Would it be possible to add a toggle setting in preferences to disable alpha modulation by voxel intensity?

No rush on this. Just submitting the issue as a possible enhancement for the future.

FSLeyes has recently added this feature in the master branch (not released), and it can be useful to toggle that switch when viewing some images.

I would be happy to help implement this. It would take some time to get up to speed with the MRIcroGL build system and code base.

https://git.fmrib.ox.ac.uk/fsl/fsleyes/fsleyes/-/blob/master/assets/gl/gl21/glvolume_3d_frag.glsl#L404

https://github.com/rordenlab/MRIcroGL12/blob/70d20ec1f1fb913e7efe5861e8d9dbb6ac77f52b/Resources/shader/Default.glsl#L51

atlas shown in screenshots:

https://git.fmrib.ox.ac.uk/open-science/UK_biobank_pipeline_v_1/-/raw/master/templates/GMatlas/GMatlas.nii.gz?inline=false

example MRIcroGL screenshot:

Screenshot 2021-03-03 at 17 48 00

FSLeyes with intensity modulation

Screenshot 2021-03-03 at 17 58 36

FSLeyes WITHOUT intensity modulation

Screenshot 2021-03-03 at 17 59 05

Cannot compile as simplelaz file is missing

I am trying to compile this package, and the README indicates this should be done via the same command line script as MRIcroGL-1.0.

I use:

lazbuild -B --lazarusdir="/usr/share/lazarus/" --pcp="system-lazarus-config" simplelaz.lpi

and get:

silenthost ~ # emerge -v mricrogl

 * IMPORTANT: 5 news items need reading for repository 'gentoo'.
 * Use eselect news read to view new items.


These are the packages that would be merged, in order:

Calculating dependencies... done!
[ebuild  N     ] sci-visualization/mricrogl-1.2.20190902::chymeric  0 KiB

Total: 1 package (1 new), Size of downloads: 0 KiB


>>> Verifying ebuild manifests

>>> Emerging (1 of 1) sci-visualization/mricrogl-1.2.20190902::chymeric
 * mricrogl-1.2.20190902.tar.gz SHA256 SHA512 WHIRLPOOL size ;-) ...                                                                 [ ok ]
>>> Unpacking source...
>>> Unpacking mricrogl-1.2.20190902.tar.gz to /var/tmp/portage/sci-visualization/mricrogl-1.2.20190902/work
>>> Source unpacked in /var/tmp/portage/sci-visualization/mricrogl-1.2.20190902/work
>>> Preparing source in /var/tmp/portage/sci-visualization/mricrogl-1.2.20190902/work/MRIcroGL12-1.2.20190902 ...
>>> Source prepared.
>>> Configuring source in /var/tmp/portage/sci-visualization/mricrogl-1.2.20190902/work/MRIcroGL12-1.2.20190902 ...
>>> Source configured.
>>> Compiling source in /var/tmp/portage/sci-visualization/mricrogl-1.2.20190902/work/MRIcroGL12-1.2.20190902 ...
cp: cannot stat '/etc/lazarus': No such file or directory
SetPrimaryConfigPath NewValue="system-lazarus-config" -> "/var/tmp/portage/sci-visualization/mricrogl-1.2.20190902/work/MRIcroGL12-1.2.20190902/system-lazarus-config"
Error: (lazbuild) package not found: simplelaz.lpi
 * ERROR: sci-visualization/mricrogl-1.2.20190902::chymeric failed (compile phase):
 *   (no error message)
 *
 * Call stack:
 *     ebuild.sh, line 125:  Called src_compile
 *   environment, line 785:  Called die
 * The specific snippet of code:
 *       lazbuild -B --lazarusdir="/usr/share/lazarus/" --pcp="system-lazarus-config" simplelaz.lpi || die
 *
 * If you need support, post the output of `emerge --info '=sci-visualization/mricrogl-1.2.20190902::chymeric'`,
 * the complete build log and the output of `emerge -pqv '=sci-visualization/mricrogl-1.2.20190902::chymeric'`.
 * The complete build log is located at '/var/tmp/portage/sci-visualization/mricrogl-1.2.20190902/temp/build.log'.
 * The ebuild environment file is located at '/var/tmp/portage/sci-visualization/mricrogl-1.2.20190902/temp/environment'.
 * Working directory: '/var/tmp/portage/sci-visualization/mricrogl-1.2.20190902/work/MRIcroGL12-1.2.20190902'
 * S: '/var/tmp/portage/sci-visualization/mricrogl-1.2.20190902/work/MRIcroGL12-1.2.20190902'

The README also mentions a “Run” command, but I cannot find one inside the source code:

silenthost /var/tmp/portage/sci-visualization/mricrogl-1.2.20190902/work/MRIcroGL12-1.2.20190902 # find -name "*run*"
silenthost /var/tmp/portage/sci-visualization/mricrogl-1.2.20190902/work/MRIcroGL12-1.2.20190902 # find -name "*Run*"
silenthost /var/tmp/portage/sci-visualization/mricrogl-1.2.20190902/work/MRIcroGL12-1.2.20190902 # find -name "*un*"
./mainunit.pas
./mainunit.lfm
./MRIcroGL.app/Contents/Resources/matcap/unused
./MRIcroGL.app/Contents/Resources/matcap/Burgundy.jpg
./MRIcroGL.app/Contents/Resources/lut/CT_Lungs.clut
./Resources/shader/unused
./Resources/shader/ancient/unused
./Resources/matcap/unused
./Resources/matcap/Burgundy.jpg
./Resources/lut/CT_Lungs.clut

Warning, not all volumes loaded

Hi, I hope this is the right place to ask for help.

I'm using the latest precompiled version and whenever I try to open 4D nii.gz files (from bold fmri runs), a little window pops up, with the message "Warning: Loaded X out of 527 volumes".

Some more details:

  • When I convert my DICOMS to a nii.gz using dcm2niix, MRIcroGL manages to load the first 30 out of the 527 volumes.
  • When I try to view the preprocessed nii.gz file (fmriprep), it only loads the first 3 out of 527 volumes
  • The size difference from original to preprocessed is roughly a factor of 10 (70MB vs 640MB). Could this be a memory issue?

Could provide the nifti files privately, if needed.
Thanks in advance!

Location of installed files

Having compiled and installed the following files:

silenthost ~ # equery f mricrogl
 * Searching for mricrogl ...
 * Contents of sci-visualization/mricrogl-1.2.20200324:
/usr
/usr/bin
/usr/bin/MRIcroGL
/usr/share
/usr/share/MRIcroGL
/usr/share/MRIcroGL/lut
/usr/share/MRIcroGL/lut/1red.clut
/usr/share/MRIcroGL/lut/2green.clut
/usr/share/MRIcroGL/lut/3blue.clut
/usr/share/MRIcroGL/lut/4hot.clut
/usr/share/MRIcroGL/lut/5winter.clut
/usr/share/MRIcroGL/lut/6bluegrn.clut
/usr/share/MRIcroGL/lut/6warm.clut
/usr/share/MRIcroGL/lut/7cool.clut
/usr/share/MRIcroGL/lut/8redyell.clut
/usr/share/MRIcroGL/lut/CT_Bones.clut
/usr/share/MRIcroGL/lut/CT_Kidneys.clut
/usr/share/MRIcroGL/lut/CT_Liver.clut
/usr/share/MRIcroGL/lut/CT_Muscles.clut
/usr/share/MRIcroGL/lut/CT_Skull.clut
/usr/share/MRIcroGL/lut/CT_Soft_Tissue.clut
/usr/share/MRIcroGL/lut/CT_Surface.clut
/usr/share/MRIcroGL/lut/CT_Vessels.clut
/usr/share/MRIcroGL/lut/CT_w_Contrast.clut
/usr/share/MRIcroGL/lut/GE_color.clut
/usr/share/MRIcroGL/lut/HOTIRON.clut
/usr/share/MRIcroGL/lut/Inferno.clut
/usr/share/MRIcroGL/lut/NIH.clut
/usr/share/MRIcroGL/lut/Plasma.clut
/usr/share/MRIcroGL/lut/Viridis.clut
/usr/share/MRIcroGL/lut/actc.clut
/usr/share/MRIcroGL/lut/blue2red.clut
/usr/share/MRIcroGL/lut/bone.clut
/usr/share/MRIcroGL/lut/bronze.clut
/usr/share/MRIcroGL/lut/copper.clut
/usr/share/MRIcroGL/lut/copper2.clut
/usr/share/MRIcroGL/lut/cubehelix.clut
/usr/share/MRIcroGL/lut/electric_blue.clut
/usr/share/MRIcroGL/lut/gold.clut
/usr/share/MRIcroGL/lut/jet.clut
/usr/share/MRIcroGL/lut/linspecer.clut
/usr/share/MRIcroGL/lut/surface.clut
/usr/share/MRIcroGL/lut/x_rain.clut
/usr/share/MRIcroGL/script
/usr/share/MRIcroGL/script/basic.py
/usr/share/MRIcroGL/script/clip.py
/usr/share/MRIcroGL/script/cluster.py
/usr/share/MRIcroGL/script/ct_abdomen.py
/usr/share/MRIcroGL/script/ct_head.py
/usr/share/MRIcroGL/script/cutout.py
/usr/share/MRIcroGL/script/explode.py
/usr/share/MRIcroGL/script/explode2.py
/usr/share/MRIcroGL/script/glass.py
/usr/share/MRIcroGL/script/help.py
/usr/share/MRIcroGL/script/hidezeros.py
/usr/share/MRIcroGL/script/invert.py
/usr/share/MRIcroGL/script/jagged.py
/usr/share/MRIcroGL/script/mip.py
/usr/share/MRIcroGL/script/mosaic.py
/usr/share/MRIcroGL/script/mosaic2.py
/usr/share/MRIcroGL/shader
/usr/share/MRIcroGL/shader/Default.glsl
/usr/share/MRIcroGL/shader/Edges.glsl
/usr/share/MRIcroGL/shader/Glass.glsl
/usr/share/MRIcroGL/shader/MIP.glsl
/usr/share/MRIcroGL/shader/Matte.glsl
/usr/share/MRIcroGL/shader/Minimal.glsl
/usr/share/MRIcroGL/shader/Occlusion.glsl
/usr/share/MRIcroGL/shader/OverlaySurface.glsl
/usr/share/MRIcroGL/shader/Shell.glsl
/usr/share/MRIcroGL/shader/ShellEdges.glsl
/usr/share/MRIcroGL/shader/Slow 2.glsl
/usr/share/MRIcroGL/shader/Slow.glsl
/usr/share/MRIcroGL/shader/SpecialEffects.glsl
/usr/share/MRIcroGL/shader/Standard.glsl
/usr/share/MRIcroGL/shader/Tomography.glsl

I get lots of issues from MRIcroGL, and while the interface starts, it's not able to do much (I can try to do a video recording if the exact behaviour is of interest to you).

I am assuming perhaps MRIcriGL does not find the files under /usr/share/MRIcroGL (which would be the correct place to install them according to the FHS). Is this the case? And if so, how can I tell it to look in the right place?

Color when saving as bitmap becomes blue

Somehow, whenever I use the save as bitmap function, images come out with blue tint, especially for overlay images. Attached are the screenshot of the console, and the image generated with save as bitmap.

I'm using the precompiled MRIcroGL 1.2.20190902++ GTK2 on Linux. Load up any image and overlay, and overlay color will come out with blue tint when saved as bitmap.

Screenshot:
Screenshot from 2019-11-22 19:48:50

Saved file:
bitmapsave

Decrease line thickness in glass brain?

I'm trying to reproduce a visualization that looks like this:
Screen Shot 2023-04-06 at 3 19 46 PM

But with the glass brain option in MRIcroGL, the thickness of the edges gets exagerated, giving it almost a marker-drawn, chunky aesthetic:
Screen Shot 2023-04-06 at 2 12 17 PM

Is there a way to tweak the glass brain renderer so that it looks more similar to the images I'm trying to reproduce?

option to display a specified number of leading paths in the file navigator pane

related to #39 as an option to adjust display of filenames an example of which I use here
image

if I have a following filenames structure

d1/mn152.nii.gz
d2/mn152.nii.gz

opening both of them at the same time would just show two mni152 entries in the pane, making it impossible to distinguish between the two. It would be cool if mricrogl helped to make difference obvious. It could be

  • manual option on how many leading parent paths to include in the display
  • automagic option: if conflict (the same name) is detected, choose sufficient number of leading paths to distinguish

thank you very much in advance

GTK3 issues

The upcoming release of MRIcroGL for Linux will target the GTK2 and QT5 widget sets. The following (fixable) issues remain:

  • There are autosizing issues and some controls are frozen until the screen is resized.

There are inherent limitations with GTK3 that make it poorly suited for this project. Since GTK 3.22 was supposed to be the last version, these are unlikely to be resolved.

  • OpenGL [multi-sampling is not supported](https://github.com/aklomp
    /gtk3-opengl/issues/2), therefore the quality of MRIcroGL images in GTK3 is poorer than QT5 and GTK2.
  • Complicated GTK3 widgets like GtkSpinButton never have real GtkWidget children. This creates limitations inusing these widgets with MRIcroGL.

Therefore, while one can compile MRIcroGL for GTK3, the functionality is limited.

Error on startup on Ubuntu

Hello,

Using the latest release of MRIcroGL, I have the following message on startup:

GLSL error 0:57(28): warning: `textureSz' used uninitialized
0:67(20): warning: `textureSz' used uninitialized

Then the display looks incomplete:

Capture d’écran de 2019-12-19 18-43-05

I'm using Ubuntu 18.04

Thanks for your help.

Loading progress for Windows

For MacOS and Linux, MRIcroGL will report progress for loading volumes in the terminal. However, this is not the case with Windows. 3D images are often slow to load relative to 2D images due to file size and cache proximity between slices. Therefore, interactive information during loads would be useful.

Convert PAR/REC to Nifti

I downloaded MRIcroGL 2-Novemember from https://www.nitrc.org/projects/mricrogl to convert PAR/REC file into Nifti format. Now, I got stuck with a problem. When I tried to convert a PAR/REC file into Nifti format, the MRIcroGL doesn't work. The error message is as below.
image

However, if I modify the diffusion (ap, fh, rl) parameter in image information session from (0.000, 0.000, -1.000) to (0.000001, 0.000, -1.000), MRIcroGL could convert the data into Nifti format. Can you help me fix the problem?
image

10cm Ruler

Many DICOM viewers include 10cm rulers. Add "Ruler" checkbox to "2D Slice Selection" tools to show/hide ruler when in 2D slice view.
clusters

MRIcroGL overlay render depth

Hi,

On MRIcron, when you do a render the brain is opaque, so you only see the surface activation.

However on MRIcroGL, when you do "surface overlay" the brain is transparent, so you see activation deep inside as well.

The issue is, when you modify the "overlay depth" it does not specify how deep you are looking into the cortex. Can someone please tell me how much in mm/cm does the overlay depth correspond to? Or how can I replicate the exact search depth that is used in MRIcron?

How can I make the brain opaque in MRIcroGL?

How can I find out the voxel-wise search depth in MRIcroGL? Which is an option in MRIcron like this:

image

resolves symlinks to .git/annex/-ed content

user reported that when opening a git-annex'ed file, mricrogl shows the filename of the resolved file which is a long git-annex key:
image

I wonder if there could be an option to avoid resolving symlinks either globally or for specific files? Thanks in advance!

cannot install the linux version on WSL (Ubuntu)

I am trying to install the linux version of MRIcroGL on WSL. I can doenload the zip file but the download help page says to extract from the ZIP and then run the executable. But what is the executable? I can see a file called MRIcroGL_QT. When I try to execute that I get the error:

Unable to find AFNI_ATLAS_PATH
MRIcroGL/MRIcroGL_QT: symbol lookup error: MRIcroGL/MRIcroGL_QT: undefined symbol: QLCLOpenGLWidget_Create

As if it is expecing that I have setup some environmental variables.

Saving T1 + spmT overlay as a single combined nifti file

Is it possible to save a T1 (added through open file) and it's spmT overlay (added as an overlay) together as a single nifti file? So that the T1 image is modified to have itself along with the activation maps of the spmT.nii file?

Loads blank window on startup, is this the “long wait” from the notification?

So when I start MRIcroGL I get a blank window, after which I can either wait a while or just close it, and the viewer starts up normally.

I also see this in the command line:

[deco]~ ❱ MRIcroGL
If there is a long delay at launch, ensure full GTK2 install: "sudo apt-get install appmenu-gtk2-module"
Unable to find AFNI_ATLAS_PATH
Loading preferences /home/chymera/.MRIcroGL12.ini
Unable to find folder "/usr/share/MRIcroGL/standard"
Unable to find folder "/usr/share/MRIcroGL/atlas"
Load time 26
float range 0..0.94197642803192139
float window 0...0.83225166797637939
Init time 5
Set Min/Max Window 0..0.83225166797637939 time 1
Update RGBA time 1

Is this the issue I'm getting? If so, what file does it need exactly? that's as far as I can tell a specific package name from Debian or Ubuntu.

Also, for reference I tried both =mricrogl-1.2.20211007 and =mricrogl-1.2.20220720, both of them with either

lazbuild -B --lazarusdir="/usr/share/lazarus/" --pcp="system-lazarus-config" MRIcroGL_Debian.lpi || die

or

lazbuild -B --lazarusdir="/usr/share/lazarus/" --pcp="system-lazarus-config" MRIcroGL_NoPython.lpi || die

all 4 with the same results.

Interpolating Thresholded Images

As reported by Marcus Heldmann adding statistical overlays that have thresholded by SPM12 can look slightly eroded when saved as 32-bit float relative to saving as 16-bit integer. This only occurs when overlay loading is smoothed (Load Smooth Overlays in Options button menu is checked), and only for maps from SPM, not other tools. The reason for this is that SPM sets voxels that do not reach the threshold to not-a-number (NaN), whereas for the integer data the voxels that do not reach threshold are set to zero. Interpolating a positive value with a zero yields a (smaller) positive number, but interpolating a positive number with a NaN yields a NaN. The upcoming release will convert NaNs to zeros.

As ever, it is always recommended to apply a threshold AFTER reslicing the statistical map to the resolution of the background image. Since statistical maps are intentionally smoothed, sub-threshold voxels near the edge of a significant cluster are virtually always near threshold. Resampling before thresholding preserves this information. However, the upcoming release also changes the interpolation of thresholded images a little bit to ty to fight some of the artifacts of re-sampling a thresholded image. The issue is illustrated in the 1D figure below. The red rectangles represent original voxel values, and the red horizontal dotted line shows an arbitrary threshold applied to these voxels (here at 5.5). The voxels shown in solid red survive the threshold, those that do not survive are shown with a dashed outline. The blue line shows the interpolation one would get by linear interpolation of all the voxels regardless of whether they are above or below the threshold. The intersection of the blue line and the dotted red line shows the ideal thresholding. Simple linear interpolation applied to the thresholded data yields the green line. The artificially zeroed voxels have eroded this object: fewer voxels will survive the threshold. However, the interpolation also shows an artificial border of sub-threshold signal. The proposed solution is shown in orange. In this case, when an image is interpolated, one detects the smallest positive signal in the entire 3D volume (which is likely to be extremely close to the threshold applied to the input image). For our example, lets call say this is 5.52 (the picture only shows surviving voxels with an intensity of 6, but presumably other surviving voxels in the image are a bit closer to the threshold). We filter the interpolated image so any voxel less than 2.51 will get the value zero, and any voxel with an intensity between 2.51 and 5.52 will get the value 5.52. This preserves the volume of the ideal outcome, and avoids the artificial dark ring surrounding thresholded objects.

bleeding

Scripting RBG colors

How can specify an ROI color with the input of RGB values, instead of using the "colorname"?

Separation between peaks

The Options button has an item Generate cluster table with options which allows the user to specify thresholds for filtering data. @jpurcel8 has suggested an enhancement: providing a minimum separation between peaks to ensure they are not too close together. A reference implementation exists in bspm.

Is a MNI152 to SPM152 transformation available?

I've got some points and ROIs I've mapped in MNI152, but I've just realized they may have been origialy plotted on something closer to the SPM152 template. Is there a transformation from MNI152 to SPM152 available? Is is just a rescaling?

Issues building =mricrogl-1.2.20210317

Hi, I'm trying to build the currently latest version (1.2.20210317) and I get this build error: build.log.

I think it could be a missing file?

Fatal: (2013) Cannot open include file "../Metal-Demos/common/glopts.inc"

I am using =fpc-3.2.2 and =lazarus-2.0.12.

Recommend Projects

  • React photo React

    A declarative, efficient, and flexible JavaScript library for building user interfaces.

  • Vue.js photo Vue.js

    🖖 Vue.js is a progressive, incrementally-adoptable JavaScript framework for building UI on the web.

  • Typescript photo Typescript

    TypeScript is a superset of JavaScript that compiles to clean JavaScript output.

  • TensorFlow photo TensorFlow

    An Open Source Machine Learning Framework for Everyone

  • Django photo Django

    The Web framework for perfectionists with deadlines.

  • D3 photo D3

    Bring data to life with SVG, Canvas and HTML. 📊📈🎉

Recommend Topics

  • javascript

    JavaScript (JS) is a lightweight interpreted programming language with first-class functions.

  • web

    Some thing interesting about web. New door for the world.

  • server

    A server is a program made to process requests and deliver data to clients.

  • Machine learning

    Machine learning is a way of modeling and interpreting data that allows a piece of software to respond intelligently.

  • Game

    Some thing interesting about game, make everyone happy.

Recommend Org

  • Facebook photo Facebook

    We are working to build community through open source technology. NB: members must have two-factor auth.

  • Microsoft photo Microsoft

    Open source projects and samples from Microsoft.

  • Google photo Google

    Google ❤️ Open Source for everyone.

  • D3 photo D3

    Data-Driven Documents codes.