


Are you interested in creating games with Unreal Engine using C++?
In this repo, we'll guide you through the basics of getting started with Unreal Engine and C++. We'll cover the fundamentals of C++ programming, such as data types and pointers, and show you how to use these concepts in the context of game development with Unreal Engine. We'll also introduce you to the Unreal Engine module system, which is an important aspect of organizing your game code into smaller, more manageable pieces.
Note
This repository was created in conjunction with ChatGPT to assist in writing and formulating each sentence. While it provides valuable information, it may not be entirely accurate. If you detect any errors or false statements, please feel free to create a new issue to report them for further improvement and clarification.
You can also send a new pull request to make correct changes to codebase.
Your contributions and feedback are appreciated!
Note
Examples and documentation are intended to work on UE 5.0 version and upwards. Some code may or may not work on previous versions!
Click to expand

 Winslow - Unreal Engine 5 Blueprint CheatSheet Dark Theme
 Winslow - Unreal Engine 5 C++ CheatSheet Dark Theme


| This section was written in conjunction with ChatGPT. |
Highly recommend taking a short class of native C++. Here is a video link to ~1h long video tutorial from Mosh.
You can also watch a playlist from GGameDev about getting started with Unreal Engine C++.
C++ is a statically typed, compiled, general-purpose programming language that offers a combination of high-level and low-level features. It was developed by Bjarne Stroustrup at Bell Labs in 1979 as an enhancement to the C language, originally named C1 with Classes and later renamed C++ in 1983.
You can read more about C++ Language Reference from Microsoft Learn.
Using C++ with Unreal Engine unlocks the engine's full feature set, allowing developers to harness advanced graphics rendering, physics simulations, networking, and AI capabilities. C++ provides a level of control, customization, and performance optimization that complements visual scripting.
Developing with C++ in Unreal Engine enables better debugging, profiling, and performance optimization through techniques such as multithreading and memory management. It also facilitates integration with third-party libraries, expanding the range of functionality and flexibility available to developers.
You can read more about it on their docs.
To use C++ effectively in Unreal Engine, it is crucial to have a strong foundation in programming principles and understanding of Unreal Engine's architecture and conventions. Leveraging resources like the Unreal Engine documentation, community forums, and collaboration with other developers helps to gain knowledge and best practices.
By combining the power of C++ and Unreal Engine, developers can create immersive experiences and unlock the full potential of the engine's capabilities.
| This section was written in conjunction with ChatGPT. |
An Integrated Development Environment (IDE) is a software application that provides comprehensive tools for writing, debugging, and managing code. IDEs offer a streamlined and feature-rich environment for software development, making it easier for developers to work on their projects efficiently.
Popular IDEs used in Unreal Engine and C++ development include:
-
Visual Studio: The Visual Studio IDE for Unreal Engine development. It offers a powerful set of C++ tools and seamless integration with Unreal Engine, providing a robust development environment.
Free. -
Visual Studio Code (VSCode): Visual Studio Code is a lightweight, cross-platform code editor with a rich ecosystem of extensions, including ones for Unreal Engine development.
Free. -
Rider: Rider is a popular IDE developed by JetBrains, designed for game development, and it offers solid integration with Unreal Engine projects.
Cost.
| This section was NOT written in conjunction with ChatGPT. |
Here are some tools that can be integrated into your IDE's for better performance, debugging or writing good code practices.
-
Visual Assist: A productivity tool for refactoring, reading, writing, navigating and generating C/C++/C# code.
Costand forVS. -
UnrealMacroGenerator: Provides a macro editor used by Unreal C ++ of Unreal Engine. You can create macros and edit already written macros.
Freeand forVS.
| This section was written in conjunction with ChatGPT. |
-
High performance: C++ allows you to write code that can run directly on the CPU and GPU, making it possible to achieve very high performance levels in your game or application.
-
Integration with existing codebases: If you have existing C++ code that you want to integrate with your Unreal Engine project, using C++ allows you to do so more easily.
-
Access to low-level functionality: C++ gives you access to lower-level functionality than other programming languages, which can be especially useful in game development where fine-grained control over memory, data structures, and algorithms is often necessary.
-
Garbage Collection and Memory Management: While C++ demands manual memory management, Unreal Engine provides a garbage collector that efficiently clears out
UObjectclasses from memory. With the control over manual memory handling, you can precisely dictate when to allocate and deallocate memory as necessary.
| This section was NOT written in conjunction with ChatGPT. |
-
More prone to errors: C++ is a strongly typed language, requiring the precise use of semicolons, braces and accurate syntax to ensure successful compilation. Rectifying these issues can be time-consuming. On the contrary, the Blueprint's node-based graph system operates without the need for "correct" syntax, offering a more "forgiving" environment.
-
Tied to Unreal's API: Throughout the evolution of Unreal Engine, Epic Games may modify the source code, rendering certain functions and members as obsolete/deprecated. Consequently, Unreal might recommend the need to update the codebase with the latest API changes. Failure to do so can lead to compilation errors, in the future.
-
Updating your codebase: When working with C++ and Unreal Engine, your C++ code is compiled into a .DLL (in Windows OS) file that Unreal Engine can read and use within Blueprint graphs. However, this necessitates Unreal Engine to reload to incorporate your code changes. Epic Games has introduced Hot Reload, allowing for code reloading without editor restart, streamlining the development process. While Hot Reload often works for a while, it is unreliable and frequently causes blueprint corruption or other issues.
-
Requires more storage: When working with C++ within Unreal Engine, it often involves using "Editor Symbols for debugging," consuming approximately 60 GB of storage. Similarly, if you opt to build Unreal Engine from its source code (on their github page), you'll require around 200 GB of storage space.
Click to expand
| This section was written in conjunction with ChatGPT. |
Click to expand
Object-Oriented Programming (OOP) is a programming paradigm that organizes code around objects, which are instances of classes. It focuses on the concept of objects, their properties (attributes), and behaviors (methods), allowing for modular, reusable, and structured code design.
Encapsulation is the practice of bundling data and the methods that operate on that data within a single unit, which is typically a class. It promotes data hiding and information hiding, ensuring that the internal state and implementation details of an object are not directly accessible from outside the object. Encapsulation helps achieve data integrity, security, and abstraction by controlling access through well-defined interfaces.
Data hiding is a principle closely related to encapsulation. It involves concealing the internal implementation details of an object and exposing only the necessary information through well-defined interfaces. By hiding implementation details, the object's data is protected and can only be accessed or modified through controlled methods. This enhances data security, code maintainability, and reduces the risk of unintended modifications or access to critical data.

Inheritance is a mechanism in OOP that allows new classes (derived classes or subclasses) to inherit properties and behaviors from existing classes (base classes or superclasses). Inheritance promotes code reuse, as derived classes can inherit and extend the functionality of their base classes. The derived classes can add new attributes and behaviors or override existing ones to customize the behavior of inherited members. Inheritance facilitates code organization, modularity, and the creation of hierarchical relationships between classes.

Polymorphism is a fundamental concept in object-oriented programming (OOP) that allows objects of different classes to be treated as objects of a common base class. It enables you to write code that can work with objects of multiple types in a uniform manner.
Polymorphism is often illustrated through inheritance, where you have a base class and multiple derived classes that inherit from it. The derived classes can override or extend the behavior of the base class's methods, while still adhering to the common interface.
| This section was written in conjunction with ChatGPT. |
Syntax refers to the set of rules that define the structure, format and grammar of a programming language. It dictates how statements and expressions should be written to form valid code.
C++ follows a structured syntax that includes elements such as keywords2, identifiers, operators and control structures. The syntax is designed to provide precise instructions to the compiler on how to interpret and execute the code.
Weak and strong typing refer to different approaches in how programming languages handle data types and type safety.
In C++, the language is considered strongly typed, as it requires explicit type conversions and does not perform implicit type coercion without the programmer's explicit instruction (except number data types). C++ enforces strong typing to ensure type safety and minimize potential errors.
Weak Typing (Python3 code):
a = 5 # Compiled! Because Python is a weak typing language.Strong Typing (C++ code):
a = 5; // Error!
int a = 5; // Compiled!In C++, a semicolon (;) is used to mark the end of a statement. It serves as a delimiter, indicating to the compiler that one statement has finished and another begins. The presence of semicolons allows the compiler to separate statements and interpret code correctly.
The requirement for semicolons in C++ is a design choice that provides explicit statement termination. This approach allows for more fine-grained control over program execution and eliminates ambiguity.
In contrast, languages like Python3 use indentation to define blocks of code, eliminating the need for explicit statement termination with semicolons.
int a = 5; // Compiled!
int b = 5 // Error! Semicolon missing.C++ uses curly braces ({}) as block delimiters to enclose multiple statements or define the body of control structures, functions, and classes. The use of curly braces provides a clear and explicit way to define the boundaries of code blocks (also know as a scope).
Curly braces help define the scope of variables and maintain code readability. They ensure that statements within the braces are treated as a single unit, making it easier to understand the flow and logic of the program.
class Car
{

};
namespace MyNamespace
{
}void MyFunction()
{
{
// Scope inside a function
}
}Both single-line and multi-line comments are helpful for adding explanatory notes, documenting code, or temporarily disabling sections of code during debugging or development. They enhance code readability, facilitate collaboration, and provide valuable information to developers maintaining the codebase.
Single-line comments start with two forward slashes // and continue until the end of the line.
They are typically used for brief comments or explanations on a single line.
// This is a single-line comment in C++Multi-line comments, also known as block comments, start with a forward slash (/) followed by an asterisk (*) and end with an asterisk (*) followed by a forward slash (/).
Multi-line comments can span multiple lines and are used for more extensive comments or documentation.
/*
    This is a multi-line comment
    It can span multiple lines
*/In C++, header files and source files are two types of files used to organize and manage code in a C++ program.
The separation of header and source files is a design choice that promotes modularity and improves build efficiency in C++. By keeping declarations in header files and implementations in source files, the compiler can easily check for correctness and compile only the necessary code, reducing build times and preventing redundant compilation. In the early days of computing, languages like Fortran and COBOL used single file extensions because of the limitations of the operating systems and compilers at the time. Each file had to adhere to a specific format defined by the language and its compiler, and the extension represented that format. |
Other languages, like C#4, Java5, and Python3, continued to use single file extensions because they adopted a more integrated approach to handling both declarations and implementations within a single file.
In modern programming, the choice of using single file extensions or separate header and source files depends on the language's design philosophy and the needs of the development community. Both approaches have their strengths and weaknesses, and different languages adopt the one that best aligns with their goals and use cases.
In C++, the include directive is used to bring external code (headers or libraries) into your source code. It allows you to access the declarations and definitions present in those files.
The include directive is typically written as:
#include "filename.h"   // Using double quotes for user-defined headers
#include <filename.h>   // Using angular brackets for standard library headers
Here's the difference between using double quotes and angular brackets:
-
Double Quotes (`"filename.h"): When you use double quotes, the preprocessor searches for the header file in the current directory first. If it doesn't find the file there, it will look in the additional include directories specified in the project settings.
Example:
#include "MyHeader.h" -
Angular Brackets (
<filename.h>): When you use angular brackets, the preprocessor only searches for the header file in the standard library directories specified for the compiler.Example:
#include <iostream>
In general, you use double quotes for your own header files (which may be part of your project) and angular brackets for standard library headers (like iostream, vector, etc.) or headers from external libraries.
| This section was written in conjunction with ChatGPT. |
The standard library in C++ is a collection of pre-defined classes and functions that provide a wide range of functionality for common tasks. It is a part of the C++ Standard Template Library (STL) and is officially known as the C++ Standard Library. The library is designed to be platform-independent and provides a standardized set of features that are supported across different C++ compilers and environments.
The C++ Standard Library is organized into several header files, each of which contains declarations for specific classes and functions. Some of the key components of the standard library include containers (like vectors, lists, maps, etc.), algorithms (sorting, searching, etc.), iterators, input/output operations, strings, and more.
To use the standard library in C++, you include the appropriate header files in your code, and then you can directly use the classes and functions provided by the library. For example, to use the std::vector class, you include the <vector> header file and then create instances of the vector and use its methods.
The name "std" comes from the fact that all the classes, functions, and other elements of the standard library are part of the std namespace. The namespace std is used to avoid naming conflicts with other libraries and user-defined code. By using the std:: prefix before any element from the standard library, you explicitly specify that you are referring to the elements in the std namespace.
Here's a simple example of how to use the standard library in C++:
#include <iostream>
#include <vector>
#include <algorithm>

std::vector<int> numbers = {5, 2, 9, 1, 7};

// Use standard library algorithm to sort the vector
std::sort(numbers.begin(), numbers.end());

// Use standard library to print the sorted vector
for (int num : numbers)
{
    std::cout << num << " ";
}| This section was written in conjunction with ChatGPT. |
|
Table from Microsoft Learn about Data Type Ranges.
| Type Name | Bytes | Other Names | Range of Values |
|---|---|---|---|
int |
4 | signed |
-2,147,483,648 to 2,147,483,647 |
unsigned int |
4 | unsigned |
0 to 4,294,967,295 |
__int8 |
1 | char |
-128 to 127 |
unsigned __int8 |
1 | unsigned char |
0 to 255 |
__int16 |
2 | short, short int, signed short int |
-32,768 to 32,767 |
unsigned __int16 |
2 | unsigned short, unsigned short int |
0 to 65,535 |
__int32 |
4 | signed, signed int, int |
-2,147,483,648 to 2,147,483,647 |
unsigned __int32 |
4 | unsigned, unsigned int |
0 to 4,294,967,295 |
__int64 |
8 | long long, signed long long |
-9,223,372,036,854,775,808 to 9,223,372,036,854,775,807 |
unsigned __int64 |
8 | unsigned long long |
0 to 18,446,744,073,709,551,615 |
bool |
1 | none | false or true |
char |
1 | none | -128 to 127 by default; 0 to 255 when compiled by using /J |
signed char |
1 | none | -128 to 127 |
unsigned char |
1 | none | 0 to 255 |
short |
2 | short int, signed short int |
-32,768 to 32,767 |
unsigned short |
2 | unsigned short int |
0 to 65,535 |
long |
4 | long int, signed long int |
-2,147,483,648 to 2,147,483,647 |
unsigned long |
4 | unsigned long int |
0 to 4,294,967,295 |
long long |
8 | none (but equivalent to __int64) |
-9,223,372,036,854,775,808 to 9,223,372,036,854,775,807 |
unsigned long long |
8 | none (but equivalent to unsigned __int64) |
0 to 18,446,744,073,709,551,615 |
enum |
varies | none | |
float |
4 | none | 3.4E +/- 38 (7 digits) |
double |
8 | none | 1.7E +/- 308 (15 digits) |
long double |
same as double |
none | Same as double |
wchar_t |
2 | __wchar_t |
0 to 65,535 |
If its name begins with two underscores (__), a data type is non-standard.
[!WARNING] C++ lacks explicitness about data types size, leading to potential variation. For instance, the
inttype can manifest as either 16-bits or 32-bits, depending on the context.
Here is a summary of the explicit data sizes:
|
char myChar = 'a';bool isDead = true;int health = 10;C++ allows the char, int, and double data types to have modifiers preceding them. A modifier is used to alter the meaning of the base type so that it more precisely fits the needs of various situations.
|
The modifiers signed, unsigned, long and short can be applied to integer base types. In addition, signed and unsigned can be applied to char, and long can be applied to double.
The modifiers signed and unsigned can also be used as prefix to long or short modifiers.
For example:
unsigned long int // Same as unsigned 32-bit integer (unsigned int)[!NOTE] The default behavior for all integer types is
signed.
Here is a list of modifiers for integer data type:
| Declare | Size (bits) | Size (bytes) | Min Value | Max Value |
|---|---|---|---|---|
unsigned char |
8 | 1 | 0 | 255 |
unsigned short int |
16 | 2 | 0 | 65,535 |
unsigned int |
32 | 4 | 0 | 4,294,967,295 |
unsigned long long |
64 | 8 | 0 | 18,446,744,073,709,551,615 |
signed char |
8 | 1 | -128 | 127 |
signed short int |
16 | 2 | -32,768 | 32,767 |
signed int |
32 | 4 | -2,147,483,648 | 2,147,483,647 |
signed long long |
64 | 8 | -9,223,372,036,854,775,808 | 9,223,372,036,854,775,807 |
float speedInMetersPerSecond = 5.5f; // C++ always uses 'f' or 'F' literal for defining a float variable.double speedInMetersPerSecond = 5.5; // C++ never uses a literal for defining a double variable.| This section was written in conjunction with ChatGPT. |
In C++, the typedef keyword2 is used to create an alias or alternative name for existing data types. It provides a way to define a new name that can be used as a shorthand for the original type, improving code readability and maintainability.
Here's an example:
typedef int myInt; // Declare our alias for custom type

myInt x = 5;  // Equivalent to: int x = 5;
[!WARNING] Unreal Engine doesn't support typedefs with UHT7. Meaning, you can't expose to Blueprint.
| This section was written in conjunction with ChatGPT. |
Members are variables or functions that are part of a class or object. They define the properties and behaviors of the class.
There are two main types of members: variables and functions.
Members that store data. They can be of different types such as numbers, strings, booleans, or custom data types. Variables hold values that can be accessed and manipulated within the class or object.
There are abbreviations for frequently done kinds of assignments. Here are a few:
| Abbreviation | Meaning | Note |
|---|---|---|
n += k |
n = n + k |
|
n -= k |
n = n - k |
|
++n |
n = n + 1 |
Where the value of expression ++n is the value of n after the assignment |
n++ |
n = n + 1 |
But the value of expression n++ is the value of n before the assignment |
--n |
n = n - 1 |
Where the value of expression --n is the value of n after the assignment |
n-- |
n = n - 1 |
But the value of expression n-- is the value of n before the assignment |
Functions are blocks of code that perform a specific task or set of tasks. They encapsulate a series of instructions and can be called and executed from various parts of a program. Functions can accept input parameters (arguments) and can also return a value as a result.
Functions can be defined outside of classes as standalone functions or can be defined within classes as member functions. Standalone functions are typically used for common tasks that are not specific to any particular class or object.
Here's an example:
/// @brief Calculates the factorial of a number using recursion.
/// @param n Number of times.
/// @result A number.
int Factorial(int n)
{
    if (n == 0 || n == 1)
        return 1;
    else
        return n * Factorial(n - 1);
}| This section was written in conjunction with ChatGPT. |
Classes are the building blocks of object-oriented programming (OOP). They are a blueprint for creating objects, which are instances of a class. A class defines the structure and behavior of objects by specifying the members it contains.
A class can have variables (members) to store data and functions (methods) to perform actions. The variables defined within a class are often referred to as attributes, while the functions are referred to as methods.
Objects created from a class can access and modify the class's members. They provide a way to create multiple instances that share the same structure and behavior defined by the class. Objects can be thought of as individual entities that represent real-world objects or abstract concepts.
Classes allow for code reusability, encapsulation (hiding internal details), and the ability to model complex systems by organizing related data and behavior together.
Here's an example:
class Person
{
public:
    Person(std::string name, int age)
        : name(name)
        , age(age)
    { }

    void DisplayInfo()
    {
        // ...
    }

private:
    std::string name;
    int age;
};In C++, a struct is a user-defined data type that allows you to group multiple variables of different data types under a single name.
It is similar to a class, but with some key differences.
Usage of struct in C++
- Structs are used to create lightweight data structures to hold related data elements.
- They are commonly used to represent simple data objects or records that do not require complex behavior or methods.
Difference between class and struct
In C++, the main difference between a class and a struct is the default access level. In a class, the default access level for its members is private, while in a struct, the default access level is public. This means that members of a struct are accessible outside the struct without the need for access specifiers.
For example:
struct Vector3
{
    float x;
    float y;
    float z;

    Vector3(float _x = 0.0f, float _y = 0.0f, float _z = 0.0f)
        : x(_x)
        , y(_y)
        , z(_z)
    { }
};

Vector3 v1(1.0f, 2.0f, 3.0f);
Vector3 v2(4.0f, 5.0f, 6.0f);

float dx = v1.x - v2.x;
float dy = v1.y - v2.y;
float dz = v1.z - v2.z;

float dist = std::sqrt(dx * dx + dy * dy + dz * dz);
Historical difference with C language
In C, there was no concept of classes, and struct was the primary way to define user-defined data types. In C++, the struct keyword was retained to maintain compatibility with C, but it gained additional features and behavior, such as the ability to have member functions and access specifiers.
In modern C++, the distinction between class and struct has become more a matter of convention and coding style rather than a strict rule. Many developers prefer to use struct for simple data containers with public data members and class for more complex objects with private data members and member functions. However, you can use either class or struct based on your design preferences.
| This section was written in conjunction with ChatGPT. |
| Keyword | Access ability | Description |
|---|---|---|
public |
All | Members and functions are accessible from anywhere, including outside the class. |
protected |
Subclasses | Members and functions are accessible from within the class and any subclasses, but not from outside. |
private |
Class | Members and functions are only accessible from within the class itself. |
mutable |
Class | Specifies that a member variable can be modified even if the owning object is const. |
friend |
Class | Allows a non-member function or class to access the private and protected members of a class. |
class MyClass
{
public:
    int publicVar; // Public member variable

    // Public member function
    void publicFunction()
    {
        // ...
    }

protected:
    int protectedVar; // Protected member variable

    // Protected member function
    void protectedFunction()
    {
        // ...
    }

private:
    int privateVar; // Private member variable

    // Private member function
    void privateFunction()
    {
        // ...
    }

    mutable int mutableVar; // Mutable member variable

    friend void friendFunction(MyClass& obj); // Friend function declaration
};

void friendFunction(MyClass& obj)
{
    obj.privateVar = 42; // Friend function can access private member variable
}

MyClass obj;

// Accessing public members
obj.publicVar = 10; // Compiled!
obj.publicFunction(); // Compiled!

// Accessing private members via friend function
friendFunction(obj); // Compiled!

// Accessing private members directly (only possible within the class)
obj.privateVar = 20; // Error!
obj.privateFunction(); // Error!| This section was written in conjunction with ChatGPT. |
If-statement is a fundamental control structure that allows you to conditionally execute a block of code based on a specified condition. It provides a way to control the flow of execution in your program.
if (condition)
{
    // Code to be executed if the condition is true
}
else if (secondCondition)
{
    // Code to be executed if the secondCondition is true, but condition was false
}
else
{
    // Code to be executed if the condition and secondCondition is both false
}| This section was NOT written in conjunction with ChatGPT. |
Here are some operations for creating conditions:
==- Equality check!=- Inequality check>- Check for greater<- Check for less>=- Check for greater or equal<=- Check for less or equal&&- Expression A && B is evaluated by first evaluating A. A has value 0, then A && B also has value 0, and B is not evaluated. Otherwise, B is evaluated; if B has value 0, then A && B has the same value 0, and otherwise has value 1. Also calledANDoperator.||- Expression A || B is evaluated by first evaluating A. If A has a nonzero value, then A || B has value 1, and B is not evaluated. Otherwise, A || B has value 1 if B is nonzero and value 0 if B is zero. Also calledORoperator.!- Expression !A is 0 if A is nonzero, and is 1 if A is 0. Also calledNOToperator.
| This section was NOT written in conjunction with ChatGPT. |
Conditional expressions in C++ are statements that evaluate a condition and return a value based on the result of the condition. They provide a concise way to express simple conditions and perform different actions or assignments based on the outcome.
The basic syntax of a conditional expression in C++ is as follows:
int value = isDead ? 100 : -100; // condition ? value_if_true : value_if_false;-
1. The condition within the parentheses is evaluated.
-
2. If the condition is true, the value or expression before the colon (:) is returned as the result of the conditional expression.
-
3. If the condition is false, the value or expression after the colon is returned as the result.
| This section was written in conjunction with ChatGPT. |
In C++, a switch statement is a control flow construct used to select one of many possible execution paths based on the value of a given expression. It provides an alternative to using multiple if-else statements when checking a variable against different values.
The basic syntax of a switch statement in C++ is as follows:
switch (expression)
{
    case value1:
        // Code to be executed if expression matches value1
        break;
    case value2:
        // Code to be executed if expression matches value2
        break;
    // Add more case statements as needed
    default:
        // Code to be executed if none of the cases match
        break;
}-
1. The expression is evaluated, and its value is compared against the cases specified in the switch statement.
-
2. If a case matches the value of the expression, the code block associated with that case is executed. The execution then continues until a break statement is encountered, which exits the switch statement.
-
3. If none of the cases match the expression's value, the code block associated with the default case (optional) is executed. The default case serves as a fallback option when no matching cases are found.
| This section was written in conjunction with ChatGPT. |
Loops are essential constructs in programming languages that allow repetitive execution of a block of code based on a specified condition. They provide a way to automate tasks, process collections of data, and iterate over a sequence of elements.
While loop are used when the number of iterations is uncertain but depends on a condition. The loop continues as long as the specified condition remains true. It evaluates the condition before each iteration, and if it becomes false, the loop terminates.
Here's an example of finding the first power of 2 greater than 100:
int num = 1;

while (num <= 100)
{
    num *= 2;
}

std::cout << "First power of 2 greater than 100: " << num << std::endl;

// Output: First power of 2 greater than 100: 128A do-while loop is a control flow structure in programming that executes a block of code at least once, and then repeats the execution as long as a specified condition remains true. It is similar to the while loop, but with the condition checked at the end of each iteration.
Here's an example of printing numbers from 1 to 5 using a do-while loop:
int i = 1;

do
{
    std::cout << i << " ";
    i++;
} while (i <= 5);

// Output: 1 2 3 4 5For loop are used when you know the number of iterations in advance. They consist of an initialization, a condition for continuation, and an iteration statement. The loop iterates over a range of values or a collection, incrementing or decrementing a counter variable with each iteration.
Here's an example of printing numbers from 1 to 5:
for (int i = 1; i <= 5; i++)
{
    std::cout << i << " ";
}

// Output: 1 2 3 4 5Foreach loop are designed to iterate over collections or sequences of elements. They automatically handle the iteration logic, allowing you to process each element without managing an explicit index or counter. The loop iterates over each element in the collection until all elements have been processed.
Here's an example of printing each character of a string:
std::string message = "Hello";

for (char c : message)
{
    std::cout << c << " ";
}

// Output: H e l l o
In summary:
| Loop Type | Purpose |
|---|---|
| while loop | Executes the block of code while the condition is true. |
| do-while loop | Executes the block of code first, then checks the condition. It guarantees that the loop will execute at least once. |
| for loop | Executes the block of code based on the initialization, condition, and update expressions. |
| foreach loop | Iterates over the elements of a container (e.g., arrays, vectors) and executes the block of code for each item. |
| This section was written in conjunction with ChatGPT. |
The terms immutable and mutable refer to the state of an object or variable and whether it can be changed after its creation. Understanding the difference between immutable and mutable objects is essential in programming as it affects how data is manipulated and shared within the code.
In C++, the mutable keyword is used to modify the behavior of a class member when the class itself is declared as const. When a class member is marked as mutable, it can be modified even when the object is considered constant.
When you declare a class member as const, it means that the member cannot be modified once the object is created. However, there are scenarios where you may want to allow certain members to be modified even in a const object. This is where the mutable keyword comes into play. By using mutable keyword, you can change a const class member and alter the value.
Usage of mutable for variables:
class MyClass
{
public:
    MyClass(int value) : constantValue(value) {}

    void IncrementValue() const
    {
        mutableValue++; // Modifying the mutable member inside a const member function
    }

    // This function is const and cannot modify constantValue
    int GetConstantValue() const { return constantValue; }

    // This function is const, but mutableValue can still be modified.
    int GetMutableValue() const { return mutableValue; }

private:
    const int constantValue; // Regular constant member
    mutable int mutableValue; // Mutable member
};
When to use mutable keyword:
The mutable keyword is used in situations where a class member maintains a state that should be allowed to change even in a const object. Common use cases for mutable include caching and lazily initializing data. By making certain members mutable, you can improve performance in specific scenarios without sacrificing the const-correctness of your class.
[!WARNING] While
mutablecan be useful, it should be used judiciously. Modifying mutable members insideconstfunctions can lead to unexpected behavior and make the code harder to reason about. Ensure that the state being modified usingmutabledoesn't affect the logical constness of the class or lead to thread-safety issues.
When a member variable is declared as const, it means that its value cannot be changed after it is initialized. This makes the member immutable, and any attempt to modify its value will result in a compilation error.
The const keyword is used in C++ to declare a constant variable, which means its value cannot be changed once it is assigned. When applied to member functions, it indicates that the function will not modify the state of the object it is called on (i.e., it won't modify member variables unless they are explicitly marked as mutable). This allows the compiler to enforce immutability and provides additional safety guarantees in the code.
Usage of const for variables:
const int immutableValue = 10; // Immutable variable
// immutableValue = 20; // Error: Cannot modify an immutable variable| Property | Immutable | Mutable |
|---|---|---|
| State | Cannot be changed | Can be changed |
| Modification | Creates a new object | Modifies the original object |
| Data Sharing | Thread-safe (no synchronization needed) | Requires synchronization for thread-safety |
| Memory Overhead | Additional memory allocation for each update | Direct modification, no additional memory overhead |
| Performance Characteristics | Generally more memory-efficient but slower for frequent updates | May be less memory-efficient but faster for frequent updates |
| This section was written in conjunction with ChatGPT. |
In programming, try-catch is a mechanism used for error handling and exception handling. It allows you to write code that can handle potential errors or exceptions that may occur during the program's execution, preventing crashes or data corruption.
In C++, the try and catch blocks are used for implementing this mechanism. Here's how it works:
1. try: You place the code that might throw an exception inside a try block. If an exception occurs within this block, the program will immediately jump to the nearest matching catch block.
2. catch: The catch block is used to catch and handle the exceptions thrown in the try block. It specifies the type of exception it can catch. If an exception of that type is thrown, the code within the catch block will be executed.
Here's a simple example in C++:
try
{
    int numA = 5;
    int numB = 0;
    int result = numA / numB;
}
catch (const char* errorMessage)
{
    // Caught "Floating point exception"
}
Using try-catch blocks allows you to handle exceptional situations gracefully, providing error messages to users or logging errors for debugging, instead of crashing or corrupting the program's data. It helps in making your programs more robust and user-friendly.
| This section was written in conjunction with ChatGPT. |
Casting, in the context of programming languages, refers to the conversion of one data type into another. It allows you to change the interpretation or representation of a variable or object, which can be useful in various situations.
This is the most basic and straightforward form of casting. It is performed using the (type) syntax and works for converting between related types, like integer to float or vice versa. However, it may not be safe in some situations, so you need to be cautious when using it.
Example:
int num1 = 10;
double num2 = static_cast<double>(num1); // Static cast from int to doubleThis is used to add or remove the const qualifier from a variable. It allows you to modify the constness of a variable.
Example:
const int x = 5;
const_cast<int&>(x) = 10; // Const cast to remove const and modify the value of xThis is primarily used for casting pointers or references to objects in a class hierarchy. It is particularly useful when working with polymorphic classes. Dynamic casting checks the validity of the cast at runtime and returns a null pointer if the cast is not valid.
Example:
class BaseClass { /* ... */ };
class DerivedClass : public BaseClass { /* ... */ };

BaseClass* basePtr = new DerivedClass;
DerivedClass* derivedPtr = dynamic_cast<DerivedClass*>(basePtr); // Dynamic cast from BaseClass to DerivedClassThis is primarily used to convert one pointer or reference type to another, regardless of their unrelated types. It is a low-level and potentially unsafe casting operation that allows developers to treat the underlying binary representation of a pointer as a different type. Unlike static_cast, reinterpret_cast doesn't perform any type checking or conversions, and it's up to the programmer to ensure the correctness of the cast.
Example:
result_type = reinterpret_cast<result_type>(expression);| This section was written in conjunction with ChatGPT. |
Inlining is a compiler optimization technique used to improve the performance of code by inserting the body of a function directly at the call site, eliminating the overhead of function calls. It reduces the execution time by avoiding the function call stack setup and cleanup.
In C++, you can use the inline keyword to suggest to the compiler that a function should be inlined. For example:
inline int Add(int a, int b) { return a + b; }The inline keyword is a hint to the compiler, and the actual decision of whether to inline a function is made by the compiler. It might choose not to inline a function if it is too large or too complex.
The __forceinline keyword is used to force the compiler to inline a function, regardless of its size or complexity. It overrides the compiler's normal inlining heuristics and ensures that the function is always inlined wherever it is called.
Here's an example of how __forceinline can be used:
__forceinline int Multiply(int a, int b) { return a * b; }When choosing between using a macro or a function for inlining, it is generally recommended to use functions with the inline keyword. Functions are more type-safe and have better debugging support compared to macros. Macros are simple textual replacements and can lead to unexpected behavior or issues if not used carefully.
Using inline functions offers a good balance between performance and maintainability. They provide the benefits of inlining without sacrificing the advantages of type-checking and debugging support that functions offer. However, keep in mind that the inline keyword is just a hint to the compiler, and it may or may not inline the function depending on the specific context and compiler optimizations.
| This section was written in conjunction with ChatGPT. |
In programming languages, a namespace is a feature that allows you to organize code elements (such as variables, functions, classes) into distinct named scopes to avoid name collisions and improve code organization.
In C++, you can use namespaces to group related code together and avoid naming conflicts. Here's how you can define and use a namespace in C++:
// Defining a namespace
namespace MyNamespace
{
    int add(int a, int b) { return a + b; }
}

int result = MyNamespace::add(3, 5);
Namespaces are particularly helpful when you are working with multiple libraries or modules, each with its own set of classes and functions. By placing them in separate namespaces, you can avoid naming conflicts when using elements from different libraries.
For example, consider two libraries that both define a class called Vector. Without namespaces, including both libraries in the same project could lead to naming conflicts. However, by placing each Vector class in its own namespace, such as Library1::Vector and Library2::Vector, you can use them without conflicts.
#include <Library1/Vector.h>
#include <Library2/Vector.h>

Library1::Vector vec1;
Library2::Vector vec2;
// Use vec1 and vec2 without conflicts
[!WARNING] Unreal Engine doesn't support namespaces with UHT6.
| This section was written in conjunction with ChatGPT. |
In programming languages, static members are class members (variables or functions) that belong to the class itself rather than individual objects of the class. They are shared among all instances (objects) of the class and are independent of any specific object's state.
In C++, you can use the static keyword to define static members in a class. Here's how you can use static members in C++ code:
class MyClass
{
public:
    static int staticVariable; // Declaration of a static variable
    static void staticFunction(); // Declaration of a static function
};

// Definition of the static variable
int MyClass::staticVariable = 0;

// Definition of the static function
void MyClass::staticFunction()
{
    // Function implementation
}
Static variables and functions are accessed using the class name followed by the scope resolution operator ::. Since static members are shared across all instances of the class, they do not require an object to be accessed.
Here's how you can use static members in your code:
MyClass::staticVariable = 10; // Accessing static variable
MyClass::staticFunction(); // Calling static function
Static members are commonly used for class-level data and utility functions that do not rely on object-specific state. They are particularly useful when you want to maintain a single instance of a variable shared among all objects of the class, or when you need a common function that does not depend on the specific object's data.
| This section was written in conjunction with ChatGPT. |
In C++, the auto keyword is used for type inference, allowing the compiler to deduce the data type of a variable automatically based on its initialization value (similar to var keyword in C#4). It was introduced in C++11 as part of the modern C++ features.
Here's how you can use the auto keyword:
auto variable = 42; // Compiler will deduce the type of 'variable' as int
auto name = "John"; // Compiler will deduce the type of 'name' as const char*
auto pi = 3.14; // Compiler will deduce the type of 'pi' as double
The auto keyword is especially useful when dealing with complex data types or when the type is long and cumbersome to write explicitly. It can also simplify code maintenance since you don't need to update the type declaration if the initialization value changes.
Using the auto keyword for return function values can be a double-edged sword. While it can make the code more concise and reduce the need to explicitly specify return types, it can also make the code less readable and harder to understand, especially when the function's logic is complex.
auto player = GetPlayer(); // Bad

Player* player = GetPlayer(); // Good| Pros of Using 'auto' for Return Values | Cons of Using 'auto' for Return Values |
|---|---|
| Concise code with reduced type annotations | Lack of clarity: Return type might not be immediately apparent from the code |
| Easier to write and understand simple cases | Debugging and error handling might be more challenging |
| Can simplify code in certain situations | Reduced code readability in complex scenarios |
| Reduces the need to explicitly specify types | Potential impact on code maintainability as the codebase grows larger and complex |
| Improves code readability in some cases | Team coding standards and practices may not always favor using 'auto' |
| This section was written in conjunction with ChatGPT. |
The power of polymorphism lies in the ability to use a base class pointer or reference to refer to objects of derived classes. This allows you to write code that operates on the base class, without needing to know the specific derived class. During runtime, the appropriate version of the overridden method in the derived class will be invoked, based on the actual type of the object being referred to.
Polymorphism allows you to write more flexible and reusable code by treating objects based on their common behavior, rather than their specific type. It promotes code extensibility and enhances the ability to work with a variety of objects in a unified way.
In C++, operators are symbols or keywords2 used to perform various operations on data, such as arithmetic operations, logical operations, assignment, comparison, and more. They enable concise and expressive manipulation of variables and values.
Operator Overloading is a feature in C++ that allows you to redefine the behavior of an operator for user-defined types. It enables you to provide a specific implementation for an operator based on the operands' types, allowing custom operations to be performed.
Here's an example of overloading the greater-than-or-equal-to >= operator in C++:
class MyClass
{
public:
    int value;

    MyClass(int val) : value(val) {}

    bool operator>=(const MyClass& other) const
    {
        return value >= other.value;
    }
};
By overloading operators, you can define custom behavior for how objects of a class interact with the corresponding operator. This provides flexibility and allows you to use familiar syntax and semantics for user-defined types, making the code more intuitive and expressive.
Operator overloading is not limited to comparison operators; you can also overload arithmetic operators +, -, * and / assignment operators =, logical operators &&, ||, and more. Overloading operators helps create more natural and concise code, improves code readability, and enhances the usability of user-defined types.
Function overloading is a feature in C++ that allows you to define multiple functions with the same name but different parameters.
It enables you to create functions that perform similar operations but on different data types or with different parameter sets.
void TakeDamage(int DamageAmount)
{
    // Logic...
}

void TakeDamage(float DamageAmount)
{
    // Logic...
}

void TakeDamage(double DamageAmount)
{
    // Logic...
}
When you call an overloaded function, the compiler determines the appropriate function to invoke based on the arguments passed.
TakeDamage(10); // Calling function with integer parameter
TakeDamage(11.1f); // Calling function with float parameter
TakeDamage(12.25052651); // Calling function with double parameter
With function overloading, it provides several benefits, including:
|
[!WARNING] Unreal Engine doesn't support function overloading with UHT7. Meaning, you can't expose to Blueprint.
In object-oriented programming (OOP), a virtual function is a function declared in a base class that can be overridden in derived classes. It allows you to provide a common interface in the base class while allowing different implementations in the derived classes.
When a function is declared as virtual in the base class, it indicates that the function can be overridden by derived classes. This means that the derived class can provide its own implementation of the function, tailored to its specific needs.
Here's an example in C++ to illustrate the concept of virtual functions:
class Shape
{
public:
    virtual void Draw()
    {
        // Common implementation for all shapes
    }
};

class Circle : public Shape
{
public:
    void Draw() override
    {
        // Override implementation
    }
};

class Rectangle : public Shape
{
public:
    void Draw() override
    {
        // Override implementation
    }
};
The key aspect of the virtual function is that the appropriate implementation to be executed is determined at runtime, based on the actual type of the object being referred to. This is called dynamic dispatch or late binding.
Virtual functions are useful when you want to define a common interface in a base class but allow derived classes to provide their own implementations based on their specific behaviors. It enables polymorphism, allowing objects of different derived classes to be treated uniformly through a base class pointer or reference.
Using virtual functions, you can write code that works with objects based on their common interface, without needing to know their specific types. This promotes code extensibility and flexibility, as new derived classes can be added without modifying the existing code that uses the base class interface.
| Keyword used | Matching virtual function in base class | Result |
|---|---|---|
| Neither | No | New non-virtual function |
| Neither | Yes | Override |
virtual |
No | New virtual function |
virtual |
Yes | Override |
override |
No | Compile error |
override |
Yes | Override |
| Both | No | Compile error |
| Both | Yes | Override |
| This section was written in conjunction with ChatGPT. |
Generic Programming is a programming paradigm that focuses on writing reusable code by abstracting away specific types and working with generic types that can be instantiated with various concrete types. It allows programmers to create functions, classes, and algorithms that can operate on different data types without requiring code duplication.
In C++, the template keyword2 is used to implement generic programming through templates. Templates allow you to define functions or classes that can be instantiated with different types. They provide a powerful mechanism for code reuse and flexibility.
Here is a video about templates in C++ by Cazz
Here is an example:
template <typename T>
T add(T a, T b)
{
    return a + b;
}

int result1 = add(5, 10);        // Instantiated as add<int>(5, 10)
double result2 = add(3.5, 2.7); // Instantiated as add<double>(3.5, 2.7)Recursion is a programming technique where a function calls itself to solve a problem. In simpler terms, it's a process of solving a larger problem by breaking it down into smaller, more manageable subproblems.
Here's an example:
int factorial(int n)
{
    if (n == 0 || n == 1)
        return 1;
    else
        return n * factorial(n - 1); // Calling the function again (recursion)
}
|
[!WARNING] While recursion can be powerful, it's essential to use it judiciously. Recursive solutions may consume more memory and time compared to iterative solutions for certain problems. Additionally, recursive functions can lead to stack overflow errors if not implemented correctly or when dealing with very large inputs.
| This section was NOT written in conjunction with ChatGPT. |
The linker is a program that makes executable files for your project, in order to run the .exe file.
The linker's job is to resolve undefined symbols. If the linker cannot resolve the issue, it then gives you a linkage error, and you have to resolve it instead.
You can also flag the linker to export some extra debugging files or so called .pdb (Program Debug Database) file. These files can be helpful for other programmers, as they contain extra information (such as comments and other debugging information).
The linker can be configured to accept either static library or dynamic library when creating your project.
|
When you compile, you have the options to compile the source code into a .lib file. The .lib file can then be read by the linker, which include all files, when executing a compilation.
[!NOTE] Because static library is merged into .exe file, it increases the final size of .exe file.
Use static library if you want to access content statically and have compiling errors to ensure that the code can be executed.
|

When you compile, you have the options to compile the source code into a .dll file. The .dll file can then be read by the .exe file at runtime.
There are major problems when developing a project that uses .dll files. Not only, do you have to make sure that all the files are correct versions but also exists and can be executed correctly.
|
To access contents of .dll file, you have to use either __declspec(dllimport) or __declspec(dllexport).
- Use
dllimportfor importing functions and variables. - Use
dllexportfor exporting functions and variables.
[!IMPORTANT] __declspec(dllimport) is required for data imports (such as member variables).
// Example of the dllimport and dllexport class attributes
__declspec( dllimport ) int i;
__declspec( dllexport ) void func();
// To make the code more readable, use macro definitions!
#define DllImport __declspec( dllimport )
#define DllExport __declspec( dllexport )
DllExport void func();
DllExport int i = 10;
DllImport int j;
DllExport int n;You can read more about it from Microsoft Learn.
[!NOTE] Because the dynamic library is loaded at runtime, it's then loaded into RAM memory, instead of being statically compiled into the .exe file. This can take up more memory space. However, if the code use repeatably, throughout other programs, then memory space is greatly improved.
[!WARNING] Using .dll also means that the library stores compiled code directly into the file. It also may contain small extra metadata about the code (debugging symbols, comments and etc). This means, the code is unsecure and more accessible for a reverse engineer to use it and modify it. C# require storing debug symbol information (for the reflection system), hence why it is easier to reverse engineer than C++ code. While you have the options to enable debug symbol information in C++. But is not automatically turn on by default.
[!IMPORTANT] There is no way to guarantee to stop a reverse engineer to look at the compiled code or modify the game unless you run a program, which check the game's content as a hash data and compare to cloud stored version (this would take long time, but would be a safe approach).
When calling a function, you can trace the code execution in .dll file (with the assembly language viewer), thus understanding the function intention and then either replicated the function or modify it.
Most devs are most likely to focusing on the multiplayer aspect. Such as client/server prediction and assumptions. My suggestion, is to never store any password, API keys or any important information inside the game's source code.
If you need to store important information, use strip functionality. To make sure the final product of your game, doesn't contain any secret information. Also, hash your password and keys (MD5 and SHA2 methods).
Use dynamic library if you want to access content at runtime and share the code between different programs.
| This section was written in conjunction with ChatGPT. |
In C++, a lambda expression, often referred to as a lambda function or lambda, is an anonymous function that you can define inline. It provides a convenient way to create small, inline functions without the need for explicitly declaring a separate function.
Here is a video by The Cherno about Lambdas in C++.
The basic syntax of a lambda expression in C++ is as follows:
[capture_list](parameters) -> return_type
{
    // Function body
    // Statements
    // Return statement
};
Here's how a lambda expression works:
-
1. Capture List: The capture list, denoted by [ ], specifies variables from the enclosing scope that the lambda function can access. It can capture variables by value ([=]) or by reference ([&]). You can also specify individual variables to capture explicitly.
-
2. Parameters: The parameters represent the input arguments to the lambda function, similar to regular function parameters.
-
3. Return Type: The return type, denoted by ->, specifies the type of the value returned by the lambda function. If the return type is omitted, it is deduced by the compiler.
-
4. Function Body: The function body contains the statements and logic of the lambda function. It can include any valid C++ code, such as variable declarations, control flow statements, and computations.
Here's an example of how to use lambda in action:
// Lambda function that takes two integers as parameters and returns their sum.
auto sum = [](int a, int b) { return a + b; };

int num1 = 5;
int num2 = 10;

// Using the lambda to calculate the sum of num1 and num2.
int result = sum(num1, num2);| This section was written in conjunction with ChatGPT. |
Binary code is a system of representing data and instructions using a two-symbol system, typically 0 and 1. It is the fundamental language that computers understand and use internally to process information. Each 0 or 1 is called a "bit" (short for binary digit), and a group of 8 bits is called a "byte".
Logic gates are fundamental building blocks of digital circuits, responsible for performing logical operations on binary inputs to produce binary outputs. These gates form the basis of digital systems, including computers and other electronic devices. Each logic gate implements a specific Boolean function, which takes one or more binary inputs and produces an output based on a defined truth table.
There are several types of logic gates, each representing a different fundamental logical operation:
-
AND Gate: This gate produces an output of 1 (or "high") only when both of its input signals are 1. Otherwise, the output is 0 (or "low"). It behaves like the logical "AND" operation.
-
OR Gate: The OR gate produces an output of 1 if at least one of its input signals is 1. It produces an output of 0 only when both inputs are 0. It behaves like the logical "OR" operation.
-
NOT Gate: Also known as an inverter, this gate has a single input and produces the opposite value as its output. If the input is 1, the output is 0, and vice versa. It behaves like the logical "NOT" operation.
-
NAND Gate: The NAND gate is a combination of an AND gate followed by a NOT gate. It produces the opposite output of an AND gate: it gives a 0 output when both inputs are 1, and a 1 output otherwise.
-
NOR Gate: Similar to the NAND gate, the NOR gate combines an OR gate with a NOT gate. It produces the opposite output of an OR gate: it gives a 1 output only when both inputs are 0.
-
XOR Gate: The XOR (exclusive OR) gate produces a 1 output when the number of 1 inputs is odd. If the number of 1 inputs is even, the output is 0.
-
XNOR Gate: The XNOR (exclusive NOR) gate is the complement of the XOR gate. It produces a 1 output when the number of 1 inputs is even, and a 0 output otherwise.
Hexadecimal (hex) is a base-16 numbering system that is commonly used in computers to represent and manipulate binary data in a more human-readable and compact format. In the hexadecimal system, each digit represents a value from 0 to 15, making it a convenient way to represent binary data.
In the decimal (base-10) numbering system, we use ten symbols (0 to 9) to represent numbers. Similarly, in hexadecimal, we use sixteen symbols (0 to 9 and A to F) to represent values. The symbols A to F represent the decimal values 10 to 15, respectively.
Here is a comparison of decimal and hexadecimal representations:
| Decimal | Hexadecimal |
|---|---|
| 0 | 0 |
| 1 | 1 |
| 2 | 2 |
| 3 | 3 |
| 4 | 4 |
| 5 | 5 |
| 6 | 6 |
| 7 | 7 |
| 8 | 8 |
| 9 | 9 |
| 10 | A |
| 11 | B |
| 12 | C |
| 13 | D |
| 14 | E |
| 15 | F |
As an example, 255 in hexadecimal would be FF.
Bitwise Operators in C++ are used to perform bitwise operations on individual bits of data type. These operators directly manipulate the binary representation of data type at the bit level.
Bitwise operations can bring performance benefits in certain situations because they operate at a low level, dealing directly with binary representations. This can make certain operations faster and more memory-efficient compared to other higher-level approaches.


Here's a table listing all the bitwise operators in C++ and their functionality:
| Operator | Description | Example |
|---|---|---|
| & | Bitwise AND: Sets each bit to 1 if both corresponding bits are 1. | int result = a & b; |
| | | Bitwise OR: Sets each bit to 1 if either of the corresponding bits is 1. | int result = a | b; |
| ^ | Bitwise XOR (Exclusive OR): Sets each bit to 1 if only one of the corresponding bits is 1. | int result = a ^ b; |
| ~ | Bitwise NOT (Complement): Inverts all the bits, changing 0 to 1 and 1 to 0. | int result = ~a; |
| << | Left Shift: Shifts the bits to the left by the specified number of positions. | int result = a << 3; |
| >> | Right Shift: Shifts the bits to the right by the specified number of positions. | int result = a >> 2; |
Here's an example:
int a = 5;    // Binary representation: 0000 0101
int b = 3;    // Binary representation: 0000 0011

int bitwiseAnd = a & b;     // Binary representation: 0000 0001 (1 in decimal)
int bitwiseOr = a | b;      // Binary representation: 0000 0111 (7 in decimal)
int bitwiseXor = a ^ b;     // Binary representation: 0000 0110 (6 in decimal)
int bitwiseNotA = ~a;       // Binary representation: 1111 1010 (-6 in decimal)
int leftShift = a << 2;     // Binary representation: 0001 0100 (20 in decimal)
int rightShift = a >> 1; // Binary representation: 0000 0010 (2 in decimal)| This section was written in conjunction with ChatGPT. |
In programming languages, stack and heap are two different areas of memory used for memory allocation. They serve distinct purposes and have different characteristics.

In C++, you have the flexibility to choose between stack and heap memory allocation based on your program's requirements. Stack memory is typically used for most local variables and function calls, providing automatic memory management and efficient access. On the other hand, heap memory is used when dynamic memory allocation is needed, allowing you to control the lifetime of objects and manage more extensive data structures.
C++ provides features like dynamic memory allocation with new and delete operators, allowing you to allocate memory on the heap explicitly. However, it is important to manage heap memory carefully to avoid memory leaks and unnecessary memory consumption.
- Stack memory is a region of memory used for automatic memory allocation.
- It is managed by the compiler and follows a "last-in, first-out" (LIFO) data structure.
- Stack memory is typically used for storing local variables, function call frames, and other short-lived data.
- Memory allocation and deallocation in the stack are handled implicitly by the compiler.
- Stack memory is fast and efficient but limited in size.
- Variables allocated on the stack have automatic storage duration and are deallocated automatically when they go out of scope.
- Heap memory is a region of memory used for dynamic memory allocation.
- It allows for manual control over memory allocation and deallocation.
- Memory on the heap can be allocated and deallocated at runtime using functions like
newanddeletein C++. - Heap memory is typically used for storing objects with longer lifetimes or for data structures that need dynamic resizing.
- Memory allocated on the heap needs to be explicitly deallocated to avoid memory leaks.
- Heap memory is slower than stack memory due to dynamic allocation and deallocation operations.
- The size of heap memory is typically much larger than the stack, but its allocation and deallocation require manual management.
[!WARNING] Don't use
newanddeleteoperators onUObjectclasses, as this would interfere with Unreal's garbage collection system.
| Aspect | Stack | Heap |
|---|---|---|
| Memory Location | Located in the system's RAM, typically in a contiguous block. | Located in a different part of memory, often called the "free store." |
| Memory Management | Automatically managed by the compiler or runtime system using Last-In-First-Out (LIFO) order. | Requires manual management, using dynamic memory allocation and deallocation (e.g., new and delete in C++). |
| Memory Size | Fixed size, limited by the stack's size. | Dynamic size, limited by the available memory of the system. |
| Allocation Speed | Faster, as memory allocation and deallocation is done by adjusting the stack pointer. | Slower, as memory allocation requires searching for a suitable free block in the heap. |
| Deallocation | Automatically deallocated when the function or scope it belongs to exits. | Must be explicitly deallocated to avoid memory leaks. |
| Use Cases | Best suited for managing local variables and function call frames. | Used for data structures that need to exist beyond the scope of a function or when the memory size is not known at compile time. |
| Risk of Overflow | May cause a stack overflow if too much memory is used, leading to program termination. | Generally less prone to overflow as it can grow dynamically, but can still cause out-of-memory errors if not managed properly. |
| This section was written in conjunction with ChatGPT. |
Design patterns are reusable solutions to common programming problems that have been proven effective over time. They provide guidelines and templates for structuring code, promoting best practices, and improving software design.

Here are a few notable design patterns:
SOLID or Single responsibility principle, Open-closed principle, Liskov substitution principle, Interface segregation principle, and Dependency inversion principle. SOLID is a mnemonic acronym for five design principles designed to make software designs more flexible, understandable, and maintainable.

The KISS principle emphasizes simplicity and avoiding unnecessary complexity in software design. It encourages keeping code, algorithms, and systems as simple as possible to enhance readability, maintainability, and reduce the likelihood of errors.

The Singleton pattern ensures that only one instance of a class is created and provides a global point of access to that instance. It is useful in scenarios where you need to control access to a shared resource or want to limit the instantiation of a class to a single object.

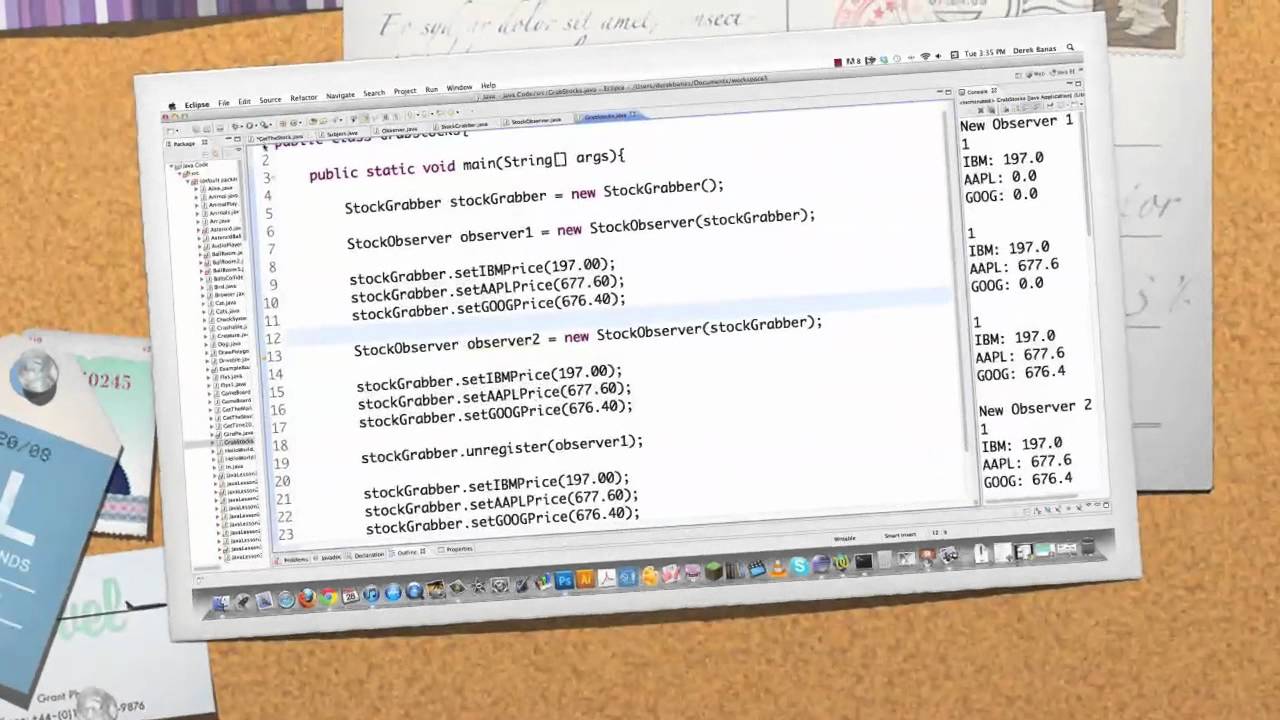
The Observer pattern establishes a one-to-many dependency between objects. It allows multiple observer objects (listeners) to be notified and updated automatically when the observed object (subject) undergoes a change in state. This pattern is widely used in event-driven systems or scenarios requiring loose coupling between objects.
The Factory pattern provides an interface for creating objects without exposing the creation logic to the client. It centralizes object creation, allowing clients to use the factory interface to create objects based on specific criteria or conditions. This pattern promotes flexibility, decoupling, and abstraction in object creation.

The Strategy pattern defines a family of algorithms and encapsulates each algorithm as a separate class. It allows clients to dynamically choose and switch between different algorithms at runtime. This pattern enables code reuse, promotes separation of concerns, and facilitates the "Open-Closed Principle" by allowing new algorithms to be added without modifying existing code.

MVC is an architectural design pattern commonly used in user interface development. It separates an application into three interconnected components: the Model (data and business logic), the View (presentation and user interface), and the Controller (handles user input and updates the model). MVC promotes code organization, maintainability, and modularity.

| Pattern/Principle | Description | Use Case |
|---|---|---|
| SOLID Principles | A set of five principles: Single Responsibility, Open/Closed, Liskov Substitution, Interface Segregation, and Dependency Inversion. | Designing maintainable, scalable, and flexible code. |
| KISS Principle | "Keep It Simple, Stupid" - Encourages simplicity and avoiding unnecessary complexity in code. | Writing code that is easy to understand and maintain. |
| Singleton Pattern | Ensures a class has only one instance and provides a global point of access to that instance. | Managing shared resources or configurations. |
| Observer Pattern | Defines a one-to-many dependency between objects, so that when one object changes state, all its dependents are notified and updated automatically. | Implementing event handling and decoupling components. |
| Factory Pattern | A creational pattern that provides an interface for creating objects, but allows subclasses to alter the type of objects that will be created. | Creating objects without specifying the exact class. |
| Strategy Pattern | Allows selecting an algorithm or behavior during runtime by encapsulating each behavior in separate classes and making them interchangeable. | Implementing different algorithms for the same task. |
| MVC Pattern | Model-View-Controller: Separates an application into three components - the model (data and business logic), the view (user interface), and the controller (manages user input and updates the model and view). | Structuring applications for better maintainability and scalability. |
| This section was written in conjunction with ChatGPT. |

An array is a collection of elements stored in contiguous memory locations. It allows accessing elements using an index, making it efficient for random access. However, its size is fixed during initialization.
Here's an example:
#include <array>

// Defining an array
std::array<int, 5> myArray = {1, 2, 3, 4, 5};A list is a linear data structure that supports fast insertion and deletion at any position. It does not provide random access but is efficient for frequent insertions and removals.
Here's an example:
#include <list>

// Defining an list
std::list<int> myList = {1, 2, 3, 4, 5};

myList.push_back(6);
myList.push_front(0);A queue is a linear data structure that follows the First-In-First-Out (FIFO) principle. Elements are added to the back (enqueue) and removed from the front (dequeue).
Here's an example:
#include <queue>

// Defining an list
std::queue<int> myQueue;

myQueue.push(1);
myQueue.push(2);
myQueue.push(3);A hash set is a collection of unique elements, and it uses hashing to achieve fast insertion, deletion, and lookup operations.
Here's an example:
#include <unordered_set>

// Defining an list
std::unordered_set<int> myHashSet = {1, 2, 3, 4, 5};

myHashSet.insert(6);A dictionary, also known as a map, is a collection of key-value pairs, where each key is unique. It provides fast access to values based on their keys.
Here's an example:
#include <map>

// Defining an list
std::map<std::string, int> myDictionary;

myDictionary["apple"] = 5;
myDictionary["banana"] = 3;
myDictionary["orange"] = 8;A linked list is a linear data structure where elements (nodes) are connected via pointers. It supports efficient insertion and deletion but requires more memory compared to arrays.
[!NOTE] Linked list structure doesn't exist in C++ standard library.
Here's an example:
struct Node
{
    int data;
    Node* next;
};

int main()
{
    Node* head = nullptr;
    Node* second = nullptr;
    Node* third = nullptr;

    head = new Node();
    second = new Node();
    third = new Node();

    head->data = 1;
    head->next = second;

    second->data = 2;
    second->next = third;

    third->data = 3;
    third->next = nullptr;

    Node* current = head;

    while (current != nullptr)
    {
        std::cout << current->data << " ";
        current = current->next;
    }

    std::cout << std::endl;

    delete head;
    delete second;
    delete third;

    return 0;
}| Data Structure | Description | Use Case |
|---|---|---|
| Array | A fixed-size collection of elements of the same data type stored in contiguous memory locations. | Used when the size is known at compile time and constant-time access is required. |
| List | A dynamic collection of elements, usually implemented as a doubly-linked list or dynamic array. | Suitable when the size is unknown or frequently changes, offering efficient insertion and deletion. |
| Hash Set | A collection of unique elements, stored in a hash table based on their hash codes. | Ideal for maintaining a set of distinct items and performing fast membership checks. |
| Dictionary | Also known as a hash map, it stores key-value pairs and allows fast lookup of values based on keys. | Used when quick access to data based on keys is required, e.g., in associative arrays. |
| Linked List | A linear data structure where elements are stored in nodes, each containing a value and a reference to the next node. | Suitable when frequent insertion and deletion at any position are required. |
| This section was written in conjunction with ChatGPT. |
Time complexity is a measure of how the runtime of an algorithm grows with the size of the input data. It helps us understand how efficient an algorithm is and how it will scale when dealing with larger datasets.

Here is a graph of Time Complexity:
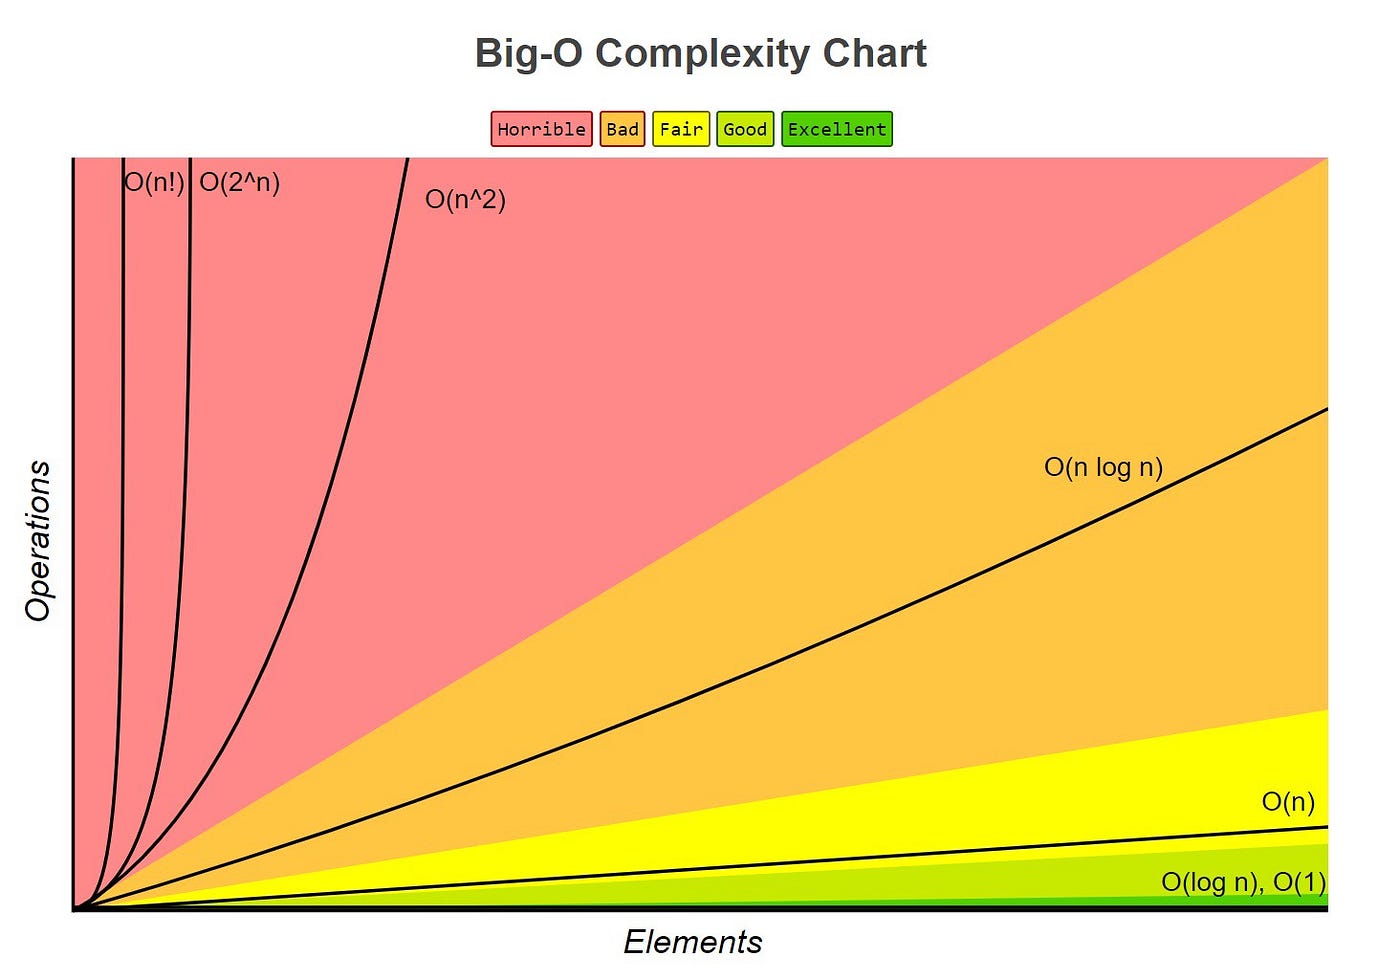
An algorithm has constant time complexity if its runtime does not depend on the size of the input data. It performs the same number of operations regardless of the input size.
Here's an example:
#include <iostream>

void constantTimeExample(int num)
{
    std::cout << "This is a constant time example: " << num << std::endl;
}

int main()
{
    int num = 42;

    constantTimeExample(num);

    return 0;
}An algorithm has logarithmic time complexity if its runtime grows logarithmically with the size of the input. It divides the input data into smaller portions and discards a significant portion at each step.
Here's an example:
#include <iostream>

int binarySearch(int arr[], int size, int target)
{
    int left = 0;
    int right = size - 1;

    while (left <= right)
    {
        int mid = left + (right - left) / 2;

        if (arr[mid] == target)
            return mid;
        else if (arr[mid] < target)
            left = mid + 1;
        else
            right = mid - 1;
    }

    return -1;
}

int main()
{
    int arr[] = {1, 2, 3, 4, 5, 6, 7, 8, 9, 10};
    int target = 7;
    int size = sizeof(arr) / sizeof(arr[0]);

    int result = binarySearch(arr, size, target);
    std::cout << "Element found at index: " << result << std::endl;

    return 0;
}An algorithm has linear time complexity if its runtime grows linearly with the size of the input data. It performs an operation for each element in the input.
Here's an example:
#include <iostream>

void linearTimeExample(int arr[], int size)
{
    for (int i = 0; i < size; i++)
    {
        std::cout << arr[i] << " ";
    }

    std::cout << std::endl;
}

int main()
{
    int arr[] = {1, 2, 3, 4, 5};
    int size = sizeof(arr) / sizeof(arr[0]);

    linearTimeExample(arr, size);

    return 0;
}An algorithm has quadratic time complexity if its runtime grows with the square of the input size. It often involves nested loops, leading to multiple iterations over the input data.
Here's an example:
#include <iostream>

void quadraticTimeExample(int arr[], int size)
{
    for (int i = 0; i < size; i++)
    {
        for (int j = 0; j < size; j++)
        {
            std::cout << arr[i] * arr[j] << " ";
        }
    }

    std::cout << std::endl;
}

int main()
{
    int arr[] = {1, 2, 3, 4, 5};
    int size = sizeof(arr) / sizeof(arr[0]);

    quadraticTimeExample(arr, size);

    return 0;
}An algorithm has exponential time complexity if its runtime grows exponentially with the size of the input data. It performs repeated operations that double with each increase in input size.
Here's an example:
#include <iostream>

int fibonacci(int n)
{
    if (n <= 1)
        return n;

    return fibonacci(n - 1) + fibonacci(n - 2);
}

int main()
{
    int n = 5;

    std::cout << "Fibonacci of " << n << " is: " << fibonacci(n) << std::endl;

    return 0;
}
An algorithm has factorial time complexity if its runtime grows with the factorial of the input size. It is one of the slowest-growing time complexities and should be avoided for larger datasets.
Here's an example:
#include <iostream>

int factorial(int n)
{
    if (n == 0)
        return 1;

    return n * factorial(n - 1);
}

int main()
{
    int n = 5;

    std::cout << "Factorial of " << n << " is: " << factorial(n) << std::endl;

    return 0;
}
| Time Complexity | Description | Example | Characteristics |
|---|---|---|---|
| Constant (O(1)) | The time taken is constant, irrespective of the input size. | Accessing an element in an array with an index. | Fast and efficient, doesn't depend on input size. |
| Logarithmic (O(log n)) | The time grows logarithmically with the input size. | Binary search algorithm. | Efficient for large datasets, grows slowly with input. |
| Linear (O(n)) | The time grows linearly with the input size. | Linear search in an unsorted array. | Time increases linearly with input size. |
| Quadratic (O(n^2)) | The time grows quadratically with the input size. | Nested loops. | Becomes inefficient for large input, grows rapidly. |
| Exponential (O(2^n)) | The time grows exponentially with the input size. | Recursive Fibonacci. | Very slow, becomes impractical for even small inputs. |
| Factorial (O(n!)) | The time grows factorially with the input size. | Recursive permutation algorithm. | Extremely slow, highly impractical for most cases. |
| This section was written in conjunction with ChatGPT. |
Choose C++ when you anticipate the need for interaction with other C++ code or require extensive control over low-level optimizations and memory management. C++ is well-suited for classes that require direct access to engine internals and efficient execution.
Use Blueprint as an inherited class when you want to benefit from the visual scripting capabilities and quick prototyping offered by Blueprint, while still having the option to incorporate C++ code in the future. This allows for a flexible approach where you can leverage the power of Blueprint while having the ability to extend functionality with C++ when needed.
graph TD;
    UObjectBase-->UObjectBaseUtility;
    UObjectBaseUtility-->UObject;
    UObject-->USubsystem;
    USubsystem-->UDynamicSubsystem;
    USubsystem-->UGameInstanceSubsystem;
    USubsystem-->ULocalPlayerSubsystem;
    USubsystem-->UWorldSubsystem;
    UObject-->UBlueprintFunctionLibrary;
    UObject-->UEngine;
    UEngine-->UEditorEngine;
    UEngine-->UGameEngine;
    UObject-->UPlayer;
    UPlayer-->ULocalPlayer;
    UPlayer-->UNetConnection;
    UObject-->UScriptViewportClient;
    UScriptViewportClient-->UGameViewportClient;
    UObject-->UGameInstance;
    UGameInstance-->UPlatformGameInstance;
    UObject-->UWorld;
    UObject-->UPackage;
    UObject-->ULevel;
    UObject-->UInterface;
    UObject-->USoundBase;
    USoundBase-->USoundCue;
    USoundBase-->USoundWave;
    UObject-->UFXSystemAsset;
    UFXSystemAsset-->UParticleSystem;
    UObject-->UAnimationAsset;
    UAnimationAsset-->UAnimSequenceBase;
    UAnimSequenceBase-->UAnimSequence;
    UObject-->UTexture;
    UTexture-->UTexture2D;
    UTexture-->UMediaTexture;
    UObject-->UMaterial;
    UObject-->UVisual;
    UVisual-->UWidget;
    UWidget-->UUserWidget;
    UUserWidget-->UEditorUtilityWidget;
    UObject-->UDataAsset;
    UDataAsset-->UPrimaryDataAsset;
    UObject-->AActor;
    AActor-->AInfo;
    AInfo-->AGameSession;
    AInfo-->AGameModeBase;
    AGameModeBase-->AGameMode;
    AInfo-->AGameStateBase;
    AGameStateBase-->AGameState;
    AInfo-->AGameNetworkManager;
    AInfo-->AWorldSettings;
    AInfo-->APlayerState;
    AActor-->ALevelScriptActor;
    AActor-->AHUD;
    AActor-->APlayerCameraManager;
    AActor-->AController;
    AController-->AAIController;
    AController-->APlayerController;
    AActor-->APawn;
    APawn-->ADefaultPawn;
    APawn-->ACharacter;
    UObject-->UActorComponent;
    UActorComponent-->UMovementComponent;
    UActorComponent-->USceneComponent;
    USceneComponent-->UAudioComponnent;
    USceneComponent-->UCameraComponent;
    USceneComponent-->ULightComponentBase;
    USceneComponent-->UPrimitiveComponent;
    UPrimitiveComponent-->UMeshComponent;
    UMeshComponent-->UStaticMeshComponent;
    UMeshComponent-->USkinnedMeshComponent;
    USkinnedMeshComponent-->USkeletalMeshComponent;
    UMeshComponent-->UWidgetComponent;
    UPrimitiveComponent-->UShapeComponent;
    UShapeComponent-->UBoxComponent;
    UShapeComponent-->UCapsuleComponent;
    UShapeComponent-->USphereComponent;
UObject is a base class for objects in the engine that require some common functionality such as garbage collection, serialization, reflection, and more. UObject also provides some additional functionality such as networking support, dynamic class creation, and object-oriented programming features like inheritance and polymorphism.
You can read more about Unreal Architecture at their docs.
Some of the notable classes, that inherit from UObject include:
Click to expand
-
AActor- A base class for the every object placed in the world. It's an
UObjectthat usually contains otherUObjects specialized to be part of an actor - this what we call components. - This class contains a basic functionality to operate on the "object placed in the world".
AActoritself doesn't have a transform (i.e. position in the world), it depends on the transform of the root component.- Functions:
BeginPlay()- Called when the level starts ticking, only during actual gameplay.Tick(float DeltaSeconds)- Update function, called every frame on Actor.EndPlay(const EEndPlayReason::Type EndPlayReason)- Whenever actor is being removed from a levelSetLifeSpan(float InLifespan)- Set the lifespan of actor.Destroy(bool bNetForce, bool bShouldModifyLevel)- Destroy actor.
- A base class for the every object placed in the world. It's an
-
APawn- Represents a pawn in the game world. A pawn is an entity that can be controlled by the player or by AI, and can move and interact with the game world.
APawnprovides basic movement and input handling functionality, as well as collision detection and physics simulation.
-
AHUD- Represents the heads-up display (HUD) in the game. The HUD displays important information to the player, such as health and ammunition levels, as well as providing visual feedback for game events such as damage or power-up pickups.
AHUDcan be customized to display different types of information and to use different visual styles.
-
ACharacter- Represents a playable character in the game world.
ACharacteris a subclass ofAPawnand provides additional functionality specific to player-controlled characters, such as animation and movement controls, camera handling, and input management. ACharactercan be used as a base class for player characters, enemies, and other types of characters in the game.
- Represents a playable character in the game world.
-
AController- Represents a controller in the game, which can be used to control a
APawnorACharacter. AControllerprovides input handling and navigation functionality, allowing players or AI to move and interact with the game world.AControllercan be used to implement different types of control schemes, such as first-person or third-person controls, and can be customized to support different input devices and control configurations.
- Represents a controller in the game, which can be used to control a
-
UActorComponent- A base class for every object placed inside AActor.
- Used for components contains only the logic, i.e.
UMovementComponentorUSceneComponent. UActorComponentdoesn't appear in the world.- Functions:
BeginPlay()- Begins Play for component.TickComponent(float DeltaTime, enum ELevelTick TickType, FActorComponentTickFunction* ThisTickFunction)- Function called every frame on ActorComponent.EndPlay(const EEndPlayReason::Type EndPlayReason)- Ends gameplay for component.
-
UMovementComponent- Provides movement functionality to an actor in the game world.
UMovementComponentcan be used to implement a variety of movement types, such as flying, walking, swimming, or sliding. UMovementComponenthandles physics simulation and collision detection for the actor, and can be customized to provide different movement behaviors.
- Provides movement functionality to an actor in the game world.
-
USceneComponent- A base class for every component which actually appears in the world, it has a transform evaluated every frame.
- It's used by components that need to know its place in the world to run the logic, i.e.
UAudioComponnent,UCameraComponent. - Component of this class isn't rendered or doesn't collide with anything.
-
UPrimitiveComponent- And this finally the base class for all components representing any sort of geometry.
- These components are rendered and tested for collision.
-
USubsystem- Provide services or functionality that can be used by other parts of the engine or by games built with the engine.
- Examples of subsystems in Unreal Engine include the rendering subsystem, the physics subsystem, and the input subsystem.
- Subsystems are responsible for initializing, updating, and shutting down their associated services, and can be used to customize or extend engine functionality as needed.
- 4 types of subsystems
- Engine (Engine lifetime)
- Editor (Editor lifetime)
- GameInstance (Game instance lifetime)
- LocalPlayer (share lifetime of local players)
-
UBlueprintFunctionLibrary- Allows you to create custom static functions that can be used in Blueprint graphs. These functions can be called from any Blueprint and can perform complex calculations or operations that are not easily achievable with standard Blueprint nodes.
-
UEngine,UEditorEngineandUGameEngine- Manages the main loop of the engine, handles rendering, input, audio, networking, and more.
UEditorEngineis used to manage the editor, which includes all of the tools and systems needed to create and edit levels, assets, and other game content.UGameEngineis used to manage the game itself, which includes gameplay mechanics, AI, physics, rendering, and so on.
-
UGameViewportClient- Manages the viewport and input handling for the game. It is responsible for rendering the game's output to the screen, handling user input, and managing the game's display settings.
-
ULocalPlayer- Manages the player's input, screen rendering, and other local gameplay-related tasks. ULocalPlayer is often used in conjunction with other classes, such as APlayerController, to manage local player interactions with the game.
-
UWorld- Represents a single instance of a level or map. It contains all the actors, components, and other objects that are present in the level, as well as information about the level's environment and physics settings.
- Functions:
SpawnActor()andSpawnActorDeferred()(deferred allow you to set actor properties before it's spawned into the world.)
-
ULevel- Represents a level in the game world that contains actors, geometry, lighting, and other assets.
-
UGameInstance- Represents the game instance, which is created when the game starts up and persists for the duration of the game.
- The game instance can be used to manage persistent data and game state across levels, as well as to perform global game operations such as handling networking, input, and other system-level tasks.
-
AGameMode- Defines the rules and mechanics of a particular game mode, such as deathmatch or capture the flag.
- Can be used to control game behavior, spawn actors, manage player input and game state, and perform other game-specific tasks.
- Each level in a game can have its own
AGameMode, allowing for different game modes to be used in different levels.
-
AGameState- Represents the state of the game during play.
AGameStatecan be used to store and manage data that is specific to a particular game, such as player scores, game timers, and other game state information. AGameStatecan also be used to synchronize game state across multiple clients in a networked game, ensuring that all players have an accurate view of the game world.
- Represents the state of the game during play.
-
UUserWidget- Represents a user interface (UI) widget in the game.
UUserWidgetprovides a flexible framework for creating UI elements such as buttons, text fields, and images, and can be customized to implement complex UI behaviors such as animations, transitions, and data binding. UUserWidgetcan be used to create menus, health bars, inventory screens, and other UI elements in the game.
- Represents a user interface (UI) widget in the game.
-
UPrimaryDataAsset- Represents a primary data asset in the engine. A primary data asset is a piece of game content that is created in the Unreal Editor, such as a mesh, texture, sound, or level.
UPrimaryDataAssetprovides a base class for creating custom data assets that can be loaded and used by the game at runtime. UPrimaryDataAssetcan be used to manage and organize game content, and can be customized to provide additional functionality such as data validation and metadata management.
- Represents a primary data asset in the engine. A primary data asset is a piece of game content that is created in the Unreal Editor, such as a mesh, texture, sound, or level.
-
USoundBase- Represents a sound or audio asset in the engine. ASoundBase can be used to play sound effects, music, and other audio in the game world.
ASoundBaseprovides a number of features for controlling the playback of audio, including volume, pitch, and spatialization effects such as 3D sound and reverb.
- Represents a sound or audio asset in the engine. ASoundBase can be used to play sound effects, music, and other audio in the game world.
-
UMaterial- Represents a material which defines the visual appearance of objects in the game world.
-
UTexture- Represents an image or texture that can be used in the engine for various purposes such as materials or user interface elements.
You can watch a video from underscore about Unreal Engine Architecture.
You can also watch a video discussion about Multiplayer Framework of Unreal Engine from Kekdot.
Note
This architecture is based on a multiplayer game setup. However, if you are making a singleplayer game, then you can ignore some of the main classes.
You can also watch The Unreal Engine Game Framework: From int main() to BeginPlay by Alex Forsythe, which he talks about Unreal Engine's architecture and how Unreal starts your game/editor.
| This section was written in conjunction with ChatGPT. |

There is a github repo, which talks about Unreal's naming convention. The repo is very detailed and explains how you should name your assets, as well as your code. Repo is called Unreal Engine's style guide by Michael Allar.
You can read more about Epic C++ Coding Standard on their docs.
Unreal Engine follows a specific naming convention that helps maintain consistency and readability in the codebase. When using Naming Conventions, all code and comments should use U.S. English spelling and grammar.
Pascal case is a naming convention used in programming and other contexts where compound words or phrases are created by capitalizing the first letter of each word and joining them without spaces. In Unreal Engine, pascal case is commonly used for naming classes, member variables, functions, and other constructs.
In Unreal Engine, the use of pascal case for classes is part of the naming convention for user-defined classes. When you create a new class in Unreal Engine, it is recommended to use pascal case for the class name. For example:
class AMyPlayerCharacter : public ACharacter
{
    // Class definition here
};
Similarly, pascal case is used for member variables and functions in Unreal Engine to maintain consistency and improve code readability. For example:
class AMyPlayerCharacter : public ACharacter
{
public:
    UPROPERTY()
    float MovementSpeed;

    UFUNCTION()
    void Jump();
};
Boolean variables, which uses a prefix of b followed by a descriptive name in pascal case.
For example, a boolean variable that controls whether a character is running might be named: bIsRunning.
Variable, method, and class names should be:
- Clear
- Unambiguous
- Descriptive
The greater the scope of the name, the greater the importance of a good, descriptive name. Avoid over-abbreviation.
// what does true mean?
bool CheckTea(FTea Tea);

// name makes it clear true means tea is fresh
bool IsTeaFresh(FTea Tea);
Enumerated (Enum) classes are a replacement for old-style namespaced enums, both for regular enums and UENUMs. For example:
// Old enum
UENUM()
namespace EThing
{
    enum Type
    {
        Thing1,
        Thing2
    };
}

// New enum
UENUM()
enum class EThing : uint8
{
    Thing1,
    Thing2
}
Enums are supported as UPROPERTYs, and replace the old TEnumAsByte<> workaround. Enum properties can also be any size, not just bytes:
// Old property
UPROPERTY()
TEnumAsByte<EThing::Type> MyProperty;

// New property
UPROPERTY()
EThing MyProperty;| This section was NOT written in conjunction with ChatGPT. |
| Prefix | Class | Subclasses |
|---|---|---|
| U | UObject |
UActorComponent, UPrimaryDataAsset, UEngine, UGameplayStatics |
| A | AActor |
APawn, ACharaacter, AController, AHUD, AGameMode |
| F | Struct | FHitResult, FVector, FRotator, FTableRowBase |
| E | Enum | EEnvQueryStatus, EConstraintType, EEndPlayReason |
| I | Inteface | IInputDevice, IHapticDevice, ITargetPlatform |
| T | Template | TSubclassOf<T>, TArray<T>, TSet<T>, TMap<T>, TMultiMap<T> |
| G | Global Class | GEngine, GConfig, GWorld, GEngineLoop, GIsEditor |
Tip
Did you know that F prefix actually stands for Float (floating point). but it was inadvertently spread throughout and has lost its original meaning.
| This section was written in conjunction with ChatGPT. |
|
| This section was written in conjunction with ChatGPT. |

Click to expand
In C++ native, you write a character by using char data type:
char myChar = 'a';In Unreal, there are couples or char data types:
ANSICHAR- An ANSI character. Normally a signed type.WIDECHAR- A wide character. Normally a signed type.TCHAR- EitherANSICHARorWIDECHAR, depending on whether the platform supports wide characters or the requirements of the licensee.UTF8CHAR- An 8-bit character containing a UTF8 (Unicode, 8-bit, variable-width) code unit.UTF16CHAR- An 16-bit character containing a UTF16 (Unicode, 16-bit, variable-width) code unit.UTF32CHAR- An 32-bit character containing a UTF32 (Unicode, 32-bit, fixed-width) code unit.
When working with Unreal, you are typical going to work with TCHAR data type as a char type.
Define TCHAR:
TCHAR MyChar = 'A';And to use the extra functions for these data types, you must use:
FCharforTCHARFCharWideforWIDECHARFCharAnsiforANSICHAR
Here's a list of functions, you can access from FChar:
ToUpper()- Only converts ASCII characters.ToLower()- Only converts ASCII characters.IsUpper()- Returns a boolean if the character is an uppercase letter.IsLower()- Returns a boolean if the character is a lowercase letter.IsAlpha()- Returns a boolean if the character is an alphabetic letter.IsGraph()- Returns a boolean if the character is a graphic character (printable and not a space).IsPrint()- Returns a boolean if the character is a printable character (including whitespace).IsPunct()- Returns a boolean if the character is a punctuation character (neither alphanumeric nor a whitespace).IsAlnum()- Returns a boolean if the character is an alphanumeric character (a letter or a digit).IsDigit()- Returns a boolean if the character is a hexadecimal digit (0-9, a-f or A-f).IsHexDigit()- Returns a boolean if the character is a decimal digit (0-9).IsWhitespace()- Returns a boolean if the character is a whitespace character (space, tab, newline, carriage return, vertical tab or form feed).IsControl()- Returns a boolean if the character is a control character (non-printing).IsOctDigit()- Returns a boolean if the character is an octal digit (0-7).ConvertCharDigitToInt()- Converts a character representing a decimal digit to an integer.IsIdentifier()- Returns a boolean if the character is an alphanumeric or underscore character.IsUnderscore()- Returns a boolean if the character is an underscore.ToUnsigned()- Convert a character to an unsigned integer to avoid sign extension problems with signed characters smaller thanint.
Include the header file:
#include "Misc/Char.h"Here's an example, of using these functions from FChar:
TCHAR MyChar = 'a';

MyChar = FChar::ToUpper(MyChar); // MyChar: A

bool bIsDigit = FChar::IsDigit(MyChar); // false
bool bIsDigit = FChar::IsAlpha(MyChar); // true
You can read more about TCHAR on Unreal's docs.
// Unreal uses a 'b' prefix for booleans (always in lowercase).
bool bIsDead = true;In C++ native, you write a integer by using int data type:
int health = 10;In Unreal, you write a integer by using int32:
int32 Health = 10;In Unreal, the availability of different integer types such as int8, int16, and int64 alongside the standard int32 provides developers with a range of options tailored to specific needs in terms of both data size and numerical range.
int8 NumberA = 0;       // -128                             ->      127
int16 NumberB = 0;      // -32,768                           ->      32,767
int32 NumberC = 0;      // -2,147,483,648                   ->      2,147,483,647
int64 NumberD = 0;      // 9,223,372,036,854,775,808        ->      9,223,372,036,854,775,807
You also have unsigned (positive-only) integers as well:
uint8 NumberA = 0;      // 0    ->      255
uint16 NumberB = 0;     // 0    ->      65,535
uint32 NumberC = 0;     // 0    ->      4,294,967,295
uint64 NumberD = 0; // 0 -> 18,446,744,073,709,551,615// C++ always uses 'f' or 'F' literal for defining a float variable.
float SpeedInMetersPerSecond = 5.5f;// C++ never uses a literal for defining a double variable.
double SpeedInMetersPerSecond = 5.5;It is generally recommended to use Unreal's typedefs, such as int32 instead of int for representing 32-bit signed integers. This is because the exact size of int is not defined by the C++ standard.
C++ implementation can define the size of a data type in bytes (sizeof(type)) to be any value, as long as:
- The expression
sizeof(type) * CHAR_BITevaluates to a number of bits high enough to contain required ranges. - And the ordering of type is still valid (e.g.
sizeof(int) <= sizeof(long)).
The CHAR_BIT is the number of bits in char. It is declared in “limits.h” header file in C++ language. It is of 8-bits per byte.
You can read more about data ranges in this section.
So, the summary data sizes would be:
|
You can read more in-depth about this from Alex on Stack Overflow.
Here's a full list of Unreal's data type sizes:
| Data Type | Signed | Size (bytes) |
|---|---|---|
bool |
- | NEVER assume the size |
TCHAR |
- | NEVER assume the size |
uint8 |
false | 1 |
int8 |
true | 1 |
uint16 |
false | 2 |
int16 |
true | 2 |
uint32 |
false | 4 |
int32 |
true | 4 |
uint64 |
false | 8 |
int64 |
true | 8 |
float |
true | 4 |
double |
true | 8 |
In Unreal Engine, instead of writing signed long long for a 64-bit integer, you can now write int64 instead. These aliases are called typedefs, which you can read more about typedef keyword in C++ docs.
You can read more about C++ typedefs in this section.
Here is a full list of Unreal Engine's typedefs:
//~ Unsigned base types.
/// An 8-bit unsigned integer.
typedef FPlatformTypes::uint8		uint8;
/// A 16-bit unsigned integer.
typedef FPlatformTypes::uint16		uint16;
/// A 32-bit unsigned integer.
typedef FPlatformTypes::uint32		uint32;
/// A 64-bit unsigned integer.
typedef FPlatformTypes::uint64		uint64;

//~ Signed base types.
/// An 8-bit signed integer.
typedef	FPlatformTypes::int8		int8;
/// A 16-bit signed integer.
typedef FPlatformTypes::int16		int16;
/// A 32-bit signed integer.
typedef FPlatformTypes::int32		int32;
/// A 64-bit signed integer.
typedef FPlatformTypes::int64		int64;

//~ Character types.
/// An ANSI character. Normally a signed type.
typedef FPlatformTypes::ANSICHAR	ANSICHAR;
/// A wide character. Normally a signed type.
typedef FPlatformTypes::WIDECHAR	WIDECHAR;
/// Either ANSICHAR or WIDECHAR, depending on whether the platform supports wide characters or the requirements of the licensee.
typedef FPlatformTypes::TCHAR		TCHAR;
/// An 8-bit character containing a UTF8 (Unicode, 8-bit, variable-width) code unit.
typedef FPlatformTypes::UTF8CHAR	UTF8CHAR;
/// A 16-bit character containing a UCS2 (Unicode, 16-bit, fixed-width) code unit, used for compatibility with 'Windows TCHAR' across multiple platforms.
typedef FPlatformTypes::CHAR16		UCS2CHAR;
/// A 16-bit character containing a UTF16 (Unicode, 16-bit, variable-width) code unit.
typedef FPlatformTypes::CHAR16		UTF16CHAR;
/// A 32-bit character containing a UTF32 (Unicode, 32-bit, fixed-width) code unit.
typedef FPlatformTypes::CHAR32		UTF32CHAR;

/// An unsigned integer the same size as a pointer
typedef FPlatformTypes::UPTRINT UPTRINT;
/// A signed integer the same size as a pointer
typedef FPlatformTypes::PTRINT PTRINT;
/// An unsigned integer the same size as a pointer, the same as UPTRINT
typedef FPlatformTypes::SIZE_T SIZE_T;
/// An integer the same size as a pointer, the same as PTRINT
typedef FPlatformTypes::SSIZE_T SSIZE_T;

/// The type of the NULL constant.
typedef FPlatformTypes::TYPE_OF_NULL	TYPE_OF_NULL;
/// The type of the C++ nullptr keyword.
typedef FPlatformTypes::TYPE_OF_NULLPTR	TYPE_OF_NULLPTR;
[!WARNING]
uint16,uint32,uint64,int8,int16anddoubleare not supported with UHT6. Meaning, can't expose to Blueprint.
String in programming languages are fundamental data types used to represent and manipulate sequences of characters, such as words, sentences, or even binary data. They are extensively used in various programming tasks, including input/output operations, text processing, data serialization, and more.
In Unreal Engine, strings play a crucial role in handling text-based information within the game or application. Unreal Engine provides several string-related classes to cater to different use cases and requirements.
You can read more about string handling from the docs.
|
In Unreal Engine, FName is a specialized type used for identifying objects within the Unreal Engine object system. It is optimized for fast comparison and storage and is commonly used for referencing actors, components, or assets in a performance-efficient manner.
The FName class stores strings as hashed indices, making it a lightweight and fast alternative to regular strings. Because of this, FName are immutable string class.
Here's an example:
Include the header file:
#include "UObject/NameTypes.h"Declare FName:
FName MyName = FName(TEXT("PlayerName"));| This section was NOT written in conjunction with ChatGPT. |
FText is a specialized string class designed for localization support in Unreal Engine. Because of this, FText are immutable string class. FText provides the ability to represent text in different languages and cultures, making it a crucial component for building multi-language games or applications.
You can read more about it on Unreal's docs.
Here's an example:
Include the header file:
#include "Internationalization/Text.h"Declare FText from a string literal (non-localized):
// Avoid this! Since this cost more performance than initializing directly as FText.
FText NewGameText = FText::FromString(TEXT("New Game"));
To use a multi-line FText inside Unreal Editor, you can specify UPROPERTY with meta tag of Multiline:
UPROPERTY(EditAnywhere, Category = "Details", meta = (MultiLine = "true"))
FText Description;
Declare FText from INVTEXT() macro. Which creates a culture invariant FText from a string literal:
FText TooltipText = INVTEXT("Tooltip Text");

/*
    Inside Unreal Engine source code:

    // Creates a culture invariant FText from the given string literal.
    #define INVTEXT(InTextLiteral) FText::AsCultureInvariant(TEXT(InTextLiteral))
*/

// So, FText::AsCultureInvariant does the same thing as INVTEXT() macro.
FText NewTooltipText = FText::AsCultureInvariant(TEXT("This is another tooltip text"));
// Define the namespace to use with LOCTEXT
// This is only valid within a single file, and must be undefined before the end of the file
#define LOCTEXT_NAMESPACE "MyNamespace"
// Create text literals
FText PlayGameText = LOCTEXT("PlayGame", "Spiel beginnen"); // German langauge
// Helpful in the editor to localize the text into another language.
FText QuitGameText = NSLOCTEXT("StartMenu", "QuitGame", "Avsluta spelet"); // Swedish language
uint32 VersionNumber = 1405476850;
FText MachineOS = INVTEXT("Windows 11 Pro, 22H2, 22621.2215");
FText UserName = INVTEXT("MrRobin");
int32 UserAge = 22;
int32 SpeedInKph = 30;
int32 FuelInPercentage = 80;
// Formatting with FText. The supported types is: int32, uint32, float, double, FText, ETextGender.
FText VersionMessageText = FText::Format(
LOCTEXT("VersionMessage", "You current version is {0} and is running on {1}"),
VersionNumber,
MachineOS
);
// FString also has FString::Prinf() function for formatting. FString::Prinf() is also similar to the native C++ sprintf() function.
// Use FFormatNamedArguments for organizing the FText::Format function.
FFormatNamedArguments Args;
Args.Add(TEXT("Name"), UserName);
Args.Add(TEXT("Age"), UserAge);
FText UserText = FText::Format(LOCTEXT("UserData", "User's name is {UserName} and is {Age} years old."), Args);
// You can also use FText::FormatNamed() function for formatting as well. Great for inlining the code.
FText CarMessageText = FText::FormatNamed(
LOCTEXT("VehicleMessage", "You current speed is {Speed} and the fuel is at {Fuel}%"),
TEXT("Speed"), SpeedInKph,
TEXT("Fuel"), FuelInPercentage
);
#undef LOCTEXT_NAMESPACE // Undefine the current namespaceYou can convert specific data type into FText format. For an example, can you use FText::AsNumber() to convert a number into FText with specific FNumberFormattingOptions formatting options.
Here's an example:
float Health = 99.8999f; // We want to round this up, like this: 100.00

bool bIncludeLeadingZero = true;
int32 Precision = 2; // Number of decimals after decimal point. (0.00)

FNumberFormattingOptions NumberFormat;
NumberFormat.MinimumIntegralDigits = (bIncludeLeadingZero) ? 1 : 0;
NumberFormat.MaximumIntegralDigits = 10000;
NumberFormat.MinimumFractionalDigits = Precision;
NumberFormat.MaximumFractionalDigits = Precision;

FText NumberText = FText::AsNumber(Health, &NumberFormat);
NumberText = FText::AsCultureInvariant(NumberText); // Disable the culture formatting
[!NOTE] By default, Unreal will use local culture when doing this format. If you wish to disable culture formatting, use
FText::AsCultureInvariantfunction.
FString is a dynamic, mutable string type in Unreal Engine, which provides a more flexible approach to string manipulation. Unlike FName, FString allows for modifications, such as appending, inserting, or removing characters, making it suitable for general string operations. It is widely used for various tasks, such as displaying messages, concatenating text, or formatting output strings.
Example usage:
#include "Containers/UnrealString.h"

FString MyString = FString("Hello, World!");
Replace a substring with another in a FString:
FString OriginalString = FString("Hello, my friend.");
OriginalString.ReplaceInline(TEXT("friend"), TEXT("buddy")); // Output: "Hello, my buddy."
Split a FString into an array of substrings using a delimiter:
FString Sentence = FString("This is a sentence.");
TArray<FString> Words;
Sentence.ParseIntoArray(Words, TEXT(" "), true); // Output: ["This", "is", "a", "sentence."]
Reverse a FString:
FString Text = FString("abcde");
Text.ReverseString(); // Output: "edcba"| Data Type | Description | Use Case |
|---|---|---|
FName |
A fast and lightweight name identifier for objects in Unreal Engine. | Best used for identifying assets and objects within the engine to save memory and improve performance. |
FText |
A localized string that supports text localization and provides text display features. | Ideal for displaying text to users in the game, supporting multiple languages and localization. |
FString |
A dynamic string that can be modified and used for general-purpose string manipulation. | Suitable for general text handling and string operations within the game code. |
[!NOTE] In Unreal Engine 5.0+, by default, all math related data types are using
doubleas backend data type. This allows Unreal to support large world coordinates (LWC).
A struct representing a 4D vector, consisting of four float values for the X, Y, Z, and W components.
Declare and initialize a FVector4:
FVector4 MyVector = FVector(1.0f, 2.0f, 3.0f, 4.0f);You can also initalize by an pre-made vector:
FVector4 OldLocation = FVector4::ZeroVector; // (0, 0, 0)
FVector4 NewLocation = FVector4::OneVector; // (1, 1, 1)
![NOTE] Use
FVector4fforfloatandFVector4dfordouble, as explicit data type for the backend conversion.
To use the integer version of FVector4:
FIntVector4 IntVector4; // Default to 32-bit
FInt32Vector4 Int32Vector4; // 32-bit
FInt64Vector4 Int64Vector4; // 64-bit

FUintVector4 UintVector4; // Default to unsigned 32-bit
FUint32Vector4 Uint32Vector4; // Unsigned 32-bit
FUint64Vector4 FUint64Vector4; // Unsigned 64-bitA struct representing a 3D vector, consisting of three float values for the X, Y, and Z components. It is often used to represent position or direction in 3D space, and provides many useful functions such as vector addition, subtraction, normalization, and dot and cross products.
Declare and initialize a FVector:
FVector MyVector = FVector(1.0f, 2.0f, 3.0f);You can also initalize by an pre-made vector:
FVector OldLocation = FVector::ZeroVector; // (0, 0, 0)
FVector NewLocation = FVector::OneVector; // (1, 1, 1)
You can select each component separately:
FVector Vec = FVector::OneVector;

double X = Vec.X;
double Y = Vec.Y;
double Z = Vec.Z;

// or

double& X = Vec[0];
double& Y = Vec[1];
double& Z = Vec[2];
![NOTE] Use
FVector3fforfloatandFVector3dfordouble, as explicit data type for the backend conversion.
Common static functions to use:
FVector::Cross()- Calculate cross product this and another vector.FVector::CrossProduct()- Calculate the cross product of two vectors.FVector::Dot()- Calculate the dot product between this and another vector.FVector::DotProduct()- Calculate the dot product of two vectors.FVector::Dist()orFVector::Distance()- Euclidean distance between two points.FVector::Dist2D()orFVector::DistXY()- Euclidean distance between two points in the XY plane (ignoring Z).FVector::DistSquared()- Squared distance between two points.FVector::DistSquared2D()orFVector::DistSquaredXY()- Squared distance between two points in the XY plane only.FVector::AllComponentsEqual()- Check whether all components of this vector are the same, within a tolerance.
[!TIP] You can use
|operator for calling the dot product.
[!TIP] You can use
^operator for calling the cross product.
Common local functions to use:
GetComponentForAxis()- Get a specific component of the vector, given a specific axis by enum.SetGetComponentForAxis()- Set a specified component of the vector, given a specific axis by enum.Set()- Set the values of the vector directly.GetMax()- Get the maximum value of the vector's components.GetAbsMax()- Get the maximum absolute value of the vector's components.GetMin()- Get the minimum absolute value of the vector's components.GetAbsMin()- Get the minimum absolute value of the vector's components.GetAbs()- Get a copy of this vector with absolute value of each component.Size()orLength()- Get the length (magnitude) of this vector.SizeSquared()orSquaredLength()- Get the squared length of this vector.Size2D()- Get the length of the 2D components of this vector.SizeSquared2D()- Get the squared length of the 2D components of this vector.HeadingAngle()- Convert a direction vector into a 'heading' angle.IsNearlyZero()- Check whether vector is near to zero within a specified tolerance.IsZero()- Check whether all components of the vector are exactly zero.IsUnit()- Check if the vector is of unit length, with specified tolerance.IsNormalized()- Checks whether vector is normalized.Normalize()- Normalize this vector in-place if it is larger than a given tolerance. Leaves it unchanged, if not.GetSignVector()- Get a copy of the vector as sign only. Each component is set to +1 or -1, with the sign of zero treated as +1.Projection()- Projects 2D components of vector based Z.GridSnap()- Get a copy of this vector snapped to a grid.IsUniform()- Check whether X, Y and Z are nearly equal.ConstainsNaN()- Utility to check if there are any non-finite values (NaN or Inf) in this vector.ToString()- Get a textural representation of this vector.ToCompactString()- Get a short textural representation of this vector, for compact, readable logging.ToText()- Get a locale aware textural representation of this vector.ToCompactText()- Get a short locale aware textural representation of this vector, for compact, readable logging.
To use the integer version of FVector:
FIntVector IntVector = FIntVector(5, 10, -25); // Default to 32-bit
FUintVector UintVector = FUintVector(5, 10, 25); // Default to unsigned 32-bit
Here's the more explicit versions:
FIntVector3 IntVector3; // Default to 32-bit
FInt32Vector3 Int32Vector3; // 32-bit
FInt64Vector3 Int64Vector3; // 64-bit

FUintVector3 UintVector3; // Default to unsigned 32-bit
FUint32Vector3 Uint32Vector3; // Unsigned 32-bit
FUint64Vector3 FUint64Vector3; // Unsigned 64-bitA struct representing a 2D vector, consisting of two float values for the X and Y components.
Declare and initialize a FVector2D:
FVector2D MyVector = FVector2D(1.0f, 2.0f, 3.0f);You can also initalize by an pre-made vector:
FVector2D OldLocation = FVector2D::ZeroVector; // (0, 0, 0)
FVector2D NewLocation = FVector2D::OneVector; // (1, 1, 1)
![NOTE] Use
FVector2fforfloatandFVector2dfordouble, as explicit data type for the backend conversion.
To use the integer version of FVector2D:
FIntVector2 IntVector2; // Default to 32-bit
FInt32Vector2 Int32Vector2; // 32-bit
FInt64Vector2 Int64Vector2; // 64-bit

FUintVector2 UintVector2; // Default to unsigned 32-bit
FUint32Vector2 Uint32Vector2; // Unsigned 32-bit
FUint64Vector2 FUint64Vector2; // Unsigned 64-bitA struct representing a 2D integer points, consisting of two int values for the X and Y components.
Declare and initialize a FIntPoint:
FIntPoint MinPoint = FIntPoint(-127, -127);
FIntPoint MaxPoint = FIntPoint(128, 128);
Declare and initialize a FUIntPoint:
FUIntPoint UnsignedMinPoint = FUIntPoint(0, 0);
FUIntPoint UnsignedMaxPoint = FUIntPoint(255, 255);
![NOTE] Use
FInt32Pointforint32,FUint32Pointforuint32,FInt64Pointforint64andFUint64Pointforuint64, as explicit data type for the backend conversion.
A struct representing a 2D integer rectangles, consisting of two IntPoint values for the Min and Max components.
Declare and initialize a FIntRect:
FIntPoint MinPoint = FIntPoint(-127, -127);
FIntPoint MaxPoint = FIntPoint(128, 128);
FIntReact Rect = FIntRect(MinPoint, MaxPoint);
Declare and initialize a FUIntReact:
FUIntPoint UnsignedMinPoint = FUIntPoint(0, 0);
FUIntPoint UnsignedMaxPoint = FUIntPoint(255, 255);
FUIntReact UnsignedRect = FIntRect(UnsignedMinPoint, UnsignedMaxPoint);
![NOTE] Use
FInt32Rectforint32,FUint32Rectforuint32,FInt64Rectforint64andFUint64Rectforuint64, as explicit data type for the backend conversion.
A struct representing a rotation in 3D space, consisting of three float values for the Pitch, Yaw, and Roll angles. It is often used to represent the orientation of an object, and provides many useful functions such as conversion to and from quaternions, and rotation of other vectors and rotators.
Declare and initialize a FRotator:
FRotator MyRotator = FRotator(0.0f, 90.0f, 0.0f);You can also initalize by an pre-made rotator:
FRotator MyRotator = FRotator::ZeroRotator; // (0, 0, 0)![NOTE] Use
FRotator3fforfloatandFRotator3dfordouble, as explicit data type for the backend conversion.
Common static functions to use:
FRotator::Vector()- Convert a rotation into a unit vector facing in its direction.
Common local functions to use:
GetInverse()- Returns the inverse of the rotator.GridSnap()- Get the rotation, snapped to specified degree segments.
A struct representing a quaternion in 3D space, consisting of three float values for the X, Y, Z, and W components. Quaternion a mathematical concept used to represent 3D rotations. It is commonly used in conjunction with FVector to represent orientations and rotations in 3D space.
Declare and initialize a FQuat:
FQuat MyQuaternion = FQuat(0.0f, 90.0f, 0.0f, 0.0f);You can also initalize by an pre-made quaternion:
FQuat MyQuaternion = FQuat::Identify; // (0, 0, 0, 0)![NOTE] Use
FQuat4fforfloatandFQuat4dfordouble, as explicit data type for the backend conversion.
A struct representing a 3D transformation, consisting of a FVector for translation, a FQuat for rotation, and a FVector for scale. It is often used to represent the position, orientation, and size of an object in 3D space, and provides many useful functions for transforming other vectors and transforms.
Declare and initialize a FTransform:
FVector Location = FVector::ZeroVector;
FRotator Rotation = FRotator::ZeroRotator;
FVector Scale = FVector::OneVector;

// Note! Unreal will convert FRotator into FQuat in the backend.
FTransform MyTransform = FTransform(Rotation, Location, Scale);
You can also initalize by an pre-made transform:
FTransform MyTransform = FTransform::Identify; // NaN![NOTE] Use
FTransform3fforfloatandFTransform3dfordouble, as explicit data type for the backend conversion.
A struct representing a 3D plane.
Here's an example:
float X = 0.0f;
float Y = 0.0f;
float X = 0.0f;

FPlane Plane = FVector(X, Y, Z);
Here's another way to initialize FPlane:
FPlane Plane = FVector(FVector(0.0f, 0.0f, 0.0f));![NOTE] Use
FPlane4fforfloatandFPlane4dfordouble, as explicit data type for the backend conversion.
A struct representing a 4x4 matrix of loating point values.
Here's an example:
FPlane XPlane = FPlane(1.0f, 0.0f, 0.0f, 0.0f);
FPlane YPlane = FPlane(0.0f, 1.0f, 0.0f, 0.0f);
FPlane ZPlane = FPlane(0.0f, 0.0f, 1.0f, 0.0f);
FPlane WPlane = FPlane(0.0f, 0.0f, 0.0f, 1.0f);

FMatrix Matrix = FMatrix(XPlane, YPlane, ZPlane, WPlane);
FVector XVector = FVector(1.0f, 0.0f, 0.0f);
FVector YVector = FVector(0.0f, 1.0f, 0.0f);
FVector ZVector = FVector(0.0f, 0.0f, 1.0f);
FVector WVector = FVector(0.0f, 0.0f, 0.0f);
FMatrix Matrix = FMatrix(XVector, YVector, ZVector, WVector);FMatrix Matrix;
int32 RowIndex = 0;
int32 ColumnIndex = 0;
double Element = Matrix[RowIndex][ColumnIndex];![NOTE] Use
FMatrix44fforfloatandFMatrix44dfordouble, as explicit data type for the backend conversion.
A struct representing a 3D sphere.
Here's an example:
FVector Center = FVector::ZeroVector;
float Radius = 500.0f;

FSphere Sphere = FSphere(Center, Radius);
![NOTE] Use
FSphere3fforfloatandFSphere3dfordouble, as explicit data type for the backend conversion.
A struct representing a 3D box.
Here's an example:
FVector MinPoint = FVector(15.5f, 15.5f);
FVector MaxPoint = FVector(25.0f, 25.0f);

FBox Box2D = FBox(MinPoint, MaxPoint);
![NOTE] Use
FBox3fforfloatandFBox3dfordouble, as explicit data type for the backend conversion.
A struct representing a 2D box.
Here's an example:
FVector2D MinPoint = FVector2D(10, 10);
FVector2D MaxPoint = FVector2D(20, 20);

FBox2D Box2D = FBox2D(MinPoint, MaxPoint);
![NOTE] Use
FBox2fforfloatandFBox2dfordouble, as explicit data type for the backend conversion.
A struct representing a 3D ray, consisting of two vector values for the Origin and Direction components.
Here's an example:
FVector Origin = FVector::ZeroVector;
FVector Direction = FVector::ForwardVector;
bool bDirectionIsNormalized = false;

FRay Ray = FRay(Origin, Direction, bDirectionIsNormalized);
Functions to use with FRay:
FVector Point = FVector::ZeroVector;

FVector ClosestPoint = Ray.ClosestPoint(Point);
double MinDistance = Ray.Dist(Point);
double MinSqrtDistance = Ray.DistSquared(Point);

double ScalarDistance = 0.5; // Along the ray
FVector PointAt = Ray.PointAt(ScalarDistance);
double CalcScalarDistance = Ray.GetParameter(PointAt); // Will convert back to 'ScalarDistance'
![NOTE] Use
FRay3fforfloatandFRay3dfordouble, as explicit data type for the backend conversion.
FColor stores a color with 8 bits (byte) of precision per channel.
FLinearColor stores a linear color with 32-bit/component floating point RGBA color.
Here's an example, how to initialize them:
FLinearColor LinearColor = FLinearColor(0.5f, 1.0f, 0.3f);FColor Color = FColor(150, 200, 50);
// or
// Supported formats are: RGB, RRGGBB, RRGGBBAA, RGB, #RRGGBB, #RRGGBBAA
FColor HexColor = FColor::FromHex(TEXT("#9fd99e"));
FString HexString = HexColor.ToHex(); // Convert it back to a string. The format of the string is RRGGBBAA.List of common colors of ´FLinearColor´:
FLinearColor::WhiteFLinearColor::GrayFLinearColor::BlackFLinearColor::TransparentFLinearColor::RedFLinearColor::GreenFLinearColor::BlueFLinearColor::Yellow
List of common colors of FColor:
FColor::WhiteFColor::BlackFColor::TransparentFColor::RedFColor::GreenFColor::BlueFColor::YellowFColor::CyanFColor::MagentaFColor::OrangeFColor::PurpleFColor::TurquoiseFColor::SilverFColor::Emerald
You can read more about linear color at Unreal's docs.
You can also read more about color at Unreal's docs.

| This section was NOT written in conjunction with ChatGPT. |
| Data Container | Description | Use Case |
|---|---|---|
| TArray | A dynamic array that can grow or shrink in size at runtime, supporting random access and iteration. | Suitable for storing and managing a collection of elements where the size may change frequently and quick access to elements is required. |
| TSet | A set data structure that stores unique elements in no particular order, efficiently supporting element insertion, deletion, and membership checks. | Ideal for maintaining a collection of distinct elements and performing fast membership checks without duplicates. |
| TMap | An associative container that stores key-value pairs, allowing efficient lookup and retrieval based on keys. | Used for creating dictionaries or associative arrays, where data is organized based on unique keys for quick and efficient access. |
A dynamic array that can store a variable number of elements of the same type. It provides many useful functions, such as adding, removing, sorting, and searching for elements, as well as iterating over them.
Here's an example:
Include the header file:
#include "Containers/Array.h"Declare a TArray of int32 (integers)
TArray<int32> MyArray { 1, 2, 3 };Add an element to the array:
MyArray.Add(4);

// MyArray: { 1, 2, 3, 4 }
Add multiple elements to the array:
MyArray.Append({10, 15, 20});

// MyArray: { 1, 2, 3, 4, 10, 15, 20 }
Remove elements from the array:
MyArray.RemoveAt(0);
MyArray.RemoveAt(0);

// MyArray: { 3, 4, 10, 15, 20 }
Get the number of elements from the array:
int32 NumOfElements = MyArray.Num(); // 5Loop through the array and log each element:
for (const int32& Element : MyArray)
{
    UE_LOG(LogTemp, Log, TEXT("Element: %i"), Element);
}
You can either allocate an array on the stack or on the heap. Without specifying, you are creating the array allocation on the heap, while the array returns a data container on the stack.
If you don't know about what the difference between stack and heap allocation, highly suggest reading upon the subject in this section.
Here is a way to allocate an array on the stack:
TArray<int32, TInlineAllocator<4>> StackArray; // Allocate 4 elements on the stack

StackArray.Add(1);
StackArray.Add(2);
StackArray.Add(3);
StackArray.Add(4);

// Now we added the same amount of elements, to our buffer size (which has been allocated on the stack).
// If we try to add more elements than allocated, Unreal will default TArray to use heap allocation for the rest of elements.

StackArray.Add(5); // Will be allocated on the heap!
[!WARNING] If you're trying to allocate a heap object on the stack with
TInlineAllocator, Unreal will default to a heap allocation.
[!WARNING] If you add more elements than have been allocated for, Unreal will default to a heap allocation instead.
[!NOTE] Unreal will treat as stack allocated array as a different data type, compare to a regular array. To accommodate this, use
TArrayViewinstead.
If you want to avoid filling up the rest of elements with heap allocation, then use TFixedAllocator:
TArray<int32, TFixedAllocator<4>> StackArray; // Allocate 4 elements on the stack

StackArray.Add(1);
StackArray.Add(2);
StackArray.Add(3);
StackArray.Add(4);

StackArray.Add(5); // Unreal calls an assertion, which will CRASH Unreal in runtime mode!

// If you're continuing on with the assertion, using Visual Studio Debugger, Unreal will call Reset() function.
// Clearing out all elements, but keeping the current allocation size.

// Same thing happens with brace initialization.
TArray<int32, TFixedAllocator<4>> StackArray{ 1, 2, 3, 4, 5 }; // Allocate 4 elements on the stack, but we got 5 elements!A set of unique elements of a single type, implemented as a hash table. It provides many of the same functions as TArray, but with faster lookup times for large collections of elements.
Here's an example:
Include the header file:
#include "Containers/Set.h"Declare a TSet of FName (names):
TSet<FName> MySet;Add elements to the set:
// Add single element to the set
MySet.Add(TEXT("hello"));

// Add multiple elements to the set
MySet.Append({TEXT("cruel"), TEXT("world"), TEXT("hello")});

// MySet: { "hello", "curel", "world" }
Get number of elements from the set:
int32 NumOfElements = MySet.Num(); // 4Check if an element exists in the set:
if (MySet.Contains(TEXT("cruel")))
{
    UE_LOG(LogTemp, Log, TEXT("'Cruel' element is in the set"));
}
Remove an element from the set:
MySet.Remove(TEXT("cruel"));

// MySet: { "hello", "world" }
Iterate through the set and log each element:
for (const FName& Name : MySet)
{
    UE_LOG(LogTemp, Log, TEXT("Name: %s"), *Name.ToString());
}
Convert the set to an array:
TArray<FName> CopyOfSet = MySet.Array();
CopyOfSet[0] = TEXT("goodbye");

// CopyOfSet: { "goodbye", "world" }A map of key-value pairs, implemented as a hash table. It allows fast lookup of a value given a key, and supports adding, removing, and iterating over key-value pairs.
Here's an example:
Include the header file:
#include "Containers/Map.h"Declare a TMap of FName (names) to int32 (integers):
TMap<FName, int32> MyMap = { { TEXT("player_id"), 457865 }, { TEXT("player_age"), 35 } };

// MyMap: { { "player_id", 457865 }, { "player_age", 35 } }
Add elements to the map:
int32& PlayerRankRef = MyMap.Add(TEXT("player_rank"));
PlayerRankRef = 420;

MyMap.Add(TEXT("player_speed"), 15);

// MyMap: { { "player_id", 457865 }, { "player_age", 35 }, { "player_rank", 420 }, { "player_speed", 15 } }
Finds the value in the map from the key. Otherwise, create and add the key to the map (with default value):
int32& PlayerIDRef = MyMap.FindOrAdd(TEXT("player_id"));
PlayerIDRef = 001100;

// MyMap: { { "player_id", 001100 }, { "player_age", 35 }, { "player_rank", 420 }, { "player_speed", 15 } }
Get number of elements from the map:
int32 NumOfElements = MyMap.Num(); // 4Iterate through the map and log key-value pairs:
for (const TPair<FName, int32>& KeyValuePair : MyMap)
{
    UE_LOG(LogTemp, Log, TEXT("Key: %s, Value: %i"), *KeyValuePair.Key.ToString(), KeyValuePair.Value);
}
Check if "player_rank" exists in the map and log its value if found:
if (int32* PlayerRankPtr = MyMap.Find(TEXT("player_rank")))
{
    UE_LOG(LogTemp, Log, TEXT("Player rank is: %i"), *PlayerRankPtr);
}
Access an element in the map:
int32 OutSpeed;

if (MyMap.TryGetValue(TEXT("player_speed"), OutSpeed))
{
    UE_LOG(LogTemp, Log, TEXT("Player's speed: %i [m/s]"), OutSpeed);
}
Modify an element in the map:
MyMap[TEXT("player_age")] = -1;

// MyMap: { { "player_id", 001100 }, { "player_age", -1 }, { "player_rank", 420 }, { "player_speed", 15 } }
Remove an element from the map:
MyMap.Remove(TEXT("player_age")); // Reference variables (such as PlayerRankRef and PlayerIDRef) become unsafe since the map size and elements have changed.

// MyMap: { { "player_id", 001100 }, { "player_rank", 420 }, { "player_speed", 15 } }
Convert the map to an array of key-value pairs:
TArray<TPair<FName, int32>> KeyValueArray = MyMap.Array();
int32 PlayerID = KeyValueArray[0].Value; // 001100With these containers, you can use a couple of helpful functions.
Empty()- Clears out the store elements (as well as resizing the buffer to zero).Reset()- Clears out the store elements (without resizing the buffer).GetSlack()- Gets the number of store elements minus it's buffer size.Slack = NumOfElements - BufferCapacity.GetAllocationSize()- Gets the buffer capacity.Shrink()- It will reset the buffer size to the number of elements, currently being stored.Reserve()- It will expand buffer size to that amount. Note, buffer size can change later on.RemoveAll- Will remove all elements with prediction as an argument.RemoveAllSwap- Same asRemoveAll()function, but doesn't preserve the order.
Here's an example:
#include "Containers/Array.h"

TArray<int32> Array = { 1, 2, 2, 3, 4, 4, 5 };

// Create a lamba function (which is a temporary function, which takes this class as reference parameter)
Array.RemoveAll([&](const int32& Item)
{
    // Removes all item, if the item is equal to: 2
    return Item == 2;
});

// Current elements: { 1, 3, 4, 4, 5 }

Array.RemoveAllSwap([&](const int32& Item)
{
    // Removes all item, if the item is equal to: 2
    return Item == 4;
});

// Current elements: { 5, 3, 1 }#include "Containers/Array.h"
TArray<int32> Array;
Array.Add(1);
Array.Add(2);
// Current element count: 2
// Current buffer size: 4
Array.Empty();
// Current element count: 0
// Current buffer size: 0
Array.Add(1);
Array.Add(2);
// Current element count: 2
// Current buffer size: 4
Array.Reset();
// Current element count: 0
// Current buffer size: 4TArray<int32> Array;
Array.Add(1);
Array.Add(2);
Array.Add(3);
Array.Add(4);
Array.Add(5);
// Current element count: 5
// Current buffer size: 22
int32 SlackAmount = Array.GetSlack(); // 22 - 5 = 17 (Slack = BufferCapacity - NumOfElements)
Array.RemoveAt(0);
Array.RemoveAt(1);
// Current element count: 3
// Current buffer size: 22
Array.Shrink();
// Current element count: 3
// Current buffer size: 4In order to remove an element without allowing the container to shrink, you can use these arguments:
#include "Containers/Array.h"

TArray<int32> Array { 1, 2, 3 };

// Removes the last element, without enable the container to shrink itself.
int32 LastElementIndex = Array.Num() - 1;
int32 NumToRemove = 1;
bool bAllowShrinking = false;
Array.RemoveAt(LastElementIndex, NumToRemove, bAllowShrinking)
When and how much does the container allocated memory for future use cases?
If you run a for-loop and running the debugger, we can analyze the allocation size and where the container has its breakpoints for requesting more memory.
#include "Containers/Array.h"

void UpdatingAllocationSize()
{
    TArray<int32> Array;

    int32 PreviousAllocatedSize = Array.GetAllocatedSize();

    for (int32 i = 0; i < 100; ++i)
    {
        Array.Add(69);

        int32 NewAllocatedSize = Array.GetAllocatedSize();

        if (PreviousAllocatedSize != NewAllocatedSize)
        {
            UE_LOG(LogTemp, Log, TEXT("[%s - %s]: Allocation size has changed from: %i to: %i. Current number of elements: %i and current max size: %i"), ANSI_TO_TCHAR(__FUNCTION__), TEXT("Adding"), PreviousAllocatedSize, NewAllocatedSize, Array.Num(), NewAllocatedSize / sizeof(int32));

            PreviousAllocatedSize = NewAllocatedSize;
        }
    }

    // Allocation size is data size times buffer size.

    // Int32 is 4 bytes in size
    // And the buffer size is currently at 4.

    // Allocation size = 4 * 4 = 16 bytes

    /*
        LogTemp: Allocation size has changed from: 0 to: 16. Current number of elements: 1 and current max size: 4
        LogTemp: Allocation size has changed from: 16 to: 88. Current number of elements: 5 and current max size: 22
        LogTemp: Allocation size has changed from: 88 to: 188. Current number of elements: 23 and current max size: 47
        LogTemp: Allocation size has changed from: 188 to: 328. Current number of elements: 48 and current max size: 82
        LogTemp: Allocation size has changed from: 328 to: 520. Current number of elements: 83 and current max size: 130
    */

    for (int32 i = 0; Array.Num() != 0; ++i)
    {
        Array.RemoveAt(Array.Num() - 1);

        int32 NewAllocatedSize = Array.GetAllocatedSize();

        if (PreviousAllocatedSize != NewAllocatedSize)
        {
            UE_LOG(LogTemp, Log, TEXT("[%s - %s]: Allocation size has changed from: %i to: %i. Current number of elements: %i and current max size: %i"), ANSI_TO_TCHAR(__FUNCTION__), TEXT("Removing"), PreviousAllocatedSize, NewAllocatedSize, Array.Num(), NewAllocatedSize / sizeof(int32));

            PreviousAllocatedSize = NewAllocatedSize;
        }
    }

    /*
        LogTemp: Allocation size has changed from: 520 to: 260. Current number of elements: 65 and current max size: 65
        LogTemp: Allocation size has changed from: 260 to: 0. Current number of elements: 0 and current max size: 0
    */
}
Algo is a namespace containing a lot of helper functions for container.
Here is common functions:
Algo::Accumulate()- Sums a range.Algo::AllOf()- Checks if every projection of the elements in the range is truthy.Algo::AnyOf()- Checks if any projection of the elements in the range is truthy.Algo::BinarySearch()- Returns index to the first found element matching a value in a range, the range must be sorted by<Algo::BinarySearchBy()- Same asAlgo::BinarySearch(), but with custom logic.Algo::Compare()- Compares two contiguous containers using operator== to compare pairs of elements.Algo::CompareByPredicate()- Compares two contiguous containers using a predicate to compare pairs of elements.Algo::Copy()- Copies a range into a container.Algo::CopyIf()- Conditionally copies a range into a container.Algo::Count()- Counts elements of a range that equal the supplied value.Algo::CountBy()- Counts elements of a range whose projection equals the supplied value.Algo::CountIf()- Counts elements of a range that match a given predicate.Algo::Find()- Returns a pointer to the first element in the range which is equal to the given value.Algo::FindBy()- Returns a pointer to the first element in the range whose projection is equal to the given value.Algo::FindLast()- Returns a pointer to the last element in the range which is equal to the given value.Algo::FindLastBy()- Returns a pointer to the last element in the range whose projection is equal to the given value.Algo::FindSequence()- Searches for the first occurrence of a sequence of elements in another sequence.Algo::ForEach()- Invokes a callable to each element in a range.Algo::Includes()- Checks if one sorted contiguous container is a subsequence of another sorted contiguous container by comparing pairs of elements.Algo::IndexOf()- Returns the index of the first element in the range which is equal to the given value.Algo::IndexOfByPredicate()- Returns the index of the first element in the range which matches the predicate.Algo::IsSorted()- Tests if a range is sorted by its element type's operator<.Algo::MaxElement()- Returns a pointer to the maximum element in a range.Algo::MinElement()- Returns a pointer to the minimum element in a range.Algo::NoneOf()- Checks if no element in the range is truthy.Algo::Sort()- Sort the range. It will default to<operator (ascending order). However, custom logic can be added.Algo::SortBy()- Same asAlgo::Sort, but uses a projection method. Projections are transformations but for values.Algo::RandomShuffle()- Randomly shuffle a range of elements.Algo::RemoveIf()- Moves all elements which do not match the predicate to the front of the range, while leaving all other elements is a constructed but unspecified state.Algo::Replace()- Replaces all elements that compare equal to one value with a new value.Algo::ReplaceIf()- Replaces all elements that satisfy the predicate with the given value.Algo::Reverse()- Reverses a range.Algo::Transform()- Applies a transform to a range and stores the results into a container.
You can read more about Algo on Unreal's docs.
Here's an example of using them:
#include "Algo/ForEach.h"
#include "Algo/Accumulate.h"
#include "Algo/IndexOf.h"

TArray<FString> Array;
Array.Add(TEXT("hello"));
Array.Add(TEXT("cRuEL"));
Array.Add(TEXT("WORLD"));

const int32 FoundIndex = Algo::IndexOf(Array, FString(TEXT("cRuEL")));

if (FoundIndex != INDEX_NONE)
{
    // Successfully found the index
}

const int32 FoundIndexPred = Algo::IndexOfByPredicate(Array,
    [&](const FString& Arg)
    {
        return TEXT("hello") == Arg.ToLower();
    });

if (FoundIndexPred != INDEX_NONE)
{
    // Successfully found the index with prediction
}

TArray<FString> TransformArray;

Algo::Transform(Array, TransformArray, [](const FString& Item) { return Item.ToUpper(); });

// { "HELLO", "CRUEL", "WORLD" }

Algo::Reverse(TransformArray);

// { "WORLD", "CRUEL", "HELLO" }

TArray<int32> SortArray { 1, 5, 3, -4, 2, -1 };
Algo::Sort(SortArray);

// { -4, -1, 1, 2, 3, 5 }

// Create a lambda function for this projection
auto AbsProjection = [](int32 Value) { return FMath::Abs(Value); };

// Will sort based on this projection. But will still reserve the original values.
Algo::SortBy(SortArray, AbsProjection);

// { -1, 1, 2, 3, -4, 5 }

Algo::ForEach(SortArray, [](int32& Value)
{
    Value *= 2;
});

// { -2, 2, 4, 6, -8, 10 }

// Will sort based on descending order
auto ReverseSortPredicate = [](int32 A, int32 B) { return A > B; };
Algo::SortBy(SortArray, AbsProjection, ReverseSortPredicate);

// { 10, -8, 6, 4, 2, -2 }Similar to TMap, but allows multiple values to be associated with the same key. It also provides functions for iterating over all the values associated with a particular key.
Here's an example:
Include the header file:
#include "Containers/Map.h"Declare a TMultiMap of FName (names) to floats:
TMultiMap<FName, float> MyMultiMap = { { TEXT("X"), 10.0f }, { TEXT("Y"), 69.0f }, { TEXT("Z"), 0.0f } }Add elements to the map:
MyMultiMap.Add(TEXT("X"), -10.0f);
MyMultiMap.Add(TEXT("Y"), 69.0f);
MyMultiMap.AddUnique(TEXT("Y"), 69.0f); // Will not add if both key and value match an existing association in the map!

// MyMultiMap: { { TEXT("X"), 10.0f }, { TEXT("Y"), 69.0f }, { TEXT("Z"), 0.0f }, { TEXT("Y"), 69.0f }, { TEXT("X"), -10.0f } }
Get all values for a key in the map:
TArray<float> OutValues;
MyMultiMap.MultiFind(TEXT("Y"), OutValues);

// OutValues: { 69.0f, 69.0f }
Get number of elements from the multi-map:
int32 NumOfElements = MyMultiMap.Num(); // 5Loop through the values and log each one:
for (const float& Value : OutValues)
{
    UE_LOG(LogTemp, Log, TEXT("Value: %f"), Value);
}
Remove all values for a key in the map:
MyMultiMap.Remove(TEXT("Y"));

// MyMultiMap: { { TEXT("X"), 10.0f }, { TEXT("Z"), 0.0f }, { TEXT("X"), -10.0f } }
Remove the first association between the specified key and value from the map:
MyMultiMap.RemoveSingle(TEXT("X"), 10.0f);

// MyMultiMap: { { TEXT("Z"), 0.0f }, { TEXT("X"), -10.0f } }
You can read more about it on Unreal's docs.
[!WARNING] Unreal doesn't support
TMultiMapwith UHT6. Meaning, you can't expose to Blueprint.
An array with a static number of elements.
You cannot add or remove any of the entries of the static array. But you can still alter each element's data.
Here's an example:
Include the header file:
#include "Containers/StaticArray.h"Declare a TStaticArray of int32 (integers) with 4 elements pre-allocated:
// Allocate 4 elements of type 'FVector'
TStaticArray<FVector, 4> StaticArray;

// StaticArray: { (0, 0, 0), (0, 0, 0), (0, 0, 0), (0, 0, 0) }
You CANNOT use brace initialization with TStaticArray:
TStaticArray<int32, 4> StaticArray { 1, 2, 3, 4 }; // Won't compile!Update each element's value:
StaticArray[0] = FVector::OneVector;
StaticArray[1] = FVector::ZeroVector;
StaticArray[2] = FVector::OneVector;
StaticArray[3] = FVector::ZeroVector;

// StaticArray: { (1, 1, 1), (0, 0, 0), (1, 1, 1), (0, 0, 0) }
Get number of elements from the static array:
int32 NumOfElements = StaticArray.Num(); // 4Loop through the values and log each one:
for (const FVector& Vec : StaticArray)
{
    UE_LOG(LogTemp, Log, TEXT("Value: %s"), *Vec.ToString());
}
You can read more about it on Unreal's docs.
[!WARNING] Unreal Engine doesn't support
TStaticArraywith UHT6. Meaning, you can't expose to Blueprint. To use a static array with Blueprint, useFixedSizedspecifier for UPROPERTY onTArrayproperty.
Dynamically sized hash table, used to index another data structure.
Vastly simpler and faster than TMap.
Here's an example:
Include the header file:
#include "Containers/HashTable.h"Define a FHashTable:
FHashTable HashTable;Add a new hash element to the table:
const uint16 Hash = 50u;
const uint16 Index = 10u;

HashTable.Add(Hash, Index);
You can read more about it on Unreal's docs.
Statically sized hash table, used to index another data structure.
Vastly simpler and faster than TMap.
Here's an example:
Include the header file:
#include "Containers/HashTable.h"Define a TStaticHashTable:
static const uint32 Capacity = 16u;
TStaticHashTable<1024u, Capacity> StaticHashTable;
Add a new hash element to the table:
const uint16 Hash = 50u;
const uint16 Index = 10u;

StaticHashTable.Add(Hash, Index);
You can read more about it on Unreal's docs.
A Map of keys to value, implemented as a sorted TArray of TPairs.
It has a mostly identical interface to TMap and is designed as a drop in replacement. Keys must be unique, there is no equivalent sorted version of TMultiMap. It uses half as much memory as TMap, but adding and removing elements is O(n), and finding is O(Log n). In practice it is faster than TMap for low element counts, and slower as n increases, This map is always kept sorted by the key type so cannot be sorted manually.
Here's an example:
Include the header file:
#include "Containers/SortedMap.h"Create a TSortedMap of FName (names) to int32 (integers):
TSortedMap<FName, int32> MyMap;Add some elements to the map:
MyMap.Add(TEXT("One"), 1);
MyMap.Add(TEXT("Two"), 2);
MyMap.Add(TEXT("Three"), 3);
Get the value associated with a key:
int32 Value = MyMap[TEXT("One")];Check if a key exists in the map:
bool Exists = MyMap.Contains(TEXT("One"));Iterate over the map and log each one:
for (const TPair<FName, int32>& Element : MyMap)
{
    UE_LOG(LogTemp, Log, TEXT("Key: %s, Value: %i"), *Element.Key.ToString(), Element.Value);
}
You can read more about it on Unreal's docs.
Simple single-linked list template.
It only stores two things:
ElementType			Element; // Value
TList<ElementType>* Next; // Pointer to the next node
Helpful for scenarios like: Pathfinding, binary tree searching or dialogue tree system.
A linked list have some benefits compare to TArray, mainly it has O(1) in time complexity, for adding and removing elements in the list. This is because, every node has a pointer to the next node in the list. Thus giving TList a time complexity to O(1).
You can read more about time complexity by Joel Olawanle.
There is a couple of downsides of using TList compare to TArray:
|
When the computer reads the memory, it reads from RAM (Random-access memory). Hence, the name it will access the memory at random location. With However, if But what With linked lists, there is no contiguous memory. Meaning, the CPU needs to find each node in different location. Which doesn't allow the CPU to cache previous result into its memory. And this called a cache miss.  Image from Dhathri Vupparapalli's blog.
Here is a video from SimonDev about cache misses and hits. You can also read more about the CPU's cache on Wikipedia.
Since every node needs to keep track of the next node in the list. And the next variable is a pointer, which takes up 4 bytes in 32-bit and 8 bytes in 64-bit computers. And if you just want to use primary data types, such as (
If you wish to have these functions, then you can just use With This is becuase there is no previous node per node. Meaning, you cannot go backwards in the list. If you wish to go backwards, then you can just use |
Here's an example:
Include the header file:
#include "Containers/List.h"// Create the head of the list with data value of 69
TList<int32> Head(69);
// Create a new node with data 1337 and link it to the head
Head.Next = new TList<int32>(1337);
// Create another node with data 3 and link it to the previous node
Head.Next->Next = new TList<int32>(3);
// Re-assign the data value
Head.Next->Next->Next.Element = 420;
// Print the elements in the linked list
TList<int32>* CurrentNode = &Head;
while (CurrentNode != nullptr)
{
UE_LOG(LogTemp, Log, TEXT("Element: %i"), CurrentNode->Element);
CurrentNode = CurrentNode->Next;
}[!NOTE]
TListdoesn't offer an insert nor a remove function for each node. If you wish to use those function, then useTLinkedList.
[!NOTE] As a rule of thumb, you should almost always use
TArray, unless you have specific reasons to use a linked list.
You can read more about it on Unreal's docs.
Encapsulates a link in a single linked list with constant access time.
This linked list is non-intrusive, i.e. it stores a copy of the element passed to it (typically a pointer)
Here's an example:
Include the header file:
#include "Containers/List.h"Define a TLinkedList of int32 (integer):
TLinkedList<int32> HeadNode;Iterate over the linked list using TIterator:
for (TLinkedList<int32>::TIterator It(&HeadNode); It; It.Next())
{
    // Get the value at the current position of the iterator
    int32 Value = *It;

    // Log the value.
    UE_LOG(LogTemp, Log, TEXT("Value: %i"), Value);
}
You can read more about it on Unreal's docs.
It only stores three things:
ElementType            Value;
TDoubleLinkedListNode* NextNode;
TDoubleLinkedListNode* PrevNode;
Here's an example:
Include the header file:
#include "Containers/List.h"Define a TDoubleLinkedList of int32 (integers):
TDoubleLinkedList<int32> A;Add node to the head/tail of the list:
A.AddHead(69);
A.AddTail(1337);
Get the number of elements in the list:
int32 NumOfElements = A.Num();Check if the list contains the value 5:
bool bContains = A.Contains(5);Find a node with value 1 in the list:
TDoubleLinkedList<int32>::TDoubleLinkedListNode* Node = A.FindNode(1);

// Log the value of the found node
if (Node != nullptr)
{
    UE_LOG(LogTemp, Log, TEXT("Value of the node: %i"), Node->GetValue());
}
else
{
    UE_LOG(LogTemp, Log, TEXT("Node with value 1 not found."));
}
Get the next node and previous node in the list:
TDoubleLinkedList<int32>::TDoubleLinkedListNode* NextNode = Node->GetNextNode();
TDoubleLinkedList<int32>::TDoubleLinkedListNode* PrevNode = Node->GetPrevNode();

// Log the values of the next and previous nodes
if (NextNode != nullptr)
{
    UE_LOG(LogTemp, Log, TEXT("Value of the next node: %i"), NextNode->GetValue());
}
else
{
    UE_LOG(LogTemp, Log, TEXT("Next node is null."));
}

if (PrevNode != nullptr)
{
    UE_LOG(LogTemp, Log, TEXT("Value of the previous node: %i"), PrevNode->GetValue());
}
else
{
    UE_LOG(LogTemp, Log, TEXT("Previous node is null."));
}
You can read more about it on Unreal's docs.
This template implements an unbounded non-intrusive queue using a lock-free linked list that stores copies of the queued items. The template can operate in two modes: Multiple-producers single-consumer (MPSC) and Single-producer single-consumer (SPSC).
The queue is thread-safe in both modes. The Dequeue() method ensures thread-safety by writing it in a way that does not depend on possible instruction reordering on the CPU. The Enqueue() method uses an atomic compare-and-swap in multiple-producers scenarios.
Here's an example:
Include the header file:
#include "Containers/Queue.h"Define a TQueue of FHitResult (hit results):
TQueue<FHitResult> MyQueue;Add some elements to the queue:
AActor* TargetActor = this;
UPrimitiveComponent* TargetComponent = this;
FVector HitLocation = FVector(900.0f, 0.0f, 500.0f);
FVector HitNormal = FVector(0.0f, 0.0f, 1.0f);

MyQueue.Enqueue(FHitResult(TargetActor, TargetComponent, HitLocation, HitNormal));
MyQueue.Enqueue(FHitResult(nullptr, nullptr, FVector::ZeroVector, FVector::OneVector.GetSafeNormal()));
Dequeue the first element in the queue:
FHitResult DequeuedElement = MyQueue.Dequeue();Check if the queue is empty:
bool IsEmpty = MyQueue.IsEmpty();Iterate over the queue:
while (!MyQueue.IsEmpty())
{
    FHitResult HitResult = MyQueue.Dequeue();

    UE_LOG(LogTemp, Log, TEXT("Hit Target: %s"), *HitResult.GetActor()->GetName());
}
You can read more about it on Unreal's docs.
When you want to reuse an array without copying or referencing the base class, you can use TArrayView.
A statically sized view of an array of typed elements. Designed to allow functions to take either a fixed C-style array or a TArray with an arbitrary allocator as an argument when the function neither adds nor removes elements.
You can read more about from Unreal's docs.
Here's an example:
#include "Containers/Array.h"
#include "Containers/ArrayView.h"

#include "Algo/ForEach.h"
#include "Algo/Accumulate.h"

int32 SumArray(TArrayView<const int32> ArrayView)
{
    // Sum the array
    return Algo::Accumulate(ArrayView, 0);
}

// Allocates on heap, but returns an array on the stack
TArray<int32> RegularArray = { 1, 2, 3 };

 // Allocates on the stack
TArray<int32, TInlineAllocator<4>> StackAllocatedArray = { 1, 2, 3 };

 // Allocates on the stack
int32 CArray[4] = { 1, 2, 3 };

UE_LOG(LogTemp, Log, TEXT("Sum=%i"), SumArray(RegularArray));

UE_LOG(LogTemp, Log, TEXT("Sum=%i"), SumArray(StackAllocatedArray));

UE_LOG(LogTemp, Log, TEXT("Sum=%i"), SumArray(CArray));
[!WARNING]
TArrayViewis a fixed size and independent array. Meaning, it will not affect from its original assignment, nor does it support Add() or Remove() functions.
[!NOTE] It's still possible to use Algo library, which offers functions to use for TArrayView and TArray. Such as Algo::Reverse() and Algo::ForEach().
[!CAUTION] Avoid using
TArrayViewwith a temporary array variable. Since, the array can go out of scope and corruptTArrayView. Since the view is relying on the array's memory block.
#include "Containers/ArrayView.h"

// Note how to mark an ArrayView const!
void ConstArrayView()
{
    TArray<int32> MutableArray;
    TArrayView<int32> ArrayView = MutableArray;
    TArrayView<const int32> ConstArrayView = MutableArray;

    ArrayView[0] = 1337; // Allowed!
    ConstArrayView[0] = 69; // Compiling error!
}

// Do not create an array view to a temporary variable, as this can cause issues!
void UnsafeArrayView()
{
    // Create Array view with temporary TArray
    TArrayView<const int32> UnsafeArray = TArray<int32> { 1, 2, 3 };

    // This memory block has likely been freed, but the array view doesn't know about it!
    int32 Value = UnsafeArray[0]; // This will cause a crash!
}

// Do not modify the array while the array view is in scope! Array view is independent from the array.
void ModifyArrayView()
{
    TArray<int32> Array { 1, 2, 3 };
    TArrayView<int32> ArrayView = Array;

    int32 PreviousValue = ArrayView[0];

    Array.RemoveAt(0); // Will not update array view!

    int32 NewValue = ArrayView[0];

    bool bIsSame = PreviousValue == NewValue; // Will return true!
}FStringView is a lightweight, non-owning view of the string data, and copying the view itself is efficient and does not affect the underlying data. However, when you copy the FStringView, the new instance of the view still refers to the same original string data.
Same concept with TArrayView but with FString instead.
Here's an example:
#include "Containers/UnrealString.h"

void ProcessString(FStringView StringView)
{
    // Use FStringView to read the string data without copying it.
    UE_LOG(LogTemp, Log, TEXT("String: %s"), *StringView);
}

FString MyString = TEXT("Hello, FStringView!");

// Pass FString as FStringView to the function without copying the data.
ProcessString(MyString);

// Copy FStringView to another variable.
FStringView CopiedStringView = MyString;

// Modifying the original FString does not affect the copied FStringView.
MyString = TEXT("Modified String");

// Print the contents of the copied FStringView.
UE_LOG(LogTemp, Log, TEXT("Copied StringView: %s"), *CopiedStringView);
You can read more about it on Unreal's docs.
When working strings, you might have to concatenate a lot of string together. Sometimes, this can create complex and messy code to read. Whilst, FString is mutable and allows the developer to alter its data without copy a new instance. A string builder can still be a very helpful tool.
The string builder allocates a buffer space which is used to hold the constructed string. The intent is that the builder is allocated on the stack as a function local variable to avoid heap allocations.
The buffer is always contiguous, and the class is not intended to be used to construct extremely large strings.
This is not intended to be used as a mechanism for holding on to strings for a long time. The use case is explicitly to aid in constructing strings on the stack and subsequently passing the string into a function call or a more permanent string storage mechanism like FString et al.
The amount of buffer space to allocate is specified via a template parameter and if the constructed string should overflow this initial buffer, a new buffer will be allocated using regular dynamic memory allocations.
There are two ways to construct a string builder. Either with initialize buffer size or with unknown buffer size.
Here's an example:
Include the header file:
#include "Containers/StringFwd.h"To create a string builder with an unknown buffer size:
FStringBuilderBase StringBuilder; // Note! This is using a regular dynamic memory allocation.To create a string builder with initialize buffer size:
int32 BufferSize = 12; // 12 characters of TCHAR
TStringBuilder<BufferSize> StringBuilder;
Append characters to the string builder:
StringBuilder.Appendchar('H');
StringBuilder.Appendchar('e');
StringBuilder.Appendchar('l');
StringBuilder.Appendchar('l');
StringBuilder.Appendchar('o');
StringBuilder.Appendchar(',');
StringBuilder.Appendchar(' ');
StringBuilder.Appendchar('W');
StringBuilder.Appendchar('o');
StringBuilder.Appendchar('r');
StringBuilder.Appendchar('l');
StringBuilder.Appendchar('d');

// StringBuilder: { 'H', 'e', 'l', 'l', 'o', ',', ' ', 'W', 'o', 'r', 'l', 'd' }
In order to get the string either call ToString() or ToView() functions:
FString Str = StringBuilder.ToString();
FStringView StrView = StringBuilder.ToView();
You can also append a string as well:
// Note! The string builder will allocate more memory, if necessary.

// We only allocated 12 characters, and this call will make it go over bound.
// Causing to allocate more memory on heap.
StringBuilder.Append(TEXT(" and welcome!"));

// StringBuilder: { 'H', 'e', 'l', 'l', 'o', ',', ' ', 'W', 'o', 'r', 'l', 'd', ' ', 'a', 'n', 'd', ' ', 'w', 'e', 'l', 'c', 'o', 'm', 'e', '!' }
[!WARNING] The string builder will allocate more memory, if necessary.
Here's an another example:
TStringBuilder<256> MessageBuilder;

float PlayerHealth = 110.5285f;
MessageBuilder << TEXTVIEW("Player's health: ") << FString::SanitizeFloat(PlayerHealth);

return FString { MessageBuilder };
You can read more about it on Unreal's docs.
Template to store enumeration values as bytes in a type-safe way.
Here's an example:
Include the header file:
#include "Containers/EnumAsByte.h"Declare a TEnumAsByte with the enumeration type ECollisionChannel:
TEnumAsByte<ECollisionChannel> Channel;Get the value of the TEnumAsByte:
ECollisionChannel Val = Channel.GetValue();Get the integer value of the TEnumAsByte:
int32 IntVal = Channel.GetIntValue();Assign a new value to the TEnumAsByte
Channel = ECollisionChannel::ECC_Camera;Log the values:
UE_LOG(LogTemp, Log, TEXT("Value of the: %i"), UEnum::GetValueAsName(Val));
UE_LOG(LogTemp, Log, TEXT("Integer value of the: %i"), IntVal);
[!NOTE] That regular enums are supported by
UPROPERTYand replaces the need of usingTEnumAsByteanymore.
You can read more about it on Unreal's docs.
| This section was written in conjunction with ChatGPT. |
Let's talk about what value type and reference types.
In various programming languages like Python3, Java5, and C#4, you may have encountered both value types and reference types.
A value type creates a copy when initialized from another variable. For instance, let's consider variable A, and when we initialize variable B with the value of A, a separate copy of the value is created in B. Essentially, B is an independent entity that holds its own value.
int A = 69;
int B = A; // A copy
On the other hand, a reference type directly references the memory location of the variable. In this case, when variable B is initialized by variable A, B becomes a reference to the same memory location as A. Consequently, any changes made to B will also affect A since B essentially points to the same underlying value as A.
int A = 69;
int& B = A; // A reference
Everything in C++ is value type by default. Even classes, which differ from C#4.
You can watch this video about references in C++ from Low Level Learning.
Here's an example:
#include <iostream>
#include <string>

struct Coords // Test struct and class
{
public:
    Coords(int x, int y)
        : X(x)
        , Y(y) {}

public:
    int X;
    int Y;

public:
    std::string toString() const
    {
        return "(" + std::to_string(X) +  ", " + std::to_string(Y) + ")";
    }
};

int main()
{
    Coords A(1, 2);
    Coords& B = A; // Test value type and reference type
    Coords* C = &B;
    Coords* D = new Coords(5, 10);
    Coords* E = &(*C); // Or &*C;

    B.X = 69;
    C->Y = 1337;
    D->Y = D->Y * 2;

    E = &*D;
    E->X = 10;

    std::cout << A.toString() << std::endl;
    std::cout << B.toString() << std::endl;
    std::cout << C->toString() << std::endl;
    std::cout << D->toString() << std::endl;
    std::cout << E->toString() << std::endl;

    delete D; // Remember: Delete raw pointers

    return 0;
}
With references, you can only assign them once, and they cannot be changed throughout the code. For example, you can have a direct reference to an argument passed into a function. This argument can then be modified within the function, similar to how an out parameter works in C#4.
Here's an example:
bool DamageHealth(int& Health)
{
   Health -= 100; // Modifying the value through the reference
   return Health <= 0;
}

int PlayerHealth = 100;

if (DamageHealth(PlayerHealth)) // Passing the `PlayerHealth` as a direct reference
{
   // Player just died!
}| This section was written in conjunction with ChatGPT. |

And lastly, we have pointers. This section, will go over about raw pointers and smart pointers. If you have no clue about pointers, highly recommend watching Cherno about pointers.
Pointers and references are similar in that they both refer to variables, but there's one key difference. Pointers are indirect references, meaning they can change throughout the code, pointing to different variables. On the other hand, regular references are direct and can only refer to the specific variable they were initialized with.
In a short summary, a pointer is like writing down the address of a building on a piece of paper. The address on the paper tells you where the building is located, just as the memory address stored in the pointer variable tells you where a variable is located in memory. Similarly, you can also pass the address on the paper to someone else, allowing them to find the building too, just as you can pass a pointer variable to a function or another part of your code, allowing it to access the variable in memory.
Pointers are valuable tools in programming as they allow us to store memory addresses, enabling dynamic memory allocation and manipulation of data structures. By using pointers, we can create more flexible and efficient code that can adapt to changing data requirements during program execution.
Additionally, pointers are essential in scenarios like data structures, linked lists, and passing data to functions by reference, providing a level of control and precision that enhances the capabilities of the program. However, it's important to handle pointers with care, as incorrect usage can lead to memory leaks or segmentation faults.
A raw pointer can be sometime dangerous, because there is no validation when accessing this pointer. And when the pointer is pointing to nothing (meaning, the pointer is a nullptr). The program will throw a null pointer exception, also known as a segmentation fault (segfault).
A segmentation fault occurs when a program tries to access a memory location that it does not have permission to access, which can happen when the program tries to dereference a null pointer. When this happens, the operating system will usually terminate the program and generate an error message.
You can read more about raw pointers from Microsoft Learn.
To avoid this, you must check before if the pointer is valid, before using it.
Use the function called
IsValid()for raw pointers.
Here's an example:
UPROPERTY()
AActor* ActorPtr = nullptr;

// Use UPROPERTY() macro, in order to tell the UHT (Unreal Header Tool), this pointer must be release into GC (garbage collector).
// If not, then this will cause a memory leak. Meaning, the pointer is still alive, even tough we are not using this memory block.

void KillActor()
{
  // IsValid() function also check if the pointer is not already destroyed by the GC (garbage collector).

  if (!IsValid(ActorPtr)) // The pointer has value of 'nullptr', therfore is NOT valid!
      return;

  ActorPtr->Destroy();
}
[!NOTE]
ActorPtris marked withUPROPERTY()in order to tell UHT6, that this pointer exists. When the pointer is unused, the garbage collector then marks it and deletes its memory. Also note, that this process can take a couple frames and is not instantaneously. Therefore, always useIsValid()function, which also checks if the pointer is not marked for the garbage collector. Avoid using manual checking, like this:PlayerCharacter != nullptr(since it will not work with GC system).
[!WARNING] If something else is referencing
ActorPtr, the pointer will not be destroyed via garbage collection (unless if it's a weak pointer).
After Unreal Engine (5.0) version, is now recommending to use TObjectPtr instead of * to mark raw pointers. TObjectPtr class contains some optimization for the editor.
Here is the updated code:
UPROPERTY()
TObjectPtr<AActor> ActorPtr = nullptr;In Unreal Engine, the Smart Pointer's library provides a set of template classes to manage memory and object ownership more efficiently and safely. These smart pointers automatically handle memory management, such as allocating and deallocating memory, and help prevent memory leaks and null pointer dereferences.
The key smart pointers in Unreal Engine's library include TSharedPtr, TWeakPtr, and TUniquePtr. They are designed to handle various ownership scenarios and provide a safer alternative to raw pointers.
You can read more about Unreal Smart Pointer Library on their docs.
TSharedPtr is a smart pointer that manages shared ownership of a dynamically allocated object. It uses reference counting to keep track of the number of shared references to the object and automatically releases the memory when the last reference goes out of scope.
Example:
TSharedPtr<int32> sharedPtr = MakeShared<int32>(42);TWeakPtr is a smart pointer that represents a weak reference to a dynamically allocated object. It allows accessing the object as long as it exists but does not affect the object's reference count. It is commonly used to avoid circular reference issues.
Example:
TSharedPtr<int32> sharedPtr = MakeShared<int32>(42);
TWeakPtr<int32> weakPtr = sharedPtr;
TUniquePtr is a smart pointer that represents sole ownership of a dynamically allocated object. It ensures that only one pointer can own the object, and when the owning TUniquePtr goes out of scope, the memory is automatically deallocated.
Example:
TUniquePtr<int32> uniquePtr = MakeUnique<int32>(42);Unreal Engine's Smart Pointers, such as TSharedPtr, TWeakPtr, and TUniquePtr, are generic smart pointers that can be used with any C++ classes or types, not limited to Unreal Engine's UObject-derived classes.
On the other hand, UObject Smart Pointers are specific to Unreal Engine's UObject-derived classes. These smart pointers, such as TWeakObjectPtr, TWeakInterfacePtr, TSoftObjectPtr and TSoftClassPtr, are designed to handle UObject ownership and management within the Unreal Engine ecosystem.
This smart pointer is used to hold a weak reference to an UObject subclass. It allows you to safely reference an object without affecting its lifespan. It is commonly used to prevent strong references that could potentially create circular dependencies.
Example usage:
TWeakObjectPtr<UObject> WeakPtr;

if (SomeObject.IsValid())
{
    WeakPtr = SomeObject;  // Assign weak reference to an object
}

if (WeakPtr.IsValid())
{
    // Access the object if it still exists
    WeakPtr->DoSomething();
}This smart pointer is used to hold a weak reference to an interface implemented by an UObject. It allows you to safely reference the interface without affecting its lifespan.
Example usage:
TWeakInterfacePtr<IMyInterface> WeakPtr;

if (SomeObject->Implements<IMyInterface>())
{
    WeakPtr = SomeObject;  // Assign weak reference to the interface
}

if (WeakPtr.IsValid())
{
    // Access the interface if the object still implements it
    WeakPtr->InterfaceFunction();
}This smart pointer is used to hold a soft reference to an UObject subclass. It is used for referencing assets that can be loaded and unloaded during runtime. Soft references do not prevent the asset from being garbage collected.

Example usage:
TSoftObjectPtr<UTexture2D> SoftPtr; // Assign soft reference to a texture asset

if (SoftPtr.IsValid())
{
    UTexture2D* Texture = SoftPtr.LoadSynchronous(); // This will cause a lag spike (if the asset is heavily chained or large in size)

    if (Texture)
    {
        // Use the loaded texture
    }
}
Asynchronous Solution:
TSoftObjectPtr<UTexture2D> SoftPtr; // Assign soft reference to a texture asset

if (SoftPtr.IsValid())
{
    OnTextureLoadedDelegate.BindLambda([]()
    {
        // Called when the texture is loaded and ready to use
        UTexture2D* Texture = SoftPtr.Get();

        if (Texture)
        {
            // Use the loaded texture as needed
        }
    });

    StreamableManager.RequestAsyncLoad(SoftPtr.ToSoftObjectPath(), OnTextureLoadedDelegate);
}
[!WARNING] Don't use
FSoftObjectPathorFSoftObjectPtr. Used for internal purpose.
This smart pointer is used to hold a soft reference to a UClass subclass. It is used for referencing blueprint classes or other classes that can be loaded and unloaded during runtime.

Example usage:
TSoftClassPtr<AMyBlueprintClass> SoftPtr; // Assign soft reference to a blueprint class

if (SoftPtr.IsValid())
{
    UClass* Class = SoftPtr.LoadSynchronous(); // This will cause a lag spike (if the asset is heavily chained or large in size)

    if (Class)
    {
        // Use the loaded class
    }
}
Asynchronous Solution:
TSoftClassPtr<AMyBlueprintClass> SoftPtr; // Assign soft reference to a blueprint class

if (SoftPtr.IsValid())
{
    OnBlueprintLoadedDelegate.BindLambda([]()
    {
        // Called when the blueprint class is loaded and ready to use
        UClass* BlueprintClass = SoftPtr.Get();

        if (BlueprintClass)
        {
            // Use the loaded blueprint class as needed
            AMyBlueprintClass* NewActor = GetWorld()->SpawnActor<AMyBlueprintClass>(BlueprintClass);

            if (NewActor)
            {
                // Successfully spawned the actor based on the loaded blueprint class
            }
        }
    });

    StreamableManager.RequestAsyncLoad(SoftPtr.ToSoftObjectPath(), OnBlueprintLoadedDelegate);
}
[!WARNING] Don't use
FSoftClassPath. Legacy code.
| Smart Pointer | Type Based On | Description |
|---|---|---|
| TSharedPtr | Regular C++ Classes | Shared pointer for managing ownership of dynamically allocated objects. Allows multiple pointers to share ownership. |
| TWeakPtr | Regular C++ Classes | Weak pointer for non-owning references to dynamically allocated objects. |
| TUniquePtr | Regular C++ Classes | Unique pointer for exclusive ownership of dynamically allocated objects. Ensures only one pointer owns the object. |
| TWeakObjectPtr | UObject Classes | Weak pointer for non-owning references to UObject-derived objects. |
| TWeakInterfacePtr | UObject Classes | Weak pointer for non-owning references to objects implementing a specific interface. |
| TSoftObjectPtr | UObject Classes | Soft pointer for non-owning references to UObject-derived objects. Allows loading the object when needed, but won't prevent it from being garbage collected. |
| TSoftClassPtr | UObject Classes | Soft pointer for non-owning references to UClass-derived objects. Allows loading the class when needed, but won't prevent it from being garbage collected. |
| This section was written in conjunction with ChatGPT. |
Unreal Header Tool (UHT6) is a code generator and reflection system in Unreal Engine. It processes special macros and meta tags in C++ header files and generates additional code to support Unreal Engine's reflection system, which enables various engine features like Blueprint integration, serialization, networking, and more.
Layout:
UPROPERTY([specifier1=setting1, specifier2, ...], [meta=(key1="value1", key2="value2", ...))])
UFUNCTION([specifier1=setting1, specifier2, ...], [meta=(key1="value1", key2="value2", ...))])
UCLASS([specifier1=setting1, specifier2, ...], [meta=(key1="value1", key2="value2", ...))])
USTRUCT([specifier1=setting1, specifier2, ...], [meta=(key1="value1", key2="value2", ...))])
UENUM([specifier1=setting1, specifier2, ...])
UPARAM([specifier1=setting1, specifier2, ...])
UMETA([specifier1=setting1, specifier2, ...])| Macro | Description | Use Case |
|---|---|---|
| UPROPERTY | Specifies properties of a class member, such as replication, serialization, editability, and blueprint visibility. | Used to define properties of variables within a class to control how they are handled by Unreal Engine systems. |
| UFUNCTION | Identifies a C++ function that can be accessed and called from Blueprint visual scripting or other systems in Unreal Engine. | Used to expose C++ functions to Blueprint for easy use in visual scripting and integration with Unreal Engine. |
| UCLASS | Defines a C++ class that is exposed to Unreal Engine's reflection system, allowing it to be used in Blueprint and other engine features. | Used to define classes that can be used in Blueprint and integrated into Unreal Engine systems like the Editor. |
| USTRUCT | Specifies a C++ struct that can be used with Unreal Engine's reflection system, making it usable in Blueprint and other engine features. | Used to define structs that can be used in Blueprint and integrated into Unreal Engine systems like the Editor. |
| UENUM | Defines a C++ enumeration that can be used with Unreal Engine's reflection system, making it usable in Blueprint and other engine features. | Used to define enumerations that can be used in Blueprint and integrated into Unreal Engine systems like the Editor. |
| UPARAM | Specifies how a function parameter should be treated when used in Blueprint or other Unreal Engine systems. | Used to define parameter properties, such as Blueprint read/write access, in C++ functions exposed to Blueprint. |
| UMETA | Provides additional metadata for UPROPERTY, UFUNCTION, UCLASS, USTRUCT, and UENUM, allowing customization of their behavior in Unreal Engine's reflection system. | Used to attach additional information or customizations to C++ entities exposed to Unreal Engine reflection. |
UPROPERTY is a macro used to declare a property within a class that needs to be exposed to the Unreal Engine's reflection system. It allows the property to be accessed and modified by the engine and Blueprint scripts.
EditAnywhere: Allows the property to be edited in the editor and during runtime for all instances of the class.EditDefaultsOnly: Permits editing the property only for the class's default object in the editor.EditInstanceOnly: Enables editing the property only for instances of the class during runtime.VisibleAnywhere: Displays the property value in the editor for all instances of the class.VisibleDefaultsOnly: Shows the property value in the editor for the class's default object.VisibleInstanceOnly: Displays the property value in the editor only for instances of the class.BlueprintReadOnly: Exposes the property to Blueprint scripts, but only for reading, not writing.BlueprintReadWrite: Exposes the property to Blueprint scripts for both reading and writing.Category: Organizes properties into named categories in the editor for better organization and readability.EditFixedSize: Specifies that anTArrayorTMapproperty should be editable in the Details Panel of the Unreal Editor with a fixed number of elements, preventing addition or removal.Transient: Indicates that a property should not be serialized, making it non-persistent and not saved when saving the state of the object.Replicated: Automatically replicates the property's value to clients in a multiplayer environment when the property changes on the server.ReplicatedUsing: Specifies a custom function that should be called on both the server and clients to handle replication of the property's value.SimpleDisplay: Indicates that the property's value should be displayed in a simple and concise manner in editor UI.AdvancedDisplay: Indicates that the property's value should be displayed with advanced options in editor UI.Config: Marks the property to be serialized to the project configuration file for external customization.GlobalConfig: Marks the property to be serialized to the global configuration file for external customization across all projects.
DisplayName: Sets a custom display name for the property in the Unreal Editor.Tooltip: Provides a tooltip description for the property in the Unreal Editor.ClampMin: Sets the minimum allowed value for the property in the Unreal Editor.ClampMax: Sets the maximum allowed value for the property in the Unreal Editor.AllowPrivateAccess: Allows access to private members within the class it belongs to.Units: Provides a human-readable unit label for the property in the Unreal Editor.
UPROPERTY(EditAnywhere, Category="Hello|Cruel|World")
int32 EditAnywhereNumber;UPROPERTY(Transient, Replicated)
int32 CurrentHealth;
UPROPERTY(Transient, ReplicatedUsing=OnArmorChanged)
int32 CurrentArmor;
UFUNCTION()
void OnArmorChanged();UPROPERTY(EditAnywhere, SimpleDisplay)
int32 MaxHealth = 100;
UPROPERTY(EditAnywhere, AdvancedDisplay)
float HealthRegenerationTime = 5.0f;// Must mark UCLASS with Config specifier
// Config can be overriden from the base class.
UPROPERTY(Config, BlueprintReadOnly)
bool bRegenerateHealth;
// GlobalConfig CANNOT be overridden from the base class.
UPROPERTY(GlobalConfig, BlueprintReadOnly)
bool bEnableHealthSimulation;UPROPERTY(EditAnywhere, EditFixedSize)
TArray<FName> Usernames = { TEXT("JohnDoe"), TEXT("MrRobin"), TEXT("JaneDoe") };UPROPERTY(EditAnywhere, meta=(Units="Celsius"))
float CookingTemperature;
UPROPERTY(EditAnywhere, meta=(Units="Kilograms"))
float TigerWeight;
UPROPERTY(EditAnywhere, meta=(Units="GB"))
float DiskSpace;
UPROPERTY(EditAnywhere, meta=(Units="Percent"))
float Happiness;
UPROPERTY(EditAnywhere, meta=(Units="times"))
float Deliciousness;You can read more about UPROPERTY by BenUi.
UFUNCTION is a macro used to declare a function within a class that needs to be exposed to the Unreal Engine's reflection system. It allows the function to be used in Blueprint scripts and network replication.
BlueprintCallable: Exposes the function to Blueprint scripts, allowing it to be called from within Blueprint graphs.BlueprintPure: Indicates that the function is a pure computation and does not modify any state, making it safe to use in Blueprint graphs without side effects.BlueprintImplementableEvent: Serves as a placeholder function in C++ that can be overridden and implemented in Blueprint.BlueprintNativeEvent: Similar toBlueprintImplementableEvent, but it also provides a C++ implementation that can be optionally overridden in Blueprint.Category: Organizes properties into named categories in the editor for better organization and readability.
DisplayName: Sets a custom display name for the function in the Unreal Editor.Tooltip: Provides a tooltip description for the function in the Unreal Editor.ShortToolTip: Provides a short tooltip description for the function in the Unreal Editor.AllowPrivateAccess: Allows access to private members within the class it belongs to.HideSelfPin: Hides the "self" pin, which indicates the object on which the function is being called. The "self" pin is automatically hidden onBlueprintPurefunctions that are compatible with the calling Blueprint's Class. Functions that use theHideSelfPinMeta Tag frequently also use theDefaultToSelfSpecifier.BlueprintInternalUseOnly: This function is an internal implementation detail, used to implement another function or node. It is never directly exposed in a Blueprint graph.BlueprintProtected: This function can only be called on the owning Object in a Blueprint. It cannot be called on another instance.DeprecatedFunction: Any Blueprint references to this function will cause compilation warnings telling the user that the function is deprecated. You can add to the deprecation warning message (for example, to provide instructions on replacing the deprecated function) using theDeprecationMessagemetadata specifier.
UFUNCTION(BlueprintPure)
int32 BlueprintPureFunction();

UFUNCTION(BlueprintCallable)
int32 BlueprintCallableFunction();

UFUNCTION(BlueprintCallable)
int32 BlueprintCallableConstFunction() const;

UFUNCTION(BlueprintPure=false)
int32 BlueprintPureFalseFunction() const;UFUNCTION(BlueprintCallable, Category = "Doggy Daycare", meta=(ReturnDisplayName = "Success"))
bool TryPetDog(const FName Name);You can read more about UPROPERTY by BenUi.
UCLASS is a macro used to declare a class that is intended to be used in Unreal Engine's reflection system. It allows the class to be instantiated, exposed to Blueprint, and used in various engine systems.
Blueprintable: Allows the class to be used as a blueprint in the Unreal Editor.BlueprintType: Specifies that the class can be instantiated and manipulated in Blueprint scripts.Abstract: Indicates that the class is an abstract class and cannot be instantiated directly.Transient: Excludes the class from being serialized and saved in the game's persistent data.MinimalAPI: Restricts the class's visibility for export, making it more suitable for engine internal use.NotBlueprintType: Prevents the class from being used as a blueprint.
DisplayName: Sets a custom display name for the class in the Unreal Editor.ToolTip: Provides a tooltip description for the class in the Unreal Editor.HideCategories: Hides specific property categories from being displayed in the Unreal Editor.ClassGroup: Assigns the class to a specific group in the Unreal Editor's class picker.IncludePath: Specifies the include path for the generated code of the class.BlueprintSpawnableComponent: Marks a class derived fromUSceneComponentas spawnable in Blueprint.
UCLASS(Blueprintable)
class MyActor : public AActor
{
    GENERATED_BODY()

public:
    UPROPERTY(EditAnywhere, BlueprintReadWrite, Category = "MyActor")
    int32 MyIntProperty;

    UPROPERTY(EditAnywhere, BlueprintReadWrite, Category = "MyActor")
    float MyFloatProperty;

    UPROPERTY(EditAnywhere, BlueprintReadWrite, Category = "MyActor")
    FString MyStringProperty;

    UPROPERTY(EditAnywhere, BlueprintReadWrite, Category = "MyActor")
    FMyStruct MyStructProperty;
};
You can read more about UCLASS by BenUi.
USTRUCT is a macro used to declare a C++ struct that is intended to be used in Unreal Engine's reflection system. It enables the struct to be used as a property within UCLASSes and exposed to Blueprint.
BlueprintType: Specifies that the structure can be used in Blueprint scripts.Atomic: Ensures that the structure is treated as an atomic type for replication in multiplayer games.NotReplicated: Excludes the structure from being replicated across the network.
DisplayName: Sets a custom display name for the structure in the Unreal Editor.ToolTip: Provides a tooltip description for the structure in the Unreal Editor.Category: Specifies the category in which the structure will appear in the Unreal Editor.
USTRUCT(BlueprintType)
struct FMyStruct
{
    GENERATED_BODY()

    UPROPERTY(BlueprintReadWrite, Category = "MyStruct")
    int32 Value1;

    UPROPERTY(BlueprintReadWrite, Category = "MyStruct")
    FString Value2;
};
You can read more about USTRUCT by BenUi.
UENUM is a macro used to declare an enumeration that is intended to be used in Unreal Engine's reflection system. It allows the enumeration to be exposed to Blueprint and used within UCLASSes.
BlueprintType: Specifies that the enumeration can be used in Blueprint scripts.DisplayNames: Specifies a list of custom display names for each enumeration value in the Unreal Editor.
DisplayName: Sets a custom display name for the enumeration in the Unreal Editor.ToolTip: Provides a tooltip description for the enumeration in the Unreal Editor.Hidden: Hides the enumeration from being displayed in the Unreal Editor.Bitflags: Indicates that the enumeration represents a set of bit flags.EnumRange: Specifies the minimum and maximum values for the enumeration.
UENUM(BlueprintType)
enum class EWeaponType
{
    Sword         UMETA(DisplayName = "Sword Weapon"),
    Axe           UMETA(DisplayName = "Axe Weapon"),
    Bow           UMETA(DisplayName = "Bow Weapon"),
    Wand          UMETA(DisplayName = "Magic Wand"),
};
You can read more about UENUM by BenUi.
UPARAM is a macro used to provide additional information to the Unreal Header Tool. It is used with parameters of UFUNCTION and UPROPERTY to specify how the engine should handle the data.
-
UPARAM(Ref): Used to mark a parameter that is passed by reference. It ensures that the parameter is treated as a reference during code generation, which may affect how the engine handles the parameter. -
UPARAM(DisplayName): Used to set a custom display name for a function parameter when it appears in the Unreal Editor's Blueprint node graph. -
UPARAM(BlueprintCallable, BlueprintPure): Used to apply multiple specifiers to a function parameter. For example, to mark a parameter as both BlueprintCallable and BlueprintPure. -
UPARAM(meta = (CustomMetaTag)): Allows developers to create custom meta tags and use them in function parameters to provide additional information to the Unreal Header Tool.
UCLASS()
class MyActor : public AActor
{
    GENERATED_BODY()

public:
    // A function that takes a parameter passed by reference
    UFUNCTION(BlueprintCallable, Category = "MyActor")
    void ModifyValue(UPARAM(Ref) int32& ValueToModify)
    {
        // Modify the value passed by reference
        ValueToModify *= 2;
    }
};
You can read more about UPARAM by BenUi.
UMETA is a macro used to specify additional metadata for an UENUM entry. It allows adding custom information to enum values for use in Blueprint, UI, and other engine systems.
DisplayName: Sets a custom display name for the enumeration value in the Unreal Editor.ToolTip: Provides a tooltip description for the enumeration value in the Unreal Editor.Hidden: Hides the enumeration value from being displayed in the Unreal Editor.DisplayPriority: Specifies the display priority for the enumeration value in the Unreal Editor.DisplayThumbnail: Allows attaching a custom thumbnail image to the enumeration value in the Unreal Editor.CustomMetaData: Specifies custom metadata that developers can define and use as needed.
UENUM(BlueprintType)
enum class EMyEnum
{
    Value1 UMETA(DisplayName = "First Value", ToolTip = "This is the first value"),
    Value2 UMETA(DisplayName = "Second Value", ToolTip = "This is the second value"),
    Value3 UMETA(Hidden),
};
You can read more about UMETA by BenUi.
| This section was written in conjunction with ChatGPT. |
Constructors are special member functions in C++ that are automatically called when an object is created. They are used to initialize the object's data members and set up its initial state. Constructors have the same name as the class and can be overloaded to take different sets of parameters, allowing for object initialization in various ways.
Here's an example:
class RegularClass
{
    RegularClass()
    {
        // Constructor called
    }
};
Destructors are another type of special member function in C++ that is automatically called when an object is destroyed or goes out of scope. They are used to perform cleanup tasks, release resources, and deallocate memory allocated during the object's lifetime. Like constructors, destructors have the same name as the class, preceded by a tilde (~).
Here's an example:
class RegularClass
{
    ~RegularClass()
    {
        // Destructor called
    }
};In Unreal Engine, you can define constructors and destructors in C++ classes just like in standard C++. Constructors are useful for initializing properties and setting up components when an object is created, while destructors can be used for cleanup tasks like releasing resources or stopping background processes when an object is destroyed.
However, Unreal Engine has its own garbage collection system that automatically manages memory and deallocation of objects. This means that using destructors for memory deallocation or resource cleanup may interfere with the garbage collection process and lead to unexpected behavior or crashes.
Due to the automatic garbage collection in Unreal Engine, it is generally advised not to use destructors explicitly for memory cleanup. Instead, Unreal Engine provides other mechanisms, such as BeginDestroy and EndPlay, to handle object cleanup and resource release when an object is destroyed or removed from the game world.
Here's an example:
#include "MyActor.h"

#include "GameFramework/Actor.h"
#include "GameFramework/MovementComponent.h"

AMyActor::AMyActor()
{
    // Set this actor to call Tick() every frame. You can turn this off to improve performance if you don't need it.
    PrimaryActorTick.bCanEverTick = false;

    // This is the default constructor for an Actor class in Unreal Engine.
    // You can initialize properties and set up components here.

    RootComponent = CreateDefaultSubobject<USceneComponent>("SceneComponent");

    MeshComponent = CreateDefaultSubobject<UStaticMeshComponent>(TEXT("MeshComponent"));
    MeshComponent->SetupAttachment(RootComponent);
    MeshComponent->bCastDynamicShadow = false;

    checkf(MeshComponent, TEXT("MeshComponent cannot be a nullptr!"));
    verifyf(MeshComponent, TEXT("MeshComponent cannot be a nullptr!"));
    ensureMsgf(MeshComponent, TEXT("MeshComponent cannot be a nullptr!"));

    // Cast<T> has to be used for *UObjects* due to type safety; it will return *nullptr* in case of a failure in comparison with *StaticCast()*. StaticCast is just a wrapper to *static_cast* function.
    if (UMovementComponent* MeshAsMovementComponent = Cast<UMovementComponent>(MeshComponent))
    {
        // Cast worked!

        MeshAsMovementComponent->bSnapToPlaneAtStart = true;
    }

    UStaticMeshComponent* RootAsActorComponent = CastChecked<UActorComponent>(RootComponent); // Cast must work, otherwise a crash will occur.
}

void AMyActor::BeginPlay()
{
    Super::BeginPlay();

    // This function is automatically called when the actor is spawned or added to the world.
    // You can perform any necessary setup or initialization here.
}

void AMyActor::EndPlay(const EEndPlayReason::Type EndPlayReason)
{
    // This function is automatically called when the actor is removed from the world or destroyed.
    // You can perform cleanup and resource release here.

    Super::EndPlay(EndPlayReason);
}In C++, initialization refers to the process of assigning an initial value to a variable when it is declared. Initialization is crucial because it ensures that variables have well-defined starting values, which can help avoid unexpected behavior and improve code clarity.
Here's a code snippet that demonstrates:
// Initialization using assignment statement
int num1 = 10;

// Initialization using brace initializer
int num2{20};
There is an important difference when using brace initializer, especially in cases where narrowing conversions are involved. A narrowing conversion occurs when a value is assigned to a variable that has a smaller range than the provided value. For example:
int num3 = 1000;       // OK, no narrowing conversion
int num4 = 1000.5;     // OK, narrowing conversion from double to int
int num5{1000.5};      // Error, narrowing conversion from double to int
In the last line, using brace initializer, the compiler will generate an error because it detects a narrowing conversion from double to int, which could potentially lead to data loss. This is a safety feature to help catch unintended data truncation.
| This section was NOT written in conjunction with ChatGPT. |

You can read more about actor's lifecycle at Unreal's docs.
By inheriting from AActor class:
void PostInitComponents();
void BeginPlay(); // Can be called multiple times
void Tick(float DeltaTime);
void EndPlay();| This section was NOT written in conjunction with ChatGPT. |
Tip
You can use TWeakInterfacePtr for storing a weak pointer to a partial interface.
| This section was written in conjunction with ChatGPT. |
Unreal Engine's reflection system is a powerful feature that allows objects and their properties to be accessed and modified at runtime. The reflection system works by storing information about each class and its members, such as properties and functions, in metadata that can be accessed at runtime. This metadata is generated automatically by the Unreal Header Tool (UHT7) during compilation. With the help of GENERATED_BODY() macro and [FileName].generated.h header.
The generated header file is typically included in the source file that defines the corresponding class or struct, and it is also included in any other source files that use that class or struct. This ensures that the metadata is available to the engine at compile-time and runtime.
The reflection system is also used in many other areas of the engine, such as serialization and networking. When objects are saved to disk or sent over the network, their properties are serialized into a binary format. The reflection system is used to determine which properties to serialize, and how to convert them to and from their binary representation.
One of the key benefits of the header system is that it allows for very efficient compilation times. Because each C++ file has its own header file, changes to one file do not require recompilation of other files that depend on it. Instead, only the files that include the modified header file need to be recompiled.
You can read more about reflection system from their docs.
| This section was written in conjunction with ChatGPT. |
Garbage Collection is an automatic memory management feature used in modern languages like C#4, Python3, and Javascript8, which automatically removes objects from memory when they are no longer in use.
In a garbage-collected environment, you can create objects, use them, and then set the variable pointing to them as null when done, and the garbage collector takes care of freeing up the memory. Unlike lower-level languages like C1 and C++, which require manual memory management, Unreal Engine has its own Garbage Collection system to simplify memory management for developers.
You can read more about Stack vs Heap section. Which tells more about how the memory is management in programming languages.
You can also read more about Unreal Object Handling on their docs.
When you create a UObject-derived object in Unreal Engine, it becomes part of the garbage collection system, which automatically identifies and removes unused objects every 30-60 seconds or as needed based on system memory. The garbage collection system maintains a "Root Set" of objects that should always be kept alive, and it uses reflection to trace object references and ensure objects are reachable. Objects outside the Root Set and not reachable are marked for garbage collection, and their memory is freed.
By properly using UE's decorators, you can avoid issues with dangling pointers and crashes caused by accessing garbage-collected objects.
Every member of a class should be declared as a UPROPERTY
If an member is left “naked,” unreal will not know about it. So, an object you are pointing at could get deleted out from under you! It is safe to leave value types such as an
intor abool“naked” although they could not be saved, replicated, or appear in the editor.
Member pointers should only point at UObject or UObject-derived objects
The garbage collector is only smart enough to recognize relationships to an object, so the object could get deleted out from under your pointer.
Any non-UObject pointer must be pointing to something “global” in the engine, or something within its own UObject
The garbage collector could delete the object that owns what you are pointing at.
Warning
For the garbage collector to do its work of determining what is safe to delete (for a container), it must traverse every field of every object. While Unreal provides several types of containers (TArray, TMap, …) the garbage collector only considers pointers in TArray.
UPROPERTY()
TArray<UWidget*> LotsOfWidgets;

TMap<int, TWeakObjectPtr<UWidget>> LotsOfWeakWidgets;UObjects should never be created with new, but only with the default creation methods (NewObject(), SpawnActor(), CreateDefaultSubobject()).
|
When objects do not fulfill any of the above conditions, on the next GC cycle they will be marked as unreachable and garbage collected (destroyed).
To force the destruction of objects that are still reachable, you can call UObjectBaseUtility::MarkAsGarbage() on them, and it will force their destruction on the next GC cycle (you generally want to avoid doing this, as that is what garbage collection is for, and some classes, like AActor and UActorComponent do not directly support it).
The destruction of an object doesn't necessarily all happen in the same frame, when garbage collection starts on it, it will first call BeginDestroy() (do not call this yourself), then, when ready FinishDestroy().
Note
Raw pointers declared with UPROPERTY, will be set to nullptr
Whenever code references an AActor or a UActorComponent, it has to deal with the possibility that AActor::Destroy() could be called on the actor or UActorComponent::DestroyComponent() could be called on the component. These functions will mark them for pending kill, thus triggering their garbage collection at the first opportunity (note that destroying an actor also destroys all its components).
Since the garbage collector automatically nulls out UPROPERTY pointers when it actually gets to destroy them, null-checking an actor or component pointer is sufficient to know it's safe to use, though you might also want to check IsPendingKill() on them (through IsValid()) to avoid accessing them after they have been marked for destruction (TWeakObjectPtr already checks for this when retrieving the raw pointer).
bool IsValid(const UObject* Test);Global function that automatically checks if an object pointer is non-null and not pending kill.
UObjectBase::IsValidLowLevel();
UObjectBase::IsValidLowLevelFast();
Should not be used for Garbage Collection checks, as on UPROPERTY pointers it will always return true, while on raw pointer it will return true or false depending on whether the object had already been destroyed, but in the latter case it's also likely to also crash the application as the pointed memory could have been overwritten.
| This section was written in conjunction with ChatGPT. |

A soft reference is a weak reference to an asset that does not create a strong dependency. It allows assets to be loaded or unloaded dynamically at runtime based on usage or other conditions. Soft references are used when you want to indicate a loose dependency on an asset without forcing its loading.
An analogy for a soft reference could be a bookmark in a book. It points to a specific page but doesn't physically hold the content. You can easily remove or change the bookmark without affecting the book's content.
A hard reference is a strong reference to an asset that creates a firm dependency. It ensures that the referenced asset is loaded and remains loaded as long as the referencing asset is in use. Hard references are used when you require a guaranteed presence of an asset during runtime.
An analogy for a hard reference could be a puzzle piece that needs to fit into a specific spot. The puzzle piece is integral to the puzzle, and removing or changing it would break the intended structure.
When an asset with hard references is loaded, it triggers a chain of dependencies, causing all assets that have hard references to be loaded as well. This ensures that all required assets are available for proper functionality. This loading behavior is known as "chain loading" or "load-on-demand."
For example, if a level blueprint references a specific sound cue with a hard reference, when the level is loaded, the sound cue and any other assets directly or indirectly referenced by it will also be loaded to maintain the integrity of the referenced sound cue's functionality.
In contrast, if a soft reference is used, the referenced asset may or may not be loaded initially, and it can be loaded or unloaded dynamically based on the specific requirements of the game or application.
Using the appropriate combination of soft and hard references allows for efficient management of asset dependencies, optimizing memory usage, and providing flexibility in loading and unloading assets during runtime.
Reference Viewer is a tool inside the editor, which allows you to look at the reference chain with a particular asset. Both hard and soft references. This tool helps you to figure it out which is loading which and what chain dependencies it has.
Size Map is another tool inside the editor, which allows you to look at the total and independent size of different assets, which has been loaded by the main asset. For example, you can see how big the character memory footprint is (with all the textures and skeletal mesh).
You can read more about soft and hard references in article called Hard References & Reasons to Avoid Them by raharuu.
You can also read more about Unreal Engine docs about Referencing Assets.
| This section was written in conjunction with ChatGPT. |
Global functions are functions that are defined outside of any class and are not tied to any specific object instance. They are accessible from any part of the codebase and can be used to perform tasks or calculations that do not require access to specific object properties or methods.
Global functions in Unreal Engine are commonly used for utility functions, helper functions, or functions that operate on data independently of any particular object instance.
IsValid(): Check if a pointer or object reference is valid. This is important to avoid accessing or modifying null pointers, which can cause crashes or other unexpected behavior.Swap(): Swaps the contents of twoTObjectPtrobjects.Exchange(): Exchanges the contents of aTObjectPtrwith a new object, returning the previous object.MakeWeakObjectPtr(): Creates a weak pointer (TWeakObjectPtr) from aTObjectPtr, allowing for non-owning references to the object.Cast(): Is used to attempt to cast an object from one type to another. If the object is not of the specified type, it will return a nullptr. If the object is of the specified type or a subclass of it, the function will return a pointer to the object cast to the specified type.CastChecked(): Is similar toCast(), but it also performs a runtime check in debug builds to ensure that the object is of the specified type. If the check fails, it will trigger an assertion. This function is useful when you are certain that an object should be of a particular type and want to catch errors early in development.
| This section was written in conjunction with ChatGPT. |
Blueprint Function Libraries (UBlueprintFunctionLibrary) are a collection of static functions that provide utility functionality not tied to a particular gameplay object. These libraries can be grouped into logical function sets, e.g. AI Blueprint Library, or contain utility functions that provide access to many different functional areas, e.g. System Blueprint Library.
UCLASS()
class UAnalyticsBlueprintLibrary : public UBlueprintFunctionLibrary
{
    GENERATED_UCLASS_BODY()

public:
    /** Starts an analytics session without any custom attributes specified */
    UFUNCTION(BlueprintCallable, Category = "Analytics")
    static bool StartSession();
}
As you can see in the example above, a Blueprint Function Library is indirectly a UObject derived and therefore requires the standard UCLASS() and GENERATED_UCLASS_BODY() macros9. It decorates the functions that are to be callable from Blueprints with the UFUNCTION() macro9. Functions in a Blueprint Function Library can be designated as BlueprintCallable or BlueprintPure depending on whether the calls have side effects or not.
Below is the implementation of the StartSession() function:
bool UAnalyticsBlueprintLibrary::StartSession()
{
    TSharedPtr<IAnalyticsProvider> Provider = FAnalytics::Get().GetDefaultConfiguredProvider();

    if (Provider.IsValid())
        return Provider->StartSession();
    else
    {
        UE_LOG(
            LogAnalyticsBPLib,
            Warning,
            TEXT("StartSession: Failed to get the default analytics provider. Double check your [Analytics] configuration in your INI")
        );
    }

    return false;
}
You can read more about Blueprint Function Libraries here!
UGameplayStatics-gameplayutility functions that can be called from both Blueprint and C++UKismetMathLibrary-mathutility functions that can be called from both Blueprint and C++UKismetStringLibrary-stringutility functions that can be called from both Blueprint and C++UKismetTextLibrary-textutility functions that can be called from both Blueprint and C++UKismetSystemLibrary-systemutility functions that can be called from both Blueprint and C++UKismetMaterialLibrary-materialutility functions that can be called from both Blueprint and C++UKismetInputLibrary-inpututility functions that can be called from both Blueprint and C++UKismetGuidLibrary-guidutility functions that can be called from both Blueprint and C++UKismetArrayLibrary-arrayutility functions that can be called from both Blueprint and C++
FMath- Math helper functions (CheckGenericPlatformMath.hfor additional math functions).DrawDebugHelpers.h- Header file contain debug draw functions. Read more about here.
Macros9 are preprocessor directives that perform text replacements before the compilation process. They are denoted by the # symbol and are used to define reusable code snippets, conditionally include or exclude code, and perform other preprocessing operations.
Creating a macro in C++ with Unreal Engine is straightforward. You can use the #define preprocessor directive to define a macro. Here's the basic syntax:
#define MACRO_NAME(value) // Macro definitionHere's an example of PI macro:
#define PI 3.14
#define PI_MULTIPLY(x) 3.14 * x
Here is a list of common macros in Unreal Engine:
GENERATED_BODY()- Boilerplate code required by the engine.TEXT()- Used for specifying wide-character (UTF-16) encoding. This makes the string literal for being platform independent. Without this macro, you are using ANSI encoding (which can cause issue on other machines).TEXTVIEW()- Calculates the length of a string from a string literal at compile time.INVTEXT()- Mark text strings for localization. It stands for "Invariant Text" and is used to specify text that should remain unchanged during the localization process.LOCTEXT()- Creating localized text. It stands for "Localized Text" and allows you to define text literals that can be localized for different languages.INandOUT- Function parameter decorators. They provide a hint about the intention and direction of data flow.INindicates that the parameter is an input parameter, meaning it provides data to the function.OUTindicates that the parameter is an output parameter, meaning the function will modify or provide data through that parameter.LINE_TERMINATOR- Represent the line terminator character sequence in Unreal Engine. It provides a platform-independent way of specifying line breaks in text files or strings.CONSTEXPR- Declare a constant expression. It is used in conjunction with theconstexprkeyword2 to specify that a function or variable can be evaluated at compile-time and treated as a constant expression.ABSTRACT- Declare an abstract class. It indicates that a class cannot be instantiated directly and must be subclassed. An abstract class serves as a base class for other classes and provides a blueprint for their common functionality.UPROPERTY()- Defines the type and behavior of the property, as well as its metadata and display names.UFUNCTION()- Defines the parameters and return type of the function, as well as its behavior and metadata.UCLASS()- Defines the properties and behavior of the class, including its inheritance hierarchy, default properties, and editor metadata.USTRUCT()- Defines the properties and behavior of the struct, including its fields, default values, and editor metadata.UINTERFACE()- Defines the values of the enumeration, as well as its metadata and display names.UPARAM()- Specify additional metadata for function parameters in Unreal Engine. This metadata can be used for a variety of purposes, such as specifying the category or tooltip for the parameter in the editor.UENUM()- Define an enumeration that can be used in Unreal Engine classes. This allows developers to define a set of named constants that can be used in a type-safe way.UMETA()- Specify additional metadata for enumeration values in Unreal Engine. This metadata can be used for a variety of purposes, such as specifying the display name or tooltip for the value in the editor.INLINE- Suggestion to the compiler that a function should be inlined, but the compiler is not required to honor it. (Replacement forinlinekeyword2)FORCEINLINE- A stronger suggestion that the compiler should inline the function if possible, and it may even produce an error if the function cannot be inlined. (Replacement forforce_inlinekeyword2)'UE_LOG- Outputs the log message into the log file. The first input parameter it takes is the name of the logging category.checkandcheckf(NOT ALLOWED IN BUILDS) - Halts execution ifExpressionis false.checkfoutputsFormattedTextto the log.verifyandverifyf(ALLOWED IN BUILDS) - Halts execution ifExpressionis false.verifyfoutputsFormattedTextto the log.ensureandensureMsgf(ALLOWED IN BUILDS) - Notifies the crash reporter on the first timeExpressionis false.ensureMsgfoutputsFormattedTextto the log.ensureAlwaysandensureAlwaysMsgf(ALLOWED IN BUILDS) - Notifies the crash reporter if Expression is false.ensureAlwaysMsgfoutputsFormattedTextto the log.unimplemented- Halts execution if the line is ever hit, similar tocheck(false), but intended for virtual functions that should be overridden and not called.checkCode- ExecutesCodewithin a do-while loop structure that runs once; primarily useful as a way to prepare information that another Check requires.checkNoEntry- Halts execution if the line is ever hit, similar tocheck(false), but intended for code paths that should be unreachablecheckNoReentry- Halts execution if the line is hit more than once.checkNoRecursion- Halts execution if the line is hit more than once without leaving scope.
What are inlined functions?
When a function is inlined, the compiler replaces the function call with the actual code of the function, as if the code had been written directly in place of the call.
This can improve performance by eliminating the overhead of a function call, but it can also increase the size of the executable.
Difference between a macro and function then?
While both macros9 and
FORCEINLINEfunctions can be used to improve performance and reduce code repetition,FORCEINLINEfunctions are generally preferred over macros9 in Unreal Engine, as they offer type safety, scoping and visibility rules, and better debugging support.
| This section was NOT written in conjunction with ChatGPT. |
All logs will be saved at: YourProjectName\Saved\Logs.
In order to view the log history inside the editor, you can access the window via: Window -> Developer Tools -> Output Log.
You can also access the log history via console command, by typing: showlog into the console.
To log to the console with C++ in Unreal Engine, you can use UE_LOG() macro. This macro takes in a couple of arguments.
- Log Category
- Log Verbosity
- The actual text to log to the console
|
The most common log category, that you will probably use, is LogTemp and LogBlueprintUserMessages for Blueprint messages.
You can also define your own log category, by using the DECLARE_LOG_CATEGORY_EXTERN() and DEFINE_LOG_CATEGORY() macros.
Inside you header file, you can write:
// .h

// Arguments:
// 1. Name of your custom category. You can use LogTemp if you don't want to define a category.
// 2. Default verbosity when one is not specified. The most common value is Log.
// Valid verbosity levels are: Fatal, Error, Warning, Display, Log, Verbose, VeryVerbose
// 3. Maximum verbosity level to allow when compiling. Can also be All
DECLARE_LOG_CATEGORY_EXTERN(MyLogCategory, Log, All);
Then inside the source file, you can write:
// .cpp

// Define the log category
DEFINE_LOG_CATEGORY(MyLogCategory);
Now you can reuse the log category, via including the header file.
Here is the list of types of verbosity levels:
| Verbosity Level | Printed in Console ? | Printed in Editor's Log? | Notes |
|---|---|---|---|
| Fatal | Yes | N / A | Crashes the session, even if logging is disabled |
| Error | Yes | Yes | Log text is coloured red |
| Warning | Yes | Yes | Log text is coloured yellow |
| Display | Yes | Yes | Log text is coloured grey |
| Log | No | Yes | Log text is coloured grey |
| Verbose | No | No | |
| VeryVerbose | No | No |
You can also override some of the pre-existing verbosity levels. These settings can be set in either Engine.ini or DefaultEngine.ini.
Here's an example of verbosity settings:
[Core.Log]
Global=<Category>=<DesiredVerbosityLevel>
Here's a couple of examples:
Log to the console with a simple string:
UE_LOG(LogTemp, Warning, TEXT("Hello"));Similar to sprintf() function in C++, where you can use specific different arguments into the string formatter. There are a couple of arguments type, that you need to know about.
|
How to log to the console with FString as an argument:
UE_LOG(LogTemp, Warning, TEXT("The Actor's name is: %s"), *YourActor->GetName());Tip
You can use __func__, __FUNCTION__ or __PRETTY_FUNCTION__ to get the name of the function and print it out in the log. However, to add this string, you must convert it into a TCHAR pointer. By using ANSI_TO_TCHAR() macro.
Sadly, UE_LOG does NOT support bool data type.
In order to print a boolean with UE_LOG, you can use %i or %d to convert a bool (boolean) into a int32 (integer).
Log to the console with bool as an argument:
bool bMyBoolean = true;

// You can either use %d or %i. Both will print an integer.
UE_LOG(LogTemp, Log, TEXT("The boolean value is: %i"), bMyBoolean); // The boolean value is: 1

// True -> 1
// False -> 0
You can also just convert the boolean into a string as well:
bool bMyBoolean = false;

UE_LOG(LogTemp, Log, TEXT("The boolean value is: %s"), (bMyBoolean ? TEXT("true") : TEXT("false"))); // The boolean value is: false
Log to the console with int32 as an argument:
int32 MyInteger = 1337;
UE_LOG(LogTemp, Log, TEXT("The integer value is: %d"), MyInteger); // The integer value is: 1337
Log to the console with float as an argument:
float MyFloat = 99.999999f;
UE_LOG(LogTemp, Log, TEXT("The float value is: %f"), MyFloat); // The float value is: 99.999999Log to the console with double as an argument:
double MyDouble = 3.1415926535897931;
UE_LOG(LogTemp, Log, TEXT("The double value is: %f"), MyDouble); // The double value is: 3.1415926535897931Log to the console with FVector as an argument:
FVector MyVector = FVector::OneVector;
// In order to log a FVector, you need to convert into a string.
UE_LOG(LogTemp, Log, TEXT("The vector value is: %s"), *MyVector.ToString()); // The vector value is: (1, 1, 1)Log to the console with FName as an argument:
// In order to log a FName, you need to convert into a string.
UE_LOG(LogTemp, Log, TEXT("The name is: %s"), *MyCharacter->GetFName().ToString());You can also alter the decimal point, when printing floating point numbers.
This can help for readability’s sake.
Using .2 will specify 2 digits after the decimal point.
Here's an example:
double MyDouble = 3.1415926535897931;
UE_LOG(LogTemp, Log, TEXT("The double value is: %.2f"), MyDouble); // The double value is: 3.14
UE_LOG(LogTemp, Log, TEXT("The double value is: %.0f"), MyDouble); // The double value is: 3
UE_LOG(LogTemp, Log, TEXT("The double value is: %,2f"), MyDouble); // The double value is: 3,14
|
In Unreal Engine 5.2, you can use UE_LOGFMT() macro instead! The new UE_LOGFMT() macro allows to alleviate many of these issues.
Here's an example of using it:
Include the header file:
#include "Logging/StructuredLog.h"Then to log to the console, just write:
UE_LOGFMT(LogTemp, Log, "This message will print to my log");And to add some arguments, you can write:
FString Name("SomeName");
int32 Value = 999;
UE_LOGFMT(LogTemp, Log, "Printing my Name: {0} with Value: {1}", Name, Value); // Printing my Name: SomeName with Value: 999Here's a couple of examples:
UE_LOGFMT(LogCore, Warning, "Loading '{0}' failed with error {1}", Package->GetName(), ErrorCode);UE_LOGFMT(LogCore, Warning, "Loading '{Name}' failed with error {Error}", ("Error", ErrorCode), ("Name", Package->GetName()), ("Flags", LoadFlags));Note
FText is not supported with UE_LOGFMT(), in order to use FText you need to convert into FString by simply calling ToString() function.
Currently, we have only logged to the console. In order to display the console messages inside the game-view, we need to call AddOnScreenDebugMessage() function instead. You can access this function inside the global engine variable (GEngine).
Here's an example:
/*
void AddOnScreenDebugMessage
(
uint64 Key, // A unique key to prevent the same message from being added multiple times.
float TimeToDisplay, // How long to display the message, in seconds.
FColor DisplayColor, // The color to display the text in.
const FString & DebugMessage, // The message to display.
bool bNewerOnTop,
const FVector2D & TextScale
)
Add a FString to the On-screen debug message system. bNewerOnTop only works with Key == INDEX_NONE
This function will add a debug message to the onscreen message list. It will be displayed for FrameCount frames.
*/
GEngine->AddOnScreenDebugMessage(-1, 5.0f, FColor::White, TEXT("This message will appear on the screen!"));And to provide arguments to this function, you need to use FString::Printf(), which is similar to sprintf() function and UE_LOG() macro.
Here's an example, how to use FString::Printf() function AddOnScreenDebugMessage() function:
GEngine->AddOnScreenDebugMessage(-1, 5.0f, FColor::Red, FString::Printf(TEXT("Some variable values: x = %f, y = %f"), x, y));| This section was written in conjunction with ChatGPT. |

Assertions are a programming technique used to detect and report errors or unexpected behavior in code. In Unreal Engine, assert macros are provided to make it easier to add assertions to code and to customize the behavior of the engine when an assertion fails.
Used to test a condition at runtime and to report an error if the condition fails. If the condition is false, the check(Expression) macro will print an error message to the console and either halt the game or break into the debugger, depending on the configuration of the engine.
The check(Expression) macro is typically used to detect programming errors or unexpected runtime conditions.
void MyFunction()
{
APlayerCharacter* PC = Cast<APlayerController>(GetController());
check(PC); // Critical check, program will terminate if PC is a `nullptr`
}Similar to the check(Expression) macro, but is only enabled in debug builds of the engine. If the condition is false, the verify(Expression) macro will break into the debugger but will not halt the game.
The verify(Expression) macro is typically used to detect errors during development or testing, but does not impact the performance of the final release build.
void MyFunction()
{
APlayerCharacter* PC = Cast<APlayerController>(GetController());
verify(PC); // Assertion in all builds, including shipping builds
}Similar to the check(Expression) macro, but is used to test conditions that are not necessarily fatal to the program. If the condition is false, the ensure(Expression) macro will print a warning message to the console and either halt the game or break into the debugger, depending on the configuration of the engine.
The ensure(Expression) macro is typically used to detect non-fatal errors or unexpected conditions that can be recovered from.
void MyFunction()
{
APlayerCharacter* PC = Cast<APlayerController>(GetController());
ensure(PC); // Non-critical check, assertion only during development and editor builds
}There is also alternatives macros9 that displays text.
void MyFunction()
{
APlayerCharacter* PC = Cast<APlayerController>(GetController());
checkf(PC, TEXT("Player character cannot be null!"));
ULocalPlayer LP = PC->GetLocalPlayer();
verifyf(LP, TEXT("Local player cannot be null!"));
bool bIsDead = false;
ensureMsgf(bIsDead, TEXT("Player shouldn't be dead!"));
} |
There is also an unimplemented assert macro. Useful for writing functions that require code, but is currently unimplemented.
void DoSomething()
{
unimplemented();
}Another assert macro is checkCode. Which is an asserted marco to check your code is valid. Behind the scene, the code runs inside a do-while loop with while set to false. This prevents from looping. The main point of using this technique is to clean up memory afterwards and the ability to use continue or break keyword.
checkCode(
if (ObjectItem->IsPendingKill())
{
UE_LOG(LogGarbage, Fatal, TEXT("Object %s is part of root set though has been marked RF_PendingKill!"), *Object->GetFullName());
}
);And lastly, we have checkNoEntry, checkNoReentry and checkNoRecursion assert macros.
checkNoEntryindicates that code should never be reached.checkNoReentryindicates that code should not be executed more than once.checkNoRecursionindicates that code should never be called recursively.
void KillPlayer()
{
PlayerPtr->Destroy();
PlayerPtr = nullptr;
if (IsValid(Player))
{
checkNoEntry();
}
}
void CleanupCharacters(int32 Count)
{
if (Count > 3)
return;
checkNoRecursion();
if (IsValid(Player))
{
checkNoReentry();
KillPlayer();
}
CleanupCharacters(Count + 1);
}You can read more about Assertions from the docs.
You can also watch a video about it from Sneaky Kitty Game Dev.
| Assertion | Description | Use Cases |
|---|---|---|
check |
A macro used for runtime checks in Unreal Engine, which is enabled only in Debug builds. | - Validating preconditions or assumptions in the code. - Ensuring that critical conditions are met during development and debugging. |
If the condition specified in the check macro evaluates to false, it triggers an assertion failure, halting the program's execution in Debug mode, allowing developers to identify and fix the issue. |
- Detecting potential bugs or logic errors during development. - Identifying unexpected conditions that should not occur during testing or debugging. |
|
The check macro is compiled out in non-Debug builds, so it has no impact on the performance of the release version of the game. |
||
verify |
A macro similar to check, used for runtime checks in Unreal Engine, but it is enabled in both Debug and Release builds. |
- Similar use cases as check, but with the intention of detecting issues in both Debug and Release builds.- Useful for crucial runtime checks in production. |
If the condition specified in the verify macro evaluates to false, it triggers an assertion failure in both Debug and Release builds, halting the program's execution. |
||
| This can help identify and fix critical issues even in the final release version of the game or application. | ||
ensure |
A macro specifically designed for Unreal Engine, used for runtime checks with a focus on improving the robustness of code in shipping games. | - Verifying and enforcing assumptions, preconditions, and invariants in the code to avoid crashes and unexpected behavior in production environments. |
The ensure macro remains active in both Debug and Release builds, and its behavior can be configured in the Unreal Editor project settings. |
- In a shipping build, ensure can be set to log a message or perform a fail-safe action instead of halting the program's execution. |
|
If the condition specified in the ensure macro evaluates to false, it may trigger an assertion or perform an alternative action based on project settings. |
| This section was written in conjunction with ChatGPT. |

Delegates are a powerful feature of the Unreal Engine that allows developers to create and manage events in a flexible and modular way. A delegate is essentially a type-safe function pointer that can be used to bind one or more functions to an event, and then trigger those functions when the event occurs.
The first step in using delegates is to define a delegate type. This is done using the DECLARE_DYNAMIC_MULTICAST_DELEGATE() macro, which takes the name of the delegate as an argument.
DECLARE_DYNAMIC_MULTICAST_DELEGATE(FMyDelegate);Once you have defined a delegate type, you can declare a delegate variable of that type. This is done using the UPROPERTY() macro to ensure that the delegate variable is properly managed by the Unreal Engine.
UPROPERTY(BlueprintAssignable)
FMyDelegate MyEvent;With the delegate variable declared, you can now bind one or more functions to it using the BindDynamic() method. This method takes a reference to the object that owns the function, the name of the function, and an optional user data parameter.
MyEvent.BindDynamic(this, &AMyActor::MyFunction);Finally, you can trigger the delegate by calling the broadcast() method. This will cause all bound functions to be called with the specified parameters.
MyEvent.Broadcast();By using delegates, developers can create modular and flexible event systems that can be easily extended and customized. Delegates can be used to trigger events in response to user input, game state changes, or other types of events, and can be used to implement a wide variety of gameplay features and mechanics.
Tip
Here is an online tool by BenUI for helping you to create a delegate macro.
Tip
Try to USE delegates where ticking is not necessary. This help save on performance.
| Type | Binds C++ Function | Binds UFUNCTION |
|---|---|---|
| Singlecast | Yes | Yes |
| Multicast | Yes | No |
| Event | Yes | ? |
| Dynamic Singlecast | No | Yes |
| Dynamic Multicast | No | Yes |
FTimerDelegate (Singlecast) |
Yes | Yes |
FTimerDynamicDelegate (Dynamic Singlecast) |
No | Yes |
| This section was written in conjunction with ChatGPT. |
UMG (Unreal Motion Graphics) is a visual interface authoring tool in Unreal Engine that enables the creation of user interfaces (UI) and interactive elements for games and applications. It provides a user-friendly, node-based system for designing UI elements and connecting them to C++ code for functionality and interactivity.
You can read more about from the docs.
There is also a video about UMG Widgets with C++ by Lively Geek.
To control Blueprint-created widgets from C++ in Unreal Engine, you can use the BindWidget meta property. This powerful feature allows you to establish a connection between widgets created in the Unreal Motion Graphics (UMG) editor and corresponding C++ variables.
By applying the BindWidget meta property to a C++ variable, you can establish the link between the widget and the variable, giving you direct access to the widget's properties and functionalities within your C++ code.
Here's an example that demonstrates how to use BindWidget:
UPROPERTY(meta=(BindWidget)) // Binding via UMG editor
UTextBlock* PlayerDisplayNameText;In this example, the PlayerDisplayNameText variable is declared as a UTextBlock* type, representing a text widget. The meta=(BindWidget) property indicates that this variable is bound to a widget created in the UMG editor.
With this binding in place, you can now access and control all the properties and functions of the PlayerDisplayNameText widget directly from your C++ code. This allows you to manipulate the widget's appearance, handle user interactions, and update its content dynamically based on game logic or user input.
Here's an example showcasing the usage of the widget:
#include "MainMenu.h"
void UMainMenu::NativeConstruct()
{
if (PlayerDisplayNameText == nullptr)
return;
PlayerDisplayNameText->OnClicked.AddDynamic(this, &UMainMenu::UpdatePlayerDisplayName);
}
void UMainMenu::UpdatePlayerDisplayName()
{
if (PlayerDisplayNameText == nullptr)
return;
const FString& NewDisplayName = TEXT("John Doe");
PlayerDisplayNameText->SetText(FText::FromString(NewDisplayName));
}In this example, assume we have a custom player character class called AMyPlayerCharacter. The UpdatePlayerDisplayName() function receives a NewDisplayName as a parameter, which represents the updated display name for the player.
Inside the function, we check if the PlayerDisplayNameText widget is valid. If it is, we use the SetText() function to update the text displayed by the widget. In this case, we convert the NewDisplayName string to an FText object using FText::FromString before assigning it to the PlayerDisplayNameText widget.
You can read more about binding widgets with C++ from the article by BenUI.
BenUI has also created a free helpful plugin, which helps you animate UMG in C++. Plugin can be install from github10. Link to repository.
Here's an example from UI Tweening Library:
UBUITween::Create( SomeWidget, 0.2f )
.FromTranslation( FVector2D( -100, 0 ) )
.FromOpacity( 0.2f )
.ToTranslation( FVector2D( 20, 10 ) )
.ToOpacity( 1.0f )
.Begin();| This section was NOT written in conjunction with ChatGPT. |
You can read more about Unreal Engine's modules here!
In Unreal Engine, a module is a way to organize game code into smaller pieces, similar to Unity's Assembly Definitions. By separating code into modules, you can reduce compile times and keep your code more organized.
For example, you could create a module called Vehicle to contain all the code related to the vehicle system. This would allow you to isolate the vehicle code from other parts of the game, such as the inventory system, and make it easier to maintain and update.
Note
Unreal Engine modules are not related to C++ 20 modules.
Here is a list of Unreal Engine's modules:
|
Working with modules can also help you stay focused on the specific functionality you're implementing, as you only need to work with the code relevant to that module.
All modules should be placed in the Source directory for either a plugin or project. The module's root folder should have the same name as the corresponding module.
There should also be a [ModuleName].Build.csfile for each module in its root folder, and its C++ code should be contained in Private and Public folders.
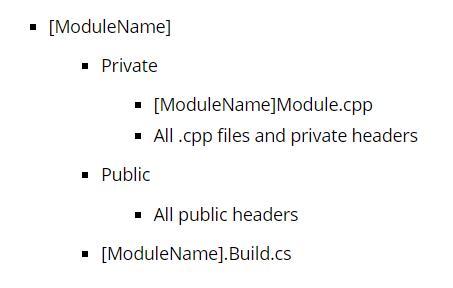
It's possible to encounter circular dependencies when multiple modules access the same module. This occurs when module A depends on module B, and module B also depends on module A.
To resolve circular dependencies, you can take several approaches:
Here's an example: using UnrealBuildTool;
public class ModuleB : ModuleRules
{
public ModuleB(ReadOnlyTargetRules Target) : base(Target)
{
PrivateDependencyModuleNames.AddRange(new string[]
{
"ModuleA"
});
CircularlyReferencedDependentModules.Add("ModuleA"); // Avoid circular dependencies errors!
}
}
|
The best solution will depend on your specific situation and the complexity of your code.
| This section was written in conjunction with ChatGPT. |
Plugins are a powerful feature of the Unreal Engine that allows developers to easily extend and customize the engine's functionality to fit their specific needs. A plugin is essentially a module that can be added to a Unreal Engine project to provide additional features, tools, and content. Unlike modules, plugins are designed to be self-contained and can be shared across multiple projects.
When you create a plugin, you can define your own modules, content, and assets that can be loaded and used in your project. Plugins can include any number of modules, each with their own classes, assets, and functionality. This allows you to keep your code organized and separated, making it easier to manage and maintain.
One of the biggest advantages of using plugins is that they can be shared with other developers, making it easy to create and distribute custom functionality to the Unreal Engine community. You can even sell your plugins on the Unreal Marketplace and earn revenue from your work.
Plugins can also be used to add support for third-party libraries and tools, such as physics engines or audio systems. This makes it easy to integrate these tools into your game and take advantage of their features without having to write custom code from scratch.
You can read more about plugins, over here!
| This section was written in conjunction with ChatGPT. |
In programming languages, including C++, the preprocessor is a component of the compiler that performs text manipulation before the actual compilation process. It operates on the source code and handles directives starting with a hash symbol #.
In C++, the preprocessor handles tasks such as macro expansion, file inclusion, and conditional compilation. It modifies the source code based on these directives before the code is compiled into machine-readable instructions.
The preprocessor can be used to define macros, which are text replacements performed by the preprocessor before the compilation stage. Macros9 allow for code reuse, conditional compilation, and other preprocessing operations. Directives like #include are used to include header files, and conditional directives like #ifdef, #ifndef, #if, and #endif are used for conditional compilation based on certain conditions.
You can read more about Preprocessor from cppreference.com.
You can also watch a video called Preprocessor Directives" by NeuralNine.
#pragma once is a preprocessor directive used in C++ header files to ensure that the header is included only once during the compilation of a source file, regardless of how many times it is referenced.
It is an alternative to traditional header guards, which involve using #ifndef and #define statements to prevent multiple inclusions.
#pragma once is a simpler and more efficient way to achieve the same effect, and is supported by most modern compilers.
Here is an example:
#pragma once
#include "Vehicle.generated.h"
UINTERFACE(BlueprintType)
class COMMONVEHICLE_API UVehicle : public UInterface
{
GENERATED_UINTERFACE_BODY()
};
class COMMONVEHICLE_API IVehicle
{
GENERATED_IINTERFACE_BODY()
// ...
};Using preprocessor directives to strip out editor functionality in Unreal Engine with C++ is a good habit, because it allows for efficient compilation and reduces the size of the final executable by excluding code that is specific to the editor but not needed in the final game build.
For an example, in this scenaro.
Here's an example:
#if WITH_EDITORONLY_DATA
UPROPERTY(VisibleAnywhere)
UArrowComponent* ArrowComponent;
#endif
#if WITH_EDITOR
void SetupArrow()
{
ArrowComponent->SetArrowColor(FLinearColor::Yellow);
}
#endifIn this scenario, ArrowComponent is not needed for the final build. Only inside the editor version. Therefore, with the use of preprocessor, we can mark it for stripping. Once Unreal Engine is building/packing the game, the piece of code will be removed.
You can also use #elif as else if or #else as else, in order to branch off the stripping processes.
Here is an updated example of this:
#if WITH_EDITORONLY_DATA
UPROPERTY(VisibleAnywhere)
UArrowComponent* ArrowComponent;
#endif
void SetupArrow()
{
#if WITH_EDITOR
ArrowComponent->SetArrowColor(FLinearColor::Yellow);
#else
GEngine->AddOnScreenDebugMessage(-1, 15.0f, FColor::Yellow, TEXT("Some debug message!"));
#endif
}
You can also used UE_BUILD_SHIPPING for negation to isolate debug code, so it wont be compiled in shipping build.
Example:
void APlayerCharacter::Kill()
{
#if !UE_BUILD_SHIPPING
GEngine->AddOnScreenDebugMessage(-1, 5.0f, FColor::Yellow, TEXT("Hello, World!"));
#endif
}With UHT7, you can specify a specific unit for UPROPERTY values. Epic has already provided some of the basic units. Which it includes both metric and imperial system.
Here's a list of units, that Epic has provided:
/** Enum *must* be zero-indexed and sequential. Must be grouped by relevance and ordered by magnitude. */
/** Enum *must* match the mirrored enum that exists in CoreUObject/Classes/Object.h for the purposes of UObject reflection */
enum class EUnit : uint8
{
/** Scalar distance/length units */
Micrometers, Millimeters, Centimeters, Meters, Kilometers,
Inches, Feet, Yards, Miles,
Lightyears,
/** Angular units */
Degrees, Radians,
/** Speed units */
CentimetersPerSecond, MetersPerSecond, KilometersPerHour, MilesPerHour,
/** Temperature units */
Celsius, Farenheit, Kelvin,
/** Mass units */
Micrograms, Milligrams, Grams, Kilograms, MetricTons,
Ounces, Pounds, Stones,
/** Force units */
Newtons, PoundsForce, KilogramsForce, KilogramCentimetersPerSecondSquared,
/** Torque Units */
NewtonMeters, KilogramCentimetersSquaredPerSecondSquared,
/** Frequency units */
Hertz, Kilohertz, Megahertz, Gigahertz, RevolutionsPerMinute,
/** Data Size units */
Bytes, Kilobytes, Megabytes, Gigabytes, Terabytes,
/** Luminous flux units, luminous intensity, illuminance, luminance, exposure value */
Lumens, Candela, Lux, CandelaPerMeter2, ExposureValue,
/** Time units */
Nanoseconds, Microseconds, Milliseconds, Seconds, Minutes, Hours, Days, Months, Years,
/** Pixel density units */
PixelsPerInch,
/** Arbitrary multipliers */
Percentage, Multiplier,
/** Stress units */
Pascals, KiloPascals, MegaPascals, GigaPascals,
/** Symbolic entry, not specifiable on meta data */
Unspecified
};Enumeration that specifies particular classes of unit:
enum class EUnitType
{
Distance, Angle, Speed, Temperature, Mass, Force, Torque, Frequency, DataSize, LuminousFlux, LuminousIntensity, Illuminance, Luminance, Time, PixelDensity, Multipliers, ExposureValue, Stress,
// Symbolic entry - do not use directly
NumberOf,
};Now, we know what types of units there are. We can now use them inside our code.
First we can use them with UHT7, by specifying with meta tag.
UPROPERTY(meta = (Units = "kg"))
float MassInKg{ 10.0f };By default, Unreal will override your unit with the respective unit for that category. For an example, if I specified my mass variable to use pounds, Unreal will overwrite and use kg instead.
If you want to disable this feature, then you can use the specifier ForceUnits instead.
UPROPERTY(meta = (Units = "lbs"))
float MassInPounds{ 22.0f };Unreal also have a class for handling the unit conversion.
Here's an example, on how to use conversion class:
float Distance = 15.535f; // Unit: Miles
// Miles -> Kilometers
Distance = FUnitConversion::Convert(Distance, EUnit::Miles, EUnit::Kilometers);
// Distance: 25 [km]You can also get the specified unit category:
EUnitType UnitType = FUnitConversion::GetUnitType(EUnit::Lumens);
// UnitType: LuminousFluxYou can also automatic change a unit to fit the best:
float Distance = 300000.0f; // Units: Centimeters
FNumericUnit<float> DistanceUnit = FUnitConversion::QuantizeUnitsToBestFit(Distance, EUnit::Centimeters); // Will auto select a better unit
EUnit NewUnit = DistanceUnit.Units;
float NewDistance = DistanceUnit.Value;
// NewDistance: 3.0 [km]| This section was NOT written in conjunction with ChatGPT. |
Include the header file:
#include "DrawDebugHelpers.h"Draw a point:
bool bPersistentLines = true;
FVector Location = FVector(0, 0, 600);
float Size = 200.0f;
FColor Color = FColor(52, 220, 239);
DrawDebugPoint(GetWorld(), Location, Size, Color, bPersistentLines);
Draw a sphere:
bool bPersistentLines = true;
float LifeTime = -1.0f;
uint8 DepthPriority = 0;
float Thickness = 2.0f;
FVector Center = FVector(0, -600, 600);
float Radius = 200.0f;
int32 Segments = 26;
FColor Color = FColor(181, 0, 0);
DrawDebugSphere(GetWorld(), Center, Radius, Segments, Color, bPersistentLines, LifeTime, DepthPriority, Thickness);
Draw a circle:
float Radius = 200.0f;
int32 Segments = 50;
bool bPersistentLines = true;
float LifeTime = -1.0f;
uint8 DepthPriority = 0;
float Thickness = 10.0f;
// Draw a circle via matrix
FMatrix TransformMatrix = FMatrix();
DrawDebugCircle(GetWorld(), TransformMatrix, Radius, Segments, FColor(0, 104, 167), bPersistentLines, LifeTime, DepthPriority, Thickness);
// Draw a circle via location
FVector Center = FVector(-300, 0, 600);
DrawDebugCircle(GetWorld(), Center, Radius, Segments, FColor(0, 0, 0), bPersistentLines, LifeTime, DepthPriority, Thickness);
Draw a circle arc:
bool bPersistentLines = true;
float LifeTime = -1.0f;
uint8 DepthPriority = 0;
float Thickness = 10.0f;
FVector Center = FVector(-400, -600, 600);
float Radius = 200.0f;
FVector Direction = FVector::ForwardVector;
float AngleWidth = 500.0;
int32 Segments = 50;
FColor Color = FColor::Yellow;
DrawDebugCircleArc(GetWorld(), Center, Radius, Direction, AngleWidth, Segments, Color, bPersistentLines, LifeTime, DepthPriority, Thickness);
Draw a 2D donut:
bool bPersistentLines = true;
float LifeTime = -1.0f;
uint8 DepthPriority = 0;
float Thickness = 10.0f;
FMatrix TransformMatrix = FMatrix();
float InnerRadius = 100.0f;
float OuterRadius = 300.0f;
int32 Segments = 26;
FColor Color = FColor::Cyan;
DrawDebug2DDonut(GetWorld(), TransformMatrix, InnerRadius, OuterRadius, Segments, Color, bPersistentLines, LifeTime, DepthPriority, Thickness);
Draw a solid box:
bool bPersistentLines = true;
// Draw a solid box
FVector MinPoint = FVector(0, 0, 0);
FVector MaxPoint = FVector(200, 200, 200);
FBox MyBox = FBox(MinPoint, MaxPoint);
FTransform MyTransform = FTransform(FVector(400, 600, 900));
DrawDebugSolidBox(GetWorld(), MyBox, FColor(20, 100, 240), MyTransform, bPersistentLines);
Draw a wired box:
bool bPersistentLines = true;
float LifeTime = -1.0f;
uint8 DepthPriority = 0;
float Thickness = 10.0f;
// Draw a wired box
FVector Center = FVector(-400, -600, 600);
FVector Extent = FVector(100, 100, 100);
FColor Color = FColor::Purple;
DrawDebugBox(GetWorld(), Center, Extent, Color, bPersistentLines, LifeTime, DepthPriority, Thickness);
Draw a cylinder:
bool bPersistentLines = true;
float LifeTime = -1.0f;
uint8 DepthPriority = 0;
float Thickness = 2.0f;
FVector Start = FVector(0, -600, 600);
FVector End = FVector(0, -1800, 600);
float Radius = 200.0f;
int32 Segments = 26;
FColor Color = FColor(181, 0, 0);
DrawDebugCylinder(GetWorld(), Start, End, Radius, Segments, Color, bPersistentLines, LifeTime, DepthPriority, Thickness);
Draw a capsule:
bool bPersistentLines = true;
float LifeTime = -1.0f;
uint8 DepthPriority = 0;
float Thickness = 2.0f;
FVector Center = FVector(0, -600, 600);
float HalfHeight = 400.0f;
float Radius = 200.0f;
FQuat Rotation = FQuat::Identity;
FColor Color = FColor(181, 0, 0);
DrawDebugCapsule(GetWorld(), Center, HalfHeight, Radius, Rotation, Color, bPersistentLines, LifeTime, DepthPriority, Thickness);
Draw a cone:
bool bPersistentLines = true;
float LifeTime = -1.0f;
uint8 DepthPriority = 0;
float Thickness = 2.0f;
FVector Origin = FVector(0, -600, 600);
FVector Direction = FVector(0, -600, 600);
float Length = 200.0f;
float AngleWidth = 100.0f;
float AngleHeight = 300.0f;
int32 NumSides = 26;
FColor Color = FColor::Yellow;
DrawDebugCone(GetWorld(), Origin, Direction, Length, AngleWidth, AngleHeight, NumSides, Color, bPersistentLines, LifeTime, DepthPriority, Thickness);
Draw a plane:
bool bPersistentLines = true;
float LifeTime = -1.0f;
uint8 DepthPriority = 0;
float Thickness = 2.0f;
FVector NormalVector = FVector::UpVector;
FPlane Plane = FPlane(NormalVector);
FVector Location = FVector(0, -600, 600);
FColor Color = FColor(181, 0, 0);
float Size = 100.0f;
DrawDebugSolidPlane(GetWorld(), Plane, Location, float Size, Color, bPersistent, LifeTime, DepthPriority);
FVector2D Extents = FVector2D::One();
DrawDebugSolidPlane(GetWorld(), Plane, Location, Extents, Color, bPersistent, LifeTime, DepthPriority);
Draw a line:
bool bPersistentLines = true;
float LifeTime = -1.0f;
uint8 DepthPriority = 0;
float Thickness = 10.0f;
FVector LocationFrom = FVector(0, -600, 600);
FVector LocationTo = FVector(0, 600, 600);
FColor Color = FColor::Emerald;
DrawDebugLine(GetWorld(), LocationFrom, LocationTo, Color, bPersistentLines, LifeTime, DepthPriority, Thickness);
Draw an arrow:
bool bPersistentLines = true;
float LifeTime = -1.0f;
uint8 DepthPriority = 0;
float Thickness = 5.0f;
FVector LocationFrom = FVector(-300, 600, 600);
FVector LocationTo = FVector(-300, -600, 600);
float ArrowSize = 120.0f;
FColor Color = FColor::Magenta;
DrawDebugDirectionalArrow(GetWorld(), LocationFrom, LocationTo, ArrowSize, Color, bPersistentLines, LifeTime, DepthPriority, Thickness);
Draw a crosshair:
bool bPersistentLines = true;
float LifeTime = -1.0f;
uint8 DepthPriority = 0;
FVector AxisLocation = FVector(0, 0, 1000);
FRotator AxisRotation = FRotator::ZeroRotator;
float Scale = 500.0f;
FColor Color = FColor::White;
DrawDebugCrosshairs(GetWorld(), AxisLocation, AxisRotation, Scale, Color, bPersistentLines, LifeTime, DepthPriority);
Draw a camera:
bool bPersistentLines = true;
float LifeTime = -1.0f;
uint8 DepthPriority = 0;
FVector Location = FVector(0, -600, 600);
FRotator Rotation = FRotator::ZeroRotator;
float FOVDeg = 45.0f;
float Scale = 1.0f;
FColor Color = FColor::White
DrawDebugCamera(GetWorld(), Location, Rotation, FOVDeg, Scale, Color, bPersistentLines, LifeTime, DepthPriority);
Draw a mesh:
bool bPersistentLines = true;
float LifeTime = -1.0f;
uint8 DepthPriority = 0;
const TArray<FVector> Verts;
const TArray<int32> Indices;
FColor Color = FColor(181, 0, 0);
DrawDebugMesh(GetWorld(), Verts, Indices, Color, bPersistent, LifeTime, DepthPriority);
Draw a string:
FVector TextLocation = FVector(0, -600, 600);
FString Str = TEXT("Hello, World!");
AActor* TestBaseActor = NULL;
FColor TextColor = FColor::White;
float Duration = -1.0f;
bool bDrawShadow = false;
float FontScale = 1.0f;
DrawDebugString(GetWorld(), TextLocation, Str, TestBaseActor, TextColor, Duration, bDrawShadow, FontScale);
Draw a centripetal catmull-rom spline:
bool bPersistentLines = true;
float LifeTime = -1.0f;
uint8 DepthPriority = 0;
float Thickness = 2.0f;
TConstArrayView<FVector> Points;
float Alpha = 0.5f;
int32 NumSamplesPerSegment = 8;
FColor Color = FColor(181, 0, 0);
DrawCentripetalCatmullRomSpline(GetWorld(), Points, Color, Alpha, NumSamplesPerSegment, bPersistentLines, LifeTime, DepthPriority, Thickness);
TConstArrayView<FColor> Colors;
DrawCentripetalCatmullRomSpline(GetWorld(), Points, Colors, Alpha, NumSamplesPerSegment, bPersistentLines, LifeTime, DepthPriority, Thickness);
You can read more about drawing shapes by Harrison McGuire.
You can also watch a video about it from Ryan Sweeney.
| This section was NOT written in conjunction with ChatGPT. |
The most common way for a game engine to run your gameplay, is simply with a while loop. This pattern is very simple to understand and execute consistently. However, this pattern does not generate the greatest performance benefits. To gain performance, usually you would rewrite your code to be multithreaded.
You can read more about Game Loop from Robert Nystrom.
Ayliroé wrote an awesome documentation on Unreal's multithreading and asynchronous tasks system, which you can read either from Google Docs or from Forum Post.
By the default, Unreal supports multithreading, but only makes partial use of it. While there are dedicated threads for audio, render and stats, most operations are still done in the game thread, including EventTicks and Blueprints.
This is why doing expensive calculations in Blueprint will lead to loss of performance. That’s where threading comes in handy!
Multithreading is the ability of a central processing unit (CPU) (or a single core in a multicore processor) to provide multiple threads of execution concurrently, supported by the operating system. In a multithreaded application, the threads share the resources of a single or multiple cores, which include the computing units, the CPU caches, and the translation lookaside buffer (TLB). This allows for faster speed of computation.
In order to make your game ready for multithreaded, then you're to change your mindset as well. When splitting your code into multiple threads can create race conditions, which is when two operations are happening at the same time, and is competing for which one will be the first to execute. This can lead to instability and can cause bugs.
You can read more about Multithreading from Vulkan Guide.
You can also watch a video from Chris Kanich about deadlocks.
If you want to create multithreading inside Blueprint will minimal C++ code, then here is a video from Project Ispheria.
FRunnable is a class which runs on a dedicated, newly created thread. Which you have full control over it.
They will automatically stop once their work is completed, and are generally useful for big computations that require a nearly continuously running thread.
Here's an example:
// .h
#pragma once
#include "CoreMinimal.h"
#include "HAL/Runnable.h"
class FMyThread : public FRunnable
{
public:
FMyThread( /*Parameters*/ )
{
bIsRunning = true;
Thread = FRunnableThread::Create(this, TEXT("MyThread"));
};
virtual ~FMyThread()
{
if (Thread)
{
bool bShouldWait = false; // Will forcefully terminate the thread.
Thread->Kill(bShouldWait);
delete Thread;
}
}
public:
bool Init() override;
uint32 Run() override;
void Exit() override;
void Stop() override;
private:
FRunnableThread* Thread;
bool bIsRunning;
};// .cpp
#include "FMyThread.h"
bool FMyThread::Init()
{
/* Should the thread start? */
return true;
}
uint32 FMyThread::Run()
{
while (bIsRunning)
{
/* Work on a dedicated thread */
}
return 0;
}
void FMyThread::Exit()
{
/* Post-Run code, threaded */
}
void FMyThread::Stop()
{
bIsRunning = true;
}When you want to start your thread, include its header and call its constructor (keep the pointer at hand!):
auto* Thread = new FMyThread( /*Parameters*/ );TaskGraph, is a job manager that tries to balance out workload along multiple preexisting threads. This is ideal to send packages of small operations, as it abstracts away from you the complexity of managing threads, and also supports defining dependencies between Tasks.
Queuing Tasks will not cause performance concerns due to the threads being already running, but the system may also be less reactive as it has to find slots to fit the work in inside a limited pool, and sending long Tasks should be avoided to not clog-up threads. It may also sometimes decide to run Tasks directly in the game thread, depending on the setup.
If you want to run a small async operation without creating a dedicated class or starting a new thread and do not need the control logic for pausing or callbacks, you can put it inside an AsyncTask running on the TaskGraph:
AsyncTask(ENamedThreads::AnyHiPriThreadNormalTask, [this] ()
{
/* Work on the TaskGraph */
Caller->FunctionToThread(); // Function call captured using [this]
});If you don't know about lambda, then highly recommend reading about it on this section.
A fancier version of AsyncTask that splits a for loop into multiple Tasks running in the TaskGraph.
ParallelFor(Array.Num(), [&](int32 i)
{
// Run Array.Num() operations, with current index i
/* Work on the TaskGraph (order of execution is variable!) */
++Array[i];
});There’s no guarantee about the order or the thread safety of the operation within, so you might want to use mutexes or atomics with it. MSVC has an analogous #pragma loop(hint_parallel(n)). Practically speaking, the contents of your loop must be significant to really benefit from this approach.
A way to declare your own AsyncTasks, in a format that sits inbetween FRunnable and lambda-like AsyncTasks. You can implement your own code in a standalone class to be more reusable, which will run on the TaskGraph instead of inside a dedicated thread, but missing some of FRunnable’s initializing and stopping logic.
#pragma once
#include "CoreMinimal.h"
#include "Async/AsyncWork.h"
class FMyTask : public FNonAbandonableTask
{
friend class FAutoDeleteAsyncTask<FMyTask>;
FMyTask( /*Parameters*/ )
{
/* Constructor */
}
void DoWork()
{
/* Work on the TaskGraph */
}
FORCEINLINE TStatId GetStatId() const
{
// Probably declares the Task to the TaskGraph
RETURN_QUICK_DECLARE_CYCLE_STAT(FMyTask, STATGROUP_ThreadPoolAsyncTasks);
}
};Start your custom Task like such:
auto* MyTask = new FAsyncTask<FMyTask>( /*Parameters*/ );
MyTask->StartBackgroundTask();As said before, Ayliroé wrote an awesome documentation on Unreal's multithreading and asynchronous tasks system, which you can read either from Google Docs or from Forum Post.
| This section was NOT written in conjunction with ChatGPT. |
You can find editor icons via this github repo, made by EpicKiwi.
Lorem Ipsum
Lorem Ipsum
| This section was written in conjunction with ChatGPT. |
Here is a video about constants keywords in C++ by Cazz
const- Specifies that an object or variable is read-only and cannot be modified.constexpr- Specifies that a function or variable can be evaluated at compile-time.constexprcan be used for inlining variables, without using macros9. Note, the compiler does not guarantee compile-time evaluation (only it CAN be evaluated at compile-time).consteval- Specifies that a function must be evaluated at compile-time. Note, the compiler has to evaluated at compile-time.constinit- Specifies that an object with static or thread storage duration should be initialized only with constant expressions.auto- Allows the compiler to deduce the type of a variable based on its initializer.static- Specifies that a variable or function is associated with a class rather than with a specific instance of the class.virtual- Specifies that a function should be polymorphic, meaning that it can be overridden by a derived class.override- Indicates that a function in a derived class is intended to override a function in the base class.break- Causes the program to exit a loop or switch statement.continue- Causes the program to skip to the next iteration of a loop.classandstruct- Are used to define user-defined types that encapsulate data and functions.inline- Specifies that a function should be inlined (i.e., its code should be inserted directly into the calling code rather than calling the function).force_inline- Instructs the compiler to inline a function, regardless of whether it would normally do so.new- Allocates memory for an object and calls its constructor.delete- Deallocates memory that was allocated with new.dynamic_cast- Performs a runtime check to determine whether an object can be cast to a different type.static_cast- Performs a static cast, which allows an expression to be converted to a different data type at compile time.const_cast- - Performs a const cast.explicit- Specifies that a constructor or conversion operator cannot be used for implicit type conversions.namespace- Defines a scope for identifiers to avoid naming conflicts.operator- Declares a function as an overloaded operator.template- Allows generic programming by defining a type or function with parameters that are specified at compile time.tryandcatch- Implements exception handling by trying a block of code that may throw an exception and catching the exception if it is thrown.
Difference between a class and struct then?
In native C++, the main difference between a struct and a class is that struct members are public by default, whereas class members are private by default. However, this difference is largely syntactic, and struct and class can be used interchangeably to define custom types.
However, Unreal Engine structs are used to represent data types that are typically used for data storage and manipulation, whereas classes are used to represent objects that have behavior and state.
In Unreal Engine, it's recommended to use the built-in memory management functions like NewObject() and MakeShared() to allocate memory for objects, rather than using new and delete. Using new and delete can interfere with the garbage collector and cause memory leaks or crashes in your game. It's always best to follow Unreal Engine's recommended memory management practices to ensure the stability and performance of your game.
Lorem Ipsum
You can read more about K2Node by Oscar Olsson.
| This section was NOT written in conjunction with ChatGPT. |
The Math Expression node acts like a collapsed graph. It is a single node that you can Double-click to open the sub-graph that makes up its functionality. Initially, the name/expression is blank. Whenever you rename the node, then the new expression is parsed and a new sub-graph is generated.

Read more here!
Expose a function to call inside the Blueprint editor. With C++, you can mark UFUNCTION specifier CallInEditor.
Here is an example:
UFUNCTION(CallInEditor, BlueprintCallable)
void DebugMessage();In order to call a UFUNCTION inside the console command, you can use Exec specifier. This tells Unreal Engine to add the function into the console commands list.
Here's an example:
UFUNCTION(Exec)
void KillCharacter();However, there is a downside from using this approach. Because Unreal finds the function and map to the corresponding name, Unreal cannot call multiple instances of the same function. It only prioritizes the current pawn, which is currently under possession by the player.
To call a function with multiple instances, you can type ke * FunctionName.
Here's an example:
$ ke * KillCharacterNote
In the context of a Command Line Interface (CLI), the dollar sign ($) is typically referred to as a "prompt symbol" or simply a "prompt." It indicates that the CLI is ready to receive input from the user. The specific appearance and behavior of the prompt may vary depending on the operating system and shell being used.
| This section was NOT written in conjunction with ChatGPT. |
During development, there are occasions when you have to rename a property, function or a class. If you compile before changing the name in other location of your code, it can cause Unreal to no longer recognize existing Assets. And therefore replace with its default initialization value.
To address this issue, Unreal Engine uses Core Redirects. Core Redirects should be configured in your project's DefaultEngine.ini file, or, in the case of a Plugin, the prefixed, self-named .ini file for that Plugin (for example, BasePaper2D.ini for the Engine's Paper2D Plugin, or Default<GamePluginName>.ini for a game Plugin).
In either case, the Core Redirects will be placed in the "[CoreRedirects]" section. These Core Redirects will automatically remap obsolete data while loading Assets, thus preventing data loss resulting from the renaming process.
Here is the following structure for a redirect of a property value:
+PropertyRedirect=(OldName="CurrentClass.OldVariableName", NewName="NewOldVariableName")Here's a full example of different use cases with redirects:
[CoreRedirects]
+PropertyRedirect=(OldName="PlayerCharacter.StartHealth", NewName="InitialHealth")
+ClassRedirects=(OldName="Pawn",NewName="MyPawn",InstanceOnly=true)
+ClassRedirects=(OldName="/Script/MyModule.MyOldClass",NewName="/Script/MyModule.MyNewClass")
+ClassRedirects=(OldName="PointLightComponent",NewName="PointLightComponent",ValueChanges=(("PointLightComponent0","LightComponent0")))
+ClassRedirects=(OldName="AnimNotify_PlayParticleEffect_C",NewName="/Script/Engine.AnimNotify_PlayParticleEffect",OverrideClassName="/Script/CoreUObject.Class")
+EnumRedirects=(OldName="ENumbers",NewName="ELetters",ValueChanges=(("NumberTwo","LetterB"),("NumberThree","LetterC")))
+FunctionRedirects=(OldName="MyOldActor.OldFunction",NewName="MyNewActor.NewFunction")
+FunctionRedirects=(OldName="MyActor.OldFunction",NewName="NewFunction")
+PackageRedirects=(OldName="OldPlugin",NewName="/NewPlugin/",MatchSubstring=true)
+PackageRedirects=(OldName="/Game/DeletedContentPackage",Removed=true)
+StructRedirects=(OldName="MyStruct",NewName="MyNewStruct")You can read more about on Unreal's docs.
The MatchSubstring argument can be used in any Core Redirect type. If present and set to true, the OldName and NewName fields will be treated as substrings rather than requiring exact matches. This enables multiple matches with a single Core Redirect. In the following example, we will start with a struct and a class.
Original code and values:
USTRUCT()
struct FMyStruct
{
GENERATED_BODY()
UPROPERTY(EditAnywhere, Category = "Documentation")
int32 TestInt;
UPROPERTY(EditAnywhere, Category = "Documentation")
int32 TestIntFromStruct;
};
UCLASS()
class REDIRECTORSTEST_API AMyActor : public AActor
{
GENERATED_BODY()
public:
UPROPERTY(EditAnywhere, Category = "Documentation")
int32 TestInt;
UPROPERTY(EditAnywhere, Category = "Documentation")
int32 MainClassTestInt;
UPROPERTY(EditAnywhere, Category = "Documentation")
FMyStruct TestStruct;
};
After creating and saving an AMyActor Asset with the values shown above, we can close the Editor and alter the the code in the .h file and the Core Redirects in the game's .ini file. We will change the code to read as follows, changing the names of our int32 properties:
USTRUCT()
struct FMyStruct
{
GENERATED_BODY()
UPROPERTY(EditAnywhere, Category = "Documentation")
int32 TestInteger;
UPROPERTY(EditAnywhere, Category = "Documentation")
int32 TestIntegerFromStruct;
};
UCLASS()
class REDIRECTORSTEST_API AMyActor : public AActor
{
GENERATED_BODY()
public:
UPROPERTY(EditAnywhere, Category = "Documentation")
int32 TestInteger;
UPROPERTY(EditAnywhere, Category = "Documentation")
int32 MainClassTestInteger;
UPROPERTY(EditAnywhere, Category = "Documentation")
FMyStruct TestStruct;
};With this change, we can examine the effects of a Core Redirect, and in particular the impact of MatchSubstring.
Results follow:


Note
Because MatchSubtring requires checking incoming Assets much more thoroughly, it can impact startup times. MatchSubstring is intended to be used temporarily as a fixup when making sweeping changes. It is recommended that Assets involved in these changes be resaved immediately and checked into your project's source control database with any related code changes, and that the Core Redirect be deleted without entering source control.
When you find a plugin and trying to install it, you might find out that it doesn't support your current engine version. And the Unreal's marketplace won't let you download unless you have a version associated.
One trick to avoid this, is to build the plugin manually and fixing compiling issues (header file missing or API changes). By installing the plugin with the access of the source code. Then by access the plugin with the UHT (Unreal Build Tool), you can then rebuild the plugin into a different engine version.
Here is .bat file (Windows Only) to locate the current engine directory, and compile your custom made plugin into another engine version:
@echo off
:: Setting up config variables
set EngineVersion=<EngineVersion>
set PluginName=<PluginName>
set InputDirectory=<InputDirectory>
set OutputDirectory=<OutputDirectory>
set TargetPlatforms=Win64
set PluginPath="%cd%\%InputDirectory%\%PluginName%\%PluginName%.uplugin"
set OutputPath="%cd%\%OutputDirectory%\%EngineVersion%\%PluginName%"
:: Locating a registry key, in order to find Unreal Engine source location
for /f "skip=2 tokens=2*" %%a in ('reg query "HKEY_LOCAL_MACHINE\SOFTWARE\EpicGames\Unreal Engine\%EngineVersion%" /v "InstalledDirectory"') do set "EngineDirectory=%%b"
set AutomationToolPath="%EngineDirectory%\Engine\Build\BatchFiles\RunUAT.bat"
title Build Plugin
echo Automation Tool Path: "%AutomationToolPath%"
echo:
call %AutomationToolPath% BuildPlugin -Plugin=%PluginPath% -Package=%OutputPath% -Rocket -TargetPlatforms=%TargetPlatforms%
echo:
pause
exit 0
And here is the bash file (Linux Only) version:
#!/bin/bash
# Setting up config variables
EngineVersion="<EngineVersion>"
PluginName="<PluginName>"
InputDirectory="<InputDirectory>"
OutputDirectory="<OutputDirectory>"
TargetPlatforms="Win64"
PluginPath="$PWD/$InputDirectory/$PluginName/$PluginName.uplugin"
OutputPath="$PWD/$OutputDirectory/$EngineVersion/$PluginName"
# Locating a registry key, in order to find Unreal Engine source location
EngineDirectory=$(reg query "HKEY_LOCAL_MACHINE\SOFTWARE\EpicGames\Unreal Engine\$EngineVersion" -v "InstalledDirectory" | awk 'NR==3{print $NF}')
AutomationToolPath="$EngineDirectory/Engine/Build/BatchFiles/RunUAT.bat"
echo "Automation Tool Path: \"$AutomationToolPath\""
echo
$AutomationToolPath BuildPlugin -Plugin="$PluginPath" -Package="$OutputPath" -Rocket -TargetPlatforms="$TargetPlatforms"
echo
read -p "Press Enter to continue..."
exit 0
Timer construct for performing delayed or repeated actions. Timers are incredibly helpful for gameplay scenarios.
Timers schedule actions to be performed after a delay, or over a period of time. For example, you may want to make the player invulnerable after obtaining a power-up item, then restore vulnerability after 10 seconds. Or you may want to apply damage once per second while the player moves through a room filled with toxic gas. Such actions can be achieved through the use of timers.
Note
Timers will be canceled automatically if the Object that they are going to be called on, such as an Actor, is destroyed before the time is up. In this case, the timer handle will become invalid and the function will not be called.
// .h
/* Handle to manage the timer */
FTimerHandle TimerHandle;
// Must mark a function with UFUNCTION, as UHT needs it, in order to find it.
UFUNCTION()
void OnExplode();// .cpp
/* Activate the bomb to explode after 1.5 seconds */
void ABombActor::OnUsed(APawn* InstigatorPawn)
{
float Delay = 1.5f; // In seconds
bool bLooping = false; // If we want to repeat this.
GetWorld()->GetTimerManager().SetTimer(
TimerHandle, // handle to cancel timer at a later time
this, // the owning object
&ABombActor::OnExplode, // function to call on elapsed
Delay,
bLooping
);
}
void ABombActor::OnExplode()
{
// ...
}Instead of calling SetTimer(), you can create delegate object with a bind function.
FTimerHandle TimerHandle;
FTimerDelegate Delegate; // Delegate to bind function with parameters
Delegate.BindUFunction(this, &ABombActor::OnExplode);
float Delay = 1.5f;
bool bLooping = false;
GetWorld()->GetTimerManager().SetTimer(TimerHandle, Delegate, Delay, bLooping);You can also specify parameters, if you wish to pass to the bounded function:
Delegate.BindUFunction(this, &APlayerCharacter::Heal, 150, true);
void Heal(int32 HealAmount, bool bReviveIfDead)
{
// ...
}If we wish to stop any of the timer, we can either call ClearTimer() or ClearAllTimersForObject():
// Clear the specified timer handle
GetWorld()->GetTimerManager().ClearTimer(TimerHandle);
// Alternatively you can clear ALL timers that belong to this (Actor) instance.
GetWorld()->GetTimerManager().ClearAllTimersForObject(this);Tip
Calling SetTimer() with a rate less than or equal to zero is identical to calling ClearTimer().
To pause or unpause a timer, you can call either PauseTimer() or UnPauseTimer() function:
// Pause the specified timer handle
GetWorld()->GetTimerManager().PauseTimer(TimerHandle);
// Unpause the specified timer handle
GetWorld()->GetTimerManager().UnPauseTimer(TimerHandle);To check if a timer is running, you can call IsTimerActive() function:
// Is this weapon waiting to be able to fire again?
GetWorldTimerManager().IsTimerActive(this, &AUTWeapon::RefireCheckTimer);You can also access the current rate (time between activations) of a timer from its timer handle:
// This weapon's rate of fire changes as it warms up. Is it currently waiting to fire, and if so, how long is the current delay between shots?
GetWorldTimerManager().GetTimerRate(this, &AUTWeapon::RefireCheckTimer);If you want the elapsed and remaining time, you can access via GetTimerElapsed() function:
// How long will it be until this weapon is ready to fire again? If the answer comes back as -1, it is ready now.
GetWorldTimerManager().GetTimerElapsed(this, &AUTWeapon::RefireCheckTimer);You can read more about Gameplay Timers on Unreal's docs.
Sometimes, you probably want to work with a curve. To access a curve inside C++, you can use UCurveFloat class. This class gives you access to interpolated points to evaluate over a given range.
You can create them from the Content Browser through Miscellaneous → Curve.
|
Module: Header file: #include "Curves/CurveFloat.h" |
// .h
UPROPERTY(EditAnywhere)
UCurveFloat TimeCycle;
UPROPERTY(EditAnywhere, meta = (ClampMin = 0.0, ClampMax = 1.0))
float TimeOfDay = 0.5f; // Range between 0 -> 1// .cpp
// This will be our output value from the curve
float SunIntensity = 0.0f;
// Check if the curve is valid before accessing it.
// Otherwise, if curve is a nullptr, a crash will happen.
if (IsValid(TimeCycle))
{
// We read the curve at the current level, and assign the value to MaxHP
SunIntensity = TimeCycle->GetFloatValue(TimeOfDay);
}You can read more about curves on Unreal's docs.
|
Module: Header file: #include "HttpModule.h"
#include "Interfaces/IHttpResponse.h"
#include "PlatformHttp.h"
#include "JsonObjectConverter.h" // Include this, if you want to send some JSON data into the request |
// .h
UENUM(BlueprintType)
enum class EHTTPRequestType : uint8
{
GET,
POST,
PUT,
DELETE
};
// Delegate for the callback
DECLARE_DYNAMIC_DELEGATE_ThreeParams(FHTTPRequest, const FString&, Result, int32 ResponseCode, bool, bWasSuccessful);
UFUNCTION(BlueprintCallable, Category = "MyPawn")
/**
* Send a request via HTTP protocol system.
*
* @param BaseURL - Base URL on which to process the request on.
* @param EndpointURL - Endpoint URL. Combined with base URL to get fully qualified URL for the request.
* @param RequestType - What type of request (GET, POST, PUT, DELETE)
* @param Callback - Callback of the request
* @return A boolean, if the request was successfully sent out.
*/
bool SendRequest(
const FString BaseURL,
const FString EndpointURL,
const EHTTPRequestType RequestType,
FString Payload,
FHTTPRequest Callback
);// .cpp
bool YourClass::SendRequest(
const FString BaseURL,
const FString EndpointURL,
const EHTTPRequestType RequestType,
FString Payload,
FHTTPRequest Callback)
{
// Get a reference to the HTTP singleton and create a request object
const FHttpRequestRef Request = FHttpModule::Get().CreateRequest();
// Creates a lambda function and stores to a variable.
auto LambdaFunc = [this, Callback](FHttpRequestPtr Req, FHttpResponsePtr Res, bool bWasSuccessful)
{
FString Result;
// Check the status code
const int32 ResCode = Res->GetResponseCode();
if (!bWasSuccessful || ResCode < 100 || ResCode > 300)
{
// Only accepting 200 -> 299 response code
Callback.ExecuteIfBound(Result, ResCode, false);
return;
}
Result = Res->GetContentAsString();
Callback.ExecuteIfBound(Result, ResCode, true);
};
// Bind the lambda as the callback
Request->OnProcessRequestComplete().BindLambda(LambdaFunc);
Request->SetURL(BaseURL + EndpointURL);
Request->SetVerb(UEnum::GetDisplayValueAsText(RequestType).ToString());
switch (RequestType)
{
case EHTTPRequestType::POST:
case EHTTPRequestType::PUT:
case EHTTPRequestType::DELETE:
{
// To send data into the request, you must include this header
// Which tells the request to expect a JSON data type
Request->SetHeader("Content-Type", "application/json");
// Payload is in JSON format. Use JsonObjectConverter to convert Unreal's data type into JSON format.
Request->SetContentAsString(Payload);
}
break;
}
// Returns true if the HTTP request has started. Does NOT return the result of the callback lambda.
return Request->ProcessRequest();
}Then you can call SendRequest() function:
void YourClass::SendTestRequest()
{
// Final URL: BASE_URL + ENDPOINT_URL = "https://swapi.dev/api/planets/3/"
// Helpful to split the endpoint, as you can switch to another endpoint.
const FString BASE_URL = "https://swapi.dev/api/";
const FString ENDPOINT_URL = "planets/3/"; // "starships/9/", "people/1/"
FString JSON;
FHTTPRequest Delegate;
Delegate.BindDynamic(this, &YourClass::OnRequestCompleted);
// Send the request with delegate passed into the parameters
SendRequest(BASE_URL, ENDPOINT_URL, EHTTPRequestType::GET, "", Delegate);
}
void YourClass::OnRequestCompleted(const FString& Result, bool bWasSuccessful)
{
if (!bWasSuccessful)
{
UE_LOGFMT(LogTemp, Log, "The Request was not successful!");
return;
}
UE_LOGFMT(LogTemp, Log, "Request Output: {0}", Result);
}Tip
You can test out HTTP request via Postman with Star Wars API example.
You can read more about HTTP module on Unreal's docs.
When working with encryption and decryption.
// .h
// Encrypts Int32 using a 10 digit Alpha-Numeric Key into an FString
UFUNCTION(BlueprintCallable, Category = "Encryption")
static FString EncryptInt32(int32 InInt, FString EncryptionKey);
// Decrypts an encrypted FString back to Int32 using a 10 digit Alpha-Numeric Key
UFUNCTION(BlueprintCallable, Category = "Encryption")
static int32 DecryptToInt32(FString EncryptedValue, FString EncryptionKey);// .cpp
#include "Kismet/KismetStringLibrary.h"
FString YourClass::EncryptString(FString Data, FString EncryptionKey)
{
FString EncryptedValue;
TArray<TCHAR> ValueChars = Data.GetCharArray();
TArray<TCHAR> KeyChars = EncryptionKey.GetCharArray();
for (int32 i = 0; i < ValueChars.Num() -1; i++)
{
FString TempString;
TempString.AppendChar(ValueChars[i]);
EncryptedValue.AppendChar(KeyChars[UKismetStringLibrary::Conv_StringToInt(TempString)]);
}
return EncryptedValue;
}
FString YourClass::DecryptToString(FString EncryptedValue, FString EncryptionKey)
{
TArray<TCHAR> ValueChars = EncryptedValue.GetCharArray();
TArray<TCHAR> KeyChars = EncryptionKey.GetCharArray();
FString OutString;
for (int32 i = 0; i < ValueChars.Num() -1; i++)
{
OutString = (OutInt * 10) + KeyChars.Find(ValueChars[i]);
}
return OutString;
}| This section was written in conjunction with ChatGPT. |
When creating a UFUNCTION and marking it as const, Unreal will interpret this function as pure function. A pure function will evaluate everything it's called, compare to a regular function, which Unreal caches the result and save for later.
If you want to mark a UFUNCTION as const without Unreal converting into a pure function, you can add this specifier:
UFUNCTION(BlueprintCallable, BlueprintPure = false)
void ComplexFunction() const
{
// ...
}Lorem Ipsum
double DistanceUnificationFactor(EUnit From)
{
// Convert to meters
double Factor = 1;
switch (From)
{
case EUnit::Micrometers: return 0.000001;
case EUnit::Millimeters: return 0.001;
case EUnit::Centimeters: return 0.01;
case EUnit::Kilometers: return 1000;
case EUnit::Lightyears: return 9.4605284e15;
case EUnit::Miles: Factor *= 1760; // fallthrough
case EUnit::Yards: Factor *= 3; // fallthrough
case EUnit::Feet: Factor *= 12; // fallthrough
case EUnit::Inches: Factor /= 39.3700787; // fallthrough
default: return Factor; // return
}
}Refactoring is the process of making changes to the codebase to improve its structure, readability, and maintainability without changing its external behavior.
Refactoring is an essential practice in software development that helps keep the codebase clean, maintainable, and scalable. It involves making incremental improvements to the code without changing its external behavior, which is crucial for maintaining a healthy and sustainable codebase throughout the software development lifecycle.
Renaming members, such as variables, functions, or classes, is a common refactoring technique used to give them more meaningful and descriptive names, making the code easier to understand and maintain.
Example:
// Before refactoring
class Rectangle
{
private:
int w; // Width
int h; // Height
public:
Rectangle(int width, int height) : w(width), h(height) {}
int area() { return w * h; }
};
// After refactoring
class Rectangle
{
private:
int width; // Descriptive name for width
int height; // Descriptive name for height
public:
Rectangle(int width, int height) : width(width), height(height) {}
int area() { return width * height; }
};Extract Method is a refactoring technique where you take a portion of code within a method and move it into a separate method. This helps improve code readability, encourages code reuse, and simplifies complex methods.
Example:
// Before refactoring
void printFullName(std::string firstName, std::string lastName)
{
std::cout << "Full Name: " << firstName << " " << lastName << std::endl;
// Some other logic related to printing the full name
}
// After refactoring
void printFullName(std::string firstName, std::string lastName)
{
print("Full Name: " + firstName + " " + lastName);
}
void print(const std::string& message)
{
std::cout << message << std::endl;
}Introducing a typedef can make complex type names more concise and easier to understand. On the other hand, inline typedefs are useful for reducing the complexity of code and improving code readability by avoiding unnecessary type aliases.
Example:
// Before refactoring
typedef std::map<std::string, std::vector<int>> NameToNumbersMap;
NameToNumbersMap numbers;
// After refactoring (Introduce typedef)
using NumbersVector = std::vector<int>;
using NameToNumbersMap = std::map<std::string, NumbersVector>;
NameToNumbersMap numbers;
// After refactoring (Inline typedef)
std::map<std::string, std::vector<int>> numbers;Introducing a variable can simplify complex expressions or improve code readability by giving meaningful names to intermediate results.
Example:
// Before refactoring
int total = (price + tax) * quantity - discount + shippingCost;
// After refactoring
int netPrice = price + tax;
int totalPrice = netPrice * quantity - discount + shippingCost;Consider the following code snippet:
void MyCharacter::DoSomething()
{
if (bIsReadyToMove)
{
if (!bIsMoving)
{
MoveCharacter();
}
else
{
// Handle already moving
}
}
else
{
// Handle not ready to move
}
}As you can see, the if blocks encompass the whole body of the method. This presents an opportunity to make code more readable by getting rid of the nested scope and adding return keyword2 as follows:
void MyCharacter::DoSomething()
{
if (!bIsReadyToMove)
{
// Handle not ready to move
return;
}
if (!bIsMoving)
{
MoveCharacter();
}
else
{
// Handle already moving
}
}Here is a video explaining some of the best practices with Unreal Engine and C++.
There is a video about some of these best practices called Best Practices (2019-2021) from Stephen Maloney
In the video, there is also a Google documentation (if video wasn't enough) for more details about some of his tips and tricks.
PrimaryActorTick.bCanEverTick = false;
PrimaryActorTick.bStartWithTickEnabled = false;PrimaryComponentTick.bCanEverTick = false;
PrimaryComponentTick.bStartWithTickEnabled = false;- Set the tick interval to the maximum value you can get away with. Unfortunately this is often per frame for smoothly moving things
PrimaryActorTick.TickInterval = 0.2f;
PrimaryComponentTick.TickInterval = 0.2f;- Enable/disable tick to only tick when required.
SetActorTickEnabled()
SetComponentTickEnabled()Abstract base class for all tick functions.
Sample code to get started:
#pragma once
#include "CoreMinimal.h"
#include "Tickable.h"
class FMyTickableThing : public FTickableGameObject
{
public:
// FTickableGameObject Begin
virtual void Tick( float DeltaTime ) override;
virtual ETickableTickType GetTickableTickType() const override
{
return ETickableTickType::Always;
}
virtual TStatId GetStatId() const override
{
RETURN_QUICK_DECLARE_CYCLE_STAT( FMyTickableThing, STATGROUP_Tickables );
}
virtual bool IsTickableWhenPaused() const
{
return true;
}
virtual bool IsTickableInEditor() const
{
return false;
}
// FTickableGameObject End
private:
// The last frame number we were ticked.
// We don't want to tick multiple times per frame
uint32 LastFrameNumberWeTicked = INDEX_NONE;
};#include "MyTickableThing.h"
void FMyTickableThing::Tick( float DeltaTime )
{
if ( LastFrameNumberWeTicked == GFrameCounter )
return;
// Do our tick
// ...
LastFrameNumberWeTicked = GFrameCounter;
}Note
Tick any object you want, UObject or not!
Warning
USTRUCT don't support expose functions with UHT7.
| This section was written in conjunction with ChatGPT. |
In C++, a direct reference is a reference variable that directly refers to the memory location of another variable. When you use a direct reference, you are essentially creating an alias or an alternative name for the original variable. This means any changes made to the reference will be reflected in the original variable, and vice versa.
Using direct references can be beneficial for performance in certain situations because it avoids creating unnecessary copies of data. When you pass large objects or structures as function arguments, using direct references instead of passing by value (copy) can save memory and processing time, especially for complex objects.
Using the const qualifier in a direct reference serves as a safety mechanism to prevent accidental modifications to the referenced variable. When you declare a variable as const, it means that its value cannot be changed after initialization.
In some cases, using const in direct references can also enable certain compiler optimizations, as it provides additional information to the compiler about the immutability of the referenced value.
int a = 5;
int b = a; // Gets a copy
b = b * 2; // B = 10 and A = 5
int& c = 10;
int& d = c;
d = 20; // C = 20 and D = C, which is 20
const int& e = 10; // Direct reference (use const for stopping ability to modify the variable)
const int& f = e;
f = 11; // COMPILER ERROR!!! Cannot modify const variable!!| This section was NOT written in conjunction with ChatGPT. |
stat fps: Display FPS.stat unit: Display frame time.stat game: Display a general idea on how long the various gameplay ticks are taking.dumpticks: Display a list of current actors, which currently ticks in the level.slomo: To speed up or slow down the game time.obj list: Display a list of current loaded objects.obj list class=BP_PlayerCharacter_C: Same asobj listbut with a filter.obj gc: Collect all objects with GC (Garbage Collector).au.Debug.AudioSoloSoundWave: Takes a sound wave name as an additional input, and toggles whether that sound wave is solo (the only audible sound).
Here is also a website by Pongrit, which showcase all of Unreal Engine's console commands.
| This section was NOT written in conjunction with ChatGPT. |
To change any of the shortcuts, you can access the keyboard shortcut settings via Editor Preferences, then under General select Keyboard Shortcuts.
-
Ctrl + C: Copy
-
Ctrl + X: Cut
-
Ctrl + V: Paste
-
Del - Delete
-
Ctrl + Y: Undo
-
Ctrl + Z: Redo
-
Ctrl + A: Select All
-
Esc: Clear Selection
-
Up/Down/Left/Right Arrow Keys: Move Selection
-
Ctrl + Spacebar: Open Content Browser
-
Ctrl + B: Find in Content Browser
-
Ctrl + Tab: Browse Tabs
-
Ctrl + O: Open Level
-
Ctrl + P: Asset Picker
-
Alt + P or Alt + S: Play/Simulate
-
P: Show Nav Mesh
-
Mouse Wheel Up/Down: Zoom
- Ctrl + G or Shift + G: Group/Ungroup
- Right-Click on Group: Pin/Unpin
- Ctrl + S: Save Blueprint
- Ctrl + F: Find within Blueprint
- Ctrl + Shift + F: Find in all Blueprints
-
Ctrl + S: Save All
-
End: Snap to Floor
-
Alt + End: Snap Pivot to Floor
-
Shift + End: Snap Bounds to Floor
-
Ctrl + End: Snap Origin to Grid
-
Alt + Transform: Duplicate and Transform
-
Alt + G: Perspective View
-
Alt + H: Front View
-
Alt + J: Top View
-
Alt + K: Side View
-
F: Focus
-
G: View
-
R: Scale
-
W: Translate
-
E: Rotate
-
Spacebar: Toggle Move/Rotate/Scale
- Ctrl + Shift + Comma: GPU Visualizer
| This section was NOT written in conjunction with ChatGPT. |

Description
A semicolon may be missing.
The following sample generates C2628:
// C2628.cpp
class CMyClass {} // C2628 error
int main()
{
}Possible resolution:
// C2628b.cpp
class CMyClass {};
int main()
{
}Link to error message.
Description
The compiler doesn't recognize the identifier and, therefore, considers it undeclared. The compiler needs to be aware of the existence of identifiers before they can be used. By declaring an identifier, you provide the compiler with the necessary information about its name and type, allowing it to properly allocate memory or resolve references.
The following sample generates C2065:
// C2065.cpp
#include <iostream>
int main()
{
std::cout << x; // C2065 error
return 0;
}Possible resolution:
// C2065.cpp
#include <iostream>
int main()
{
int x = 5; // Declare and initialize the variable x
std::cout << x;
return 0;
}Link to error message.
| This section was NOT written in conjunction with ChatGPT. |
| Type | Author | Title | Length | Description | Link |
|---|---|---|---|---|---|
| Video | Mosh Hamedani | C++ Tutorial for Beginners - Learn C++ in 1 Hour | 01:22:55 | https://www.youtube.com/watch?v=ZzaPdXTrSb8 | |
| VS Tool | Naotsun | UnrealMacroGenerator | https://marketplace.visualstudio.com/items?itemName=Naotsun.Naotsun-UE-UMG | ||
| Article | Ben | benui | https://benui.ca/unreal/ | ||
| Article | Unreal Engine | Dev Community | https://dev.epicgames.com/community/ | ||
| Article | Community-driven | Unreal Engine Community Wiki | https://unrealcommunity.wiki/ | ||
| Video | Alex Forsythe | Blueprints vs. C++: How They Fit Together and Why You Should Use Both | 47:13 | https://www.youtube.com/watch?v=VMZftEVDuCE | |
| Video | Alex Forsythe | The Unreal Engine Game Framework: From int main() to BeginPlay | 27:22 | https://www.youtube.com/watch?v=IaU2Hue-ApI | |
| Video | Alex Forsythe | Multiplayer in Unreal Engine: How to Understand Network Replication | 22:07 | https://www.youtube.com/watch?v=JOJP0CvpB8w | |
| Video | Alex Forsythe | What do you do when Unreal Editor crashes? | 13:04 | https://www.youtube.com/watch?v=TXZGIvpEhW8 | |
| Video | Unreal Engine | Blockout and Asset Production in UE5 | 34:07 | https://www.youtube.com/watch?v=R5TsbnW4fk8 | |
| Video | Unreal Engine | Building Open Worlds in Unreal Engine 5 | 49:41 | https://www.youtube.com/watch?v=EEf07ggFWRw | |
| Video | Unreal Engine | 35 UE5 Features You Probably Don't Know About | 49:55 | https://www.youtube.com/watch?v=k2IP5DYQ0-0 | |
| Video | Amir Ansari | Unreal Overloaded - Soft and Hard References | 01:13:35 | https://www.youtube.com/watch?v=giDf4G6Ndk8 | |
| Video | UNF Games | Unreal Engine 5 Beginner Modeling Tutorial - Learn to Model Inside Unreal! | 02:12:34 | https://www.youtube.com/watch?v=9InU0xbX7l0 | |
| Article | Jonas Reich | OpenUnrealConventions | https://jonasreich.github.io/OpenUnrealConventions/C++/ | ||
| Online Tool | Sébastien Rancoud | blueprintUE | Uunofficial tool with the intent of helping Unreal Engine developers | https://blueprintue.com/ | |
| Online Tool | Matt Godbolt | Compiler Explorer | Run compilers interactively from your web browser and interact with the assembly | https://godbolt.org/ | |
| Online Tool | Unreal Engine 4 Console Variables and Commands | List of all UE commands | https://digilander.libero.it/ZioYuri78/ | ||
| Article | Oskar Świerad | UNREAL ART OPTIMIZATION | Help you achieve smooth graphics performance in Unreal Engine-based projects | https://unrealartoptimization.github.io/book/ | |
| Extension | Thomas Ingram | Developer Notes | See and post notes on developer documentation. | https://chrome.google.com/webstore/detail/developer-notes/fchdfdnnpkphopmdaochdfnmcahndmnb |
If you have any questions or issue, just write either to my YouTube channel, Email or Twitter DM.
|
IS 14 PAGES LONG! |
Footnotes
-
C is a procedural programming language known for its efficiency and portability, commonly used for system-level programming and embedded systems development. ↩ ↩2
-
Keyword, also known as a Reserved word. ↩ ↩2 ↩3 ↩4 ↩5 ↩6 ↩7 ↩8
-
Python is a user-friendly, high-level language often used for scripting, data analysis, web development, and artificial intelligence applications. ↩ ↩2 ↩3 ↩4 ↩5
-
C# is a high-level, object-oriented programming language developed by Microsoft, widely used for building Windows applications and games using the .NET framework. ↩ ↩2 ↩3 ↩4 ↩5 ↩6
-
Java is a versatile, platform-independent language known for its "write once, run anywhere" capability, commonly used in web development and enterprise applications. ↩ ↩2
-
ASCIIor American Standard Code for Information Interchange. A character encoding standard for representing English (Latin) characters and symbols. ↩ ↩2 ↩3 ↩4 ↩5 ↩6 ↩7 -
The Unreal Header Tool (UHT) is a powerful tool for managing dependencies between C++ files in an Unreal Engine project. The header tool is designed to work with the Unreal Build Tool (UBT), which is responsible for compiling the engine and all its modules. ↩ ↩2 ↩3 ↩4 ↩5 ↩6
-
JavaScript is a versatile, dynamic scripting language commonly used for web development to add interactivity and functionality to websites. ↩ ↩2
-
Macros in C++ are preprocessor directives that enable the definition of reusable code snippets through text replacement before compilation. Here is a video about it. ↩ ↩2 ↩3 ↩4 ↩5 ↩6 ↩7 ↩8
-
GitHub is a web-based platform and version control repository that allows individuals and teams to collaborate on software development projects by providing a centralized location for code storage, version tracking, issue tracking, and collaboration features such as pull requests and code reviews. Link to there site. ↩


